Motific.ai is a SaaS product that enables organizations leverage Generative AI (GenAI) powered capabilities with enterprise-grade controls for sensitive data, security, responsible AI, and cost.
Motific.ai is designed to support various business functions such as marketing, sales, customer experience, finanace and HR by offering tailored solutions to enhance innovation and productivity while manintaining security, complinace, and control over costs.
In this Motific.ai documentation, you have everything you need to start your GenAI journey with trust, security, and ease! You can discover the advanced features of Motific.ai, how to use them, the concepts behind the features and how to get started with Motific.ai. Also, refer to the API documentation to integrate your GenAI app with Motific.ai in no time.
Introduction to Motific.ai
Learn what is Motific.ai and how it can benefit your organization. Also glance through the features of Motific.ai and how you can leverage the product and provision GenAI apps faster with security and data compliance.
Getting started
Learn how you can quickly onboard and get started with the Motific.ai SaaS product. Also, explore methods for experimenting with policy enabled and custom-data integrated Motifs linked to foundational models within our chat console.
User guide
The Motific.ai user guide equips you with all the essential information required to begin setting up GenAI applications, including AI assistants, chatbots, and more.
API documentation
Learn about connecting your own generative AI application to a Motif and interacting with the LLM you configured via Motific.ai API endpoints.
Settings
Learn about how you can add users to your Motific.ai tenant, and the different roles authourized to interact with certain features of Motific.ai.
Known issues
Encountered a issue? Prior to reaching out to support, please consult our known issues page to determine if your issue has been identified and documented, and to see if there is a suggested work-around available.
1 - What's new
Motific.ai key features
Security and compliance guardrails
Motific.ai’s security and compliance guidelines empower organizations to establish and maintain controlled GenAI usage across their organizations, ensuring adherence to compnay policies and responsible AI standards. Furthermore, these guardrails and controls incorporate safeguards to protect GenAI applications and their associated data from unauthorized access, modification, or destruction. These safeguards are manifested as policy templates within Motific.ai, granting you the flexibility to tailor the guidelines to suit your specific requirements. These policies must be applied to a GenAI application for them to take effect.
The policies that can be configured with Motific.ai include:
Code presence: The code presence policy, when applied, can detect the presence of code in the input prompts and model responses. Currently this policy is in the experimental stage and supports detection of coding languages like Python, JavaScript, and Java.
Adversarial content: An adversarial content policy, when applied, can block attempts to exploit AI models through prompt injections, SQL query injection, and security threats, ensuring safe interactions with LLMs.
Toxic content: Toxic content policy enforces guidelines for toxic (umbrella term for rude, offensive, sexually explicit content) and unsafe content. It ensures interactions with any LLMs are free from racism, sexism, and other harmful behaviors.
Malicious URL: Malicious URL and data protection policy prohibits the injection of harmful URLs, protecting the chat interface from cybersecurity risks.
Off-topic content: Off-topic content policy, when set, helps maintain focused and relevant conversations, preventing misuse of chatbots for unintended purposes.
Personally identifiable information content: PII content policy prevents the sharing of sensitive personal information with LLMs to safeguard user privacy. It can redact and block the following PII entities: Social Security Number (SSN), credit card number, phone number, physical address, person name, and email addresses.
Language support
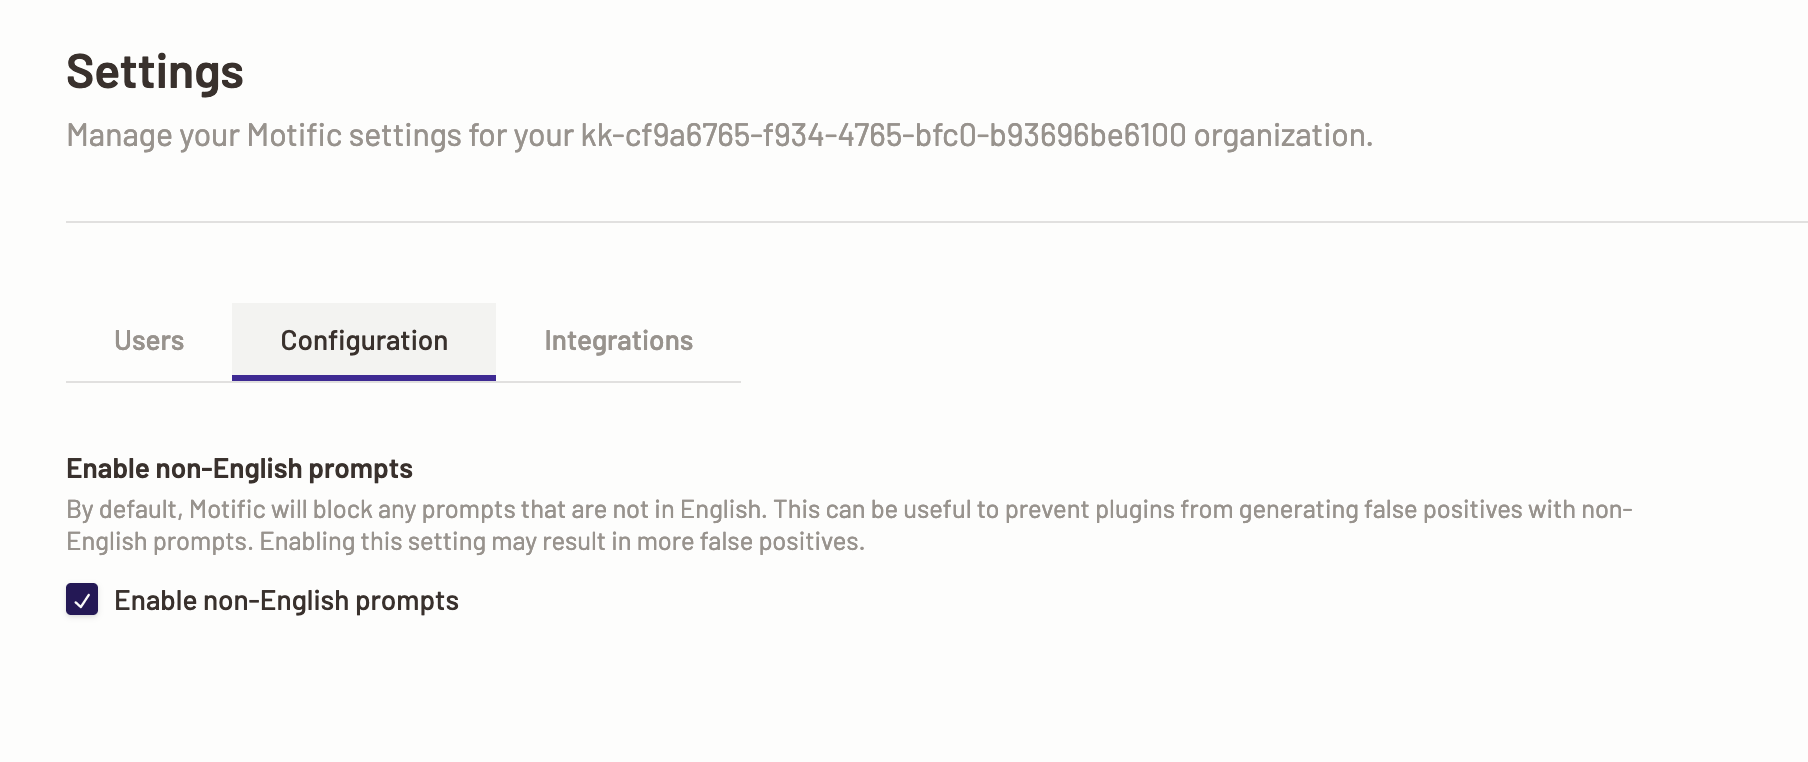
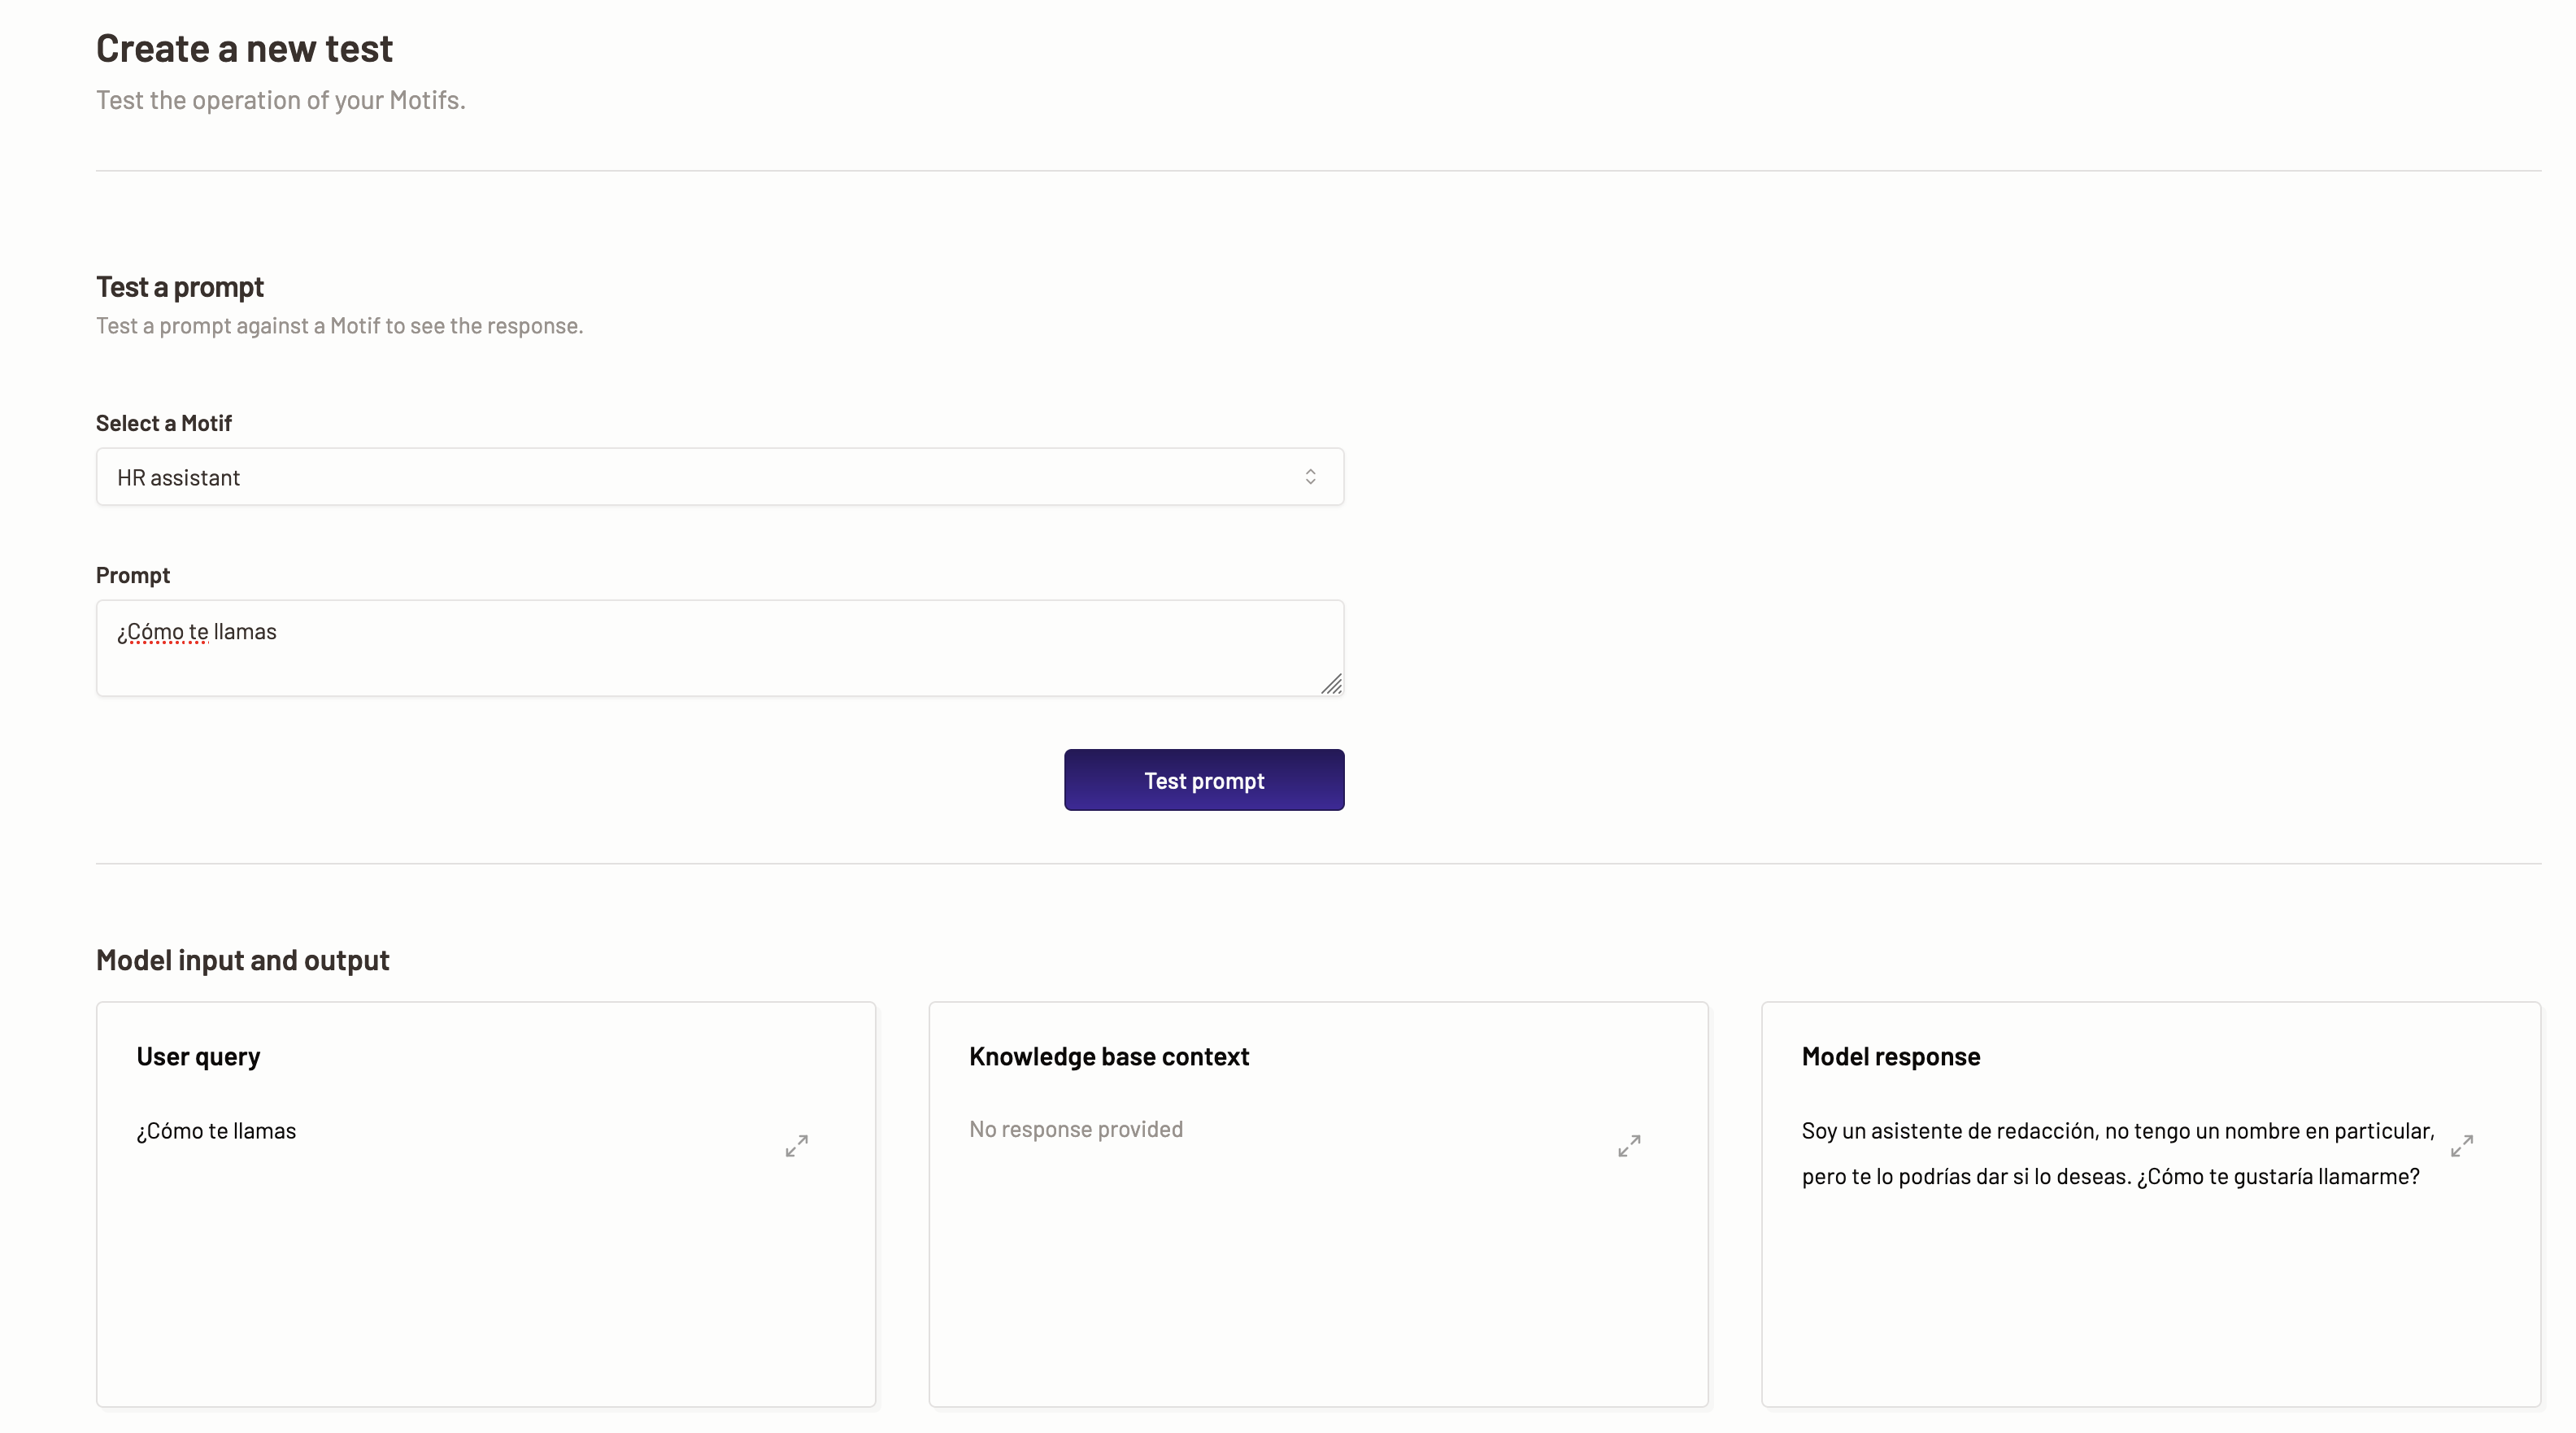
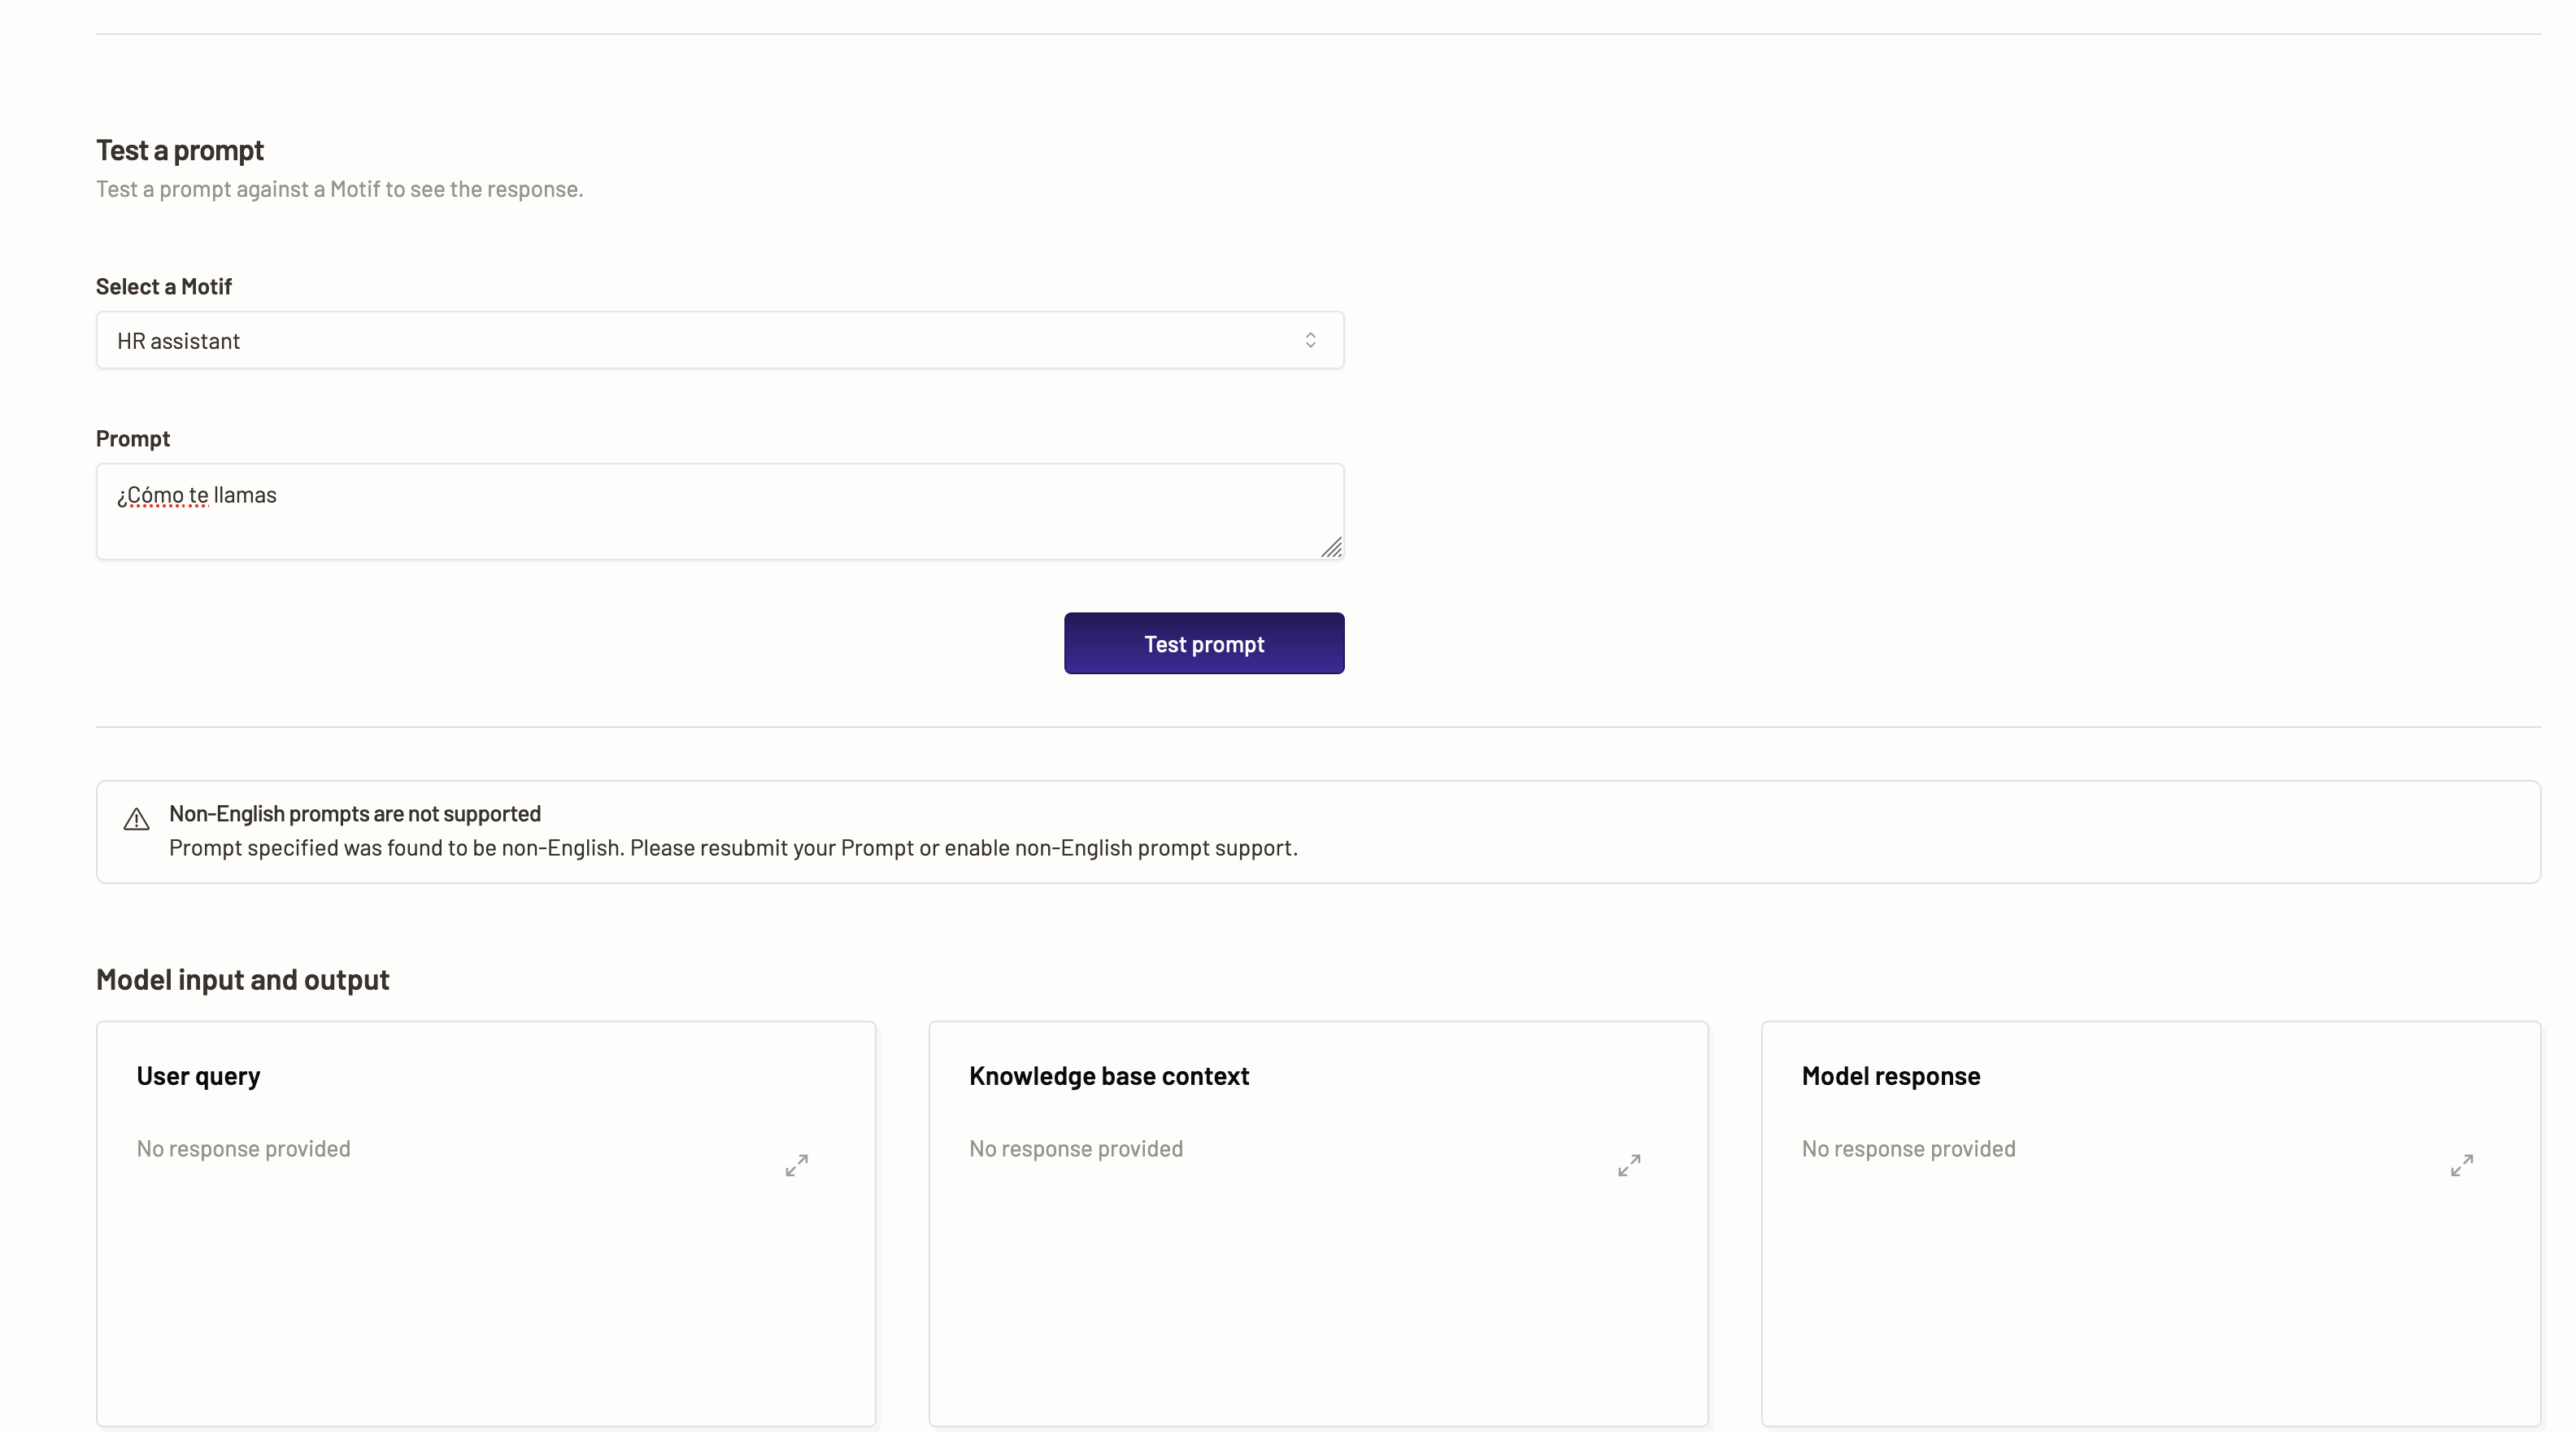
Motific.ai supports English language only. You can enable Motific.ai to support other languages, but note that the underlying small language models that power the Motific.ai system are trained with English language datasets.
LLM provider connections
Motific.ai offers seamless integration with a range of foundational models from multiple providers including Mistral AI, Amazon Bedrock, and Azure OpenAI. This flexibility allows Motific.ai administrators to customize and personalize a wide range of GenAI assistants and API endpoints to meet the specific needs of business teams’ use cases.
Retrieval augmented generation service
Motific.ai leverages the Retrieval-Augmented Generation (RAG) framework for its RAG service, which is an enterprise-grade offering enriched by a generative AI toolchain. This toolchain incorporates elements like data source connectors, embedding models, a vector database, and a retrieval system to facilitate context-aware model inputs and outputs. It enables the incorporation of tailored knowledge bases into your generative AI applications, which may include a range of enterprise data sources such as Microsoft SharePoint or various internal and external websites that act as repositories of business-relevant documents. The RAG service allows Motific.ai to generate responses that are not only precise but also pertinent to the given context, drawing from actual data to inform its output as opposed to relying exclusively on the pre-trained knowledge of the model.
Hallucination policy for RAG
In Motific.ai, hallucination detection ensures faithfulness of queries and responses to the context derived from the attached knowledge bases of Motific.ai assistants and API endpoints. Currently, context in user queries outside the Motif’s knowledge base is treated as user prompt and not checked for response faithfulness.
Cost management
Motific.ai provides comprehensive cost management for every customized GenAI application with configurable token budgets and thresholds for each Motif. This cost control functionality enables you to define token usage limits for each application. Should an app exceed its allocated token threshold, it will cease to process further prompts or inputs, preventing users from receiving responses to their inquiries. You have the flexibility to adjust these budgetary constraints to align with weekly, monthly and annual budgets or with changing usage patterns.
Intelligence
The Intelligence feature offers a suite of insights encompassing operational, usage, and business metrics. It equips Motific.ai administrators and business decision-makers with the critical data necessary to make informed investment and operational decisions based on the usage patterns of Motific.ai assistants. The insights offered by the Intelligence feature include a summary of tasks performed by Gen AI assistants, analysis of token consumption trends by task categories, estimates of productivity gains and time efficiencies achieved through the deployment of GenAI assistants and recommendations for the most effective model to handle specific tasks.
Dashboard
Motific.ai’s observability dashboard provides real-time monitoring capabilities for AI assistants equipped with configured policies and data sources. It offers insights into key operational metrics such as policy violations and token consumption for both inputs and outputs. It features usage insights, including visualizations of the number of prompts for the top five task categories queried by users across all provisioned AI assistants. Furthermore, the dashboard highlights trends in token usage, comparing data from the current to the previous month.
Monitoring
The monitoring feature enables you to review the summary of policy flags by Motif, over a period of time and by most flags by across assistant users. In addition it also shows a summary of top token consumptions by user and motif.
Shadow GenAI detection is another feature of the monitoring section that enables detection of enterprise endpoints using LLMs across the organization. This capability requires integrating with an existing Cisco Umbrella CASB account.
Prompt history is another feature within the monitoring section that enables review of each individual prompt interaction with the system. This is useful for use cases such as audit trail, policy effectiveness evaluation and end to end system efficiency checks.
Abstract APIs
Our abstracted APIs provide simplified, consistent access to the chosen foundation models. The ease of use of these APIs makes it easy to integrate with your Gen AI assistants.
What can you do in Motific?
With just a few clicks, central-IT and security teams in organizations can provision GenAI assistants and abstracted APIs for Large Language Models, that are customized with RAG on organizational data sources, for out-of-the-box use or for building GenAI applications.
A Motif in Motific.ai represents a carefully selected aggregation of settings that are customized for specific GenAI application. These settings include how to connect with LLM providers, how to access enterprise data through knowledge bases, how to apply policy controls, and how to regulate user access.
Customize the following settings within the Motif:
Connect your model provider and select the models that will power your Motifs.
Connect your data sources and create knowledge bases to provide contextual data to your Motifs.
Create a policy from our templates to improve trust, safety, security, and cost compliance.
Add users to your Motific.ai tenant. There are different roles authourized to interact with certain features of Motific.ai.
Create a Motif connecting your model, knowledge base, and policies to deliver a trustworthy GenAI assistant.
Step 3: Test a Motif
Use Motific.ai’s streamlined APIs to interact with your configured Motif.
Alternatively, evaluate the Motif’s performance on:
Track engagement with LLMs using prompts within the Motif’s framework.
2 - Introduction
What is Motific.ai?
Motific.ai is a SaaS product empowering IT, security, and compliance teams to deliver Generative AI (Artificial Intelligence) capabilities to your organization’s internal teams. It ensures control over sensitive data, security, responsible AI, and costs. Motific.ai also enables your teams to monitor the usage of the Generative AI (GenAI) applications within your organization.
Motific.ai empowers your teams to quickly set up AI assistants and streamlined APIs that harness your enterprise data sources, all while enabling you to incorporate policy, security, and cost controls, in just minutes. You can connect to the major Large Language Model (LLM) service providers without any hassle.
Motific.ai provides comprehensive security and compliance policy controls.
Motific.ai provides detailed analytics and intelligence on every user-model interaction, helping assess return on investment and recommending more suitable models based on past usage patterns.
Motific.ai features
Language support
Motific.ai supports English language only. You can enable Motific.ai to support other languages, but note that the underlying small language models that power the Motific.ai system are trained with English language datasets.
Security and compliance guardrails
Motific.ai’s security and compliance guidelines empower organizations to establish and maintain controlled GenAI usage across their organizations, ensuring adherence to compnay policies and responsible AI standards. Furthermore, these guardrails and controls incorporate safeguards to protect GenAI applications and their associated data from unauthorized access, modification, or destruction. These safeguards are manifested as policy templates within Motific.ai, granting you the flexibility to tailor the guidelines to suit your specific requirements. These policies must be applied to a GenAI application for them to take effect.
The policies that can be configured with Motific.ai include:
The code presence policy, when applied, can detect the presence of code in the input prompts and model responses. Currently this policy is in the experimental stage and supports detection of coding languages like Python, JavaScript, and Java.
Adverserial content
An adversarial content policy, when applied, can block attempts to exploit AI models through prompt injections, SQL query injection, and security threats, ensuring safe interactions with LLMs.
Off-topic detection
Off-topic content policy, when set, helps maintain focused and relevant conversations, preventing misuse of chatbots for unintended purposes.
Personally identifiable information content
Personally identifiable information (PII) content policy prevents the sharing of sensitive personal information with LLMs to safeguard user privacy. It can redact and block the following PII entities: Social Security Number (SSN), credit card number, phone number, physical address, person name, and email addresses.
Malicious URL
Malicious URL and data protection policy prohibits the injection of harmful URLs, protecting the chat interface from cybersecurity risks.
Toxic content
Toxic content policy enforces guidelines for toxic (umbrella term for rude, offensive, sexually explicit content) and unsafe content. It ensures interactions with any LLMs are free from racism, sexism, and other harmful behaviors.
LLM provider connections
Motific.ai offers seamless integration with a range of foundational models from multiple providers including Mistral AI, Amazon Bedrock, and Azure OpenAI and continues supporting more. This flexibility allows Motific.ai administrators to customize and personalize a wide range of GenAI assistants and API endpoints to meet the specific needs of business teams’ use cases.
Retrieval augmented generation service
Motific.ai Retrieval-Augmented Generation (RAG) enables you to attach your own enterprise data to your Motifs. RAG is a hybrid machine learning approach that combines the capabilities of two models: a retriever model that fetches relevant information from a database or document corpus aka enterprise data, and a generator model that creates text based on the retrieved information.
Motific.ai leverages the RAG framework for its enterprise-grade RAG service, enriched by a generative AI toolchain. This toolchain incorporates components such as data source connectors, embedding models, a vector database, and a retrieval system, all designed to facilitate context-aware model inputs and outputs. It enables the incorporation of customized knowledge bases into your GenAI applications, which may include a range of enterprise data sources such as Microsoft SharePoint and accessible websites that house business-critical documents. The RAG service ensures Motific.ai generates responses that are not only accurate but also contextually relevant, utilizing actual data model. Rather than solely depending on the pre-trained knowledge of the model.
Hallucination policy for RAG
In Motific.ai, hallucination detection ensures faithfulness of queries and responses to the context derived from the attached knowledge bases of Motific.ai assistants and API endpoints. Currently, context in user queries outside the Motif’s knowledge base is treated as user prompt and not checked for response faithfulness.
Cost management
Motific.ai provides comprehensive cost management for every customized GenAI application with configurable token budgets and thresholds for each Motif. This cost control functionality enables you to define token usage limits for each application. Should an app exceed its allocated token threshold, it will cease to process further prompts or inputs, preventing users from receiving responses to their inquiries. You have the flexibility to adjust these budgetary constraints to align with weekly, monthly and annual budgets or with changing usage patterns.
Intelligence
Motific.ai offers an Intelligence feature that offers a suite of insights encompassing operational, usage, and business metrics. It equips Motific.ai administrators and business decision-makers with the critical data necessary to make informed investment and operational decisions based on the usage patterns of Motific.ai assistants. The insights offered by the Intelligence feature include a summary of tasks performed by GenAI assistants, analysis of token consumption trends by task categories, estimates of productivity gains and time efficiencies achieved through the deployment of GenAI assistants and recommendations for the most effective model to handle specific tasks.
Dashboard
Motific.ai’s observability dashboard provides real-time monitoring capabilities for AI assistants equipped with configured policies and data sources. It offers insights into key operational metrics such as policy violations and token consumption for both inputs and outputs. It features usage insights, including visualizations of the number of prompts for the top five task categories queried by users across all provisioned AI assistants. Furthermore, the dashboard highlights trends in token usage, comparing data from the current to the previous month.
Monitoring
The monitoring feature enables you to review the summary of policy flags by Motif, over a period of time and by most flags by across assistant users. In addition it also shows a summary of top token consumptions by user and motif.
Shadow GenAI detection is another feature of the monitoring section that enables detection of enterprise endpoints using LLMs across the organization. This capability requires integrating with an existing Cisco Umbrella CASB account.
Prompt history is another feature within the monitoring section that enables review of each individual prompt interaction with the system. This is useful for use cases such as audit trail, policy effectiveness evaluation and end to end system efficiency checks.
Abstract APIs
Our abstracted APIs provide simplified, consistent access to the chosen foundation models. The ease of use of these APIs makes it easy to integrate with your GenAI assistants.
How does Motific.ai work?
Provisioning an AI assistant
By following these steps, IT administrators can effectively set up and manage customized Motifs tailored for their organization’s GenAI applications.
A Motif in Motific.ai represents a carefully selected aggregation of settings that are customized for specific GenAI application. These settings include how to connect with LLM providers, how to access enterprise data through knowledge bases, how to apply policy controls, and how to regulate user access.
Customize the following settings within the Motif:
Connect your model provider and select the models that will power your Motifs.
Connect your data sources and create knowledge bases to provide contextual data to your Motifs.
Create a policy from our templates to improve trust, safety, security, and cost compliance.
Create a Motif connecting your model, knowledge base, and policies to deliver a trustworthy GenAI assistant.
Step 3: Test a Motif
Use Motific.ai’s streamlined APIs to interact with your configured Motif.
Alternatively, evaluate the Motif’s performance on:
Motific.ai supports English language only. You can enable Motific.ai to support other languages, but note that the underlying small language models that power the Motific.ai system are trained with English language datasets.
Track engagement with LLMs using prompts within the Motif’s framework.
Using the AI assistant
Once the admin setup is complete, authorized team members can utilize the custom GenAI application to boost their work efficiency. You can deploy different applications across different departments, enabling staff from areas such as marketing, finance, or customer support. By incorporating departmental data into a knowledge base, users can interact with the GenAI assistant to access information that is highly relevant and specific to their departmental context.
Who can benefit from Motific.ai?
Motific.ai can benefit any organization wishing to harness the power of GenAI applications to boost productivity in a secure, trusted, and controlled environment.
Which business verticals can benefit from Motific.ai?
Motific.ai is particularly beneficial for key sectors such as Finance, Healthcare, Tech, Telecom, and highly data-focused organizations.
Which personas can benefit from Motific.ai?
Policy and decision makers
The personas like CXOs, VPs and Directors in IT, Security, Compliance, and Data teams who are responsible for business compliance, defining strategic direction to AI deployment, reviewing evaluations of GenAI deployment approaches and approval of GenAI policy controls for the organization can benefit from the PII, toxic content, data loss prevention and security policies that can be defined and applied to apps via Motific.ai.
Administrative users
Central IT, Security, and Data Operations teams responsible for providing employees within the company with access to GenAI services can ensure policy control effectiveness and compliance, fast and frictionless GenAI end-user experience. Motific.ai provides visibility into business and operational metrics and secures GenAI-connected systems and data.
End-users
Knowledge workers and managers in business functions like Marketing, HR, Sales, Customer Support, and Finance can benefit from Motific.ai’s ability to add data-sources and knowledge bases. These functions can leverage GenAI assistants to boost productivity in a compliant manner with the backing of their business data.
IT developers
IT developers can use the provisioned abstracted APIs in business applications to interact with LLMs or RAG configs in a consistent and compliant manner. For more information read Motific.ai API documentation.
Other business functions
Other business functions such as HR, Finance, Marketing, Customer Support, IT Helpdesk can also use Motific.ai to integrate with their existing workflow to increase the operational efficiency such as handling large volumes of customers inquires and speed up the internal knowledge discovery process.
2.1 - Getting started
Sign up to Motific
To get started with Motific, navigate to the login page
To sign up, click the Sign up link.
Enter a first name, last name, these fields are mandatory.
Enter a valid email address. A verification email will be sent to the entered email address with a verification link.
Enter a password for your account. The password should adhere to the guidelines as shown in the figure below.
To sign up, accept the terms and conditions, then click Sign Up.
To activate an account, you need to verify your email by clicking on the link sent to your registered email address.
Next steps
Once you have signed up with Motific.ai and activated your account, you can login and get started with creating:
Check out our User guide for the details of each functionality in Motific.ai.
Also for the information on Motific.ai API, go to our API documentation.
2.2 - Chat console
Motific.ai chat console is an AI assistant where you can test and see the Motifs (apps/assistants) that you provisioned with various policy controls in action. The Motifs that you created are displayed here.
Accessing chat console
To navigate to the Motific.ai chat console environment, go to the right-hand side corner, click on your account, then click the Go to chat menu.
When you click on the assistant that you provisioned, you are directed to a chat interface where you can test any prompts and see live how the policies that you applied work. The knowledge bases that you attached can be seen in action and you can send inputs to fetch the responses from the knowledge bases.
This chat console corresponds to the Motif that you have selected to interact with, which means that all the policies applied, knowledge base configured come into effect. You can see the knowledge base connected in the left hand-side menu.
Chat history
In the Motific.ai chat console you can see the various threads of interaction that you had with the assistant on the left hand-side menu. Every time you start a new chat session all the interactions are saved, and you can access them from this menu.
Delete chat history
To delete a chat history, follow the steps below:
Go to the chat that you want to delete.
To delete a chat, click the delete icon at the end of chat.
You are asked to confirm the deletion of the history.
To confirm the delete of a chat, type the “DELETE” in the space provided and click Delete.
2.3 - Search Results
3 - Motific.ai user guide
At a glance
This Motific.ai user guide provides you everything you need to start using the Motific.ai Saas platform to provision your Generative AI apps such as AI assistants, chat interfaces etc.
In this guide we cover some of the concepts like:
Adding an LLM connection to your chosen LLM provider
Adding a knowledge base to a Motif
Creating a policy
Creating a Motif
Fundamental API documentation for the abstracted API
API reference that developers can follow to integrate apps with Motifc
Monitoring options
3.1 - Dashboard
In the Motific.ai dashboard, you get an overview of your organization’s Motific.ai usage. Initially on the dashboard you see the steps that you need to take to get started with building your first Motif, and create a custom, trustworthy AI assistant.
When you start creating Motifs and experiencing how Motific.ai helps you in your journey of provisioning secure and compliant GenAI deployments, you can get a glance at the metrics. The metrics and graphs presented on the dashboard highlight important information about the policy violation flags, input token count from all the prompts sent via Motific.ai and output token count from models after inferences. It also shows the upwards and downwards trends of the metrics in real-time.
Get started
Dashboard provides four steps to get started:
Connect your model provider and select the models that will power your Motifs.
The metrics here by default show the trends of the current month in comparison to the previous month. The current to previous month trend comparison of the Motifs created, policy flags detected, and total input and output tokens used can provide you with useful insights into the Gen AI usage by your users.
Total Motifs: The total count of the number of Motifs that your organization has created with Motific.ai.
Current knowledge base storage: The amount of tokens from user prom
Policy flags: The number of policy flags that were detected during the Gen AI app usage with the policies that you set up.
Policy token usage: The amount of tokens from user prompts which were processed by policies.
Input tokens: The total number of tokens sent to LLMs including the user prompt and any associated knowledge base context.
Output tokens: The total number of tokens generated by the LLMs.
Usage insights
Number of prompts for the top 5 tasks: In this section, you are provided with an easy-to-read graphical representation of the top 5 requested task category out of the total prompts requested by the users across all the Motifs that you have created.
Task usage by prompts and time saved: Task usage by prompts and time saved graph represents what percentage of tasks were requested by the prompts/inputs requested by the users of all the Motifs and how much of the user’s time was saved by using the Gen AI assistant for the tasks.
Graphical representation
Motific.ai dashboard also has graphical representation for easy understanding of your app usage and to view the number of policy violation flags per Motif. These graphs also facilitate to easily identify trends, patterns, and outliers in the data.
If you hover over the graph, the total number of times the particular policy was flagged is displayed.
3.2 - Model connections
Motific.ai Model connections page enables you to configure model connections.
What is a model connection?
Large language models are the backbone of any generative AI (GenAI) project.
Motific.ai provides standardized interfaces that integrate with our approved large language model (LLM) providers.
Initially, models from the following providers are supported:
Tip: In the event that your organization has implemented Access Control Lists (ACLs), it is imperative to add Motific.ai’s public IP address 3.136.34.161 to your organization’s ACL allowlist. Including this IP address helps to optimize the experience with Motific.ai and ensures seamless functionality. This applies whether you are using Microsoft Azure or Amazon bedrock as the LLM service providers.
After configuring the model details, next to test the connection, click the Test connection button.
Once the connection is tested successfully, click the Add connection button.
Amazon web services Bedrock
AWS Bedrock provides a suite of purpose-built foundational machine learning (ML) models designed by AWS to address common business use cases. Motific.ai supports the models provided by AWS bedrock and you can connect to them in the Motific.ai model connections page.
You need to provide the AWS IAM access key and secret key that is necessary for motific to connect with the provider. Access keys consist of two parts: an access key ID (for example, AKIAIOSFODNN7EXAMPLE) and a secret access key (for example, wJalrXUtnFEMI/K7MDENG/bPxRfiCYEXAMPLEKEY). You must use both the access key ID and secret access key together to authenticate your requests.
Follow the steps below to configure the AWS bedrock models in Motific.ai:
To connect to an AWS bedrock model, provide Access key and Secret key. Both the credentials are required by Motific.ai to connect to the AWS Bedrock provider. The access key and secret key can be found on your AWS IAM portal.
To add a model and respective access URL, click the Add model button. A pop-up screen opens.
Next, choose models for this AWS Bedrock connection can have access to.
Select a model from the drop-down list.
Enter the Access URL for your Bedrock model. This can be found on your AWS Bedrock dashboard. For example: https://bedrock.us-east-1.amazonaws.com
To add the model, click Add model.
Now select the model(s) of your choice for creating the Motific.ai model connection.
Mistral
Mistral models are cutting-edge machine learning models, known for their state-of-the-art performance in natural language processing tasks. Motific.ai can connect to the Mistral models to connect your AI assistants. The following models are available for you to choose from- Mistral small, Mistral medium, Mistral large.
You need to provide an API key to connect to the Mistral models.
Follow the steps below to configure the Mistral models in Motific.ai:
To connect to a Mistral model, provide the API key. You can find your API key under the ‘Platform’ > ‘API Keys’ section in your Mistral account.
The models are displayed so that you can choose which models the connection will have access to.
Select a model and test the connection.
Azure OpenAI
Azure OpenAI models offer a suite of powerful language AI capabilities. These models enable developers to integrate advanced natural language processing and generation into their applications. To connect to these models, you can use the Azure OpenAI service by obtaining API access through the Azure portal, where they can authenticate with Azure credentials and send requests to the OpenAI endpoints. This integration allows for seamless utilization of state-of-the-art AI models within the secure and scalable Azure cloud environment, providing businesses with access to cutting-edge AI tools for a wide range of applications.
Follow the steps below to configure the Azure OpenAI models in Motific.ai:
Provide API key to connect to the Azure OpenAI models.
Follow the steps below to add the deployments and choose that models will have access to the Azure OpenAI connection:
To add a deployment, click the Add deployment button.
Select a model from the drop-down list.
Enter the deployment URL for your Azure OpenAI model.
To add the deployment, click Add deployment.
Update a model connection
The model connections that you created can be viewed in the model connections page, you can see the existing model connections already listed (if any).
To update a model connection, click on the overflow menu (three dots) at the end of the model connection card view or in the Actions column.
Select the Edit option. Or alternatively click the model connection name.
Here you can view the previously selected model provider details. You cannot change the previously configured LLM provider, but you can choose different models from the Models list.
Here you can view the previously configured connection name.
Edit connection name- Click on the Edit button to edit a connection name.
Once you are done editing the name, click the Save button.
The models or deployments are displayed based on the LLM provider selected.
Edit model/deployment- Click on the Edit button to edit the models/deployments.
You can select or unselect the models/deployments from the list or add other deployments. Click the Save button to save the updates.
Delete a model connection
To delete model connection, click on the overflow menu (three dots) at the end of the model connection card view or in the Actions column.
Select the Delete option.
1.A confirmation screen warns you that deleting a model connection is irreversible and asks you to type in the word DELETE in the field provided for confirmation. The word should match the word presented for the delete button to be active.
Note: A model connection cannot be deleted if it is associated with a Motif. You should update the Motif with a different model connection or delete the Motif before deleting the model connection.
To delete a model connection, click Delete. Once you delete a model connection you cannot view it in the list or grid view.
3.3 - Knowledge bases
What is a knowledge base?
A knowledge base is a collection of data sources. Knowledge bases are used to empower your Motifs with contextual knowledge of the data that may not be part of the model’s original training data. Each knowledge base may consist of multiple data sources. Each data source can be configured to synchronize on a set schedule. This ensures that a Motif’s contextual data is kept up to date with the changing data.
Motific.ai enables you to create KB configurations to connect with your data sources so that the model’s response gets relevant contextual information from the data sources.
The knowledge base data sources can be one of the following:
SharePoint - SharePoint-Online sites where you have different files and folders that can be the data source for the knowledge base.
Public websites - Public websites are the websites available on the general internet. These websites can be added as data sources to a KB.
A knowledge base can currently be created using only two types of data sources - SharePoint and public websites. Multiple data sources can be included in a knowledge base.
Once a knowledge base is created then it is immutable, i.e., the data sources cannot be edited or added after the creation. The data sources can only be resynced if there is a failure or updated regularly to capture new data added to each data source over time.
In Motific.ai while creating a KB with either SharePoint or public website as a data source, following file formats are supported .html, .json, .csv, .txt, .pdf, .docx, .doc, .pptx, .xlsx.
Before creating a Motif with a knowledge base and testing it in a chat console, make sure that all the files and data sources of that KB have been completely ingested and there are no failures. The sync status should be complete. To learn more about viewing the data source sync status, refer to the here.
If there are failures during the ingestion of data sources, you have the option to resync the data sources. Resyncing the data sources will restart the ingestion process.
While creating the knowledge bases you should be aware of the following resource limits:
The maximum number of knowledge bases that can be created per tenant is ten (10).
The maximum number of documents per knowledge base that can be added is ten thousand (10000).
The maximum document size allowed is 50 MB.
1.In Motific.ai, the present hallucination policy is applied only to the queries and responses of Motifs linked to a knowledge base (KB). In essence, hallucination detection is operational for inputs and outputs that involve KB context, while the interactions of Motifs without an associated KB currently lack the capability for detecting hallucinations.
Add SharePoint
Motific.ai supports SharePoint-Online to be added as a data source. Also, Motific.ai Azure AD App-Only authentication. Procedure to grant access via Azure AD App-only is available in the Microsoft documentation
To add a SharePoint as a data source, click Add SharePoint option.
Provide the URL for the SharePoint site that you want to add.
Enter the source path- the path to the folder or document library you want to index.
Provide a Data source name for your SharePoint data source.
Provide Certificate PEM (Privacy Enhanced Mail). Drag and drop or click on the drop area to upload the PEM certificate.
Note: Please read our resources section with Sharepoint details page. On this page you can find detailed steps on how to get all of the above information that needs to be input, from your Microsoft Azure account.
Define a schedule of how often the data source should be updated by selecting an option from the drop-down. You have the following options:
One-time - The data source sync begins as soon the KB is created and is a one-time sync.
Weekly- Specify the day of the week and time of the day when the data source should be updated with any new content.
Monthly- Specify day of the month and time of the day when the data source should be updated with any new content.
Daily- Specify the time of the day when the data source should be updated with any new content.
When you add a data source and define a schedule to update that data source while creating a knowledge base the time is always defined in UTC.
This is essential information as this defines your data source update schedule and defining the right time is very essential.
Verify all the details, then to add the data source, click the Add SharePoint button.
Caveats for adding a SharePoint as a data source
For a user to access a SharePoint added to a KB during testing a Motif, the user should have access to the said SharePoint.
The email ID of a user authorized to use a Motif should be the same as the email ID that has access to the SharePoint within a KB of the Motif. If the email addresses of a user do not match, then when the user accesses the above-mentioned Motif, they may encounter errors as shown below.
Add public website
Public websites are the websites available on the general Internet. These websites can be added as data sources to a KB.
To add a website as a data source, click the Add Website button.
Provide the source URL for the website that you want to add.
Provide a name and description for your website.
Even though there is no option to define how often the data source should be updated, you have the option to resync the data sources manually whenever there is an update to the website.
Verify all the details, then to add the data source, click the Add public website source button.
When you are done adding the data source(s), you can view the details of the data source added in the knowledge base summary section. You can also delete the data sources in the summary section by clicking the red delete icon.
Click the Create Knowledge base button to add the data sources to the knowledge base.
Caveats for adding public website as a data source
The source URL added for a public website data source should be in the proper format. For example- if a URL for a website is added www.cisco.com, you may get an error while creating the KB. The right format would be https://www.cisco.com.
The ingestion of a large website with many files may take multiple hours. You should check the sync status to view the ingestion progress and be aware of any failures during the website ingestion.
View KB details
When you navigate to the Knowledge base menu the existing KBs are displayed.
You can view the KB name, number of data sources added to the KB when it was created. The data source names can be viewed by hovering over the data sources. Also, created by and the last modified time.
To view each KB detail, follow the steps below:
To view KB details, click on the KB name.
The page with the KB metrics opens.
Here, you can view the following:
Knowledge base details: The sync status depicts what is the status of the ingestion of the KB. You can also view the KB name, KB creation date, last updated date.
The sync status can be in one of the following states- Syncing, Complete, N/A, and None.
Data source details: In the data source details following items can be viewed:
name of the data source and the link to the URL can be viewed.
the data source’s last updated date
number of records- shows the number of files processed, passed, or failed during the ingestion of the data source.
If you see any record that has failed ingestion, then you can view the syncs. Click the View syncs button.
In the data source details if you see any failure of ingestion of a data source, then you can click the Resync data source button to resync the data source.
Resync data sources
The knowledge base that you created can be viewed on the Knowledge base page. The existing KB (if any) are in the list view.
To view the sync status of each data source in a KB, click on the KB whose data source sync status you want to check.
In the Data source details section, when some of the records have failed ingestion, you can resync the data source.
To resync the data sources, click the Resync data source button. The resync starts and the details of the sync can be seen by clicking View syncs.
View syncs
In the data source details section, to see the sync details of a data source, then follow the steps below:
To view the sync details of a particular data source, click the respective data source’s View syncs button.
The data source syncs section is displayed. Here, you can see all the resyncs that you have performed.
The following data is displayed for each sync:
Sync status- The status of the sync started.
Sync ID- Unique ID for each re-sync request
Started at- The time period when the sync was started
Sync duration- The duration taken to ingest and sync the data source.
Expected- The number of expected files that need to be ingested for the data source.
Processed- The number of files that are already processed and ingested.
Failed- The number of files that have failed the ingestion process.
View logs- View the logs for the particular sync run.
View details- View the details of each and every sync that was started.
View logs
To view the logs of each sync and to find out of what kind or alert level or message is recorded, follow the steps below.
Navigate to the knowledge base details of the KB.
To view the sync details of a particular data source, click the respective data source’s View syncs button.
To view the logs of a data source during a particular sync, click the corresponding sync’s View logs link. A small modal with the log opens.
The following details can be viewed in the logs:
Alert level: Alert level shows the level of the alert in the log details.
Info: Info alert includes the information about the operations of the data source sync.
Error: Error alert is assigned to event logs that contain a data source sync error message.
Message: Here, the message of the log is displayed depending on the alert level.
Origin: Origin signifies what is the origin of the particular log.
Step: Step signifies at which step of the sync process the event was logged.
Reported at: The time when the alert or log was reported.
View sync details
To view the details of each sync and the status of the records/files within the data source, follow the steps below:
Navigate to the knowledge base details of the KB.
To view the sync details of a particular data source, click the respective data source’s View syncs button.
To view the details of each record within the data source during a particular sync, click the corresponding sync’s View details link.
The page with the details of each record within the data source for that sync cycle opens.
If there are errors while syncing the data source, then the errors would be displayed as shown below:
The list of latest ingestion with summary and list of documents opens.
The summary section shows the number of documents that are in the following state:
Ingestion- The total number of records to be ingested.
Processing- The total number of records that are being processed.
Indexing- The total number of records that are being indexed.
Completed- The total number of records that have completed ingestion and are now in completed state.
Error- The total number of records that were errored out during ingestion.
In the documents section, the following details are indicated about each document/record present in the data source.
Path- The path of the document.
Ingestion status- The ingestion status of the file. If there is a green check mark that means the ingestion is completed, otherwise it is still in progress.
Processing status- The processing status of the file. If there is a green check mark that means the processing is completed, otherwise it is still in progress.
Indexing status- The indexing status of the file. If there is a green check mark that means the indexing is completed, otherwise it is still in progress.
Error- This data shows if the document/record failed one of the above steps and was not synced with Motific.ai.
3.3.1 - Delete knowledge bases
Delete KB connections
In the Knowledge base page, the existing knowledge bases are listed. You can delete the KB (Knowledge Base) by following the steps below.
To delete a knowledge base, click on the overflow menu (three dots) at the end of a knowledge base card view or in the Actions column in list view.
Select Delete option.
A confirmation screen opens.
Delete a KB with Motif associated
If you have the knowledge base associated with a Motif, then the alert that opens asks to disconnect the KB from the Motif.
Disconnect the KB from the Motif before deleting the KB.
Now the alert that opens asks to delete the data source associated with the KB first.
Delete the data sources from the Knowledge base before deleting the KB.
You are asked to type in the word DELETE in the field provided for confirmation. The word should match the word presented to activate the delete button.
To delete a knowledge base, click Delete. Once you delete a knowledge base you cannot view it in the list view.
Delete a KB not associated to a Motif
If you do not have the KB associated with a Motif, then the alert that opens asks to delete the data source associated with the KB first.
Delete the data sources from the Knowledge base before deleting the KB.
You are asked to type in the word DELETE in the field provided for confirmation. The word should match the word presented to activate the delete button.
To delete a knowledge base, click Delete. Once you delete a knowledge base you cannot view it in the list view.
Caution: A knowledge base and its data sources cannot be deleted if the KB is associated with a Motif. You can update the Motif with a different knowledge base or delete the Motif before deleting the knowledge base.
Caveats for knowledge base deletion
A knowledge base cannot be deleted while it is in syncing state or until the sync is timed out (which is about 5 hours).
3.3.2 - SharePoint details
Overview
In the Motific.ai knowledge base page, SharePoint online can be added as a data source for a knowledge base. For Motific.ai to connect to your organization’s SharePoint it needs information about your SharePoint. And in this document, we have provided you with official Microsoft Azure documentation links, and we have documented the steps for you. You can refer any of the docs to get the following essential information:
URL: The URL of your SharePoint site. Example: https://testing.sharepoint.com/sites/mysite
Source path: The path to the document library or folder to index. Example: ‘Documents’ or ‘Documents/folder’
Data source name: Give your SharePoint data source a distinct name
Azure app ID: It is the ID that you receive when you register your SharePoint app online.
Azure tenant ID: The tenant ID is created when you create an Azure Active Directory B2C (Azure AD B2C) for your organization, it’s assigned a default domain name (name) and a directory (tenant) ID. The tenant ID is same as the organization ID.
Certificate thumbprint: A certificate thumbprint, often referred to as a fingerprint, represents a cryptographic hash value computed from the entirety of the certificate’s data, including its signature.
Certificate PEM: A PEM (Privacy Enhanced Mail) certificate is a base64 encoded certificate used in various digital security protocols, such as SSL/TLS for securing web communications. It includes the certificate itself, the certificate chain (if any), and possibly the private key, all in a standardized text-based format that is delimited by specific header and footer lines.
Below you can see the steps to follow to get the above information.
Tip: To perform the steps that we mention in this document you need admin permissions to the Microsoft Azure account of your organization.
Also visit the Microsoft Azure documentation for further details.
It should be noted that in Motific.ai, SharePoint on-premises is not supported. Please note only SharePoint online can be added as a data source.
Create a self-signed certificate
For demonstration purposes here we are creating a self-signed certificate via Mac terminal:
Open a terminal on you Mac
Enter the following code into Cloud Shell to create a self-signed certificate:
The flag -days 365 denotes the number of days the certificate is valid. Once the certificate expires the Admin has to renew the certificate and upload the new certificate in Motific.ai where the SharePoint data source was added.
Export the certificate private key by running the following command:
Export the certificate pem file by running the following command:
cat selfsigncert.pem >> fullchain.pem
Submit the CSR (Certificate Signing Request) to Azure. You can associate the certificate-based credential with the client application in Azure AD from the Azure portal.
Tip:
At the end of these steps, you will have a Cert .pem file. Please save this file as you would need to upload the Cert .pem file to Motific.ai while adding SharePoint as a data source to a knowledge base.
Register an application in Microsoft Azure portal
Click on the Azure Active Directory link under the Admin centers group on the left-side. A new browser’s tab opens to Microsoft Azure portal.
In the App registrations tab the list of Azure AD applications registered in your tenant is displayed.
Note: If you do not have a tenant then create a new tenant and note down the Azure Tenant ID as this needs to be input in the Motific.ai while adding SharePoint as a data source.
Also, you should add users and assign access to users for the SharePoint site.
Click the New registration button in the upper-left.
Register the app by entering the details.
Fill in the app registration details and click the Register button at the bottom.
After App Registration, AppID is displayed.
Tip: Once the application has been created copy the Application (client) ID as you’ll need it later. This is the Azure app ID needed to be input in Motific.ai while adding SharePoint as a data source.
Connect the certificate to the application
Click on Certificates & secrets in the left menu bar.
Once the certificate is uploaded, note down the Cert Thumbprint from the Certificates & secrets UI. This Cert Thumbprint is needed as an input to Motific.ai while creating a KB with SharePoint as a data source.
Grant Azure Graph API permissions
You’ll need to add API permissions to use SharePoint API. Choose Add a permission and under Microsoft APIs.
Grant API Permissions.
Select Graph API permissions
Add Graph API User Read all
Add SharePoint Site Permissions.
Grant permissions.
Grant Permissions using Admin Privilege. Click Yes.
Verify all permissions granted successfully message.
Note down the URL to the SharePoint site and the folder where all the files and folders are present, this information should be added while creating a SharePoint data source. Within each of the steps above you can collate all the information needed to add the SharePoint site as a data source. For any other SharePoint site follow the same procedure to get the necessary information.
3.4 - Policies
What is a Policy?
In Motific.ai, a policy refers to a set of guidelines defined for the usage of a Gen AI application associated with a Motif. These policies cover a wide aray of usecases like sensitive data protection, blocking unsafe and harmful content from going to the LLM. Or stopping assistants from engaging with hateful content, or protecting users from potential phishing scams or prompt hacking attempts via the LLM. A policy also outlines a course of action to be taken when Motific.ai identifies an application usage does not conform to the defined policies. When Motific.ai detects app usage violating any of the policies, it takes pre-configured actions.
The policies are created and used when a Motif is created. These policies assist organizations in ensuring security and compliance for Gen AI apps.
Available policies
Motific.ai provides the following policy templates to be defined with a Motif:
An adversarial content policy can block attempts to exploit AI models through prompt injections, SQL query injection, and security threats, ensuring safe interactions.
You can define the policy with an action that Motific.ai should perform when it detects that a prompt is injected with adversarial or harmful content. This policy also examines and blocks the output from a model that contains any adversarial or harmful content. The actions that Motific.ai can take are Pass the prompt to LLM and the output to the user or Block both input and output.
Policy action
Pass- When the Pass action is selected, Motific.ai passes a prompt detected with adversarial and harmful content to the LLM for inference, without any action.
Block- When Block action is selected, Motific.ai blocks a prompt detected with adversarial and harmful content from getting an inference. Also, an LLM response is also blocked when it is detected to have adversarial content.
To define adversarial content policy, select the Adversarial content template.
The following categories are available for you to define policies over:
Adversarial- The adversarial category is triggered when the content of a prompt tries to deceive a LLM with harmful input. Select a policy action for Motific.ai to perform when it identifies that the prompt or a model output contains adversarial content.
Harmful- This category is triggered when a prompt contains hate speech, profanity, or self-harm content. Select a policy action for Motific.ai to perform when it detects that the prompt passed contains harmful content.
SQL injection- This category is triggered when an input contains SQL code intended to manipulate data. Select a policy action for Motific.ai to perform when it detects that the prompt or a model output is injected with SQL content i.e., SQL queries.
XSS injection- The XSS injection, also known as a cross-site scripting attack it is triggered when an input contains malicious scripts. Select a policy action for Motific.ai to perform when it detects that the prompt or a model output is injected with XSS content i.e., malicious scripts.
Context switch- This category is triggered when a prompt contains content that signals a LLM to change the topic or type of content that it is generating. Select a policy action for Motific.ai to perform when it detects that the prompt or a model output is injected with context switching content.
DAN (Do anything now)- The DAN category is triggered when the input contains open-ended master instructions that could potentially lead the LLM to generate outputs without clear ethical or safety boundaries. Select a policy action for Motific.ai to perform when it identifies that the prompt or a model output is injected with a master prompt.
Toxic content
Toxic content policy helps you enforce guidelines for toxic (umbrella term for rude, offensive content) and unsafe content. It ensures interactions with any LLMs are free from racism, sexism, and other harmful behaviors.
Here, you can set actions for when Motific.ai identifies that a prompt contains ethically wrong and unsafe content, such as hate, violence, self-harm, or sexual etc. The actions that Motific.ai can take are Pass or Block the PII.
Policy action
Pass- When the Pass action is selected, Motific.ai passes a prompt with toxic content to the LLM for inference, without any action.
Block- When Block action is selected, Motific.ai blocks a prompt with toxic content. The request does not proceed to the LLM.
To set toxic content actions, select the Toxic content option.
The following categories are available for you to define policies over:
Violence- Select a policy action such as Pass or Block that Motific.ai can perform when it detects that the prompt contains content describing violence.
Self-harm- Select a policy action such as Pass or Block that Motific.ai can perform when it detects that the prompt contains content that describes or is related to self-harm.
Hate- Select a policy action such as Pass or Block that Motific.ai can perform when it detects that the prompt contains hateful or fairness-related harmful content.
Sexual- Select a policy action to perform for when Motific.ai detects that the prompt or inference response contains sexually explicit content.
Malicious URL
Malicious URL and data protection policy prohibits the injection of harmful URLs, protecting the chat interface from cybersecurity risks.
Here, you can select the action that Motific.ai should perform when it detects that a prompt contains deliberately malicious, sensitive data theft, or data poisoning content. The actions that Motific.ai can take are Pass or Block the malicious content from reaching the model.
Policy action
Pass- When the Pass action is selected, Motific.ai passes a prompt with malicious and data theft content to the LLM for inference, without any action.
Block- When the Block action is selected, Motific.ai blocks a prompt with malicious content. The request does not proceed to the LLM.
To define malicious URL policy, select the Malicious URL option.
The following malicious URL and data protection content categories are available for you to define policies over:
Malicious URL- Malicious URLs are unsafe URLs that, if undetected, can cause phishing attacks, etc. Select a policy action for Motific.ai to perform when it detects that a prompt is injected with malicious URL(s).
Off-topic content
Off-topic content policy, when set, helps keep conversations focused and relevant, preventing misuse of chatbots for unintended purposes.
Here, you can set actions for when Motific.ai identifies that a prompt or a model output contains content from the restricted/unintended topics that you define within Motific.ai. You are provided with fields where you can define the topic names that are considered to be off-topic or restricted while interacting with an LLM. For example, topics like dating, vacation, travel, gaming etc., are topics that an organization may regard as irrelevant to the users to be productive.
For each topic you can define an action of block or warn when Motific.ai detects these topics in a prompt, that prompt can either be blocked from getting an inference from an LLM or can be passed to an LLM. Off-topic detection when set also examines the output of a model i.e., an LLM response for any restricted topic content. And depending on the action set, Motific.ai takes the next course of action. This helps ensure that the interaction with the GenAI apps is within the organization’s values and ethics.
The actions that Motific.ai can take are Warn or Block the off-topic content.
Policy action
Warn- When the Warn action is selected, Motific.ai passes a prompt detected with off-topic content from the restricted topics listed during policy creation to the LLM for inference. Also an LLM response is passed without any action if detected with off-topic.
Block- When Block action is selected, Motific.ai blocks a prompt and LLM response detected with off-topic content. The request does not proceed to the LLM. Also, if a model output is detected with off-topic the response is also blocked and no response is sent back.
To set off-topic detection policy actions, select the Off-topic detection template.
You can see the pre-populated fields, you can either keep the same topics or edit them add customized topics want to list as off-topic.
Enter the off-topic names and what action needs to be taken.
PII content
PII (Personally identifiable information) content policy prevents the sharing of sensitive personal information with LLMs to safeguard user privacy.
Here, you define an action that Motific.ai should perform, when it detects that a prompt contains any or all the PII entities. This helps safeguard user’s privacy from unauthorized access and breaches. The actions that Motific.ai can take are Pass, Block, or Redact the PII. By default, the action is set to Pass for each category.
Policy action
Pass- When the Pass action is selected, Motific.ai passes the PII content in a prompt to the LLM for inference, without any action.
Block- When Block action is selected, the PII content in a prompt is blocked from getting an inference from the LLM.
Redact- When the Redact action is selected, the PII content is redacted with a generic tag associated with the detected PII categories. For example, if a credit card number is detected in a prompt, then <CREDIT_CARD> tag is replaced with the credit card number.
To define PII content, select the PII content option.
The following PII categories are available for you to define policies over:
Credit cards- Select a policy action to perform when Motific.ai detects that the prompt or inference response contains credit card numbers.
Email address- Select a policy action to perform when Motific.ai detects that the prompt or inference response contains email addresses.
Person- Select a policy action to perform when Motific.ai detects that the prompt or inference response contains a person’s details like first name, last name.
Phone numbers- Select a policy action to perform when Motific.ai detects that the prompt contains a US phone number.
Location- Select a policy action to perform when Motific.ai detects that the prompt or inference response contains a locations details like address, country, etc.
US social security numbers- Select a policy action to perform when Motific.ai detects that the prompt contains US social security number(s).
Code presence
The code presence policy ensures that the prompt is scanned for any presence of code.
Here, you can set actions for when Motific.ai identifies that a prompt sent to a LLM, or an inference output from a model, contains code in programming languages such as Python, Java, or JavaScript. The actions that Motific.ai can take are Pass or Block the insecure code.
Policy action
Pass- When the Pass action is selected, Motific.ai passes a prompt with code to the model for inference, without any action. Also, no action is taken when a model response contains code.
Block- When Block action is selected, Motific.ai blocks a prompt from being passed to a model also it blocks an output from a model that contains code.
To define code presence policy, select the Code presence template.
Choose the action for Motific.ai to perform when code presence is detected in a prompt or model response.
You can choose to either allow the detected code to Pass or Block it from a prompt or model response.
The code presence plugin currently only supports English language prompts. Sending prompts in any other language may trigger the policy to result in false positives for code presence.
When you are done configuring the policies, click Save policy button. And the policy is saved and displayed on the Policies page.
3.4.2 - Update a policy
Update a policy
The policy that you created can be viewed on the policies page. The existing policies (if any) are in the list view.
To update a policy, click on the overflow menu (three dots) at the end of the policy card view or in the Actions column of the list view.
Select the Edit option, or alternatively click on the policy name.
Edit policy name.
Edit policy name- Click on the Edit button to edit a policy name.
Once you are done editing the name, click the Save button.
Next, you can edit the policy template. Here you can view the previously selected policy template details.
You can choose a new policy template and define actions or edit any of the actions for the categories available for the previously selected policy template.
Edit policy template- Click on the Edit button icon to edit a policy template.
You can edit the policy template, then click the Save button.
3.4.3 - Delete a policy
Delete a Policy
To delete a policy, click on the overflow menu (three dots) at the end of a policy card view or in the Actions column in list view.
Select Delete option.
A confirmation screen opens up cautioning you that deleting a policy is irreversible, and asks you type in the word DELETE in the field provided for confirmation. The word should match the word presented for the delete button to be active.
Note: A policy cannot be deleted if it is associated with a Motif. You can update the Motif with a different policy or delete the Motif before deleting the policy.
To delete a policy, click Delete. Once you delete a policy you cannot view it in the list or grid view.
3.5 - Motifs
What is a Motif?
A Motif is an aggregation of configurations specifically designed for Generative AI (GenAI) applications. These settings include connection details for Large Language Model (LLM) providers, knowledge base connections, policy information, and user access control details.
Organizations can create Motifs to establish comprehensive policy controls for security, trust, compliance, and cost management across its GenAI applications or abstracted APIs.
Once a Motif is created, the following features are available:
An API definition is provided that can be used to integrate your GenAI application with Motific.ai. This enables the application to apply the policies set within the Motif to each inference.
You can also set cost controls by setting a token budget for your Motif. With this token budget you can define a percentage warning threshold for token usage by a Motif, which will provide a warning when the budget is exceeded.
You can also get information and patterns related to the prompts sent via a Motif to the LLMs. With Motific.ai, you can now accurately measure the time saved by users when they utilize the Gen AI assistant for a task. Time-saving is demonstrated through various tasks that users typically engage in, such as reading, writing, searching, or reviewing for specific details. These metrics allow you to discover how Gen AI assistants enable productivity within your organization.
Moreover, Motific.ai offers model optimization options, allowing you to compare the performance of your chosen AI model with other providers based on parameters like delay, cost, and quality of replies.
Log in to your Motific.ai account using your credentials. Or add a user with Admin credentials.
Note: To create a Motif, you need an admin role.
Before creating a Motif
To get started with Motific.ai you need to provision Motifs, which enable developers to use AI models with applied policies.
Before creating a Motif, it is a recommended you set up the following as per your requirement:
Note: The above steps are only recommendations. You can choose to create the model connections, knowledge bases, and policies beforehand, or alternatively you can even create them during the process of creating a motif.
Features
In the Motifs menu, you can perform the following actions:
In this section, we show you how to create a Motif and configure the advanced Motif options like KB’s, policies, and access control, that can get you one step closer to provisioning GenAI apps for your users.
To create a Motif, click on the Motifs menu on the left navigation bar.
Next, click on the Create a new Motif button on the upper-right side corner.
Enter a Motif name. This field is mandatory.
Tip: As you enter the details you can observe that the Motif summary section is updated with your selection details.
Step 2: Model connection
Select a model connection
The existing model connections can be viewed in the dropdown. If you do not have a model connection, then create a new model connection. Once you have created a new model connection or have existing model connections, it’s time to select a model for your Motif.
To choose a model connection, click on the drop-down. The newly added and previously configured model connections are displayed in the drop-down.
Select the connection you want to add.
Next, choose a model connection from the drop-down that can connect to the Motif. Depending on the model provider, different models are listed in the drop down.
Note: Choosing a model connection and a model is a required step.
Add a new model connection
If you do not wish to use existing model connections or want to connect to a new LLM provider, then you can create a new model connection.
To add a new model connection, click on the Create a new model connection link.
A new browser tab with the page to add a model connection open.
To start creating a model connection, provide a connection name.
Select an LLM provider to connect to from the drop-down. Provide the necessary credentials for Motific.ai to connect to it.
Provide the respective model provider API key. This is necessary for motific to connect to the provider.
AWS Bedrock- To connect to an AWS bedrock model, Provide Access key and Secret key. Both the credentials are required to connect to the AWS Bedrock provider. The access key and secret key can be found on your AWS IAM portal.
Follow the steps below to choose models for this AWS Bedrock connection will have access to:
To add a model, click the Add model button.
Select a model from the drop-down list.
Enter the Access URL. The Access URL of your Bedrock model. This can be found on your Bedrock dashboard. For example: https://bedrock.us-east-1.amazonaws.com
To add the model, click Add model.
Mistral- Provide API key to connect to the Mistral models.
For Mistral model the models are displayed automatically
Here you can select the model that you want the connection to have access to.
Azure OpenAI- Provide API key to connect to the Azure OpenAI models.
Follow the steps below to add the deployments and choose that models will have access to the Azure OpenAI connection:
To add a deployment, click the Add deployment button.
Select a model from the drop-down list.
Enter the deployment URL for your Azure OpenAI model.
To add the deployment, click Add deployment.
To test the connection, click the Test connection button.
Once you are done adding the details, click the Add connection button.
Note: Return to the Create Motif page to continue with the model selection and the Motif creation.
Step 3: Knowledge base (KB)
Selecting a KB
The existing KB connections can be viewed in the dropdown. If you do not have a KB connection, then create a new KB connection. Once you have created a new KB connection or have existing KB connections, it’s time to select a KB for your Motif.
To choose a knowledge base, click on the drop-down. The newly added and the existing knowledge base connections are displayed in the drop-down.
Select the knowledge base you want to add.
Add a new KB
If you have not already created a knowledge base, then follow the steps below to create a knowledgebase:
To create a new knowledge base (KB) connection, click on the Create new knowledge base link.
A new browser window with the page to create a new KB opens.
Enter a unique name for your KB. Optionally, provide a description for your KB.
Caveats for knowledge base creation
A knowledge base can currently be created using only two types of data sources - SharePoint and public websites. Multiple data sources can be included in a knowledge base.
Once a knowledge base is created then it is immutable, i.e., the data sources cannot be edited or added after the creation. The data sources can only be resynced if there is a failure or updated regularly to capture new data added to each data source over time.
In Motific.ai while creating a KB with either SharePoint or public website as a data source, following file formats are supported .html, .json, .csv, .txt, .pdf, .docx, .doc, .pptx, .xlsx.
Before creating a Motif with a knowledge base and testing it in a chat console, make sure that all the files and data sources of that KB have been completely ingested and there are no failures. The sync status should be complete. To learn more about viewing the data source sync status, refer to the here.
If there are failures during the ingestion of data sources, you have the option to resync the data sources. Resyncing the data sources will restart the ingestion process.
While creating the knowledge bases you should be aware of the following resource limits:
The maximum number of knowledge bases that can be created per tenant is ten (10).
The maximum number of documents per knowledge base that can be added is ten thousand (10000).
The largest document size allowed is 50 MB.
Next, add data sources for your KB. You have the option of adding one or multiple of the following two data sources:
Add SharePoint: SharePoint sites where you have different files and folders that can be the data source for the knowledgebase.
Add website: Public websites are the websites available on the general internet. These websites can be added as data sources to a KB.
Add SharePoint
A SharePoint can be a website or a secure place to store, organize, share, and access information from any device. It can also consist of folders with various files.
To add a SharePoint as a data source, click the Add SharePoint option.
Provide the URL for the SharePoint site that you want to add.
Enter the source path- the path to the folder or document library you want to index.
Provide a Data source name for your SharePoint data source.
Provide Certificate PEM (Privacy Enhanced Mail). Drag and drop or click on the drop area to upload the PEM certificate.
Define a schedule of how often the data source should be updated by selecting an option from the drop-down. You have the following options:
One-Time - The data source sync begins as soon the KB is created.
Weekly- Specify the day of the week and time of the day when the data source should be updated with any new content.
Monthly- Specify the day of the month and time of the day when the data source should be updated with any new content.
Daily- Specify the time of the day when the data source should be updated with any new content.
When you add a data source and define a schedule to update that data source while creating a knowledge base the time is always defined in UTC.
This is essential information as this defines your data source update schedule and defining the right time is very essential.
Verify all the details, then to add the data source, click the Add SharePoint button.
You can add multiple data sources as you want to a knowledgebase.
Caveats for adding a SharePoint as a data source
For a user to access a SharePoint added to a KB during testing a Motif, the user should have access to the said SharePoint.
The email ID of a user authorized to use a Motif should be the same as the email ID that has access to the SharePoint within a KB of the Motif. If the email addresses of a user do not match, then when the user accesses the above-mentioned Motif, they may encounter errors as shown below.
When you are done adding the data source(s), you can view the details of the data source added in the knowledge base summary section. You can also delete the data sources in the summary section by clicking the red delete icon.
Add public website
Public websites are the websites available on the general internet. These websites can be added as data sources to a KB.
To add a website as a data source, click the Add Website button.
Provide the source URL for the website that you want to add.
Provide a name and description for your website.
Verify all the details, then to add the data source, click the Add public website button.
You can add multiple data sources as you want to a knowledgebase.
Caveats for adding public website as a data source
The source URL added for a public website data source should be in the proper format. For example- if a URL for a website is added www.cisco.com, you may get an error while creating the KB. The right format would be https://www.cisco.com.
When you are done adding the data source(s), you can view the details of the data source added in the knowledge base summary section. You can also delete the data sources in the summary section by clicking the red delete icon.
Click the Create Knowledgebase button to add the data sources to the knowledge base.
Return to the Create Motif page to continue with the Motif creation.
Step 4: Policies
Choose policies
The existing policy can be viewed in the dropdown. If you do not have a KB connection then create a new KB connection Once you have created a new policy or have existing policy, it’s time to select a policy for your Motif.
To choose a policy, click on the drop-down. The newly added and existing policies are displayed in the drop-down.
Select the policy base you want to add.
Note: You can add multiple policies to a Motif.
Add a policy
To define a policy, click on the Create a new policy link.
A new browser tab with the page to create a new policy opens.
Provide identification information for the new policy.
An adversarial content policy can block attempts to exploit AI models through prompt injections, SQL query injection, and security threats, ensuring safe interactions.
You can define the policy with an action that Motific.ai should perform when it detects that a prompt is injected with adversarial or harmful content. This policy also examines and blocks the output from a model that contains any adversarial or harmful content. The actions that Motific.ai can take are Pass the prompt and out or Block it.
Pass- When the Pass action is selected, Motific.ai passes a prompt detected with adversarial and harmful content to the LLM for inference, without any action.
Block- When Block action is selected, Motific.ai blocks a prompt detected with adversarial and harmful content from getting an inference. Also, an LLM response is also blocked when it detected to have adversarial content.
To define adversarial content policy, select the Adversarial content template.
The following categories are available for you to define policies over:
Adversarial- The adversarial category is triggered when the content of a prompt tries to deceive a LLM with harmful input. Select a policy action for Motific.ai to perform when it identifies that the prompt or a model output contains adversarial content.
Harmful- This category is triggered when a prompt contains hate speech, profanity, or self-harm content. Select a policy action for Motific.ai to perform when it detects that the prompt passed contains harmful content.
SQL injection- This category is triggered when an input contains SQL code intended to manipulate data. Select a policy action for Motific.ai to perform when it detects that the prompt or a model output is injected with SQL content i.e., SQL queries.
XSS injection- The XSS injection, also known as a cross-site scripting attack it is triggered when an input contains malicious scripts. Select a policy action for Motific.ai to perform when it detects that the prompt or a model output is injected with XSS content i.e., malicious scripts.
Context switch- This category is triggered when a prompt contains content that signals a LLM to change the topic or type of content that it is generating. Select a policy action for Motific.ai to perform when it detects that the prompt or a model output is injected with context switching content.
DAN (Do anything now)- The DAN category is triggered when the input contains open-ended master instructions that could potentially lead LLM to generate outputs without clear ethical or safety boundaries. Select a policy action for Motific.ai to perform when it identifies that the prompt or a model output is injected with a master prompt.
Toxic content
Toxic content policy helps you enforce guidelines for toxic (umbrella term for rude, offensive content) and unsafe content. It ensures interactions with any LLMs are free from racism, sexism, and other harmful behaviors.
Here, you can set actions for when Motific.ai identifies that a prompt contains ethically wrong and unsafe content, such as hate, violence, self-harm, or sexual etc. The actions that Motific.ai can take are Pass or Block the PII.
Policy action
Pass- When the Pass action is selected, Motific.ai passes a prompt with toxic content to the LLM for inference, without any action.
Block- When Block action is selected, Motific.ai blocks a prompt with toxic content. The request does not proceed to the LLM.
To set toxic content actions, select the Toxic content option.
The following categories are available for you to define policies over:
Violence- Select a policy action such as Pass or Block that Motific.ai can perform when it detects that the prompt contains content describing violence.
Self-harm- Select a policy action such as Pass or Block that Motific.ai can perform when it detects that the prompt contains content that describes or is related to self-harm.
Hate- Select a policy action such as Pass or Block that Motific.ai can perform when it detects that the prompt contains hateful or fairness-related harmful content.
Sexual- Select a policy action to perform for when Motific.ai detects that the prompt or inference response contains sexually explicit content.
Malicious URL
Malicious URL and data protection policy prohibits the injection of harmful URLs, protecting the chat interface from cybersecurity risks.
Here, you can select the action that Motific.ai should perform when it detects that a prompt contains deliberately malicious, sensitive data theft, or data poisoning content. The actions that Motific.ai can take are Pass or Block the malicious content from reaching the model.
Policy action
Pass- When the Pass action is selected, Motific.ai passes a prompt with malicious and data theft content to the LLM for inference, without any action.
Block- When the Block action is selected, Motific.ai blocks a prompt with malicious content. The request does not proceed to the LLM.
To define malicious URL policy, select the Malicious URL option.
The following malicious URL and data protection content categories are available for you to define policies over:
Malicious URL- Malicious URLs are unsafe URLs that, if undetected, can cause phishing attacks, etc. Select a policy action for Motific.ai to perform when it detects that a prompt is injected with malicious URL(s).
Off-topic content
Off-topic content policy, when set, helps keep conversations focused and relevant, preventing misuse of chatbots for unintended purposes.
Here, you can set actions for when Motific.ai identifies that a prompt or a model output contains content from the restricted/unintended topics that you define within Motific.ai. You are provided with fields where you can define the topic names that are considered to be off-topic or restricted while interacting with an LLM. For example, topics like dating, vacation, travel, gaming etc., are topics that an organization may regard as irrelevant to the users to be productive.
For each topic you can define an action of block or warn when Motific.ai detects these topics in a prompt, that prompt can either be blocked from getting an inference from an LLM or can be passed to an LLM. Off-topic detection when set also examines the output of a model i.e., an LLM response for any restricted topic content. And depending on the action set, Motific.ai takes the next course of action. This helps ensure that the interaction with the GenAI apps is within the organization’s values and ethics.
The actions that Motific.ai can take are Warn or Block the off-topic content.
Policy action
Warn- When the Warn action is selected, Motific.ai passes a prompt detected with off-topic content from the restricted topics listed during policy creation to the LLM for inference. Also, an LLM response is passed without any action if detected with off-topic.
Block- When Block action is selected, Motific.ai blocks a prompt and LLM response detected with off-topic content. The request does not proceed to the LLM. Also, if a model output is detected with off-topic the response is also blocked and no response is sent back.
To set off-topic detection policy actions, select the Off-topic content template.
You can see the pre-populated fields, you can either keep the same topics or edit them add customized topics want to list as off-topic.
Enter the off-topic names and what action needs to be taken.
PII content
PII (Personally identifiable information) content policy prevents the sharing of sensitive personal information with LLMs to safeguard user privacy.
Here, you define an action that Motific.ai should perform, when it detects that a prompt contains any or all the PII entities. This helps safeguard user’s privacy from unauthorized access and breaches. The actions that Motific.ai can take are Pass, Block, or Redact the PII. By default, the action is set to Pass for each category.
Pass- When the Pass action is selected, Motific.ai passes the PII content in a prompt to the LLM for inference, without any action.
Block- When Block action is selected, the PII content in a prompt is blocked from getting an inference from the LLM.
Redact- When the Redact action is selected, the PII content is redacted with a generic tag associated with the detected PII categories. For example, if a credit card number is detected in a prompt, then <CREDIT_CARD> tag is replaced with the credit card number.
To define PII content, select the PII content option.
The following PII categories are available for you to define policies over:
Credit cards- Select a policy action to perform when Motific.ai detects that the prompt or inference response contains credit card numbers.
Email address- Select a policy action to perform when Motific.ai detects that the prompt or inference response contains email addresses.
Person- Select a policy action to perform when Motific.ai detects that the prompt or inference response contains a person’s details like first name, last name.
Phone numbers- Select a policy action to perform when Motific.ai detects that the prompt contains a US phone number.
Location- Select a policy action to perform when Motific.ai detects that the prompt or inference response contains a locations details like address, country, etc.
US social security numbers- Select a policy action to perform when Motific.ai detects that the prompt contains US social security number(s).
Code presence
Code presence policy ensures the prompt is scanned for any vulnerable code.
Here you can set actions for when Motific.ai identifies that a prompt sent to a model, or an inference output form a model contains code in coding languages such as Python, Java, or JavaScript. The actions that Motific.ai can take are Pass or Block the insecure code.
Policy action
Pass- When the Pass action is selected, Motific.ai passes a prompt with code to the model for inference, without any action. Also, no action is taken when a model response contains code.
Block- When Block action is selected, Motific.ai blocks a prompt from being passed to a model also it blocks an output from a model that contains code.
Once you are done adding the details and selecting the policies, click Save policy button.
Return to the Create Motif page to continue with the Motif creation.
Step 5: Access control
As a part of the access control for a Motif, Motific.ai provides an option to add users or user groups to a Motif.
Provisioning access allows you to share the Motif with specific users or groups.
Add users
To add new individual users to provision access to a Motif, click on the Users dropdown. The list of users added to your organization’s tenant are displayed.
Select the users, or alternatively you can search for the users, click on the user you want to provision access to. You can add multiple users.
Once you add new users to provision access to the Motif, or if you have previously added users, then you can see them in the field below.
Alternatively, you can remove the users, click on the cross button on the users and they no longer have access to the Motif.
Add groups
To add new user groups to provision access to a Motif, click on the Users dropdown. The list of user groups added to your organization’s tenant are displayed.
Select the user groups, or alternatively you can search for the groups, click on the group you want to provision access to. You can add multiple groups.
Note: To add new user groups, go to User groups tab in the Motifs page.
Once you add new user groups to provision access to the Motif, or if you have previously added user groups, then you can see them in the field below.
Alternatively, you can remove the user groups, click on the cross button on the user group and they no longer have access to the Motif.
Step 6: Add Motif
Verify that you have added all the configurations to the Motif you want to create in the Motif summary section.
Once you are done verifying, to create the Motif, click Add Motif button.
3.5.2 - Update Motifs
Update Motifs
The Motif that you created can be viewed in the Motifs page. The Motifs are in the list view.
To update a Motif, click on Motif name or alternatively click on the overflow menu (three dots) at the end of the Motif card view or in the Actions column of the list view.
Select the Edit option.You are taken to the Motif details tab.
Here you can view the previously configured Motif details.
Edit Motif name- Click on the Edit button to edit a Motif name.
Once you are done editing the name, click the Save button.
Next, you can edit the model connections.
Edit model connection- Click on the Edit button to edit a model connection.
You can edit the model connection, model, or create a new model connection. Click the Save button to save the update.
Next, you can edit knowledge base.
Edit knowledge base- Click on the Edit button to edit a knowledge base.
You can choose a different knowledge base or create a new knowledge base. Click the Save button to save the update.
Next, you can edit policies.
Edit policies- Click on the Edit button to edit a policies.
You can choose different policies or create new policies to choose. Click the Save button to save the update.
Next, you can edit users or user groups.
Edit users or user groups- Click on the Edit button icon to edit a users or user groups.
You can choose different users or user groups. You can also remove the current users and groups from having the access to the Motif. Click the Save button to save the update.
3.5.3 - Delete Motifs
Delete Motifs
To delete a Motif, click on the overflow menu (three dots) at the end of a Motif card view or in the Actions column in list view.
Select Delete option.
A confirmation screen opens up cautioning you that deleting a Motif is irreversible, and asks you type in the word DELETE in the field provided for confirmation. The word should match the word presented for the delete button to be active.
Caution: Deleting a Motif is irreversible.
To delete a Motif, click Delete. Once you delete a Motif you cannot view it in the list or grid view.
3.5.4 - Manage Motifs
Manage Motif details
When a Motif is created, it is displayed on the Motifs page. Here, at a glance you can view the Motif’s name, model connection, the policies attached to the Motif and the user who added to the Motif.
Motif details
After creating a Motif, you are brought to the Motif details screen. This screen includes variety of metrics which are associated with that Motif.
Also, you can manage the Motif from here as well. You can set token budget for your Motif, such that once the budget is exceeded the users a warning is displayed.
Alternatively, you can follow the steps below to view any Motif details:
To view a Motif’s details, click on the Motif name, or alternatively overflow menu (three dots) at the end of the Motif’s card view, or in the Actions column of the list view.
Select the Edit option.
Here you can view the existing Motif details. In Motif details tab, you can update the Motif.
The Motif summary section gives a quick look at the all the configurations that have been made, you can view which model connection, policies, data soureces for KB, and users/user groups you have added.
Motif summary
Motif summary is a section that holds the summary of each configuration you made while creating a Motif. At a glance you can observe which model connection, knowledge base, policies, users/user groups you have added to a Motif.
KB summary
The knowledge base (KB) summary section is present while creating a Motif and in the Motif details tab when a Motif is created.
To view the knowledge base summary follow thes steps below:
To view the knowledge base summary added to a Motif, click the KB name in the Motif summary section.
Here, you can see the Name and URL of the KB added.
When you are done viewing the details, you can close the pop-up window.
Policies summary
The policies summary section is present while creating a Motif and in the Motif details tab for a existing Motif.
To view the policies summary follow thes steps below:
To view the policies summary added to a Motif, click the policy name in the Motif summary section.
Here, you can see the policy that is added as well as what are actions defined in the policy at one glance.
When you are done viewing the details, you can close the pop-up window.
Other Motif details
There are also following tabs containing details associated with a Motif:
In the Token budget tab, you can set the Motif token budget, and see the graphical representation of the token usage for the previous month. Also, you can check the token-budget for each task category that the users are performing, like text summarization, code generation etc., using the Gen AI application. You can also view the trends for token-budget change for different categories.
When the Motif has exceeded its total token budget, and the user sends a prompt via that Motif, then the prompts get blocked and are not processsed until next budget period when token budget is refreshed.
Set Motif token budget
When you create a Motif you can set the Motif token budget for a period of time, for example, monthly, weekly, yearly, or quarterly. The token budget will be applicable for the set time period.
To set Motific.ai token budget follow the steps below:
Navigate to the Motif menu, click on the Motif for which you want to set the token budget. If you have not created a Motif, then create a new Motif.
Go to the Cost tab of the Motif details.
Click on the Set budget button.
Enter the total token budget that you would like to set for the Motif. The total token budget encompasses both input tokens for user input, and the output tokens from the model after an inference.
To set the percentage for the warning token threshold, adjust the slider.
Select a time period for which this budget is enforced from the dropdown. For example, monthly, weekly, yearly, or quarterly .
You can also view the token used.
Click Update budget. You can see the graph for the token usage forthe previous month is populated with the real time data.
Note:
When the token budget exceeds the warning threshold set, then a warning is displayed in the Motif token budget section.
Update Motif token budget
To update Motific.ai token budget follow the steps below:
Navigate to the Motif menu, click on the Motif for which you want to set the token budget. If you have not created a Motif, then create a new Motif.
Go to the Cost tab of the Motif details. You can view the budget that has already been set.
Click on the pencil icon.
Now you can edit the total token budget, warning threshold and the time period for the budget.
Click Update budget. You can see the graph for the token usage for previous month is populated with the real time data.
API definition
In the API definition tab, you can see the essential elements that are necessary for connecting your Gen AI app with the Motific.ai API endpoint.
The following details are displayed:
API base URL: This is the initial part of the API URL. The API endpoint requests should use this as the base URL for all the calls.
Token: This is the authentication token (Bearer token) that should be passed with each API request. The request will not be authorized to access the Motif and hence the LLMs if this token is not passed.
Sample cURL: This is a sample cURL command that you can use to test the Motif.
3.5.5 - User groups
The User group tab allows you to add user groups where you can add individual users. The user groups created here can be used in the access provision section while creating a Motif. When you add a user group to a Motif all the users within the group get access to that Motif.
Create a new user group
To create a user group, follow the steps below:
Navigate to the Motif menu, go to the User group tab.
Enter a group name.
Click Create group.
A page with an option to add users opens.
To add users to the group, click Add users.
A pop-up with the list of all the users that you have added to your organization’s tenant are displayed.
Note: The user displayed here are the users that you have added in the settings. First you should add the users in the settings page, then they are displayedwhile creating user group.
Select the users that you want to add and click Add user
Update a user group
A previously created user group can be edited, users can be added and deleted from the group and the group can be updated.
To update a user group, follow the steps below:
Navigate to the Motif menu, go to the User group tab.
The user groups you have created are displayed in the list view or grid view, and you can toggle between the two views.
To update a user group, click on user group name or alternatively click on the overflow menu (three dots) at the end of the group card view or in the Actions column of the list view and click Edit.
Next, you can view the details of the user group. You can view the name and email and other details associated with the group.
Here you can add users or delete users from the group.
Delete a user group
To delete a user group, follow the steps below:
Navigate to the Motif menu, go to the User group tab.
The user groups you have created are displayed in the list view.
To delete a user group, click on the overflow menu (three dots) at the end in the Actions column and click the Delete button.
Note: You cannot delete a user group if the group contains any users. Motific.ai prompts you to delete the users before deleteing the user group.
If there are users present in the user group you wish to delete, then you will see the below pop-up. This screen prompts you to deleet the users first.
To delete all the users in the user group, click the Delete group users button. All the users are deleted once you click this button.
A confirmation screen opens up cautioning you that deleting a user group is irreversible, and asks you type in the word DELETE in the field provided for confirmation. The word should match the word presented for the delete button to be active.
Caution: Deleting a user group is an irreversible action.
To delete a user group, click Delete.
3.6 - Intelligence
Overview
The Intelligence dashboard provides enterprises and organizations with valuable insights into the tangible benefits that generative AI (GenAI) users derive from AI assistants. It analyzes the real tasks completed through user prompts and inputs, offering a comprehensive overview of the intelligence gathered from tasks performed by AI assistants deployed via Motifs.
So, what exactly does “Intelligence” entail?
This term refers to the insights derived from user prompts, also known as prompt intelligence, which includes detailed analyses of the user inputs relayed to an AI assistant. The objective is to supply business analysts with robust foundational data to enhance their understanding of GenAI utilization. This encompasses:
Intelligence on the utilization of each Motif you’ve crafted and its adoption by users.
Insight into the variety of task categories each prompt or user input belongs to.
The most frequently requested task categories by users, along with token consumption patterns for these categories.
The efficiency gains achieved through the use of an AI assistant for specific task categories, and benchmarking against other task categories.
This compilation of data and observable trends equips you to make informed decisions and fine-tune the use of your AI assistants. It also facilitates a deeper comprehension of how user inputs transform over time and provides transparency into the actual prompts submitted by users.
On this page you can also view the aggregate data of the prompt intelligence for all the Motifs that you have created. The various graphs displayed on this page are:
Trends on requested categories across all Motifs: This section showcases the tasks that were requested across all the Motifs by the users the most and the least. Based on this information you can optimize the model usage.
Least prompted category- This metric shows the prompt trend and the number of prompts for the task category that were least used by the user across all the Motifs.
Most prompted category- This metric shows the prompt trend and the number of prompts for the task category that were most used by the user across all the Motifs.
Trends on token usage across all Motifs: This section highlights the token usage trends for requested task across all the Motifs. You can determine which tasks consume the highest or least number of tokens and optimize the cost and LLM usage. The following token usage trends are displayed:
Lowest token consumption category- The task category with lowest token consumption across all the Motifs is displayed here. Also, the tokens trends of the task with the lowest percent change in the number of tokens is displayed.
Highest token consumption category- The task category with highest token consumption across all the Motifs is displayed here. Also, the tokens trends of the task with the highest percent change in the number of tokens is displayed.
Number of prompts for the top 5 categories: In this section, you are provided with an easy-to-read graphical representation of the top 5 requested task category out of the total prompts requested by the users across all the Motifs that you have created.
Categories usage by prompts and time saved: Categories usage by prompts and time saved graph represents what percentage of task categories were requested by the prompts/inputs requested by the users of all the Motifs and how much of the user’s time was saved by using the Gen AI assistant for the tasks.
Motifs
The Motifs you have created are listed and you can view the individual Motif’s prompt intelligence details by clicking on the Motif. The data associated with the Motif such as Least prompted category, Most prompted category, and Total time saved while using the particular Motif are displayed.
Here, you can filter the Motifs based on intelligence data, i.e., if a GenAI assistant provisioned via a Motif has been utilized by the users for different tasks and prompts have been provided, then there will be prompt intelligence data associated with the Motif and such Motifs can be viewed with Contains intelligence data filter. Whereas if prompts have not been passed for a Motif, then such Motifs can be filtered with No intelligence data.
The plots of the graphs show the data for the time period selected in the filter located in the upper right corner. When you change the filter, depending on the data available the plots are drawn.
When you click on the Motif of your choice, you get the following tabs with easy-to-read graphs and metrics about the prompts/inputs from the user that users request for a particular Motif.
The overview section provides you with the information about the prompts passed to the model via a Motif.
Latest prompts
The latest prompts section the most recent prompts sent by the users of the Gen AI assistant you provisioned via Motific.ai. A prompt classification is also provided.
The following details can be viewed:
Date: The time the prompt was passed to the model.
Prompt ID: The ID of the prompt.
Prompt: The user input that is passed by the user to get an inference from the model.
Requested task: The requested task column represents the task category that the prompt belongs to. The tasks category can one of the following:
Content Processing
Coding support
Brainstorming
Greetings
Text translation
Unclassified
Number of prompts for the top 5 categories
In this section, you are provided with an easy-to-read graphical representation of the top 5 requested task category out of the total prompts requested by the users of a Motif over the selected period.
Categories usage by prompts and time saved
Categories usage by prompts and time saved graph represents what percentage of tasks were requested by the prompts/inputs requested by the users of a Motif and how much of the user’s estimated time was saved by using the Gen AI assistant for the task.
The benefits of these graphs are instant understanding about the type of tasks requested by the Motif users, and the identification of which task categories are saving more time to the Motif users.
Trends on categories with responses
This section showcases the tasks that were requested by the Motif users the most and the least. Based on this information you can optimize the model usage.
Least prompted category- This metric shows the prompt trend and the number of prompts for the task that were least used by the user while using the Motif.
Most prompted category- This metric shows the prompt trend and the number of prompts for the task that were most used by the user while using the Motif.
Trends on token usage
This section highlights the token usage trends for requested tasks. You can determine which tasks consume the highest or least number of tokens and optimize the cost and LLM usage.
The following token usage trends are displayed:
Lowest token consumption category- The task with lowest token consumption is displayed here. Also, the tokens trends of the task with the lowest percent change in the number of tokens is displayed.
Highest token consumption category- The task with highest token consumption is displayed here. Also, the tokens trends of the task with the highest percent change in the number of tokens is displayed.
Time savings by categories
Time savings by categories graph shows the time savings for each of the categories of the prompts sent by the user to the AI assistant. The time savings for individual categories and aggregate of the total time savings.
Category usage
The category usage tab represents how each task category is being requested over time. The user can select which task to display information for.
The benefits of these graphs are detailed understanding of the usage, and the understanding of the token consumption and LLM costs for a given task category.
The tasks present in the Motific.ai are as follows:
Coding Support
Content Creation
Content Processing
Conversational
Data Analysis
Greetings
Question & Answer
Text Translation
Unclassified
Let’s dive in and look at each of these graphs for a task. Every task has the same graphs presented with the data for the respective requested task category via the Motif. The graphs can be empty if there is no corresponding data available in the prompts requested by the user.
Prompts per category
The prompts per task graph displays the data of how many prompts were requested for the particular task over a period of time. The task is determined by which tab you are on. The legend on the graph explains that the number of prompts is signified by a particular color.
Token usage per category
The token usage per task graph displays the data of how many tokens were consumed when a prompt for a particular category was requested by the users of a Motif over a period of time. The task is determined by which tab you are on.
Gen AI cost per category
The Gen AI cost per task graph displays the data for the cost incurred over a period of time for the particular task, depending on which task tab you are on.
Trends and comparison with other categories
The trends and comparison with other tasks graph provide information about the prompts, input and output tokens, and cost. It compares these entities for the current and past periods of time to show the trends for a particular task. The task is determined by the tab you are on.
This graph has two sections, Trends and comparisons. You can select from within the graph what you like to view.
Trends- In the trends graph, you can see the total number of prompts, input and output tokens, and cost of the current and previous periods for a particular task, providing the trends.
Comparison- In the comparison graph, you can see the comparison of the total prompts, total tokens, and total costs of a particular task with other tasks.
Time savings
Time savings builds on usage insights. It adds estimations of time savings based on per transaction or prompts input from the various users for a particular application.
The tasks present in the Motific.ai are as follows:
Coding Support
Content Creation
Content Processing
Conversational
Data Analysis
Greetings
Question & Answer
Text Translation
Unclassified
Let’s dive in and look at each of these graphs for a task. Every task has the same graphs presented with the data for the respective time savings.
The plots of the graphs show the data for the time period selected in the filter located in the upper right corner. When you change the filter, depending on the data available the plots are drawn.
Time savings per category
The Time Savings per Task chart details the estimated time saved for each task within a chosen task category, providing a side-by-side comparison with the previous period, and indicates whether the trend is ascending or descending. This chart outlines the estimated time savings and the associated Gen AI costs for tasks initiated by users via a motif, covering both current and prior periods. It also delineates the time saved in activities such as reading, writing, reviewing, and searching related to the task across these periods. The provided data is instrumental in projecting future usage patterns. Identical charts for various task categories showcase the specific data relevant to each task.
The advantage of this analytical comparison is that it highlights whether there has been an increase in user efficiency in interacting with Large Language Models (LLMs) by evaluating the changes in estimated time savings from one period to the next.
Time savings breakdown
The time savings breakdown graph illustrates the total and average estimated time saved for a specific category of tasks, such as coding support, content creation, and content processing. The steps are categorized as thinking, reading, writing, and testing. Motific.ai then estimates the time these steps would take for a particular task category, both without using GenAI and with using GenAI. This provides valuable insight to organizations on how GenAI tools can enhance user productivity.
Total
Average
Estimated time saved per category
The estimated time saved per task graph provides information about the time saved in reading, writing, testing, and searching by using the Gen AI assistant for a particular task via a Motif over a period of time.
Model recommendation
The Model Recommendation feature facilitates a side-by-side evaluation of your Motif’s current model against alternative options, assessing their estimated performance and results over a specified duration based on the given inputs (prompts) and outputs (model responses). Select an alternative model from a list of available models in the dropdown to perform this comparison. Motific.ai intelligently suggests the most suitable model tailored to your needs after reviewing your AI assistant’s performance across various task categories during the chosen timeframe.
This feature enables you to scrutinize and contrast the estimated effectiveness, response time/delays, and overall quality of the model currently in use for your Motif with any other model you’re considering.
Leveraging the Model Recommendation functionality, you can determine whether the optimal model is in place for your Motif, considering the diversity of tasks it handles. By analyzing comparative performance data across different models, you have the option to reconfigure your Motif with a new model to potentially enhance performance and track the resulting metrics and outcomes.
To get the model recommendation, follow the steps below:
Navigate to the Intelligence menu, click on the Motif for which you want to check the model recommendations. If you have not created a Motif, then create a new Motif.
Go to the Model recommendation tab.
Here, you can see that the current model for the Motif has been selected and cannot be changed.
Next, select if you want model recommendation either by model or by other options and submit the request to see the recommendations.
For optimization details by model select By model.
Next, select a LLM provider and a model against which you want to check the optimization details.
Click Submit.
You can see the results for Simulated performance. The graph displayed shows the comparison for the accumulated cost, quality and accumulated delay(s) of the two models selected. Also, you can view the recommended model
In the Model effectiveness result tab, you can view a comparison of the effectiveness of the current model vs. the alternative model. A triangle with a larger area represents higher overall effectiveness.
Note: The Submit button is not enabled until there is sufficient prompt data to calculate the optimization details.
Model recommendation by options
For optimization details by different options select By options.
Next, select one or more options for which you want to check the optimization details. The options available are cost, delay, and quality.
Click Submit.
You can see the results for Simulated performance. The graph displayed shows the comparison for the accumulated cost, quality and accumulated delay(s) of the two models selected. Also, you can view the recommended model
In the Model effectiveness result tab, you can view a comparison of the effectiveness of the current model vs. the alternative model. A triangle with a larger area represents higher overall effectiveness.
Note: The Submit button is not enabled until there is sufficient prompt data to calculate the optimization details.
3.7 - Monitoring
Overview
Monitoring involves observing and tracking the performance of the policies that you have created. You can also track the usage of your Motif with reports and logs.
Motific.ai also monitors if there are unapproved or disallowed LLMs (Shadow GenAI) being used in your organization using Cisco Umbrella.
Policy flags
In the policy flags tab, track out of compliance GenAI usage.
To see the policy performance page, navigate to the Monitoring » Policy flags tab.
To see the policy performance graphs for a particular time period, select the date range from the drop down.
Based on the date the graphs are populated with the data for that period.
Motifs with policy flags- Motifs with policy flags section displays the graph for the Motifs whose usage has violated the policies set for the given date range.
Policy flags over time- This graph shows the number of policies violated within the given data range.
Flags triggered by user- This graph displays the number of policy flags violated by a user.
Token usage
The token usage tab displays the details about your Motif’s token usage. You can view the details of token usage by user and token usage by Motif.
Prompt history
You can observe usage patterns in the prompt history section.
To see the Reports and logs page, navigate to Monitoring » Prompt history tab.
To view details of a particular log, click the View details link in the Actions column.
Prompt history details
Here, you can view the details of the prompt that you selected. You can find the following information about the prompt:
General information- This section provides general information about the prompt like prompt execution time, input and output token count for the prompt.
Profiler- The profiler shows the time elapsed at each step of the process right from the prompt submission to checking for policy violations to LLM response.
General information
This section provides general information about the prompt.
Prompt ID- The id of the prompt sent via the Motif.
Motif- The Motif name is displayed here via which the user input was sent.
Execution timestamp- The time stamp when the prompt was executed i.e., sent to the LLM to fetch a response.
Response tokens- The number of response tokens consumed by the LLM while providing the response to the prompt.
Input tokens- The number of input tokens consumed by the LLM when the prompt was sent for the inference.
Model input and output
User query- The original prompt from the user sent for get an inference from the LLM.
Knowledge base context- The content of the knowledge base on which the Motif response is based on.
Model response- The out from the LLM in response to the prompt. If there is no response, then check if there was any policy violation that caused Motific.ai to enforce the policy action of blocking the prompt from going to LLM.
Policy actions
The actions that were taken by Motific.ai according to the policy actions set for the Motif this prompt belongs to.
Step- The step of the execution can be while checking for the policy violations by the prompt or during fetching response from the model, etc.
Policies action- What action was taken based on the policies applied to the Motif via which the user input was sent.
Details- When you click on the View link, the JSON details about the response from Motific.ai are displayed.
Execution profiler
The profiler shows the sequence of the prompt execution and the time elapsed at each step of the process right from the prompt submission to checking for policy violations to LLM response. When you hover over the graph you can view the details of the execution like response at each step, time taken to execute the step, and the policy action.
3.7.1 - Shadow GenAI
Overview
Motific.ai provides integration with Cisco Umbrella that provides you with multiple levels of defense against internet-based threats and helps you track the unauthorized usage of generative AI applications.
Shadow GenAI is a term in Motific.ai that refers to the unofficial or unapproved generative artificial intelligence systems that employees use within an organization without the knowledge or approval of the IT department. It’s analogous to “shadow IT,” where employees use unauthorized technology solutions.
Before integrating Cisco Umbrella account
Before integrating your Cisco Umbrella account with Motific.ai there are some minimal recommended settings in Umbrella that need to be performed. These are the basic settings needed for Motific.ai to seamlessly get the Shadow GenAI the information from your Umbrella account to Motific.ai.
These are only a few of the steps that are needed by Motific.ai. You can have any advanced settings in your Cisco Umbrella account. Refer Cisco Umbrella documentation for more information.
Create a DNS policy in Cisco Umbrella
Following are the minimal DNS policies that need to be set up for generative AI applicataions to be blocked or allowed to be used in your organization.
Navigate to Umbrella Policies > Management > DNS Policies > Add.
Select Apply Destination Lists and Application Control.
In Destination Lists > Global Allow List to add Motific.ai.
In Control Applications select Generative AI applications you want to control
Next, provide a name for your policy. (Note: It takes several hours for the policy to be deployed and take effect)
Generate API key in Cisco Umbrella
Generate and use your API key credentials to authenticate requests to the Umbrella API
Navigate to Umbrella Admin > API Keys > Add and create a new key with the following minimal requirements. Key Scope Reports with Read-Only permissions.
Retrieve generated API Key and Key Secret
Mapping Cisco Umbrella API key and key secret
To connect your Cisco umbrella with Motific.ai to track the shadow genAI usage you need to provide the API Key and Key Secret.
Below is the mapping for the Cisco Umbrella API key and key secret with Motific.ai:
Client ID: Cisco Umbrella API key
Client secret: Cisco Umbrella key secret
Please make a note of the above when you begin the Cisco Umbrella integration with Motific.ai
Shadow GenAI
You can integrate your Cisco Umbrella account with Motific.ai and discover the generative AI usage in your organization with Motific.ai.
Follow the steps below to integrate your Cisco Umbrella account:
Navigate to settings page, click on the Settings menu on the lower-left corner of the navigation bar.
Go to Integrations tab.
Click on the CASB- Umbrella label. A pop-up to enter the Client ID and Client secret opens. You can find
Enter the Client ID and Client secret.
Click Save to save the Cisco Umbrella details.
If integrating your Cisco Umbrella account for the first time, then alternatively:
Navigate to monitoring page.
Click on the Connect.
You are taken to the integration tab in the Settings menu.
Enter the Client ID and Client secret.
Click Save to save the Cisco Umbrella details.
Once you integrate Cisco umbrella with Motific.ai, navigate to the Monitoring » Shadow GenAI.
When you are done configuring Cisco Umbrella, you can see the activity in the Motific.ai Shadow GenAI tab.
3.8 - Testing
The testing page allows you to evaluate the effectiveness of your applied policy in a controlled, simulated LLM environment.
Test a Motif
To test a Motif that you created, follow the steps below:
Navigate to the Testing menu.
Next, select a Motif from the drop down.
Next, provide a prompt to test the Motif.
Click Test.
The prompt is sent to the LLM that was configured while creating the Motif. You get a response based on the prompt and the policies you applied to the Motif.
4 - API docs
Fundamentals
Welcome to Motific.ai’s API docs!
Motific.ai API documentation guides you to integrate your application with the Motif created by your organization. Here, you can also find the information about how to obtain an access token include in a request to Motific.ai.
The API reference gives you details of the endpoints and enables you to interact with the LLM provider and knowledge bases configured to recieve responses for the prompts, all the while adhering to the policies defined in the Motif.
Obtaining access token
Each enterprise application must have a Motif created and obtain the access token. Each application is tied to a Motif and to access the API endpoints you should pass the unique access token that the API will validate before returning a response.
Follow the steps below to obtain the access token:
Log in to your Motific.ai account.
You need to have admin access to see the details of the Motif created. Or an admin should add you to the Motif.
Navigate to Motifs menu.
To view the Motif details, click on the three dots in the right corner of the Motif.
To obtain the access token, go to API definition tab.
In the API definition tab, you can get the following information:
The access token is displayed in the Token field. You can use this token for the Motific.ai that is required by your enterprise application.
The Motif-Id is displayed in the API base URL required to send the post request to Motific.ai. The Motif-id can be found at the end of the API base URL. For example: {BASE_URL}/api/v1/apps/{MOTIF_ID}
API structure
Basics
The root URL for the API is- https://api.motific.ai..
Response Format
The response format for all requests is a JSON object.
Whether a request succeeded is indicated by the HTTP status code. A 2xx status code indicates success, whereas a 4xx status code indicates failure. When a request fails, the response body is still JSON, but always contains the fields error which you can inspect to use for debugging.
Authentication
Authenticate requests using OAuth access token. This token enables you to access the Motific.ai API in order to integrate your enterprise Gen AI application with Motific.ai and to seamlessly interact with LLMs. All requests to connect to the API for an inference via Motific.ai require user-less access in which you use HTTP Bearer Authentication for every request. You can find the token in the Motific.ai API definition screen.
/prompts endpoint enables you to connect with the LLM provider configured via Motific.ai. You can send a prompt from your Gen AI application to this endpoint and receive the inference response with all the policies applied. The policies that are applied to the prompt and the inference are configured by your organization’s admin.
https://api.motific.ai- This is the base URL to access API endpoints for this release.
Request URL
/api/v1/apps/{motif-id}/
Parameter
Required
Description
{motif-id}
True
When you create a Motif in the Admin console, you get a Motif ID that should be used in the request URL. For more details see how to obtain the Motif-Id.
Header
Header
Required
Description
Content-Type: application/json
True
The header indicates that the body of the response is JSON-formatted. The client should parse the JSON data to understand the response from the server
The roles that guide the LLM response. The usual roles used are `system`- provides high level instructions, `user`- provides prompts, or `assistant`- can be model's response.
Sample request body
{
    "messages": [
        {
            "content": "Give me 5 slogans for social media campaign of our product.",
            "role": "user"

        }
    ]
}
Indicates whether a prompt was blocked by the Motific.ai as per the policy defined by your organization. If a prompt is blocked, then that signals it has violated the org policy and there was no inference response. The user must be notified of this in any way org's see fit.
finish_reason
string
Indicates the reason the execution of the API stopped.
prompt_id
string
The id of the prompt that was passed in the request
response
string
The response object that contains the details about the inference response.
Usage
object{}
Usage tokens for user's prompt and the model's response.
completion_tokens
integer
Indicates the number of tokens returned by the LLM configured.
prompt_tokens
integer
Indicates the number of prompt tokens sent to the LLM.
total_tokens
integer
Indicates the total number of prompt and inference tokens.
Sample response body
{
"blocked": false,
"finish_reason": "stop",
"prompt_id": "<<YOUR_PROMPT_ID>>",
"response": "Hello! I'm here to help answer any questions you might have or provide information on a variety of topics. I see you've written \"hello world,\" which is a common phrase used in programming to test that a program is running correctly. Is there a specific programming question or topic you'd like to know more about? Let me know and I'll do my best to help you out!","usage": {
"completion_tokens": 313,
"prompt_tokens": 18,
"total_tokens": 331 }
}
5 - Settings
The settings page enables you to manage the settings of your account with Motific.ai.
To navigate to settings page, click on the Settings menu on the lower-left corner of the navigation bar.
Add a user
To add a user, click the Add User button.
Enter the name and email of the user you want to add.
Select the role that you want to assign the user from the drop down:
User: A user with this role only has access to Motific.ai Chat assistant UI.
Admin: An admin role gives full access to Motific.ai. This role has the permission to create, update, or delete a Motif, Policies, model connections and add other users etc.
Review the details.
To the add user click the Add User button.
The status of the user is updated periodically. The user can login once they are added.
The user can then access the Motific.ai user interface and create an account or log in with an existing account. After logging in, they will be allowed to choose your tenant from the tenant selection screen.
The user must select the tenant they want access to.
Depending on the role of the user, they can access specific Motific.ai features.
Finding your tenant ID
To locate your tenant, please navigate to the settings page and click on the Settings menu located in the lower-left corner of the navigation bar.
Now, at the top of the page, you will find your tenant ID. This ID can be used when making API calls.
Delete a user
To delete a user, click the
button situated at the end of the user’s name.
A confirmation screen opens up cautioning you that deleting a user is irreversible and you are asked to type in the word DELETE in the field provided for confirmation. The word should match the word presented for the delete button to be active.
To delete the user, click Delete. Once you delete the user you cannot see the user on the list.
Deleting a user in an irreversible action.
5.1 - Configuration
Enabling non-English prompts
In the Configurations tab, you have the option to enable non-English prompts to be passed to an LLM. By default, Motific.ai will block any prompts that are not in English. This feature can be useful in preventing plugins from generating false positives with non-English prompts.
Enabling this setting may result in more false positives.
To enable the non-English prompts, select the check box and you are all set.
Testing the non-English prompts
Once you have enabled the configuration for non-English prompts, you can test Motifs by sending non-English prompts in the Motific.ai Chat UI or testing page.
When the non-English prompts setting is checked, you get responses similar to as shown below.
When non-English prompt setting is unchecked, you get responses similar to as shown below.
6 - Resources
In this section we have documented some resources that may be essential in your journey with Motific.ai.
Following resources are available for you to make use of:
This glossary as a quick reference to look up terms as they read through the documentation.It provide definitions and explanations for general terms, acronyms, and jargon that are specific to Motific.ai. This ensures that you get familiar with the terminology and can fully understand the content.
G
Gen AI
Gen AI is the term we use in the documentation as a short form for Generative Artificial Intelligence.
6.2 - Prompt collection
Prompt collection
On this page, you can see a list of prompts that you can use while using the Motific.ai sandbox environment.
Sample prompts for Sales
Below you can find some sample prompts for a sales usecase. These prompts can get you started in your journey using Motific.ai.
Write a cold email to a prospect in the finance industry with the job title Finance manager and Banking relationship manager. Find problems related to finance software and generate solutions based on our product features such as ease of managing the finance data. Keep the email within 100 words. Greet and address the client Wiktor Hoffmann in the email.
Write a LinkedIn message to George Thorne about why he should subscribe to our company page and newsletter. Explain in less than 50 words about our company motto and list our suite of products. Finally provide this email address xyz.aiprodutcs@xyz.com for any further queries.
Develop four unique concepts for Google ad campaigns for our new smart phone handset that will target customers in the following locations: San Jose, Seattle, Raleigh.
Sample prompts for Marketing
Analyze the sentiment of recent online reviews for our brand and provide a summary report.
Create a weekly social media content calendar with post ideas that align with our brand’s summer campaign.
Draft an email for our upcoming flash sale that will go out to our VIP customer segment.
Compile a report on our competitors’ social media ad performance over the past month.
Suggest improvements to our current landing page copy to increase conversion rates.
Provide a list of SEO keywords we should target for our new line of athletic wear.
Develop a press release outline for the launch of our innovative fitness app.
Create a series of blog post titles that would appeal to our target demographic interested in sustainable living.
Generate a list of catchy taglines for our new eco-friendly water bottle product line.
Sample prompts for Banking
These prompts cover banking AI chatbot scenarios and contain the some PII details that can be tested with Motifc.
How can I request a new credit card pin for my credit card 436 5572 5767 6673?
Can I withdraw cash using my card 436 5572 5767 6673 at ATM center?
How do I change the address linked to my credit card to Desrosiers, Avenida Noruega 42, Villa Real, 5000-047, Portugal
7 - Known issues
In this documentation the known issues and possible workarounds for the issues are documented.
Motific.ai release note known issues
Issue 1
Pending status shown when a user is added
When a user is added via the Settings menu, after adding the user, the status of the user is shown as pending.
Work-around
Motific.ai takes approximately 5 to 10 minutes to sync the status when a new user is added. The user you added can immediately log in to the tenant they are invited to, even though the status shows as pending.
Issue 2
The schedule defined for how often the data source should be updated is always in UTC time zone.
When you add a data source and define a schedule to update that data source while creating a knowledge base the time is always defined in UTC.
This is essential information as it defines your data source update schedule, and defining the right time is very important.
Issue 3
The un-synced public websites added as data sources cannot be deleted
When you add a public website as a data source, depending on the number of files on the website, the KB sync time can vary. If you try to delete a data source that is still ingesting the files and the sync is in progress, then you cannot delete it.
Work-around
Ignore the KB that has been stuck in the syncing state and recreate the knowledge base with the same public website. Wait for the sync to complete before testing it with a Motif.
Issue 4
The ingestion of a large website with many files may take multiple hours.
You should check the sync status to view the ingestion progress and be aware of any failures during the website ingestion. This may happen because of the larger website sizes.
Work-around
If a KB with public website is not ingested or the status has not changed to Complete, then you may have to create a new KB with the same data source.
Issue 5
When querying a Motif with a Knowledge Base (KB) that is re-syncing, there may be a brief period of time in which the KB context cannot be found, and you may not receive a response if you send a prompt or query.
Work-around
Please wait until the KB sync process is completed before querying a Motif with a KB that is re-syncing. This will help avoid any delays in receiving a response when sending a prompt.
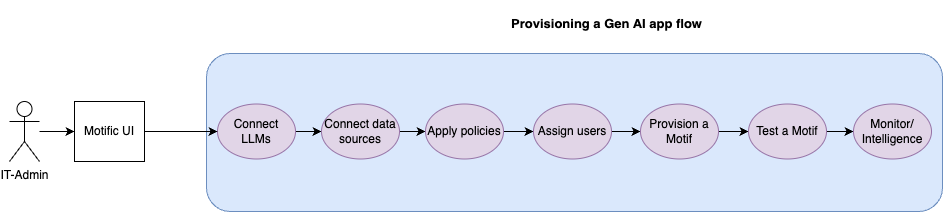
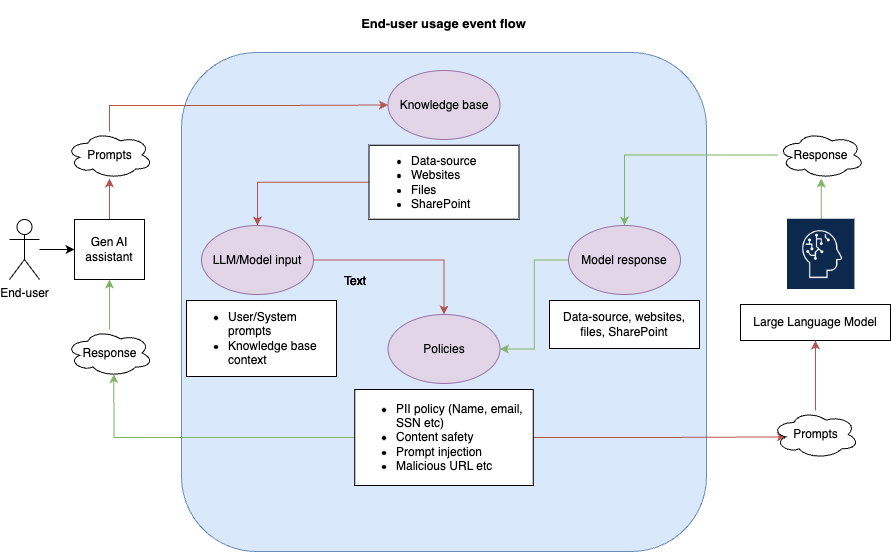
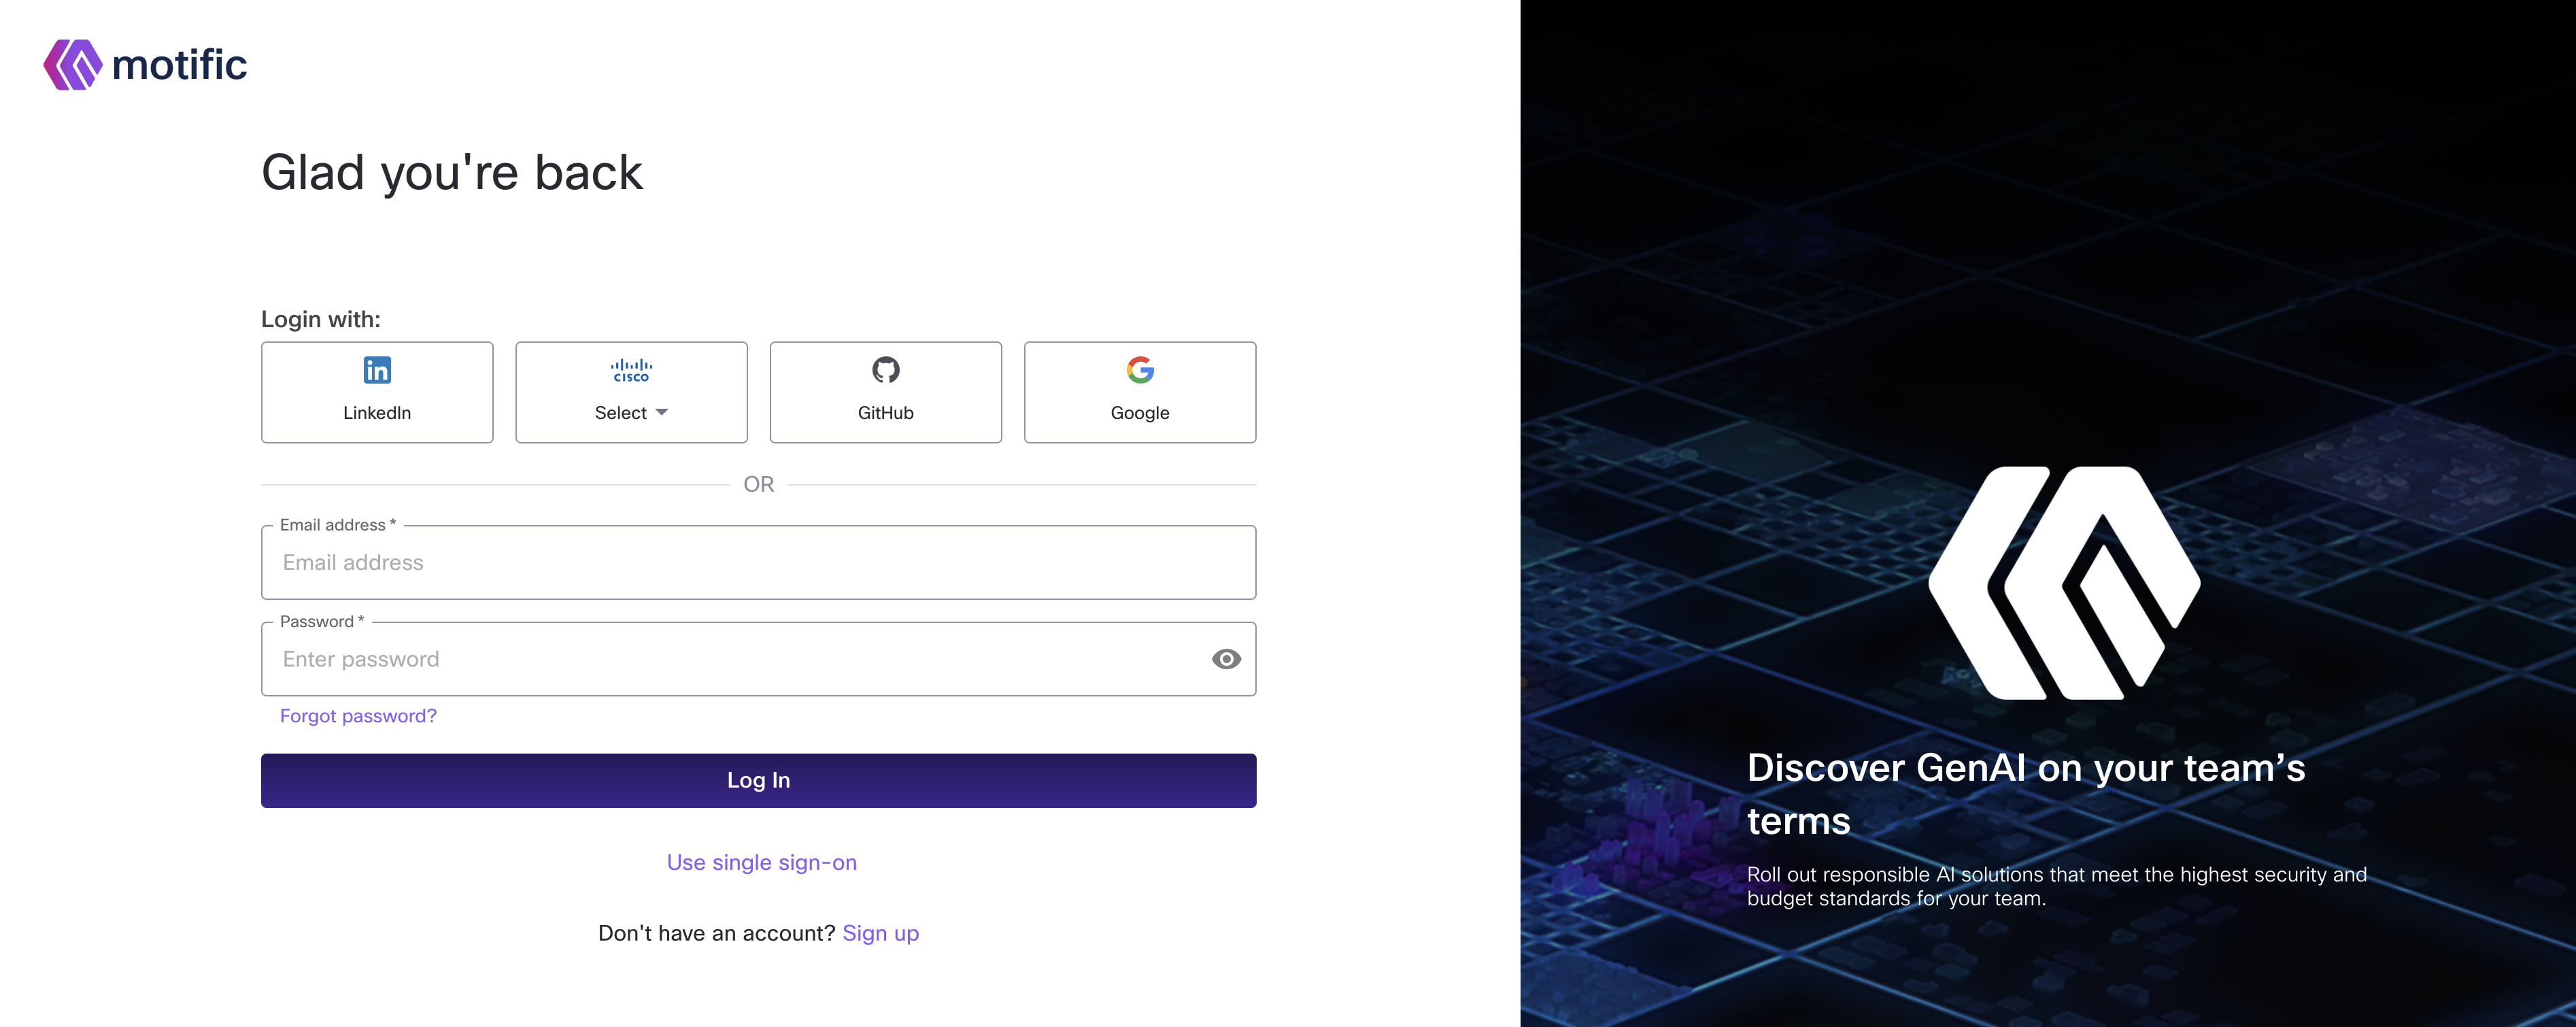
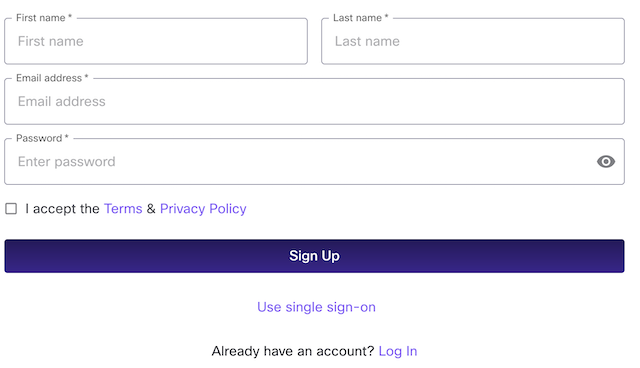

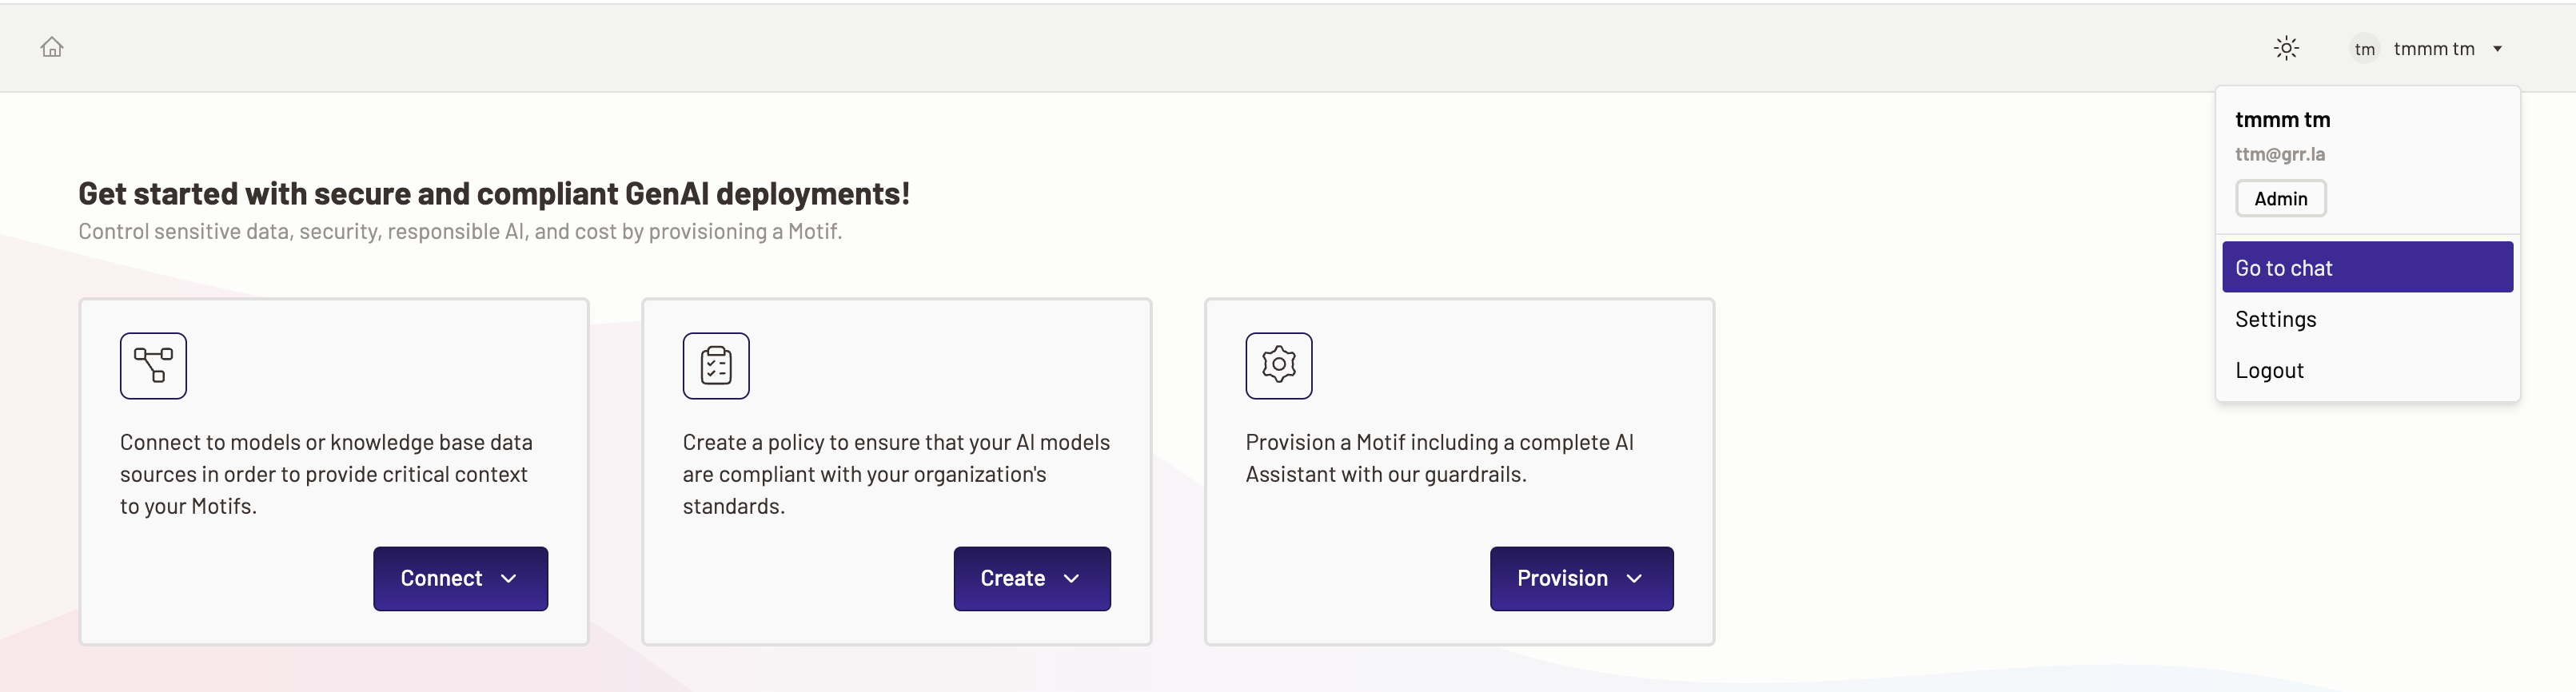
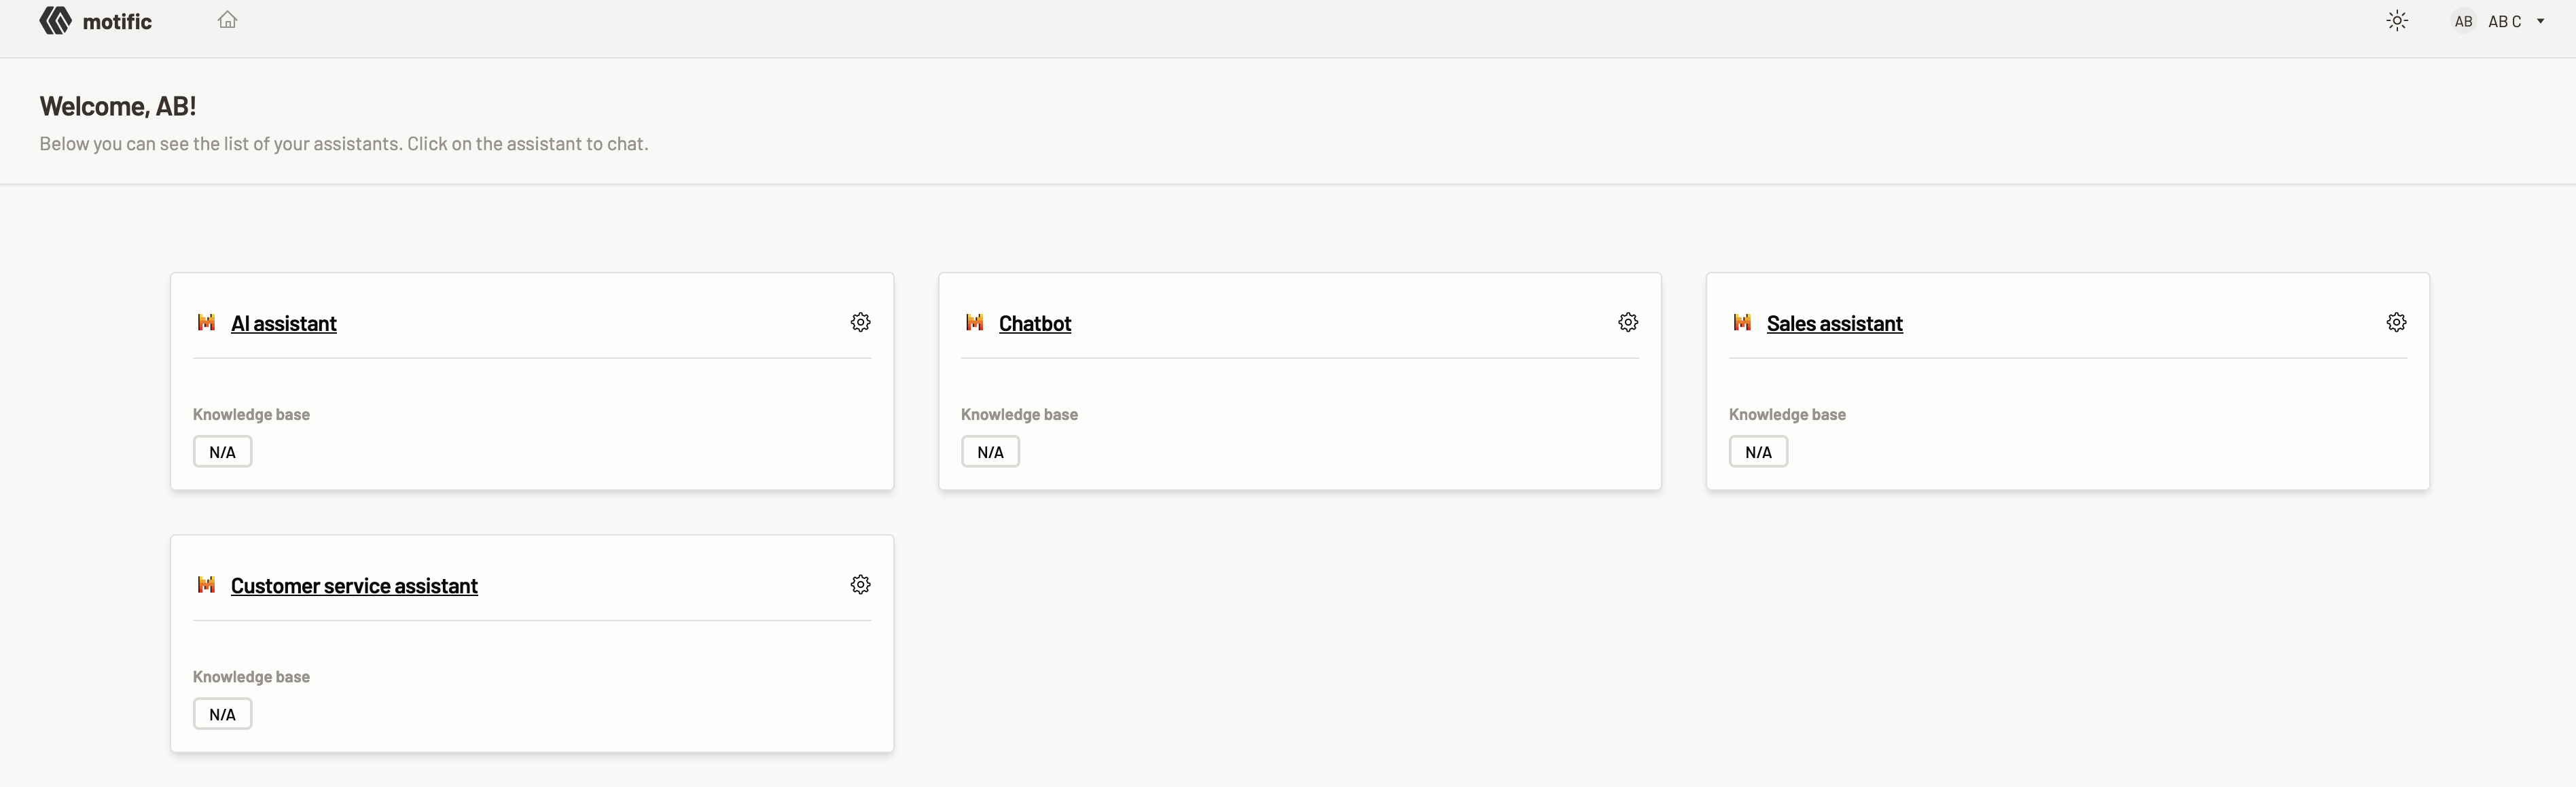
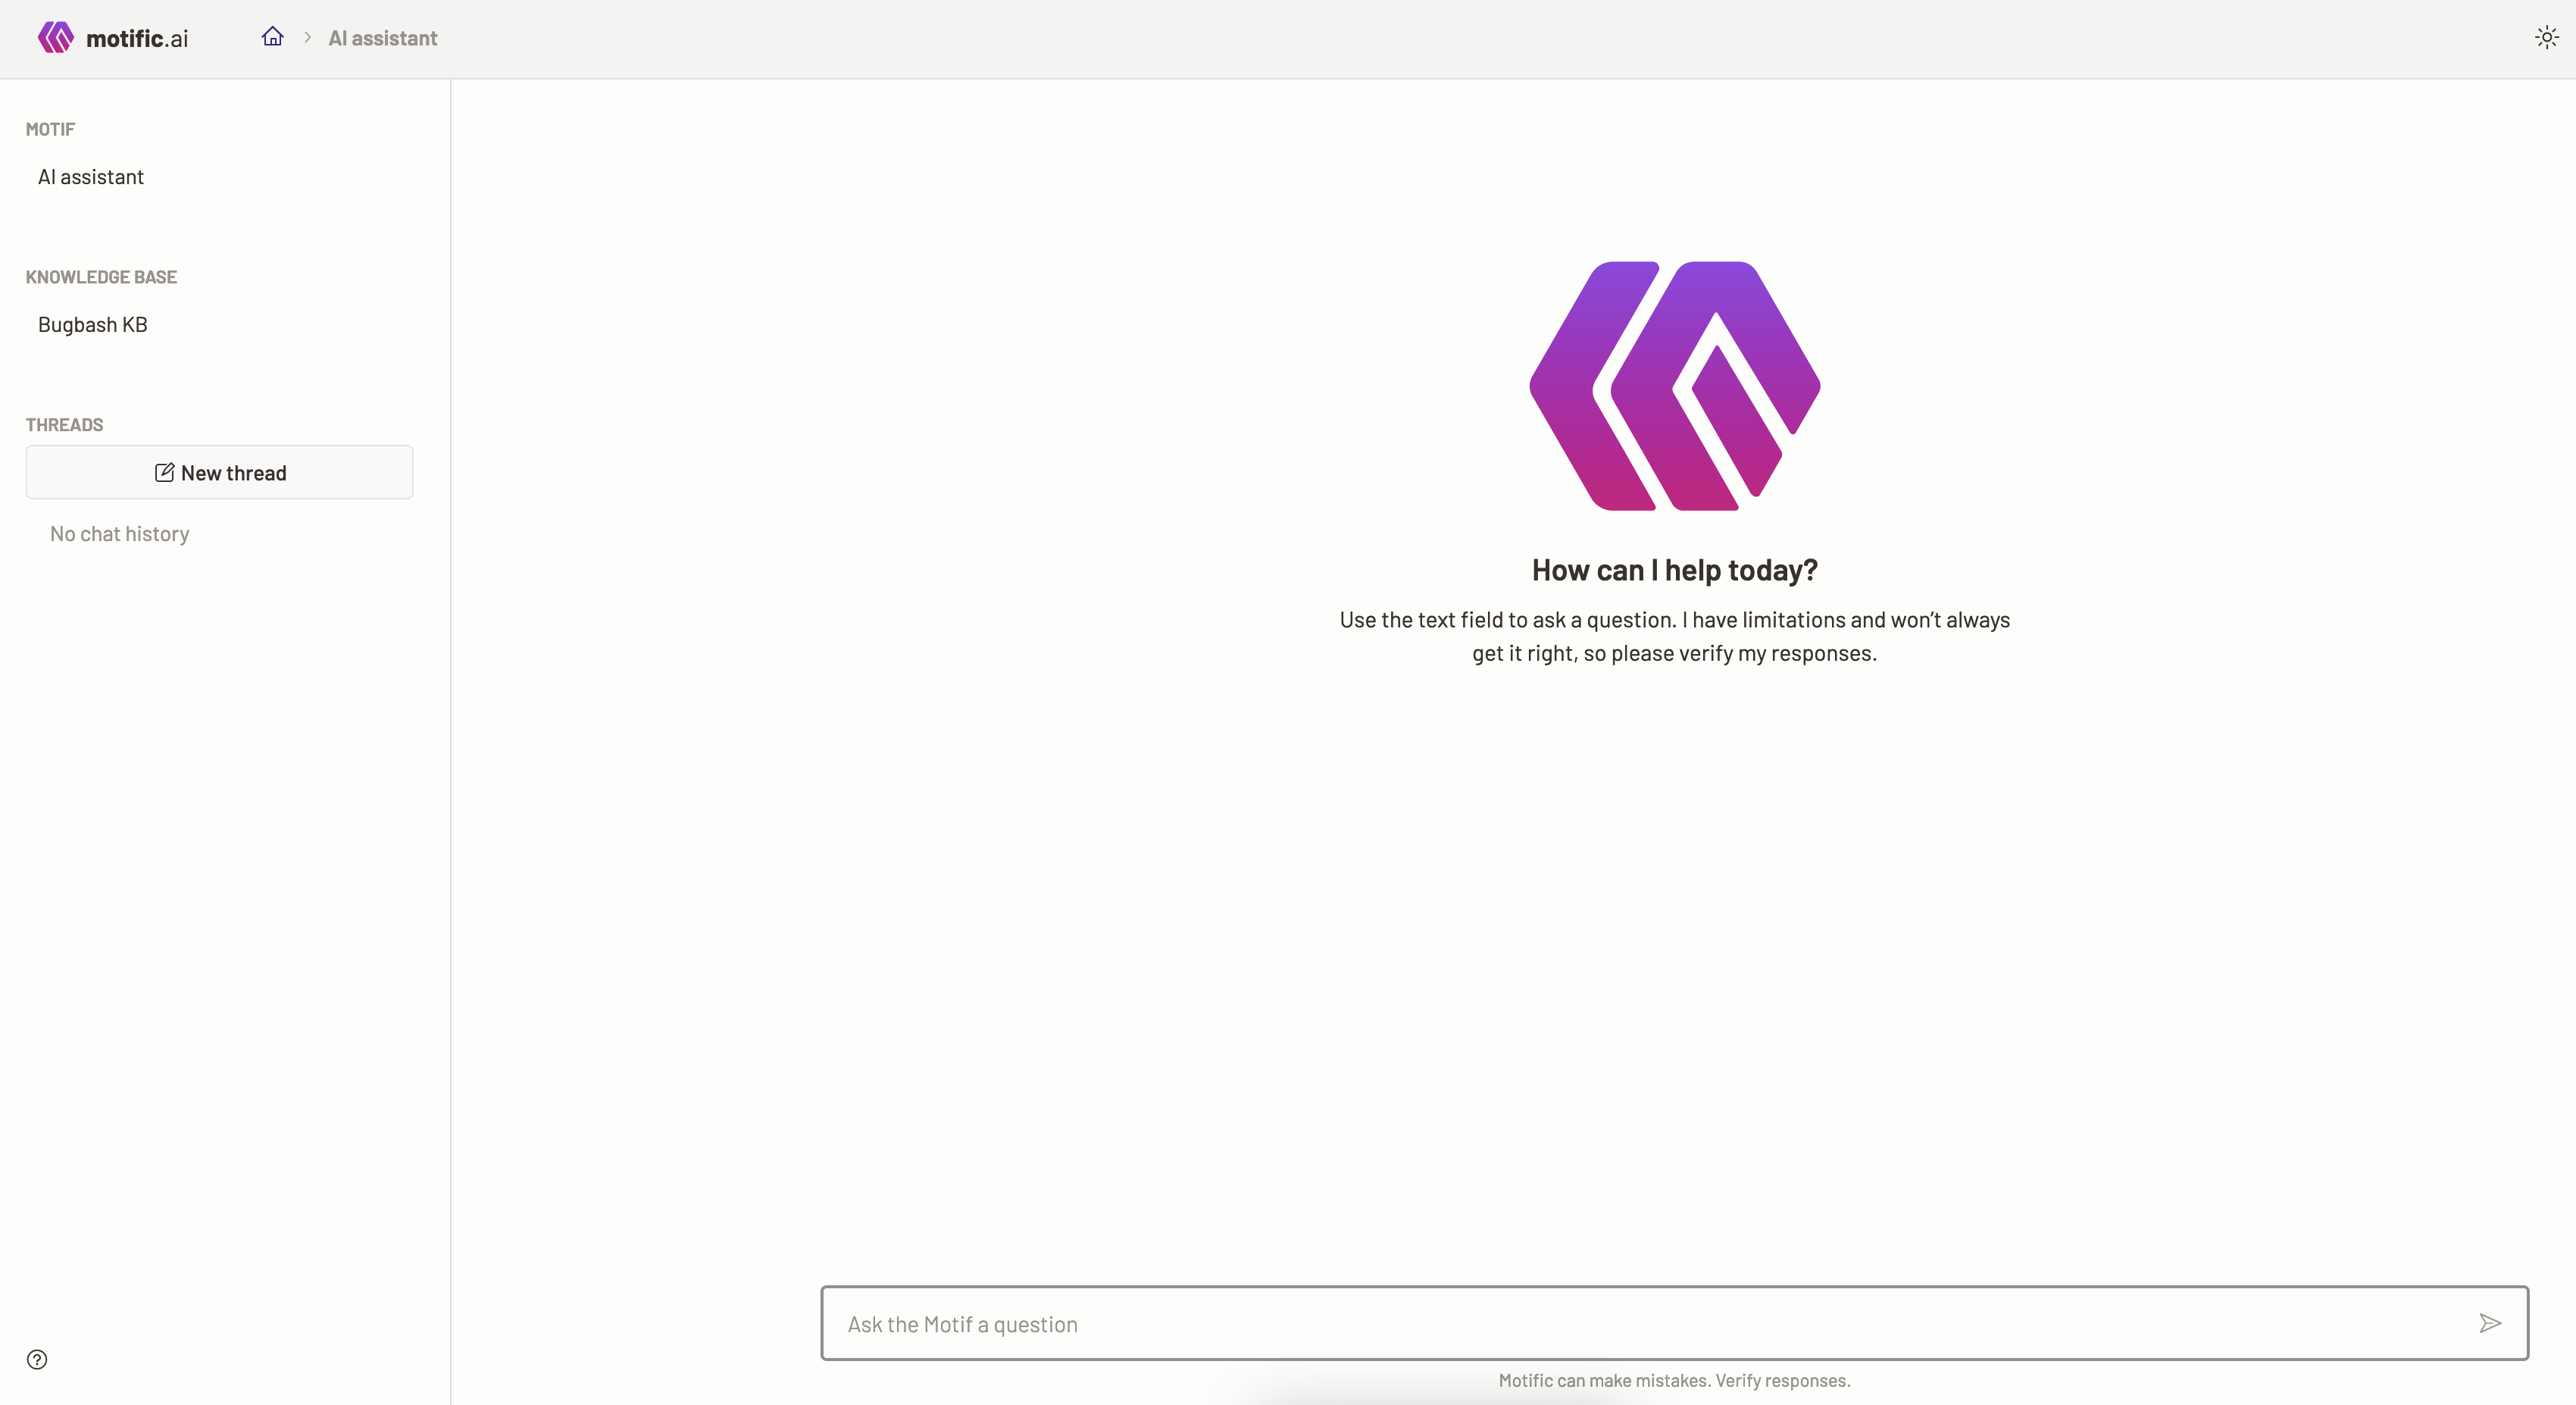
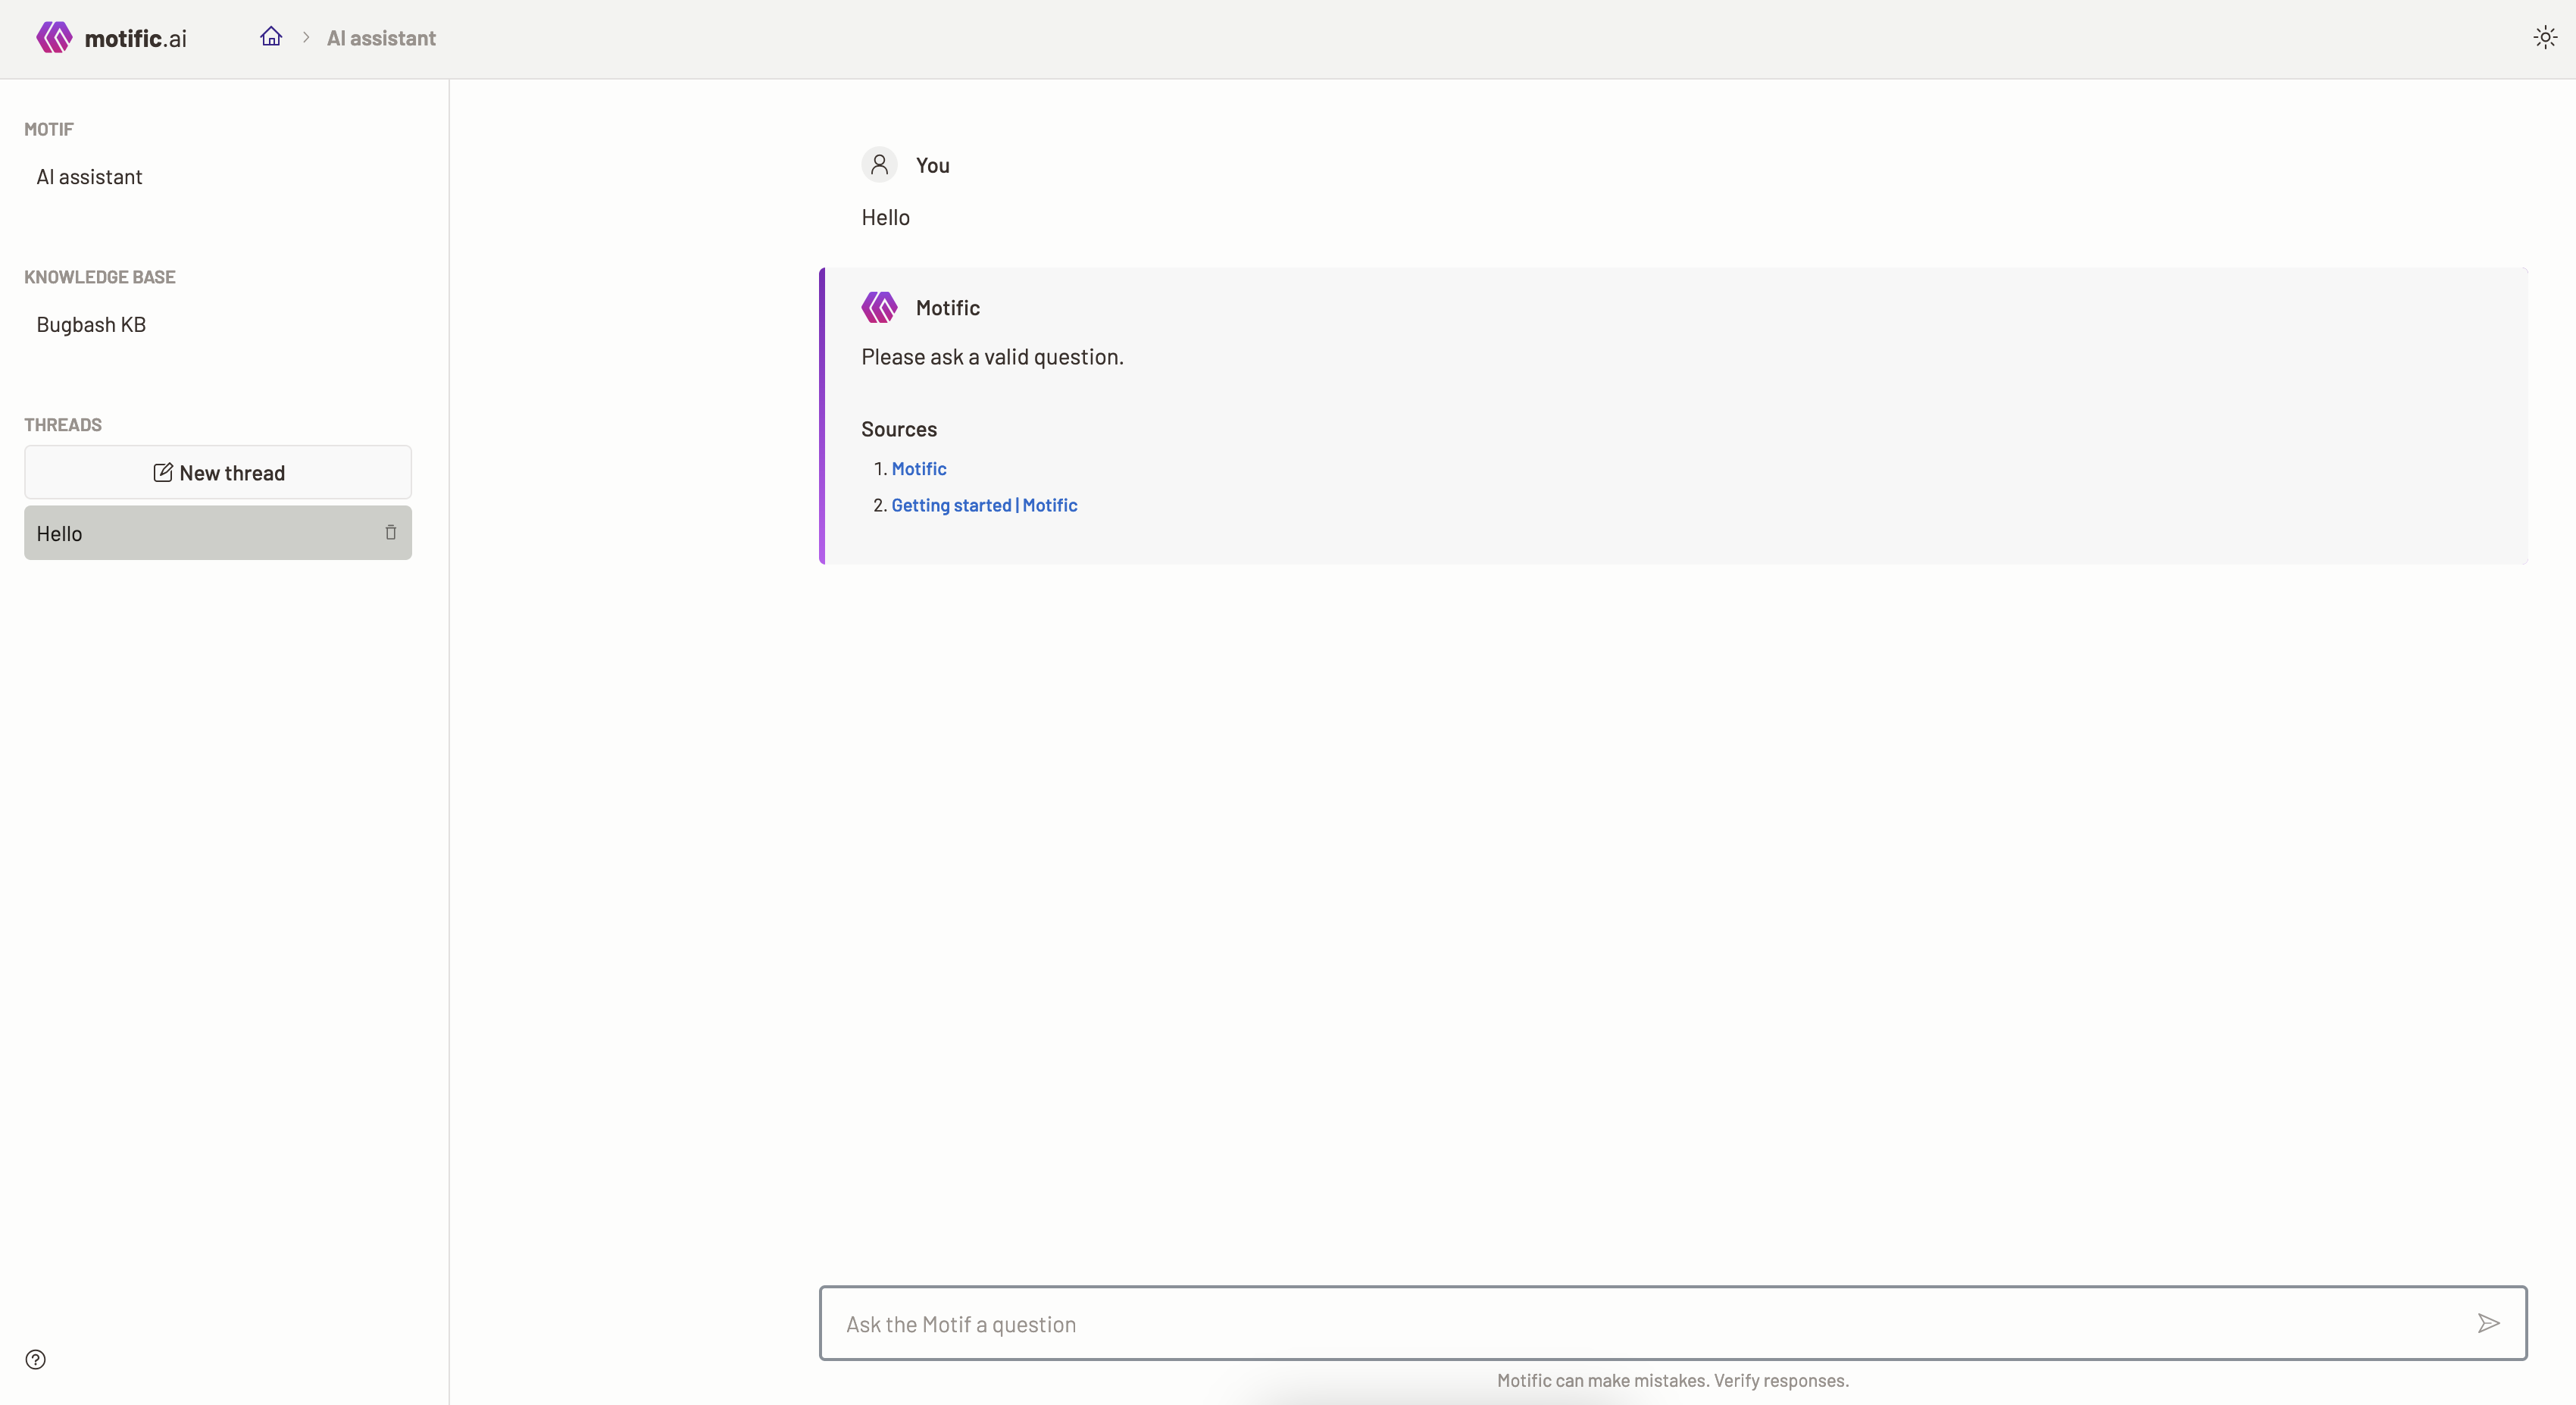
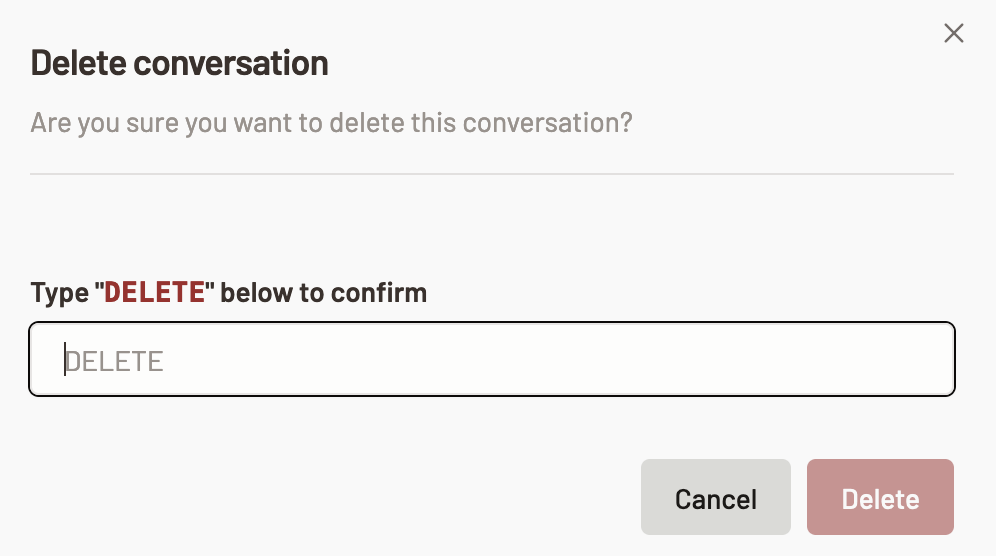
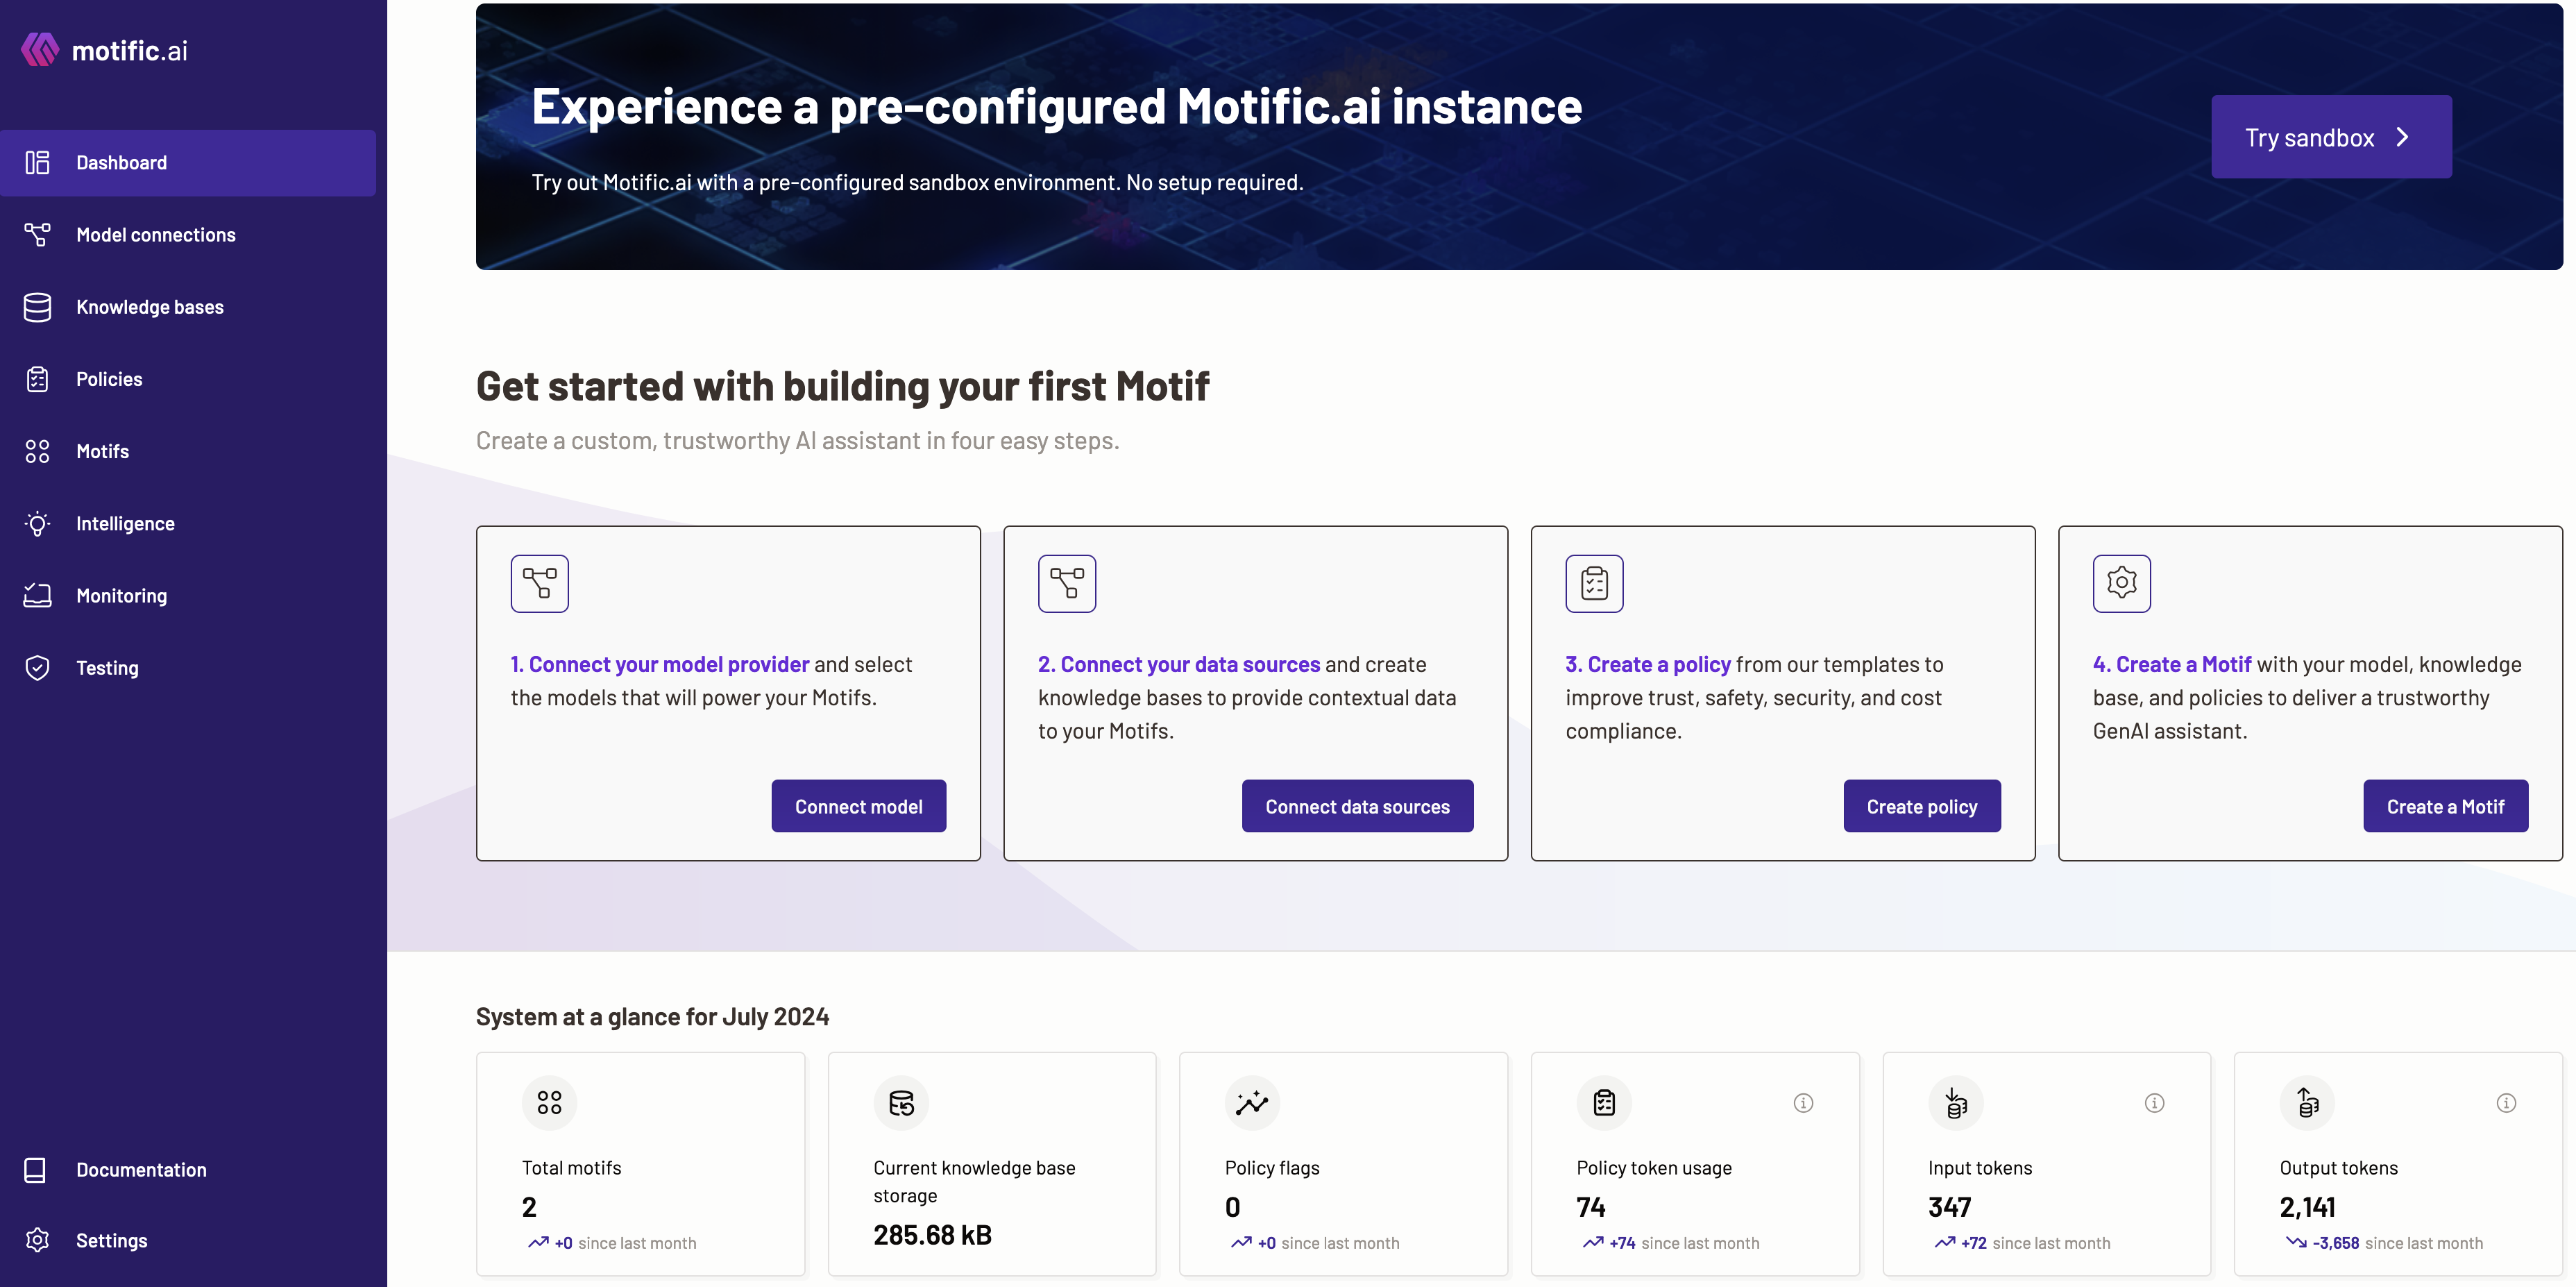

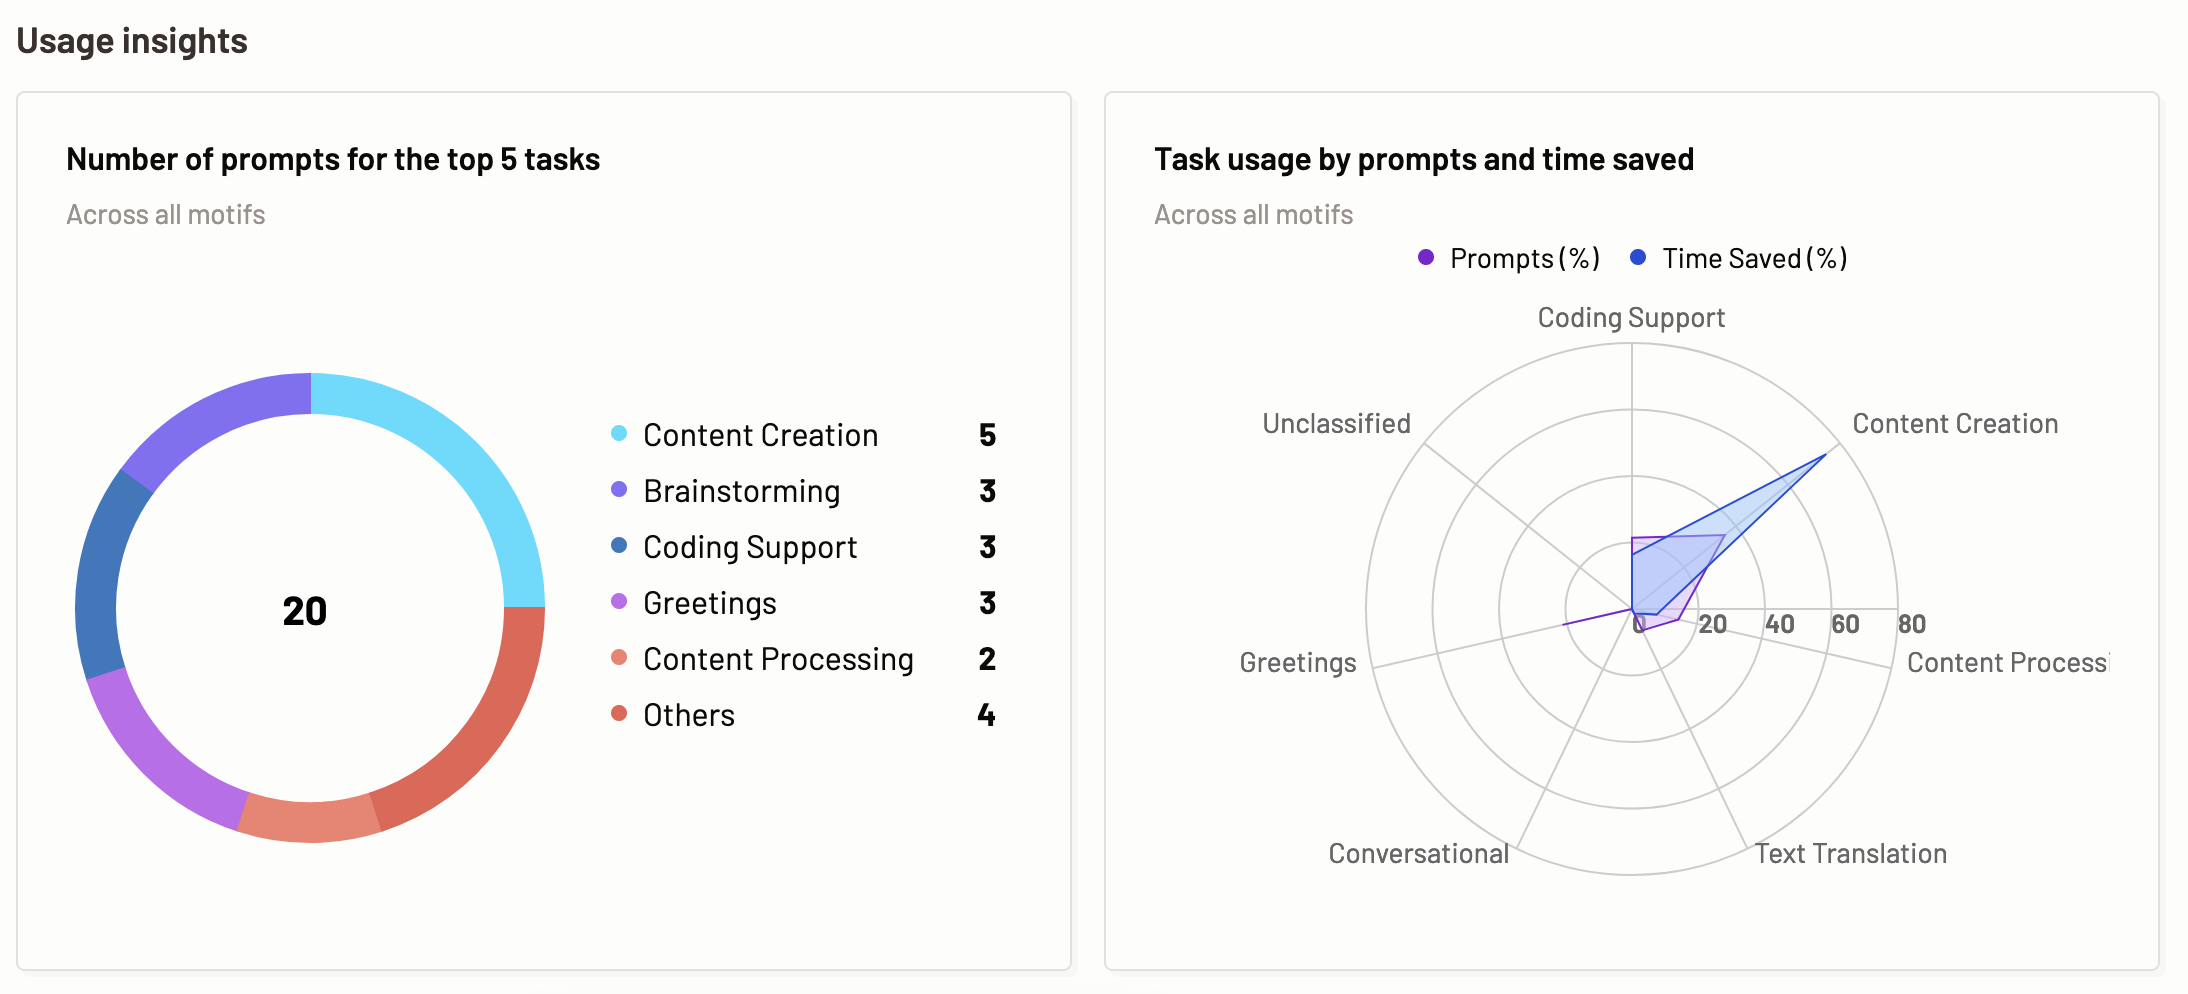

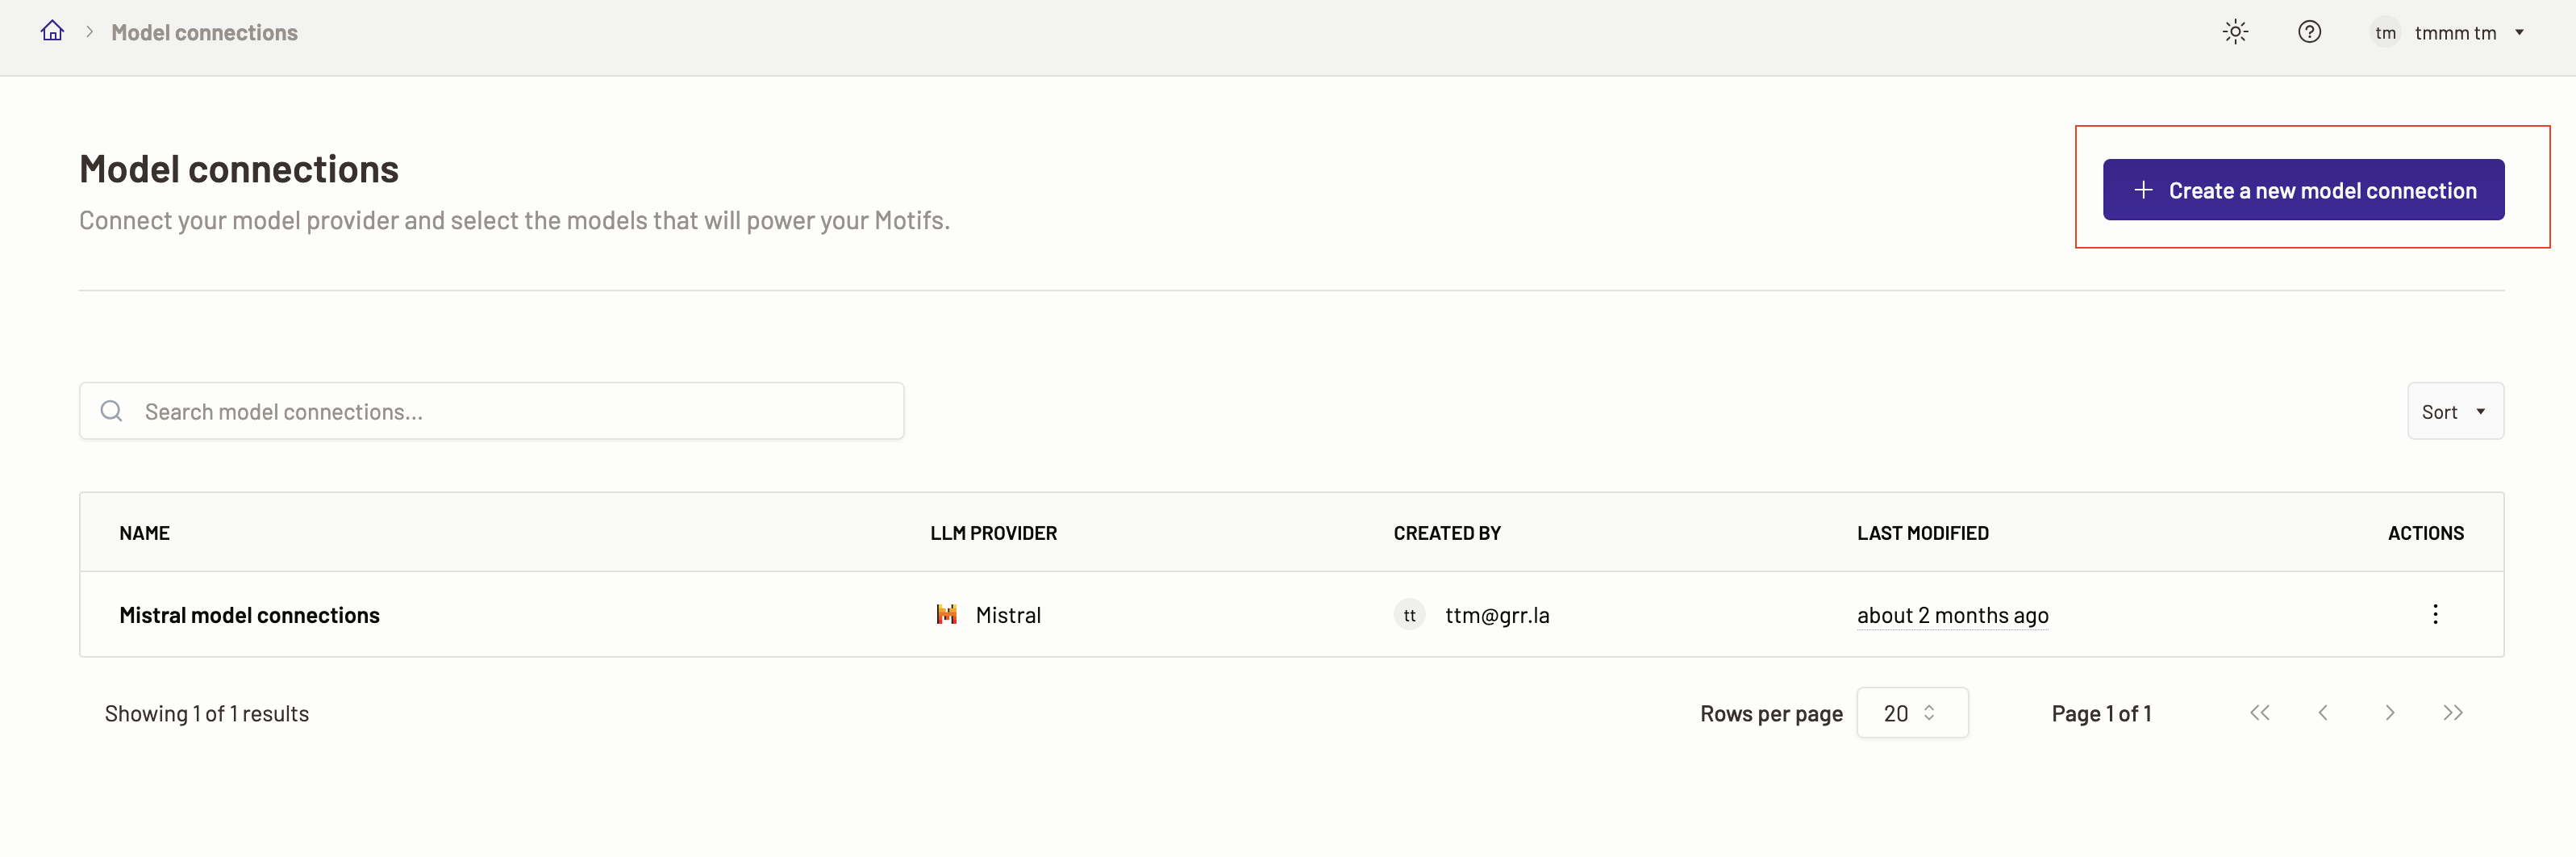
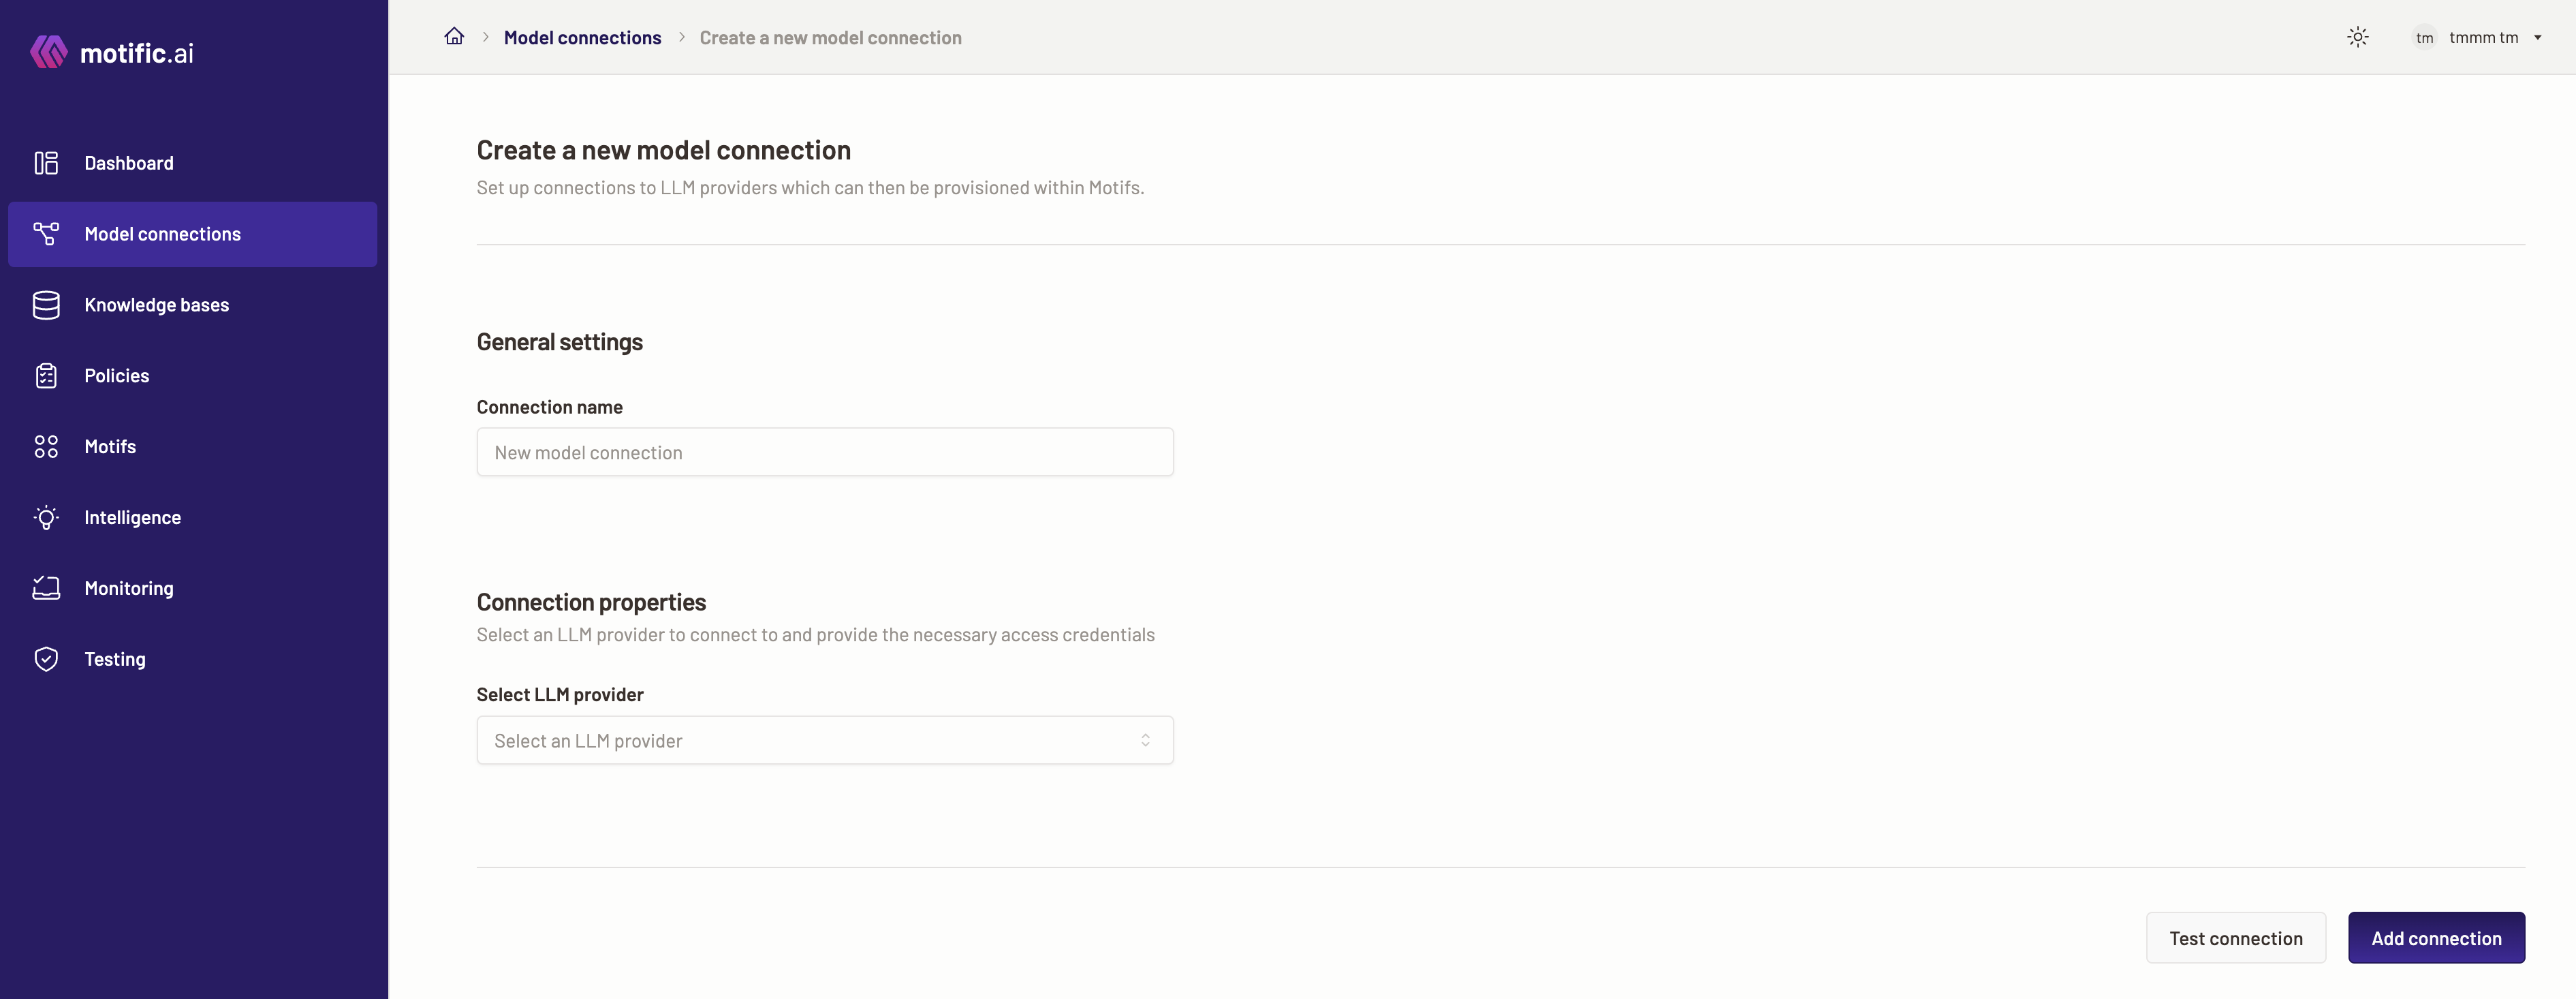
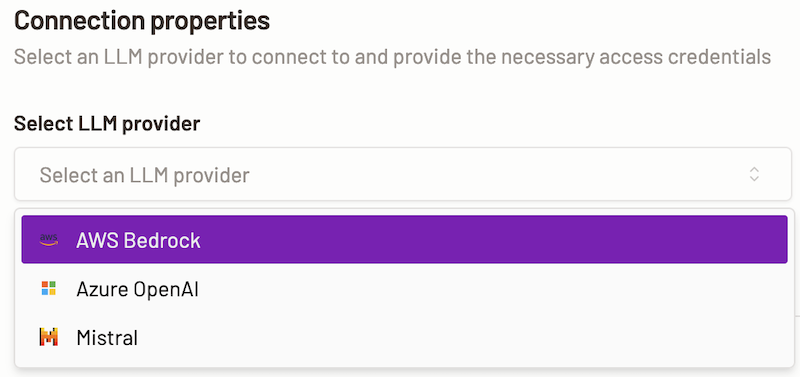
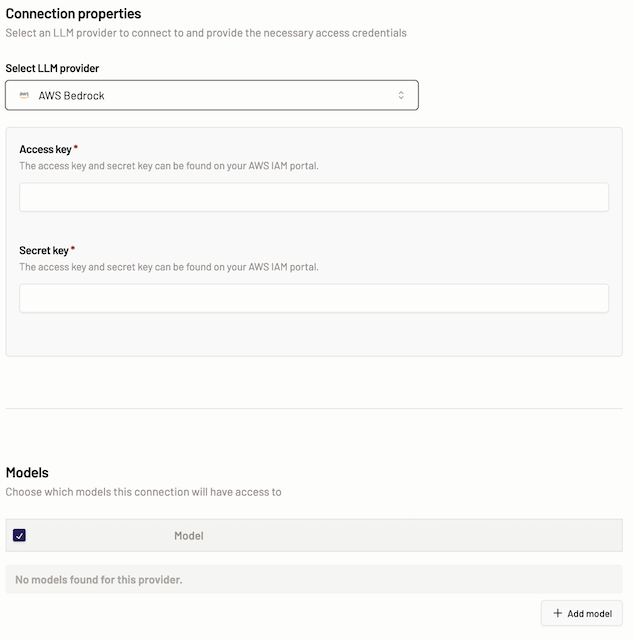
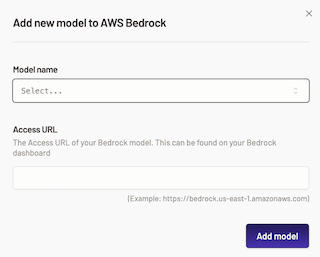
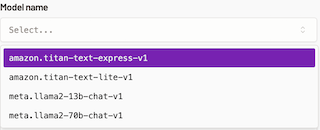

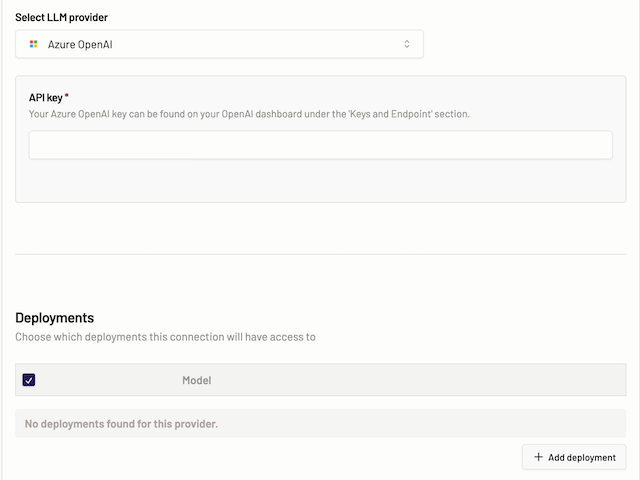
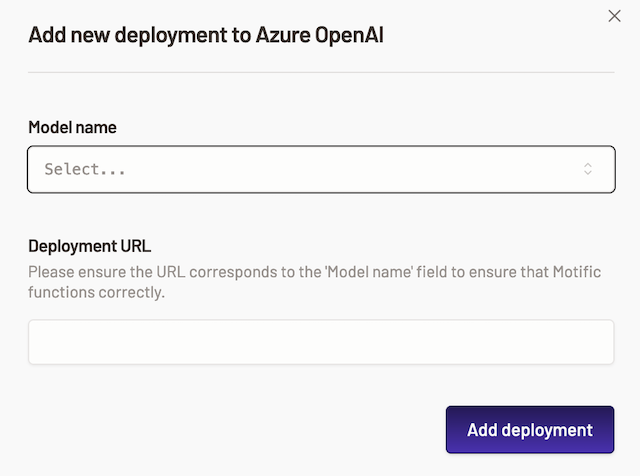
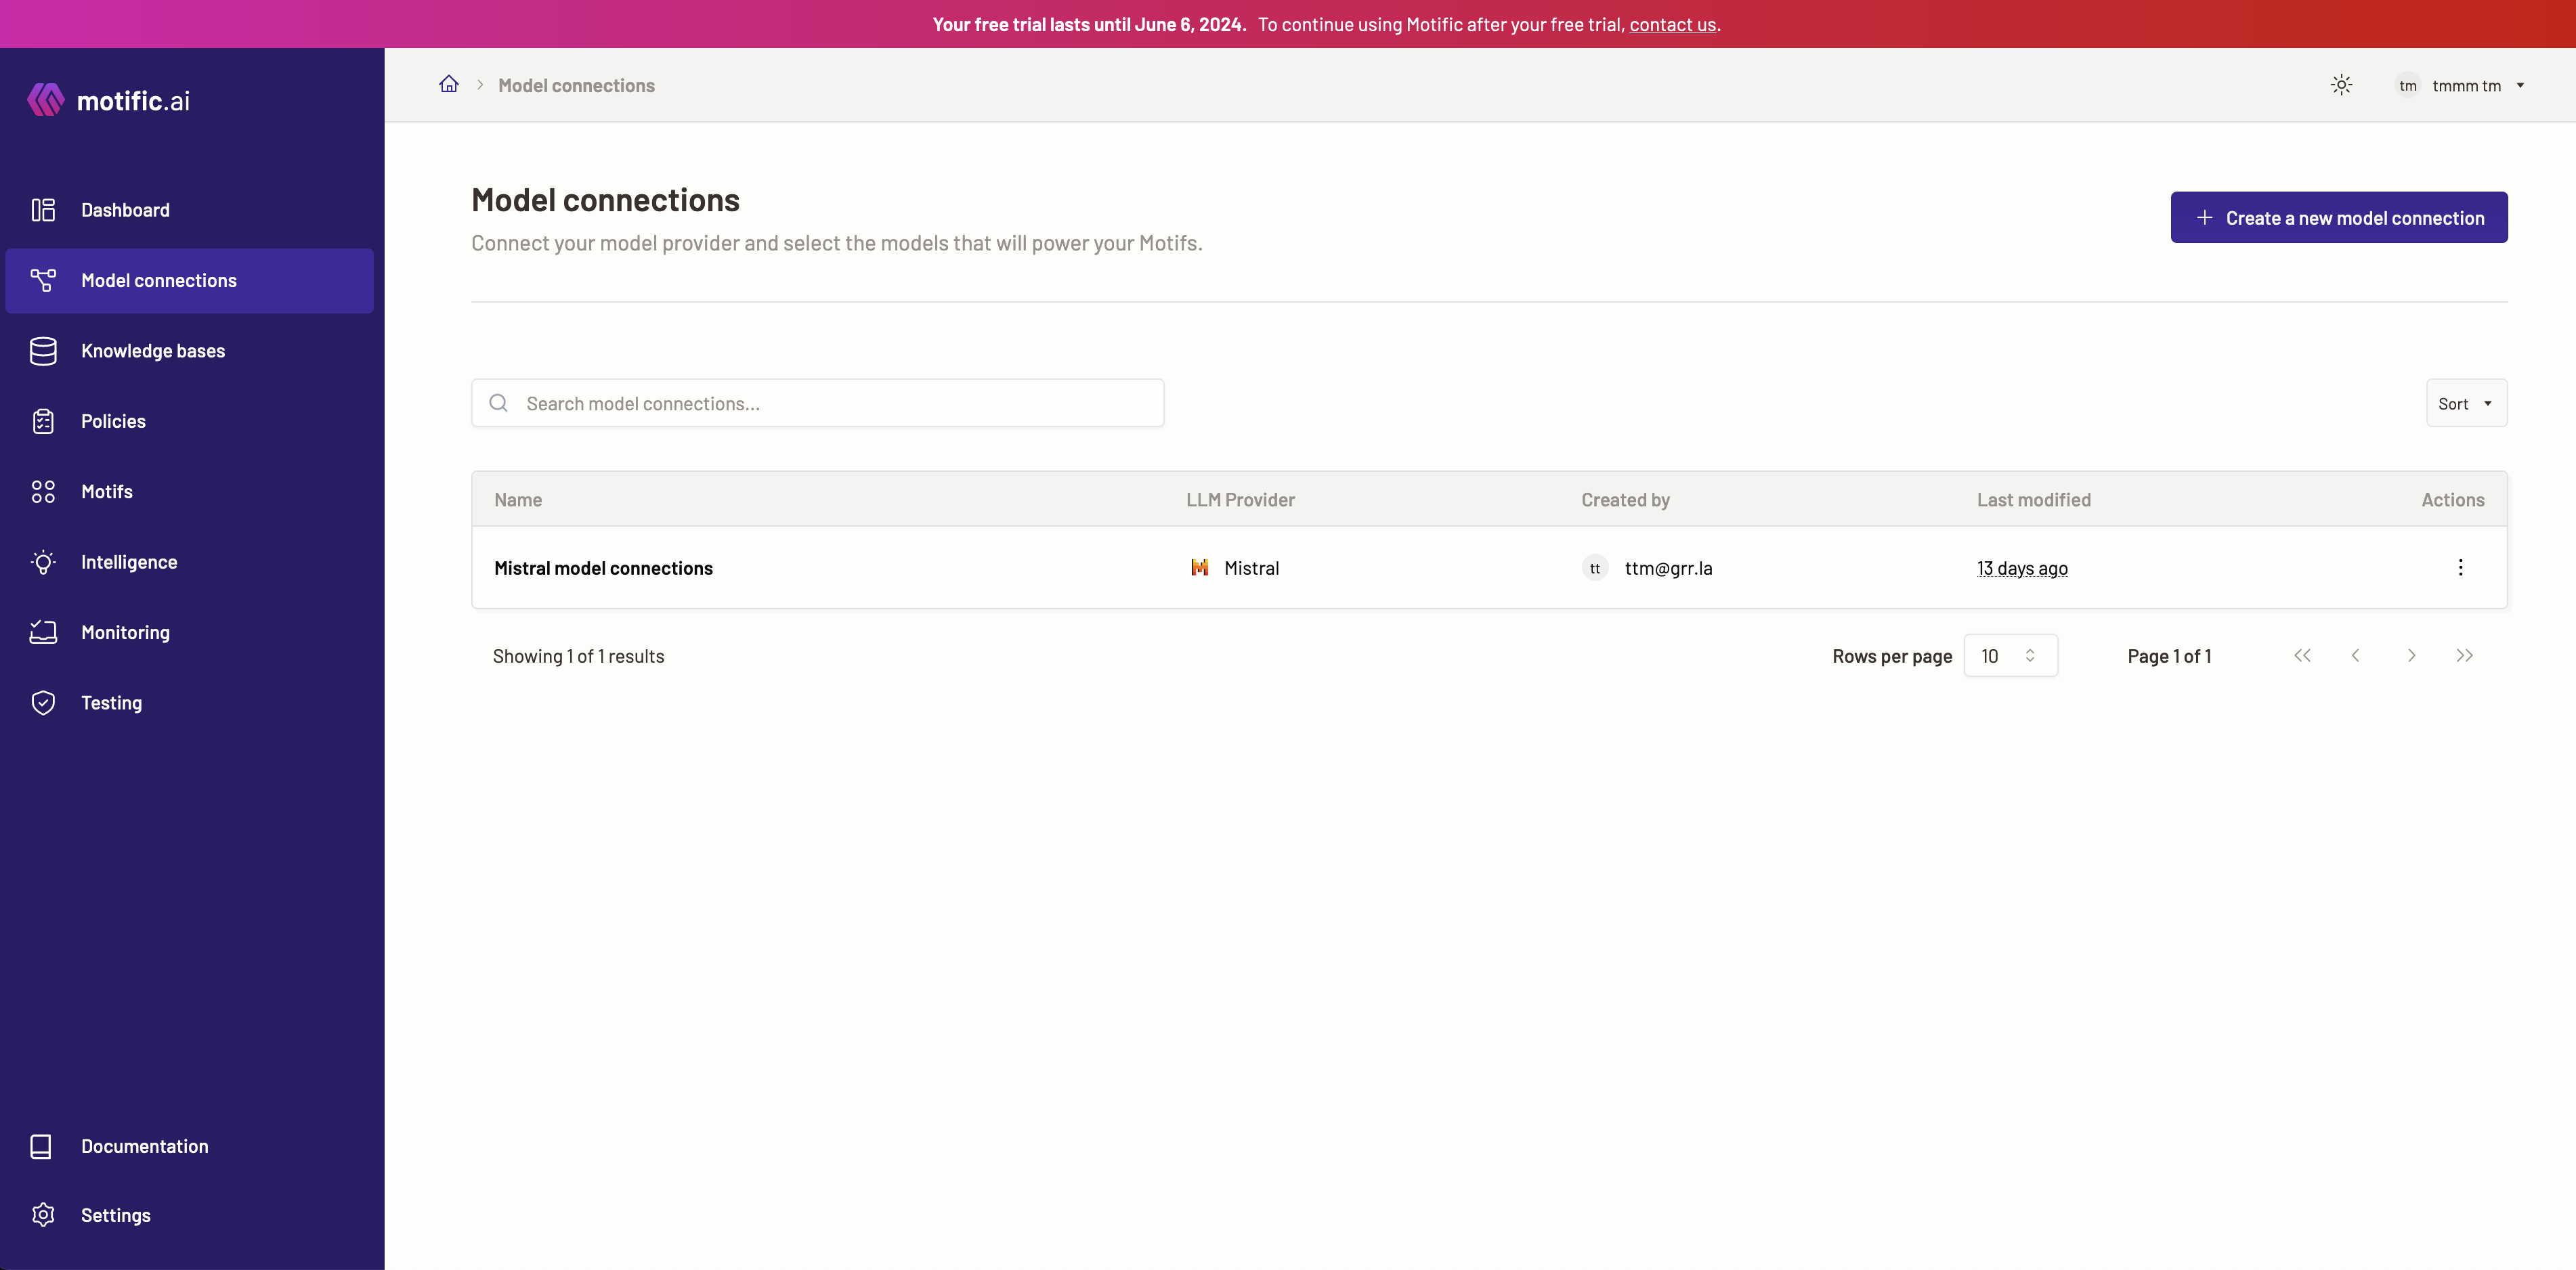

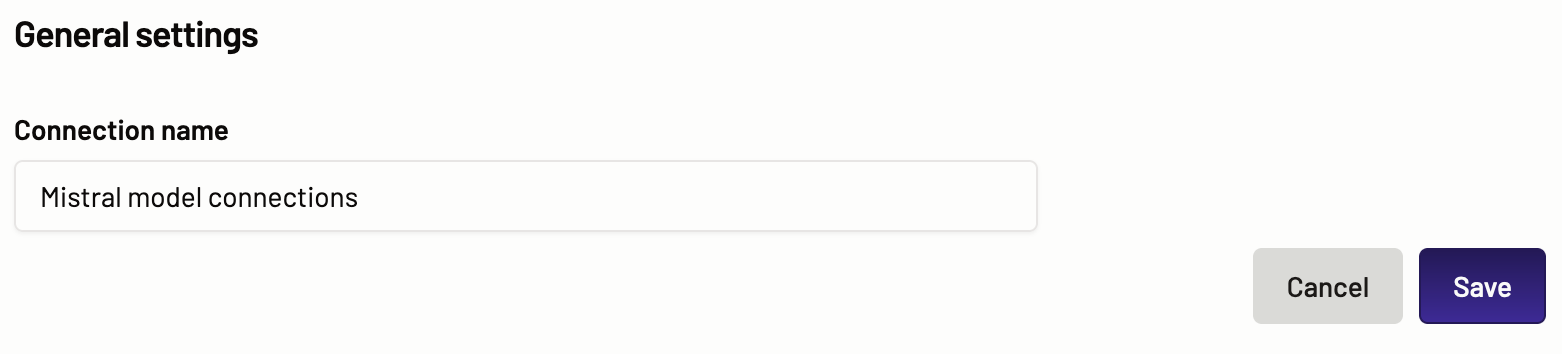
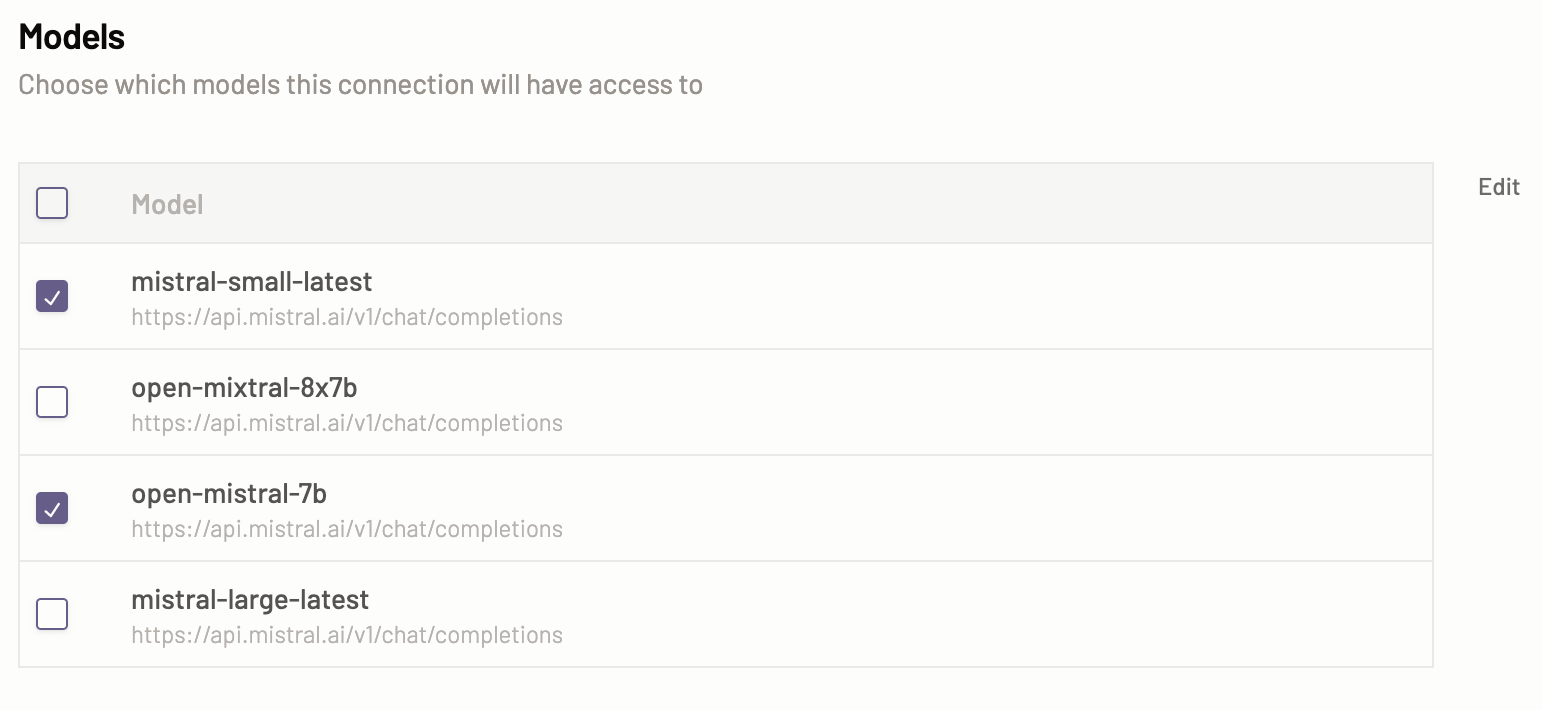
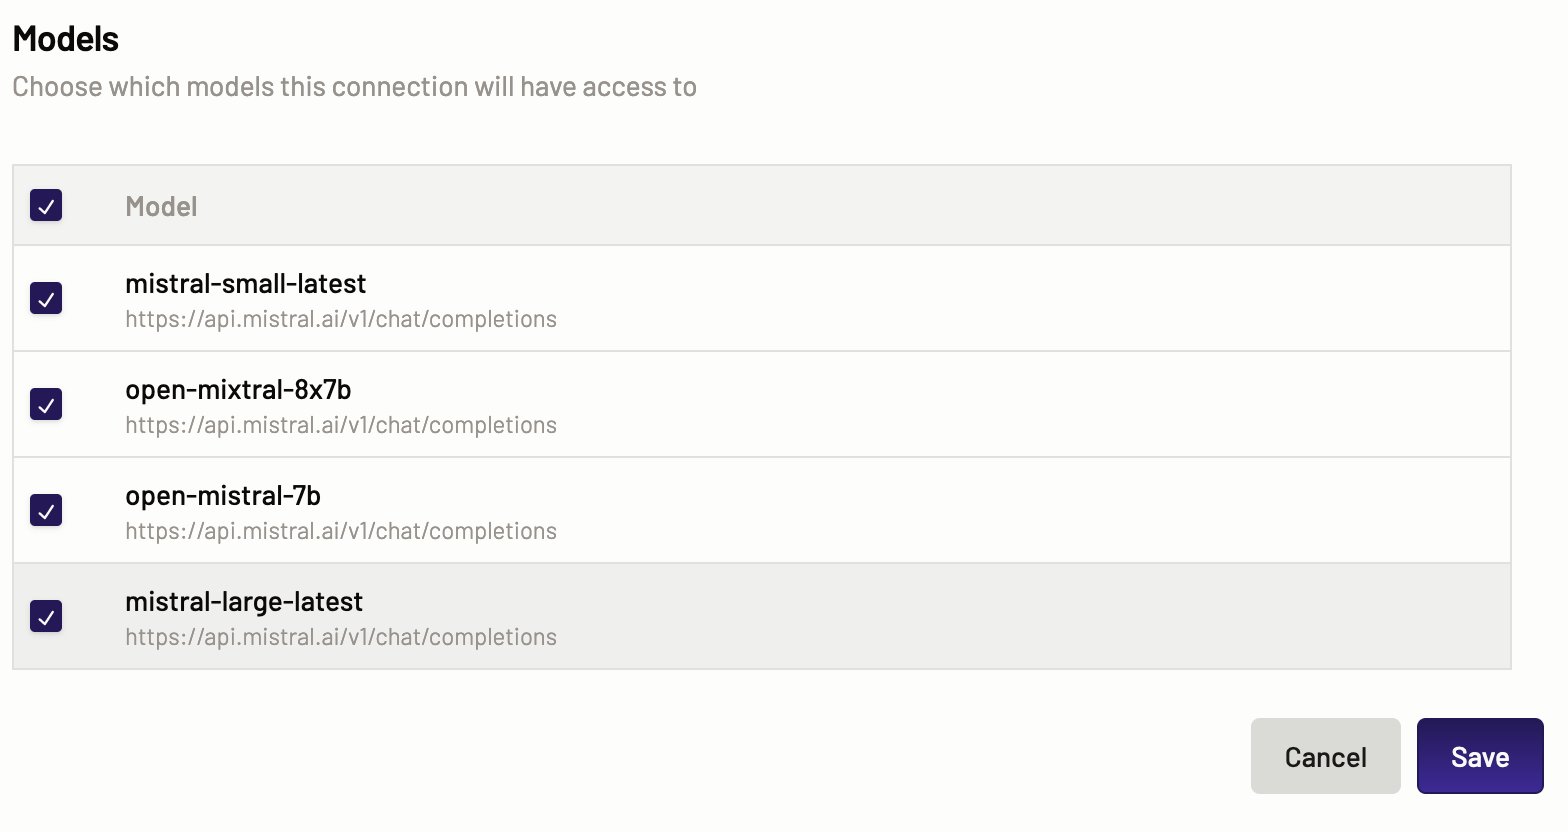

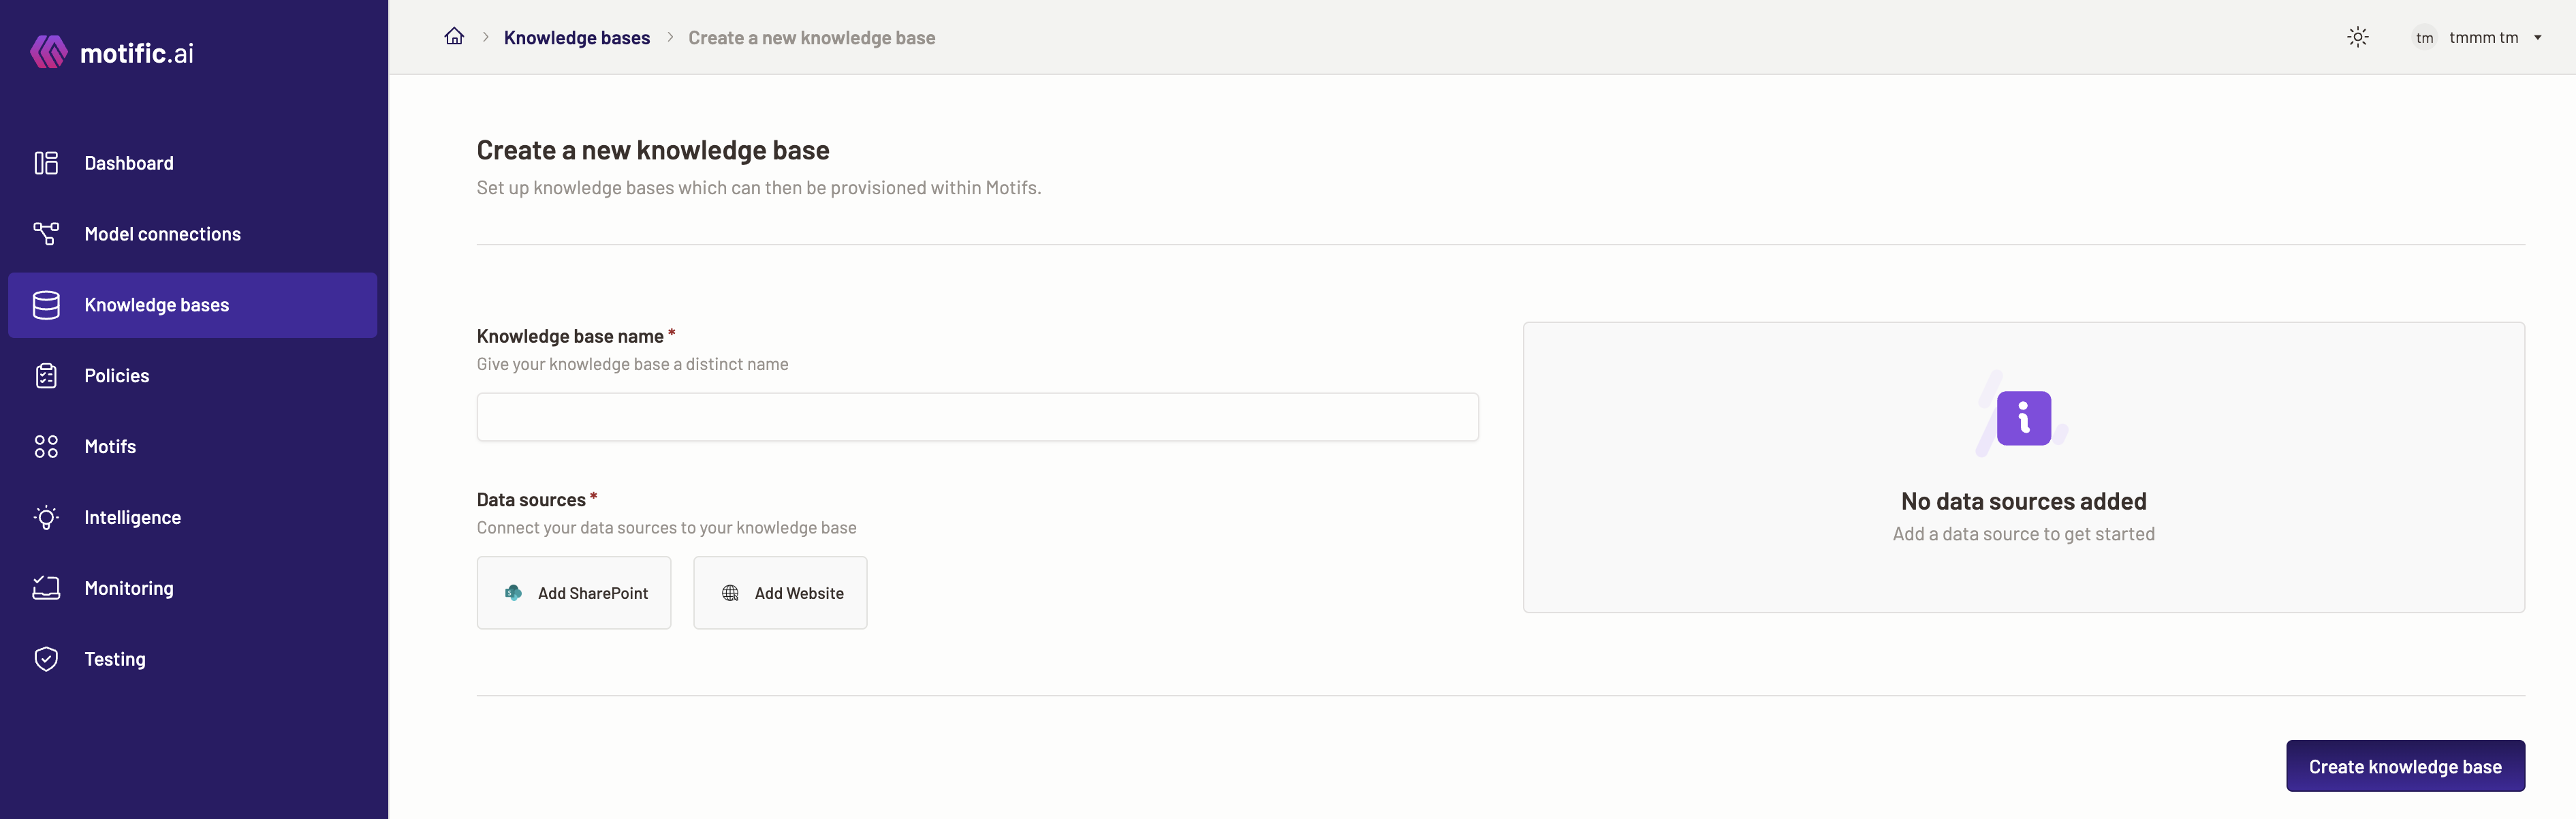
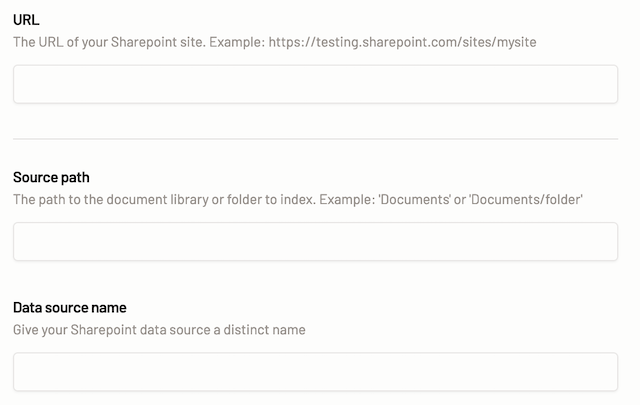
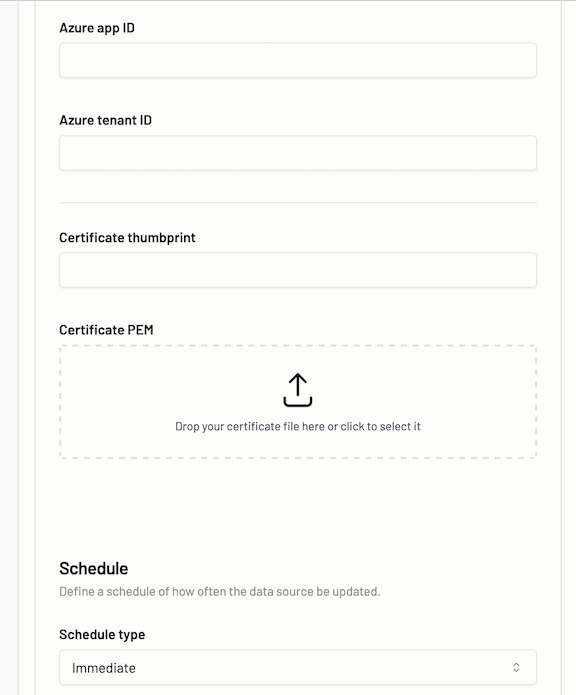

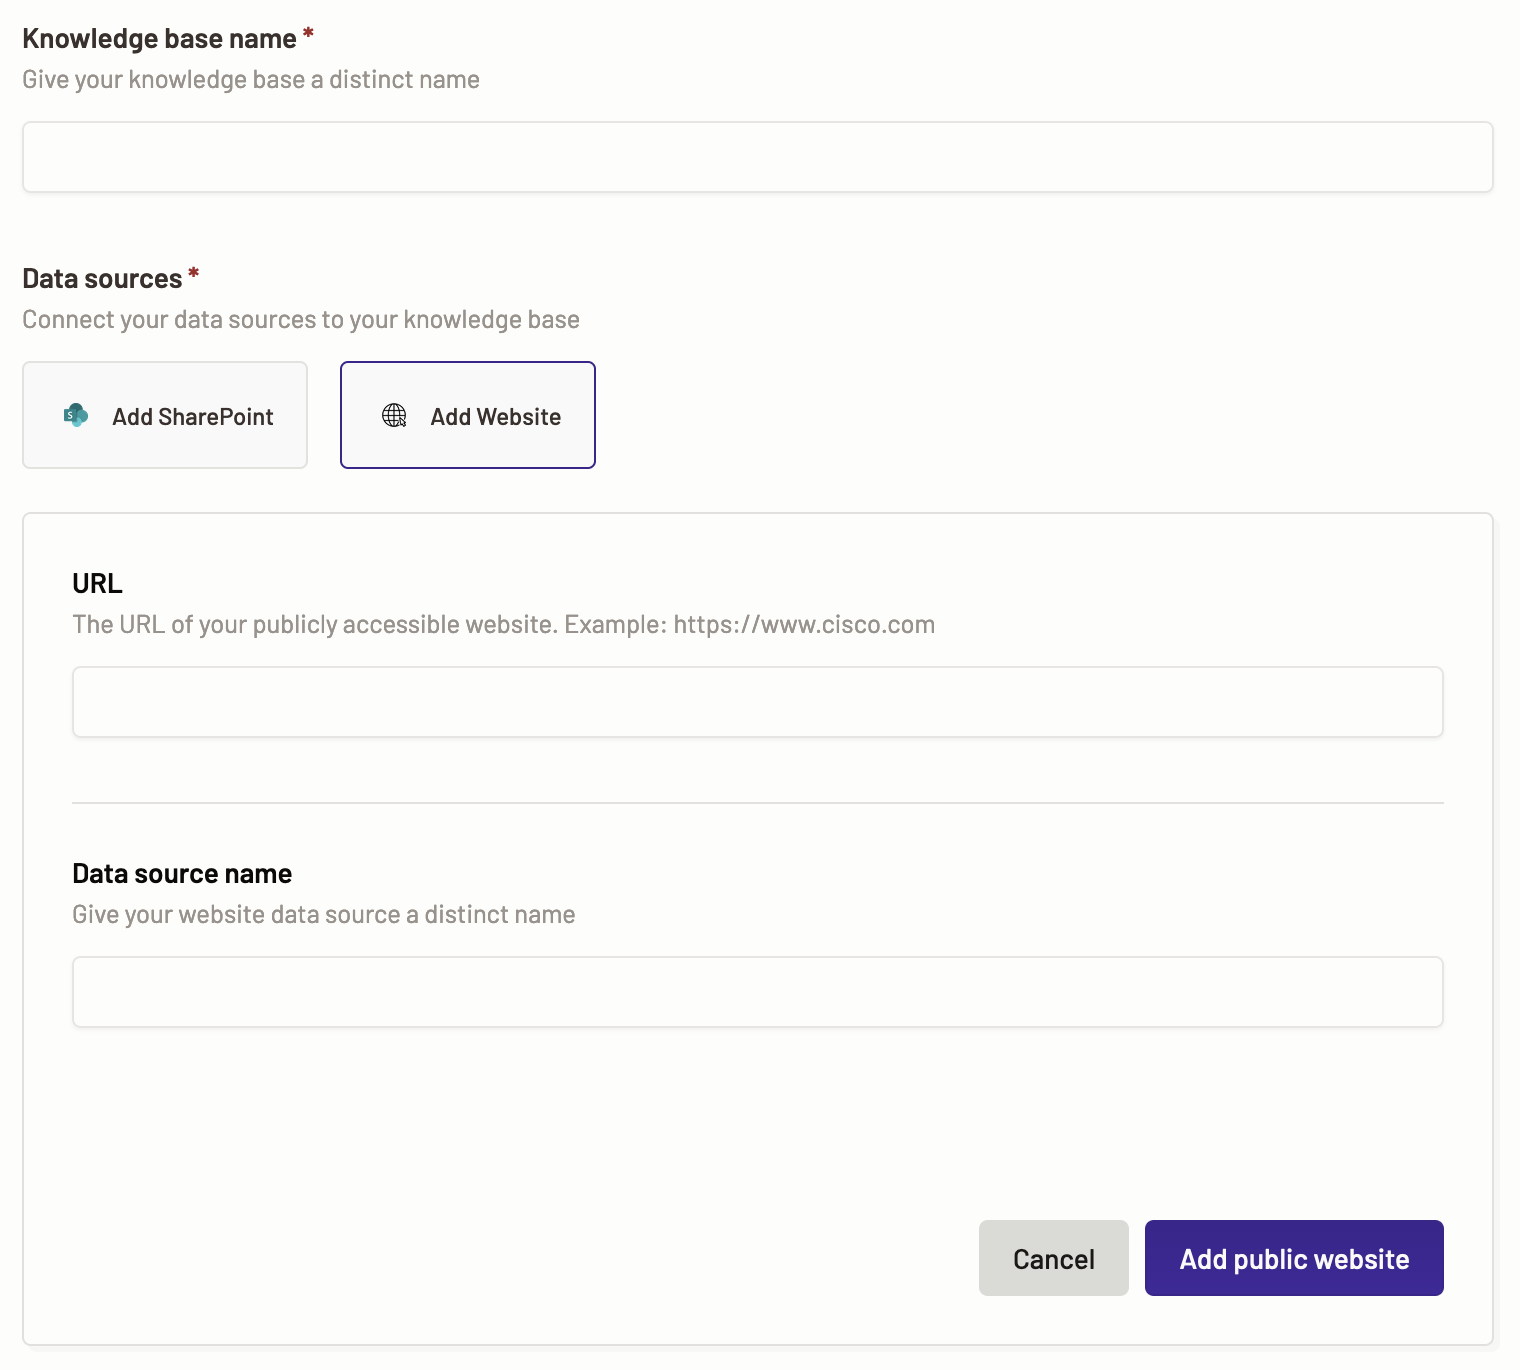

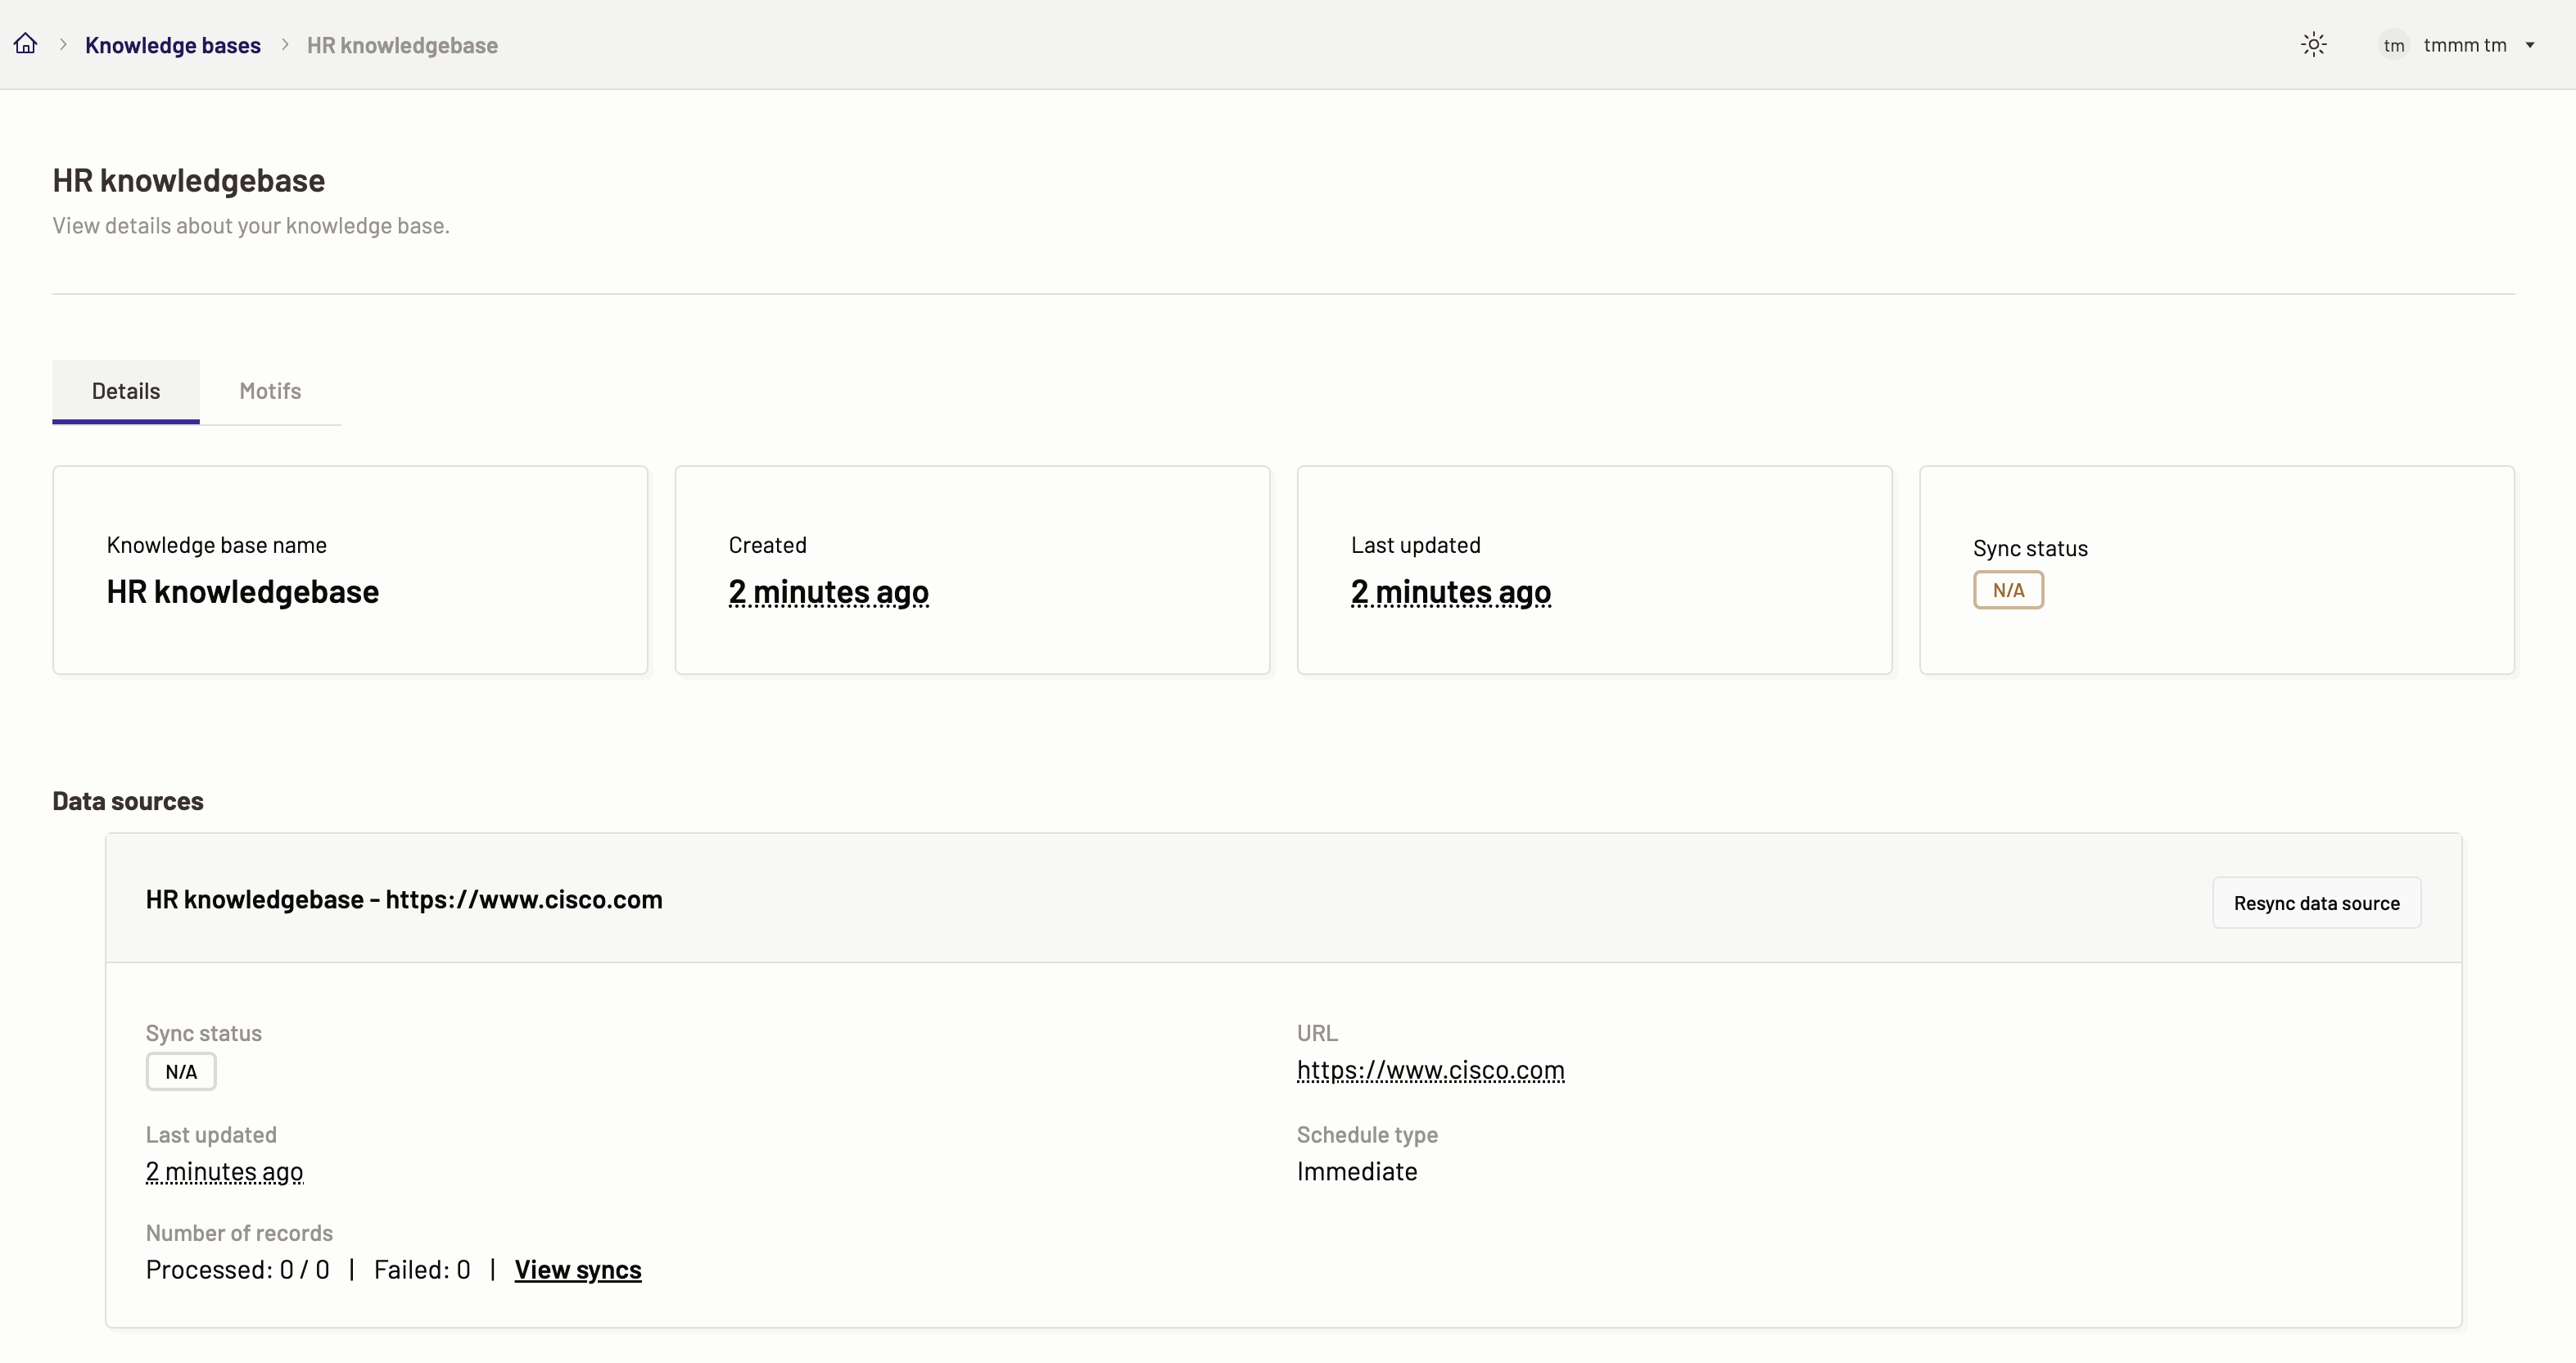
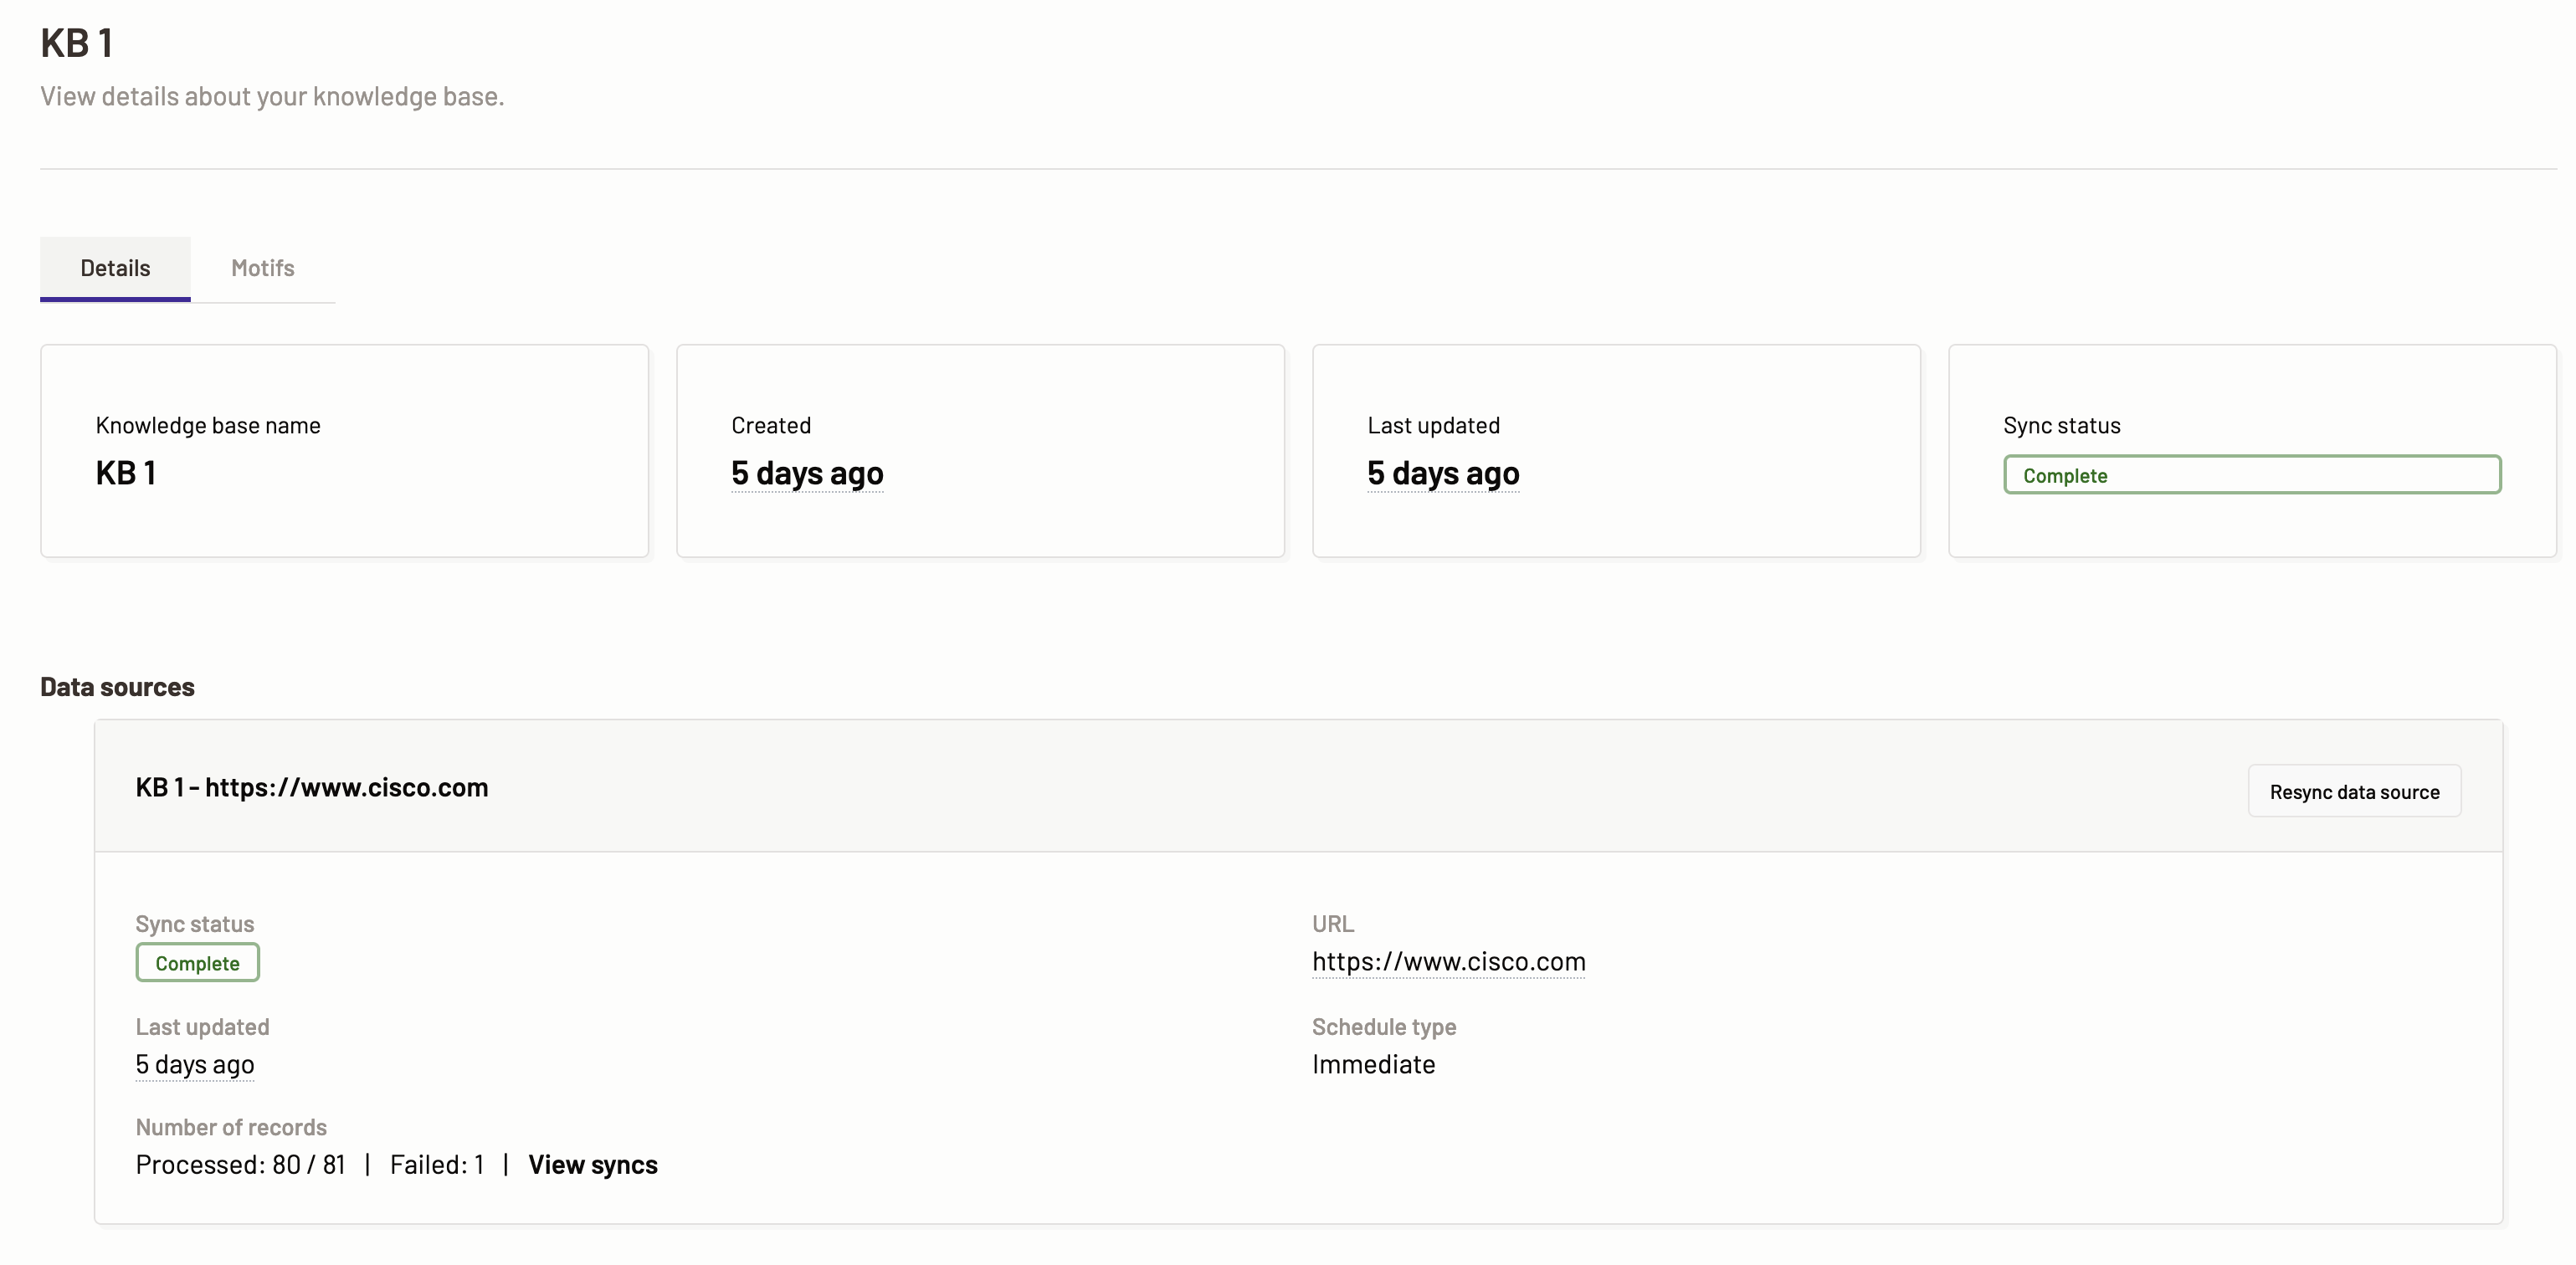
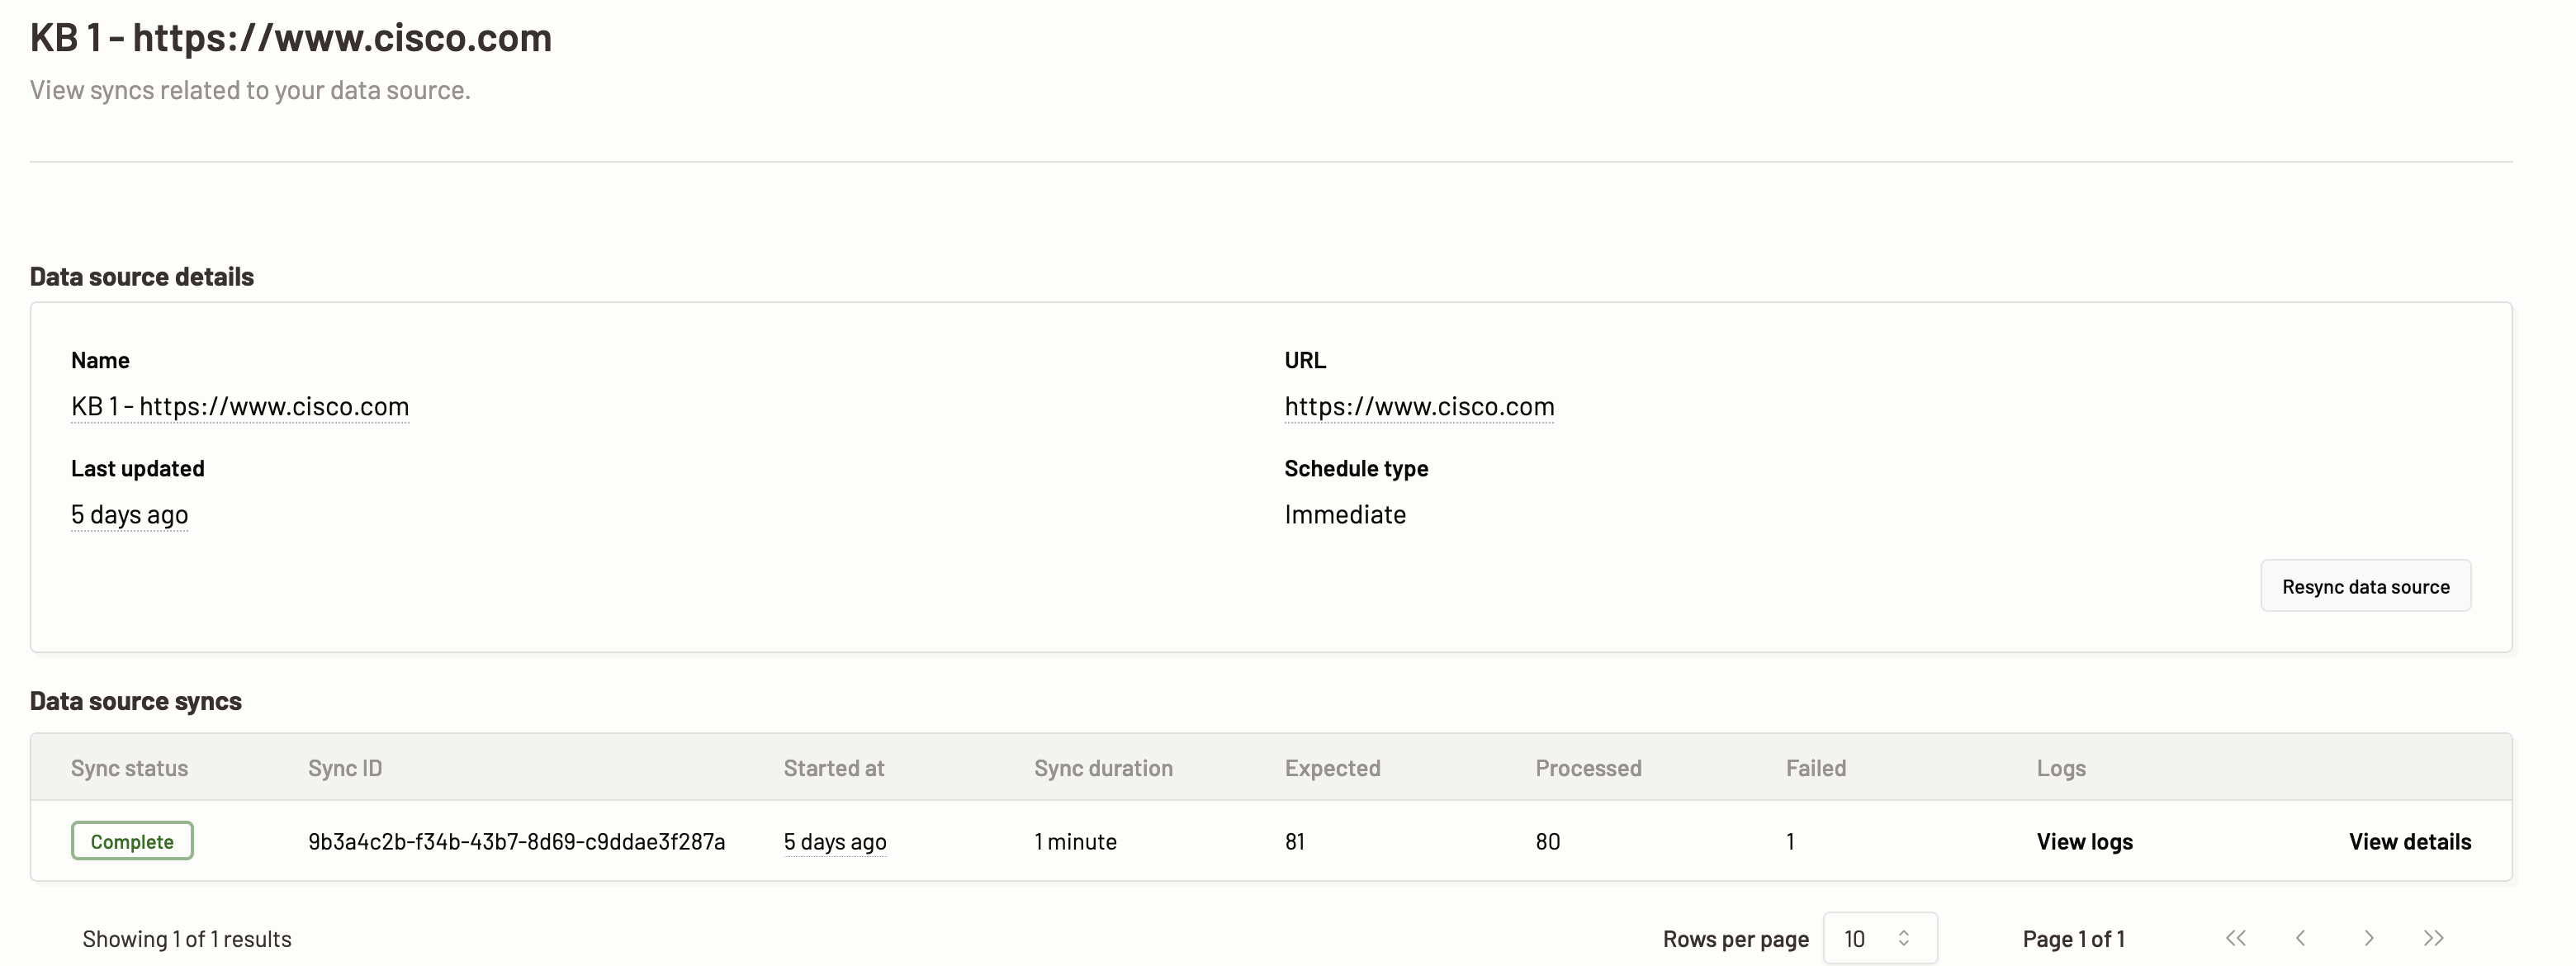


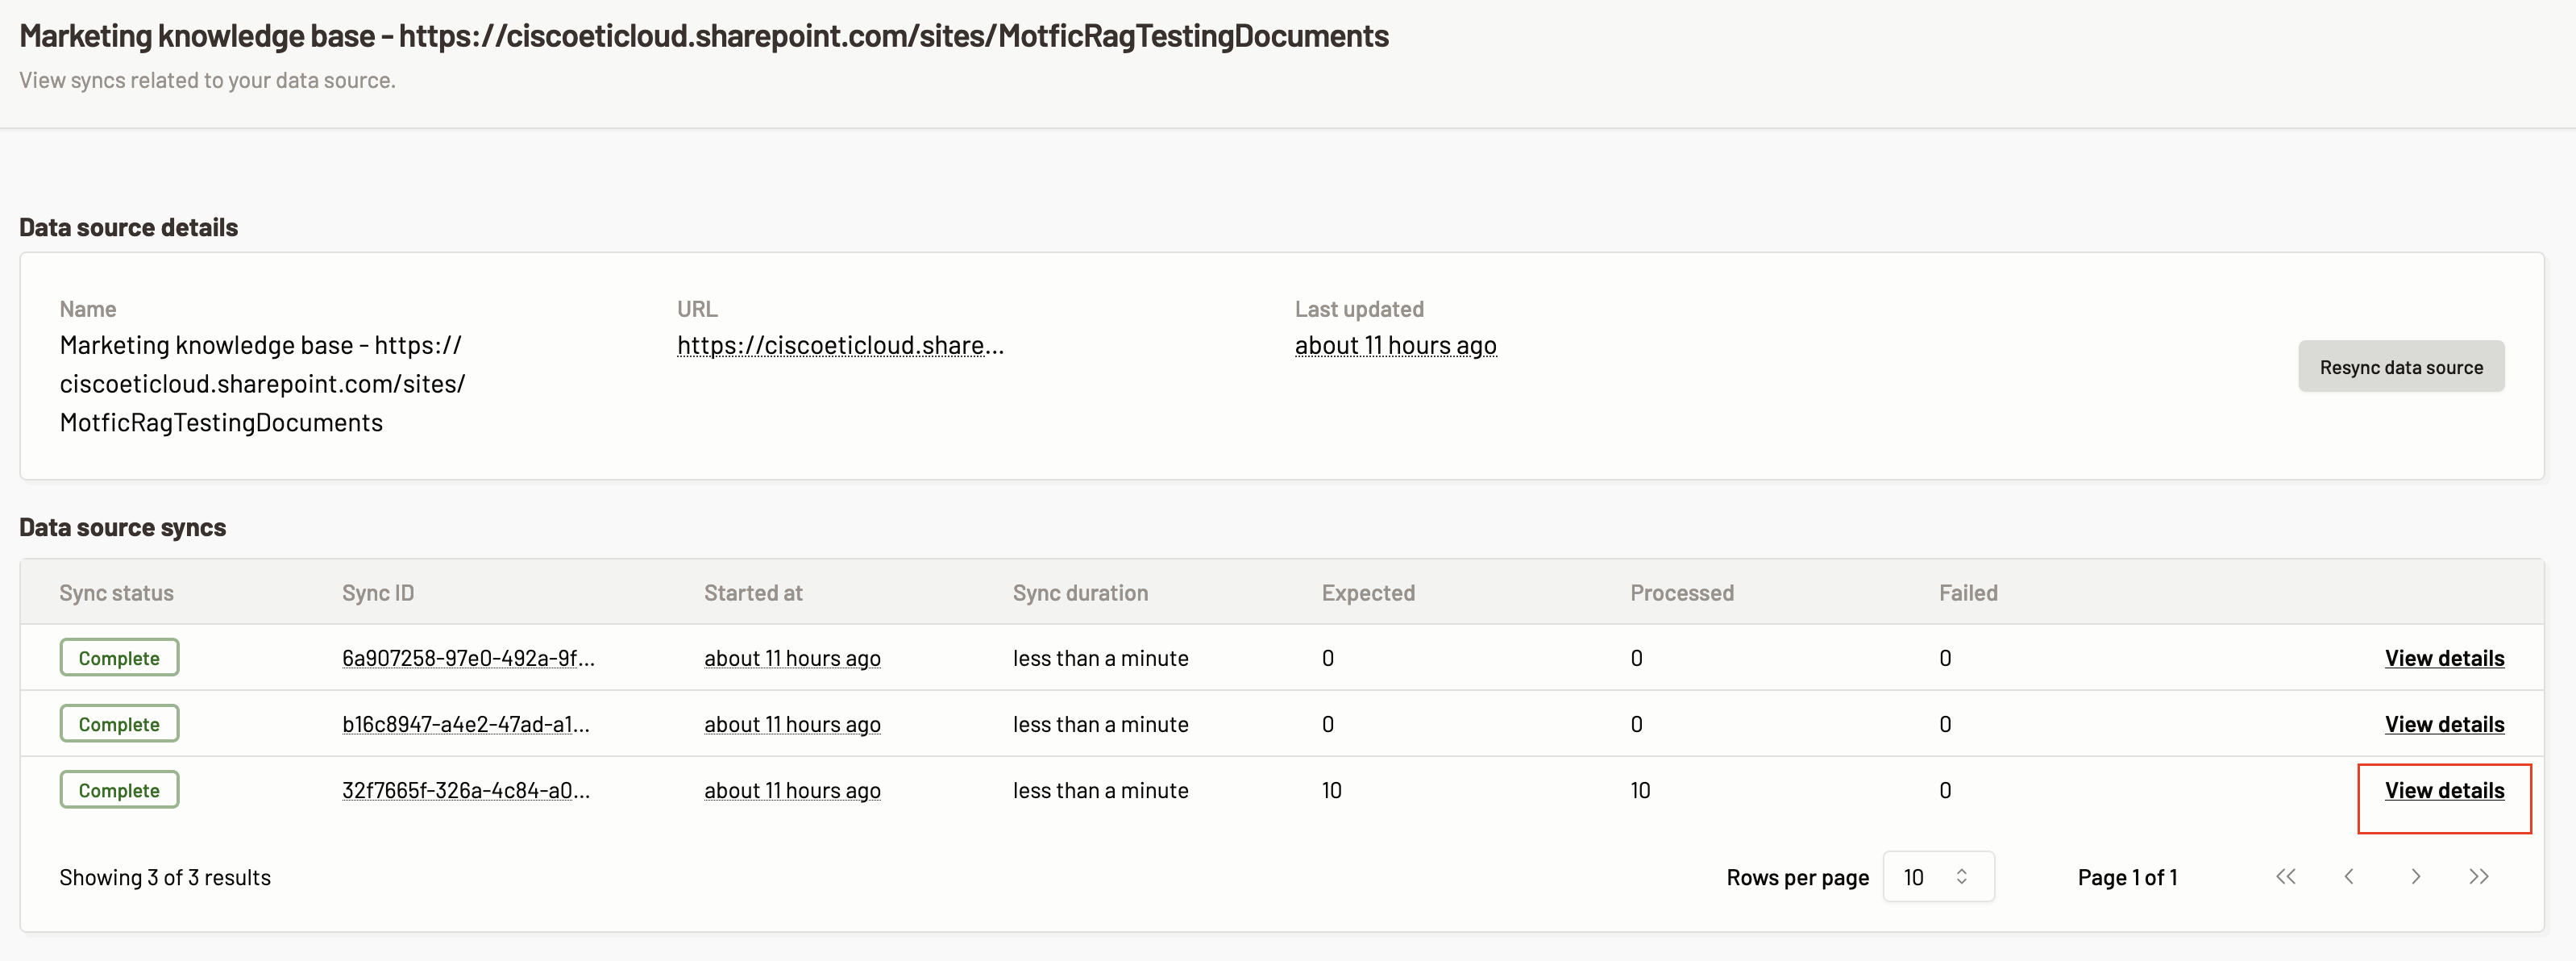
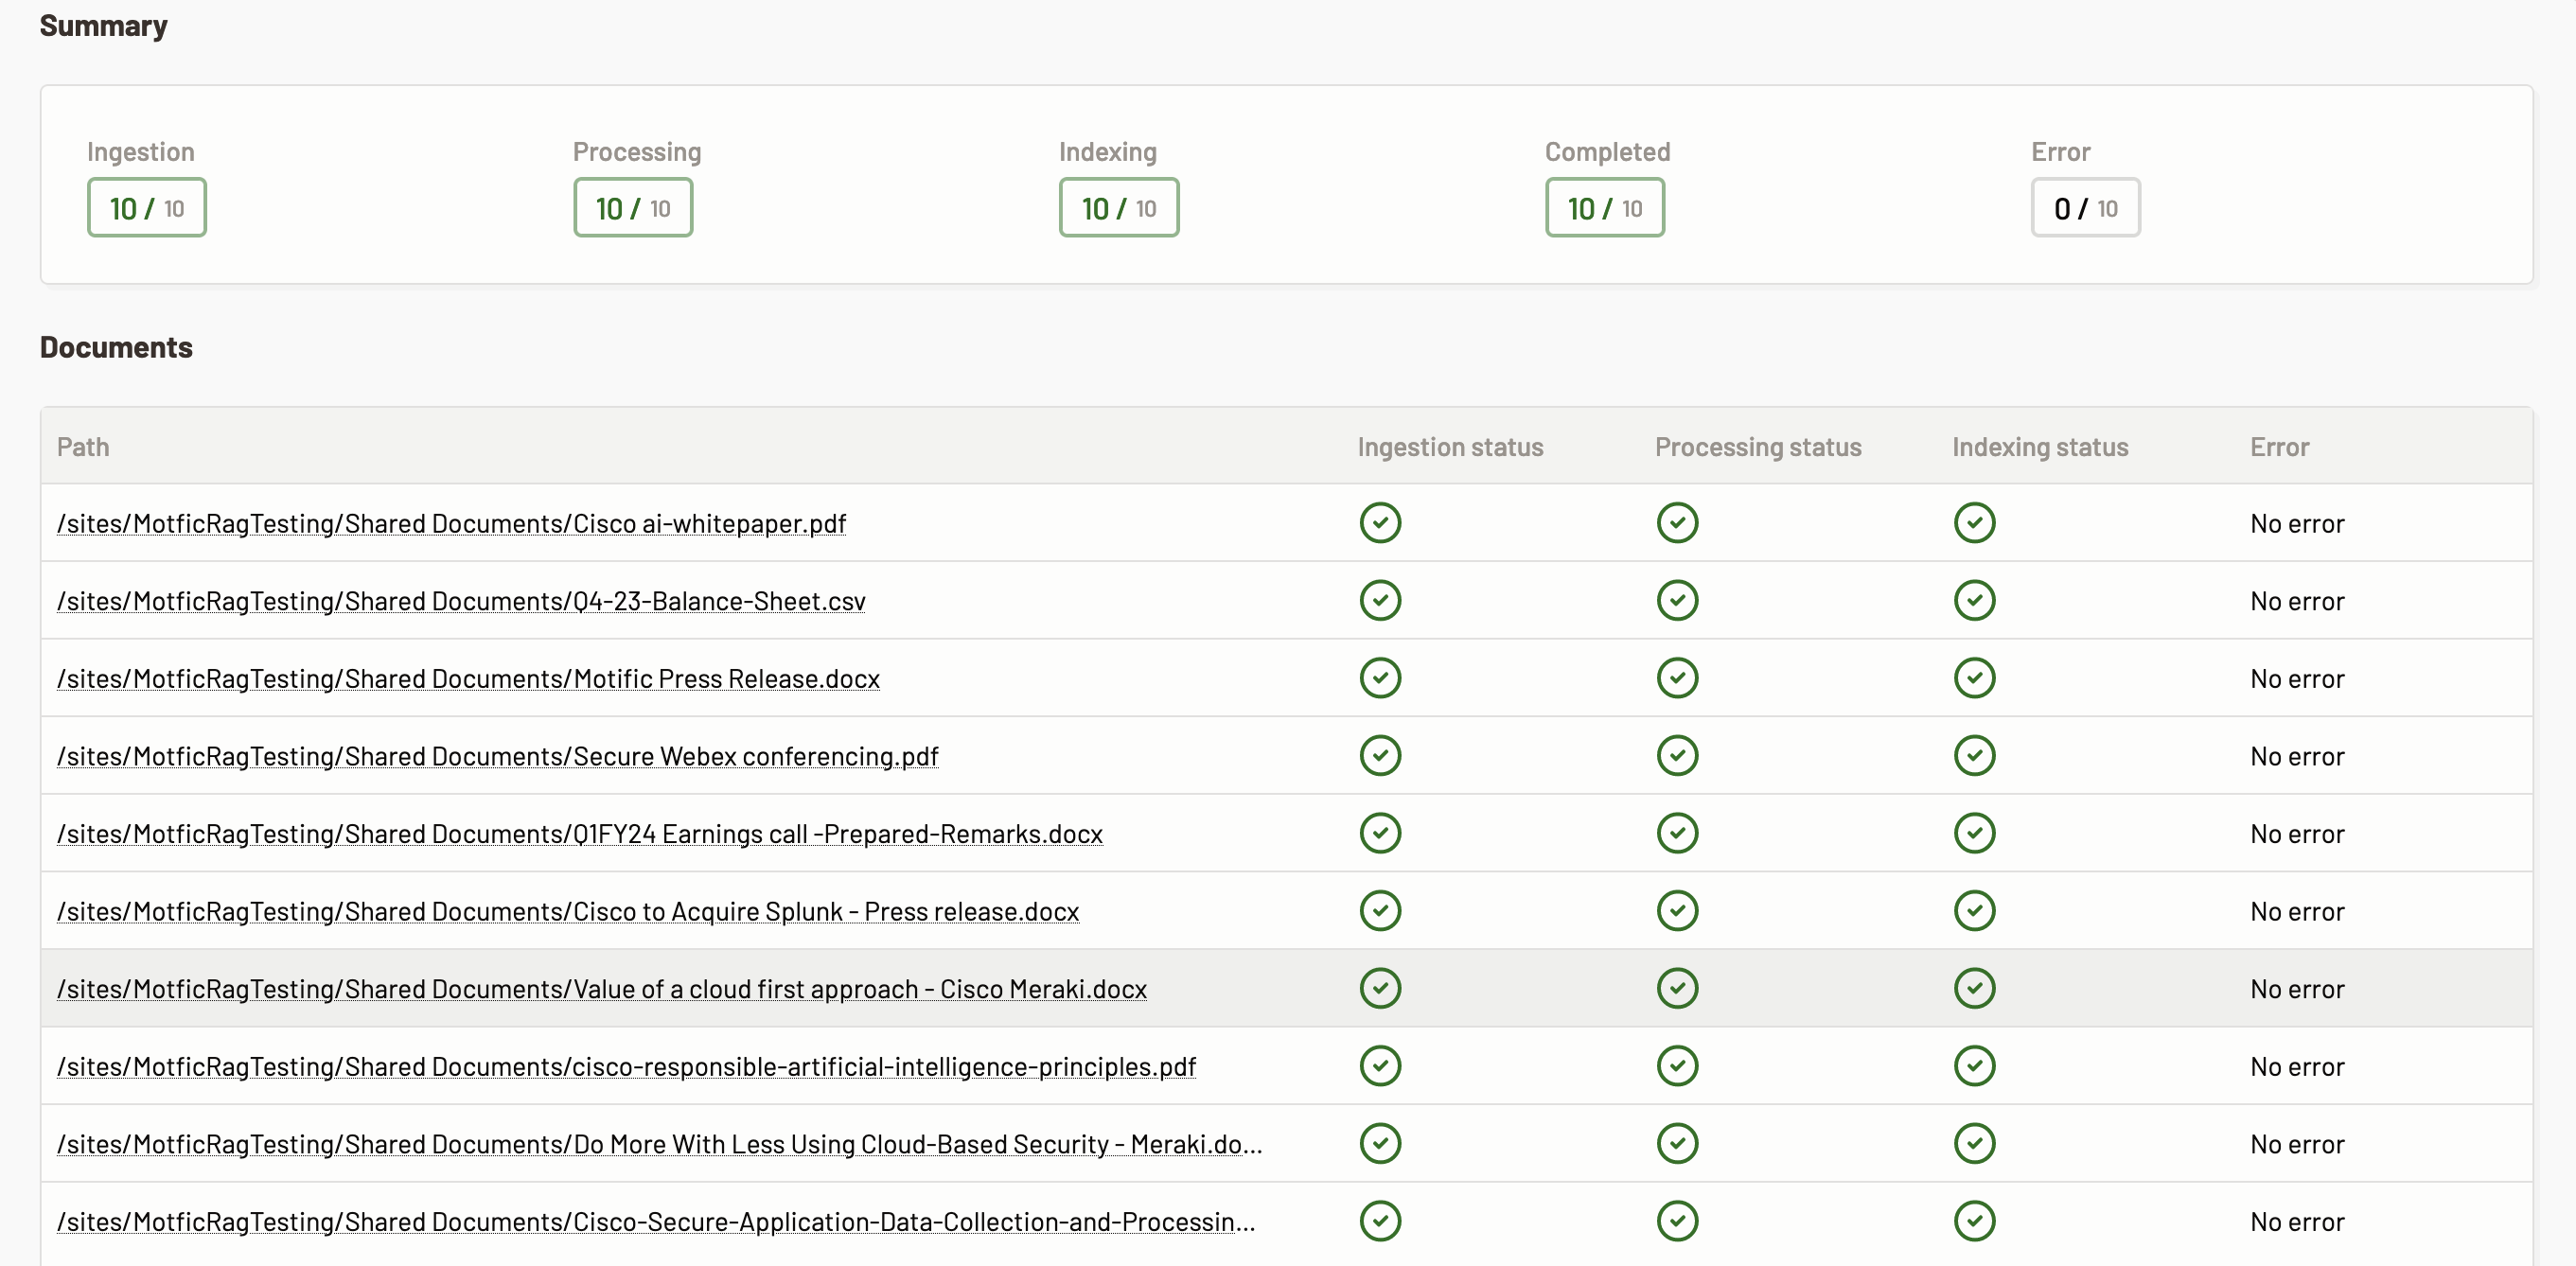
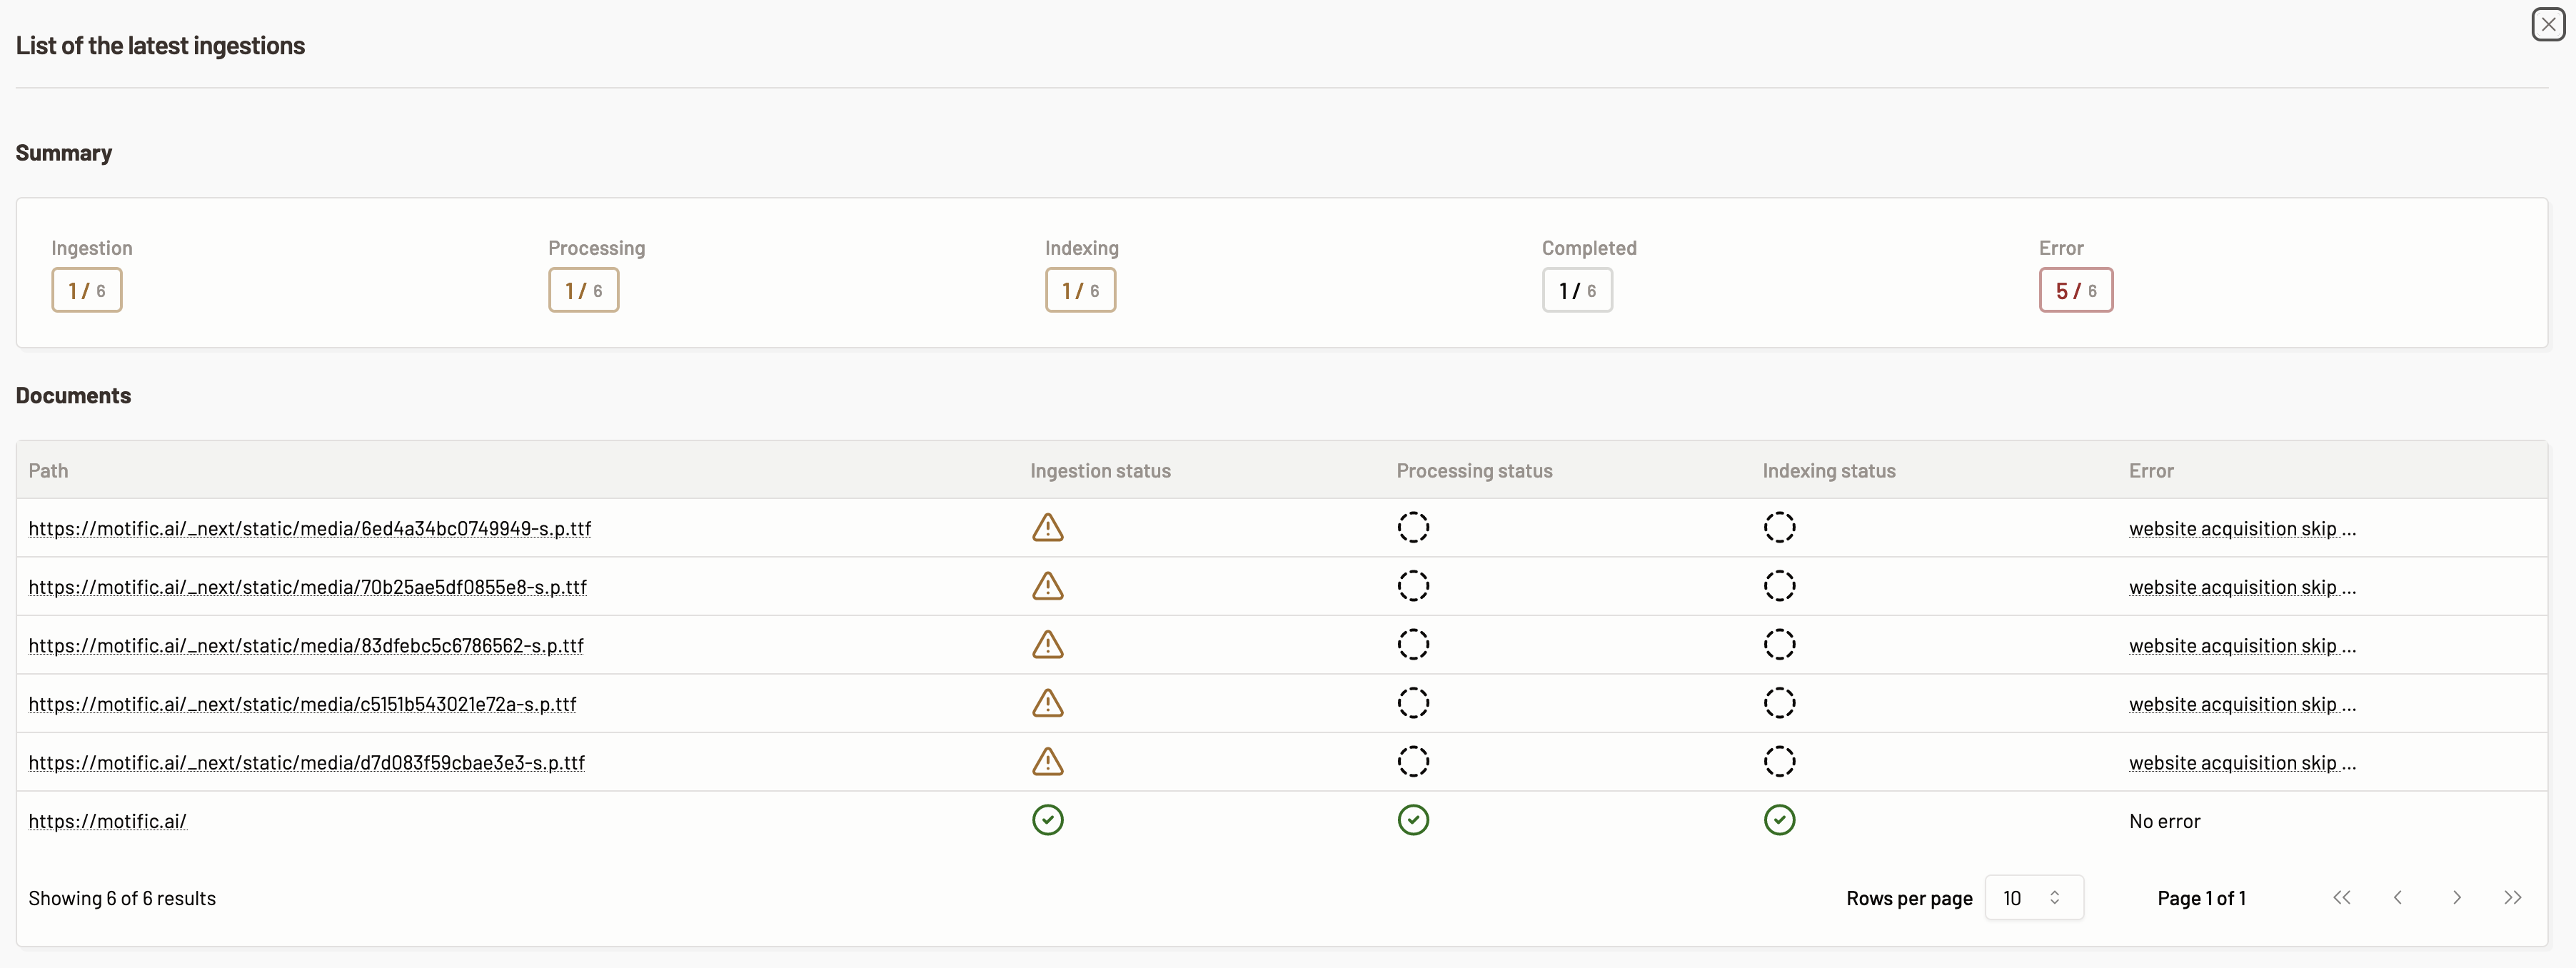
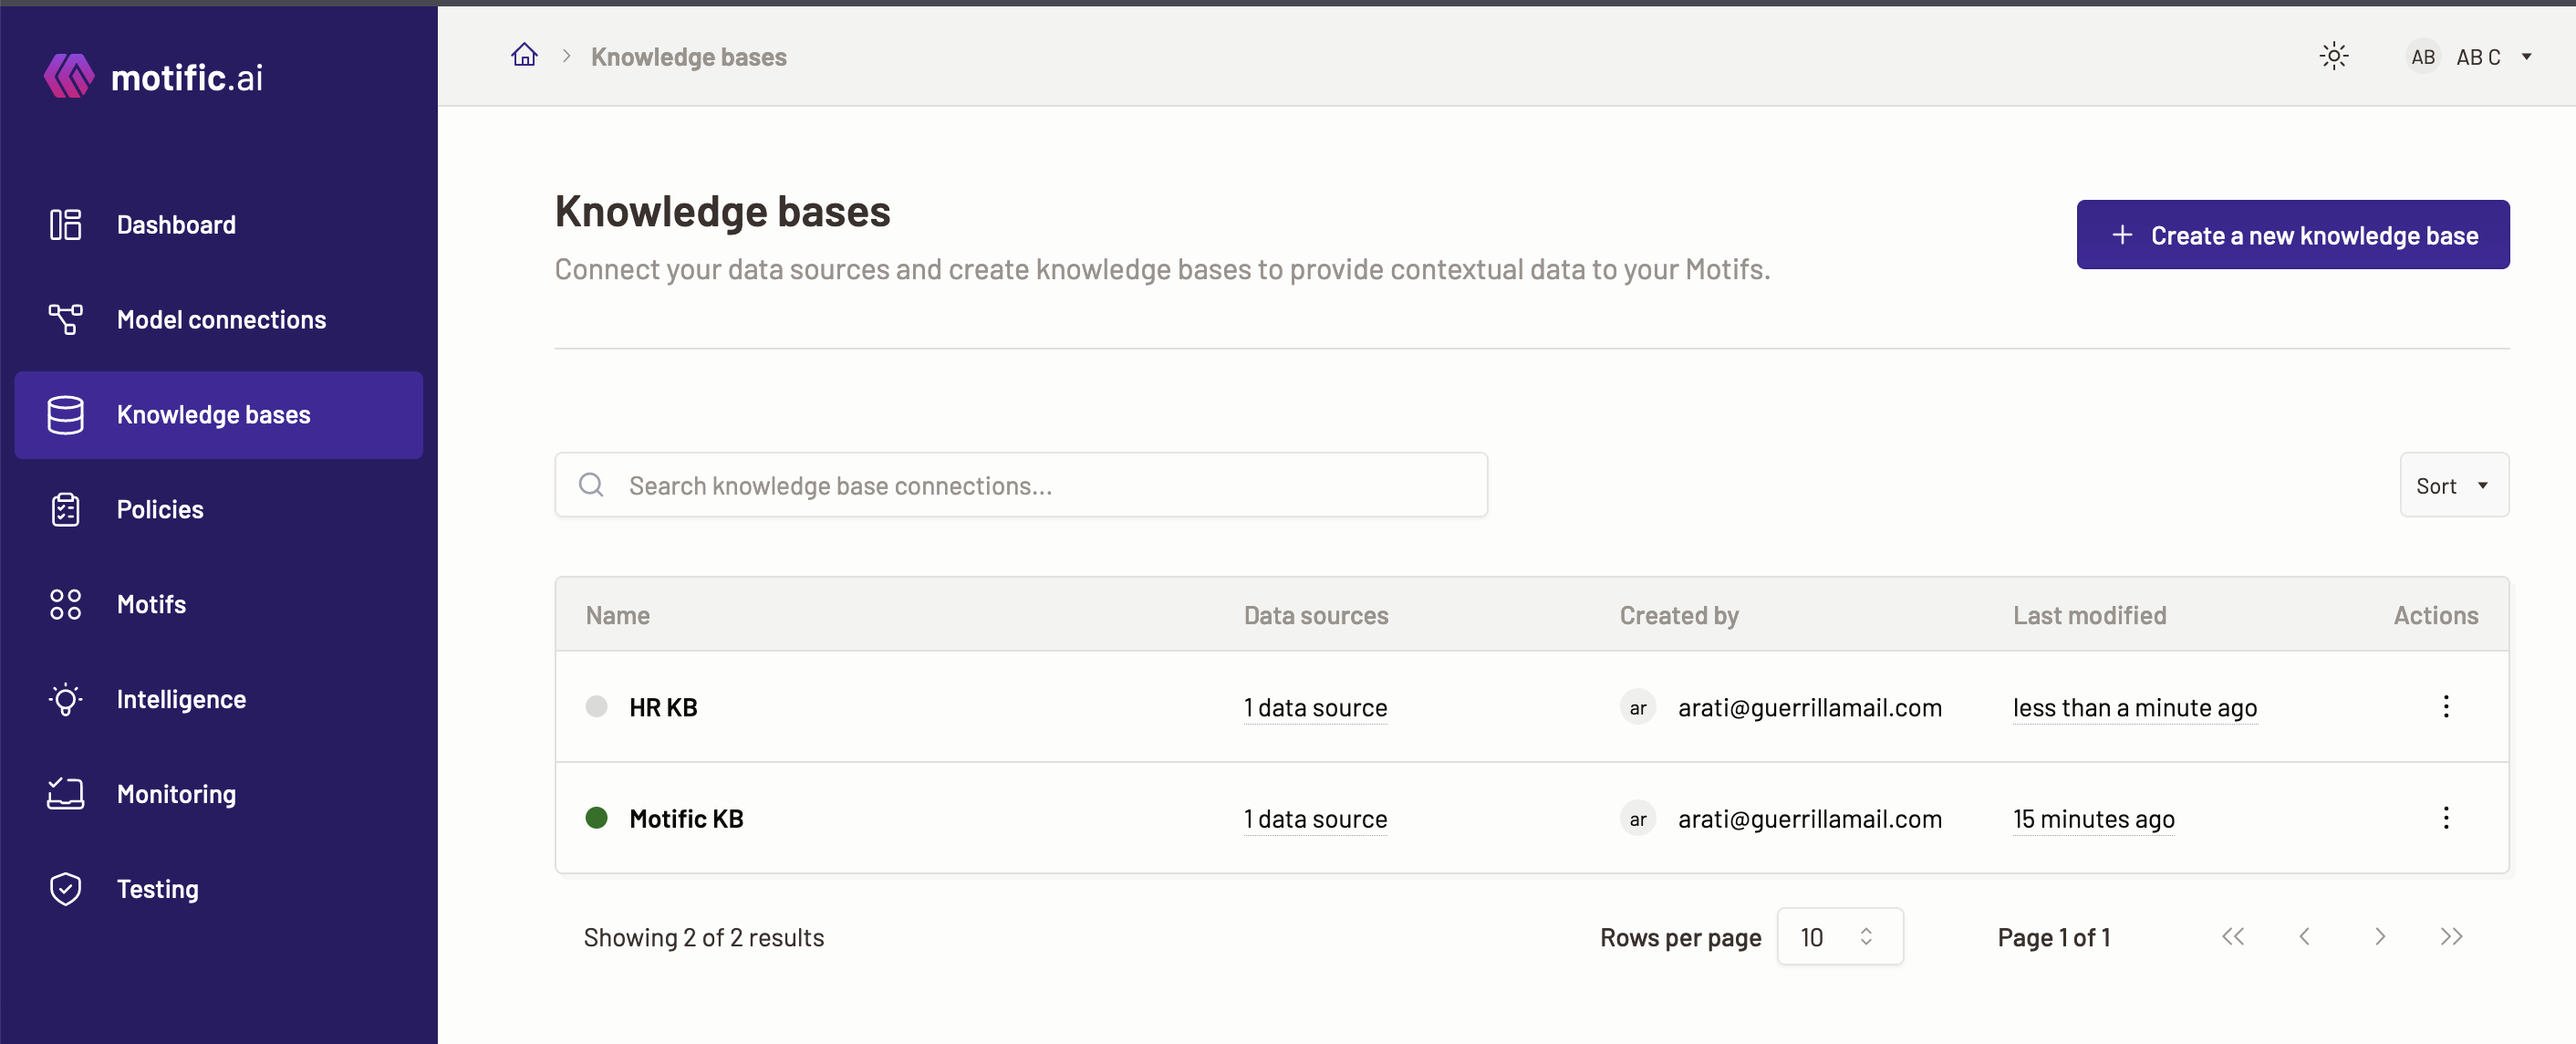
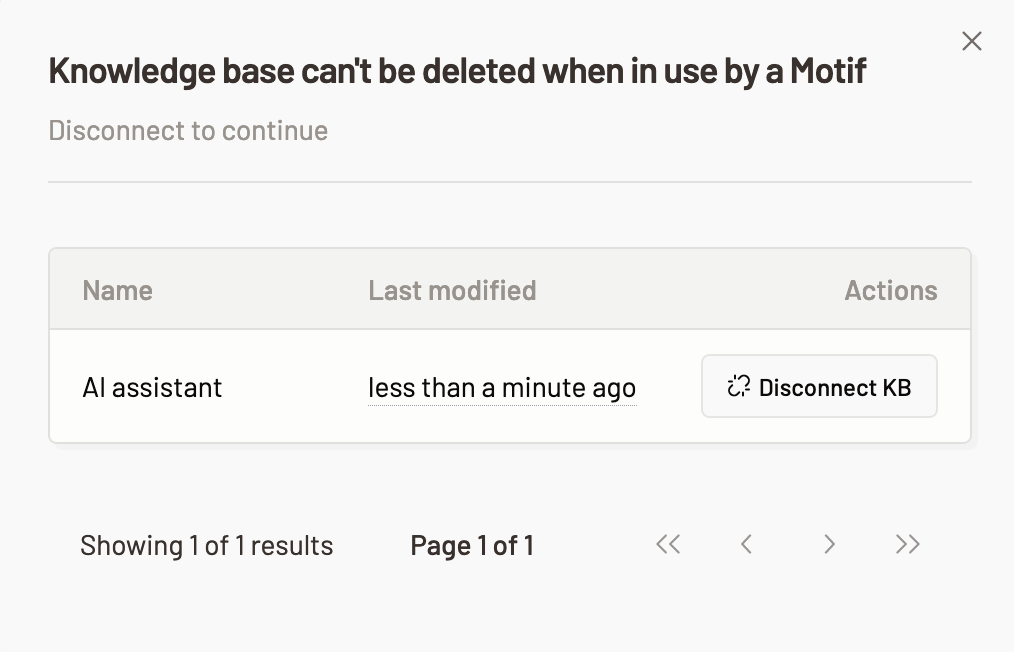

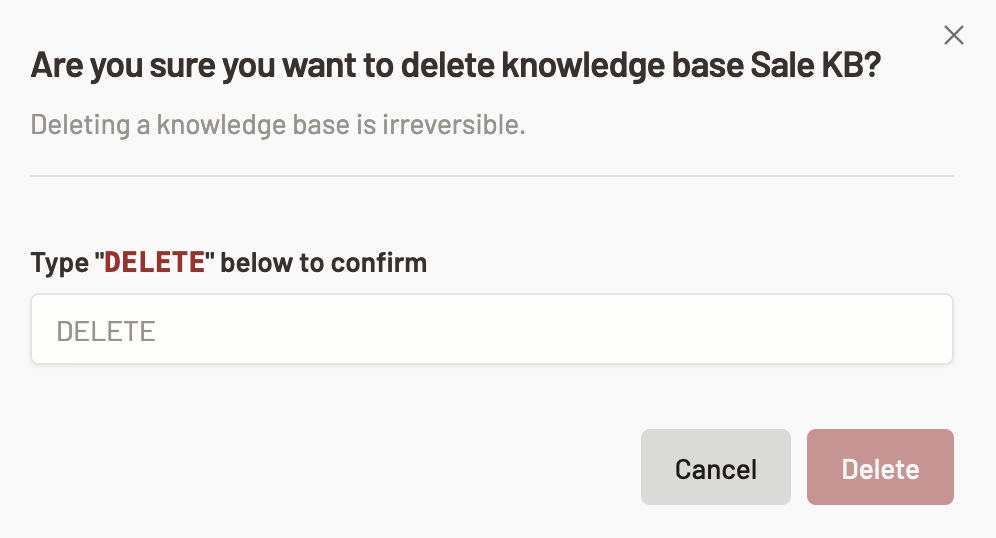
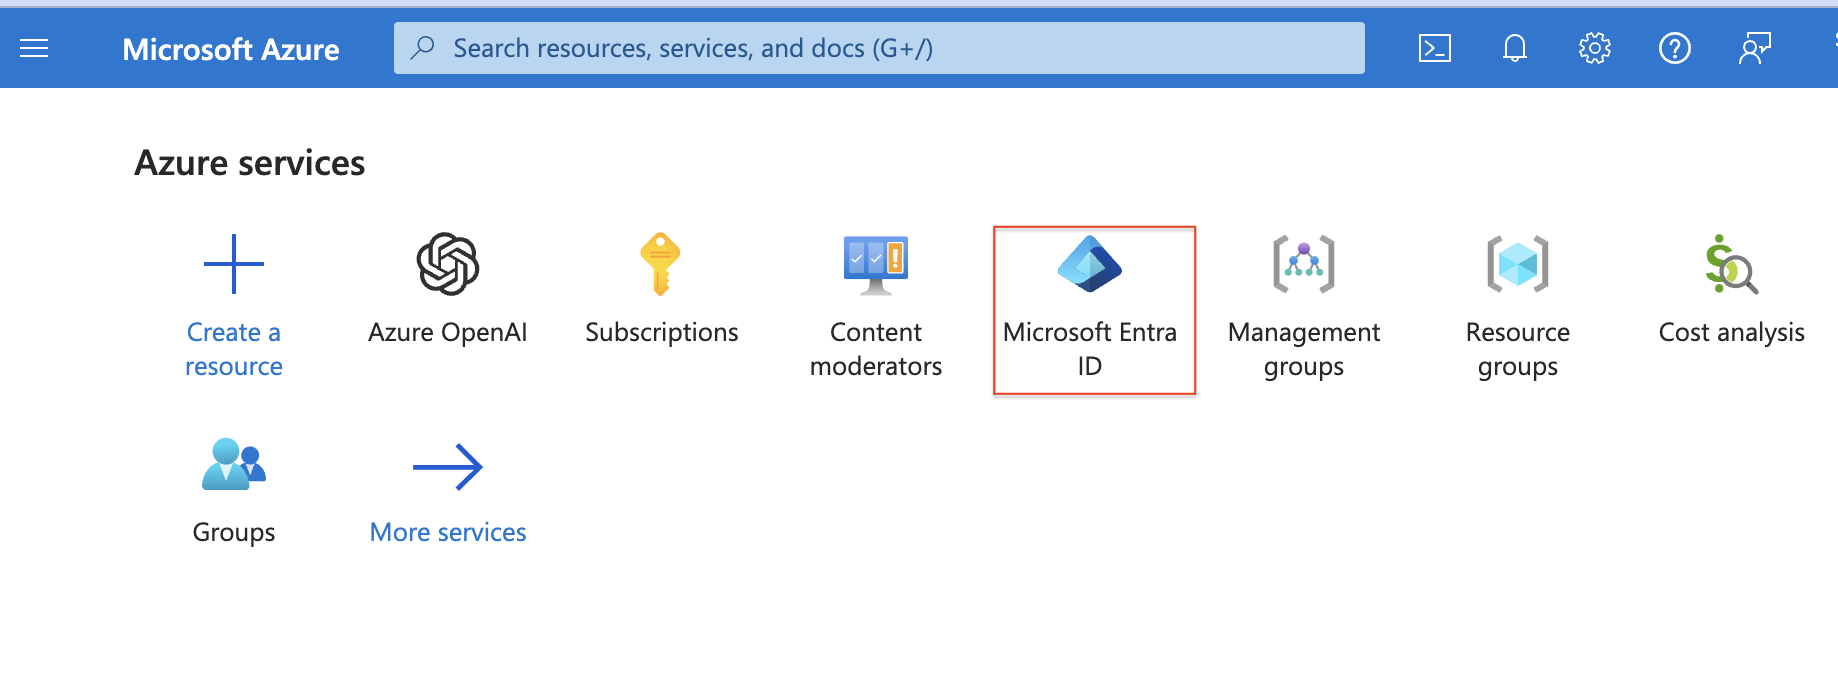
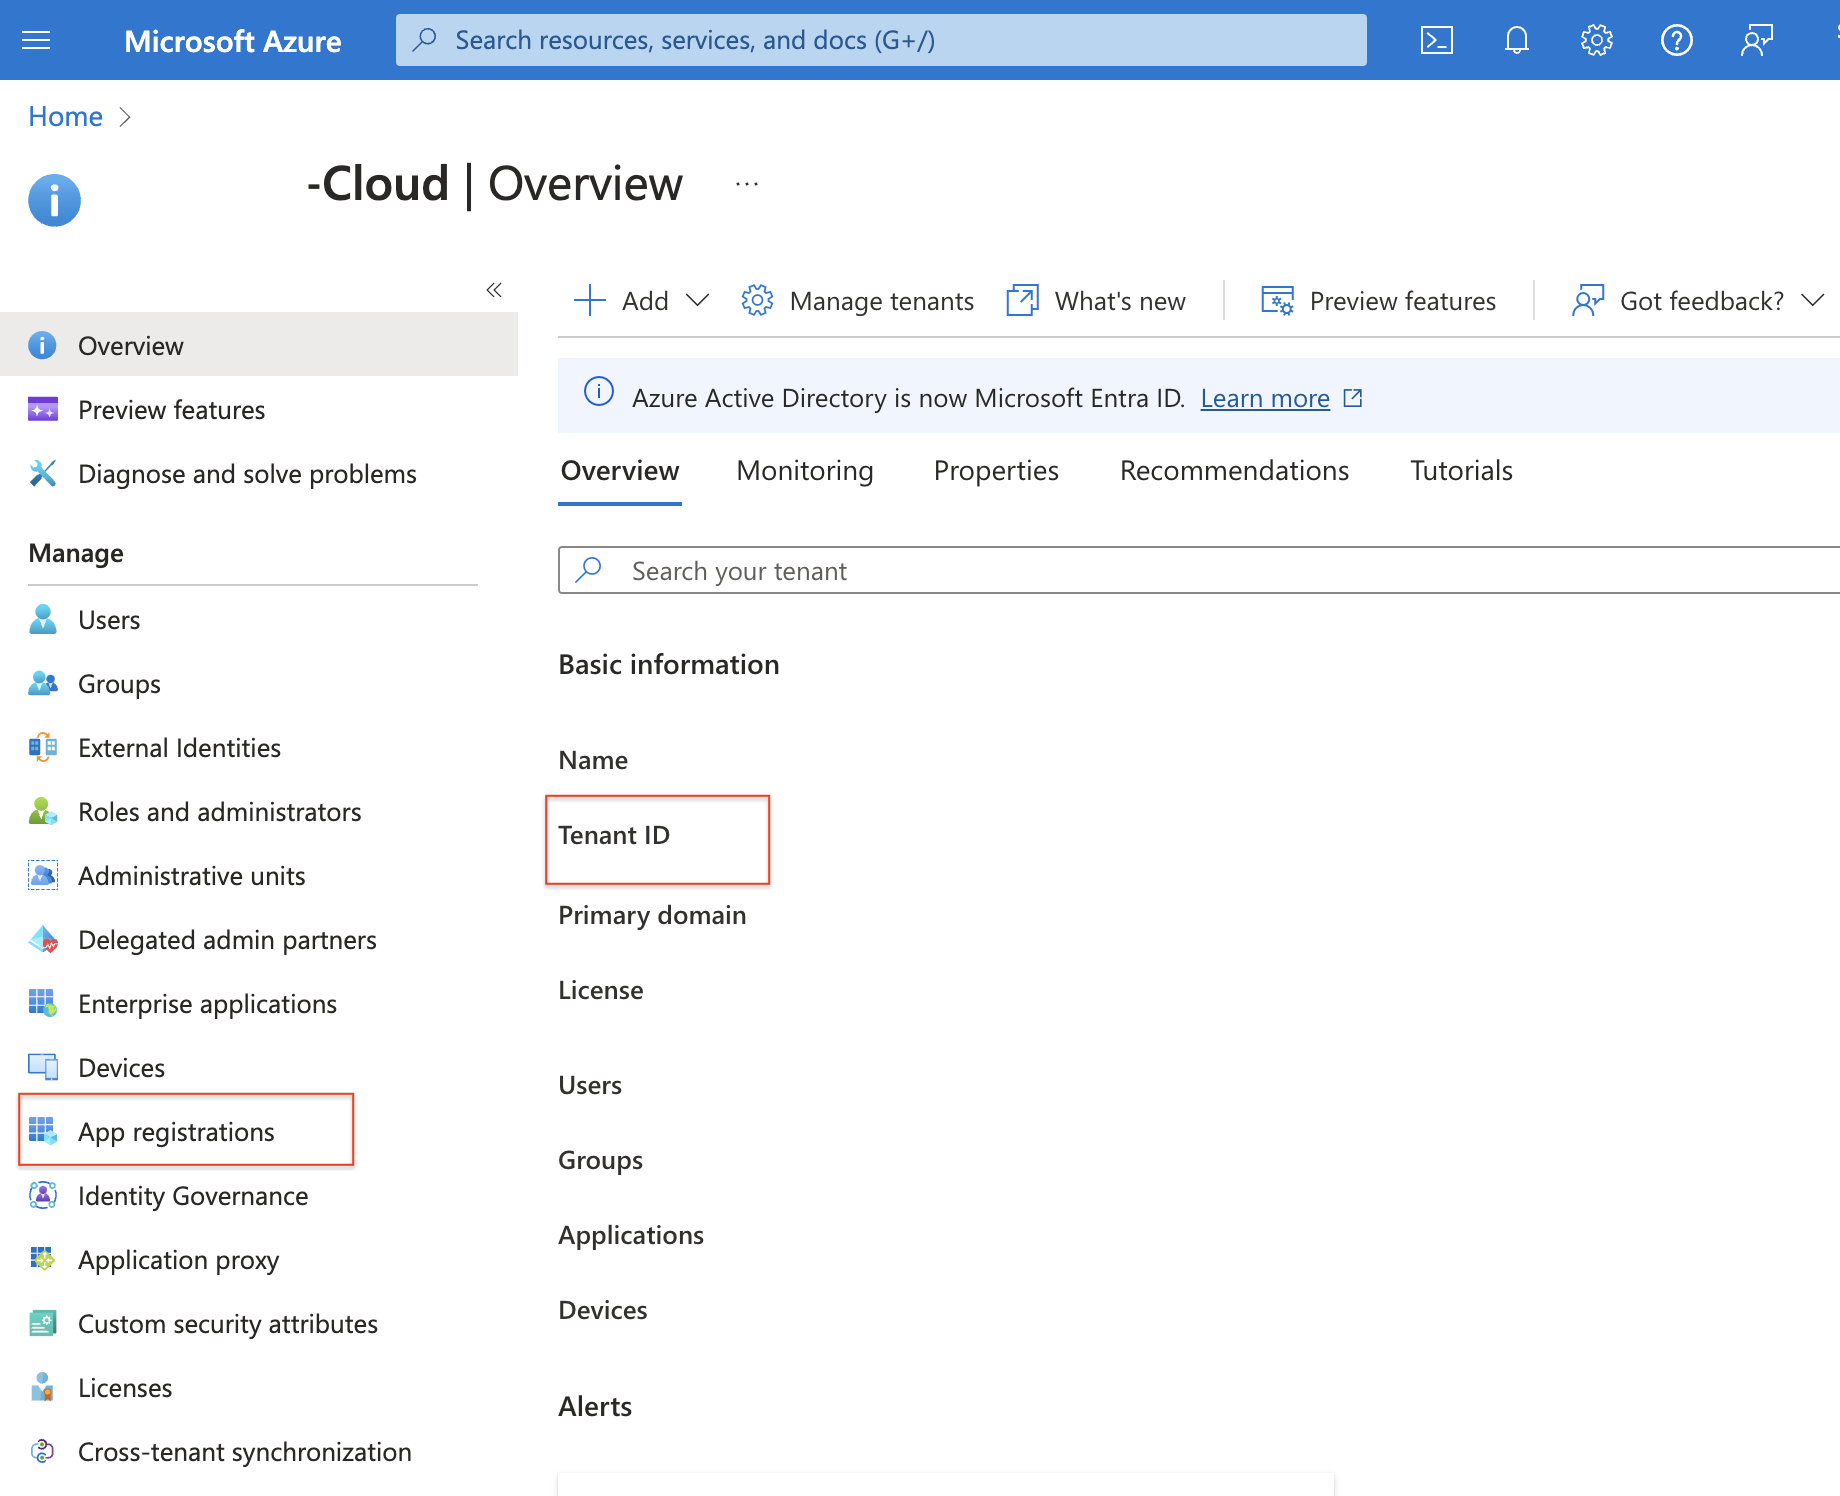
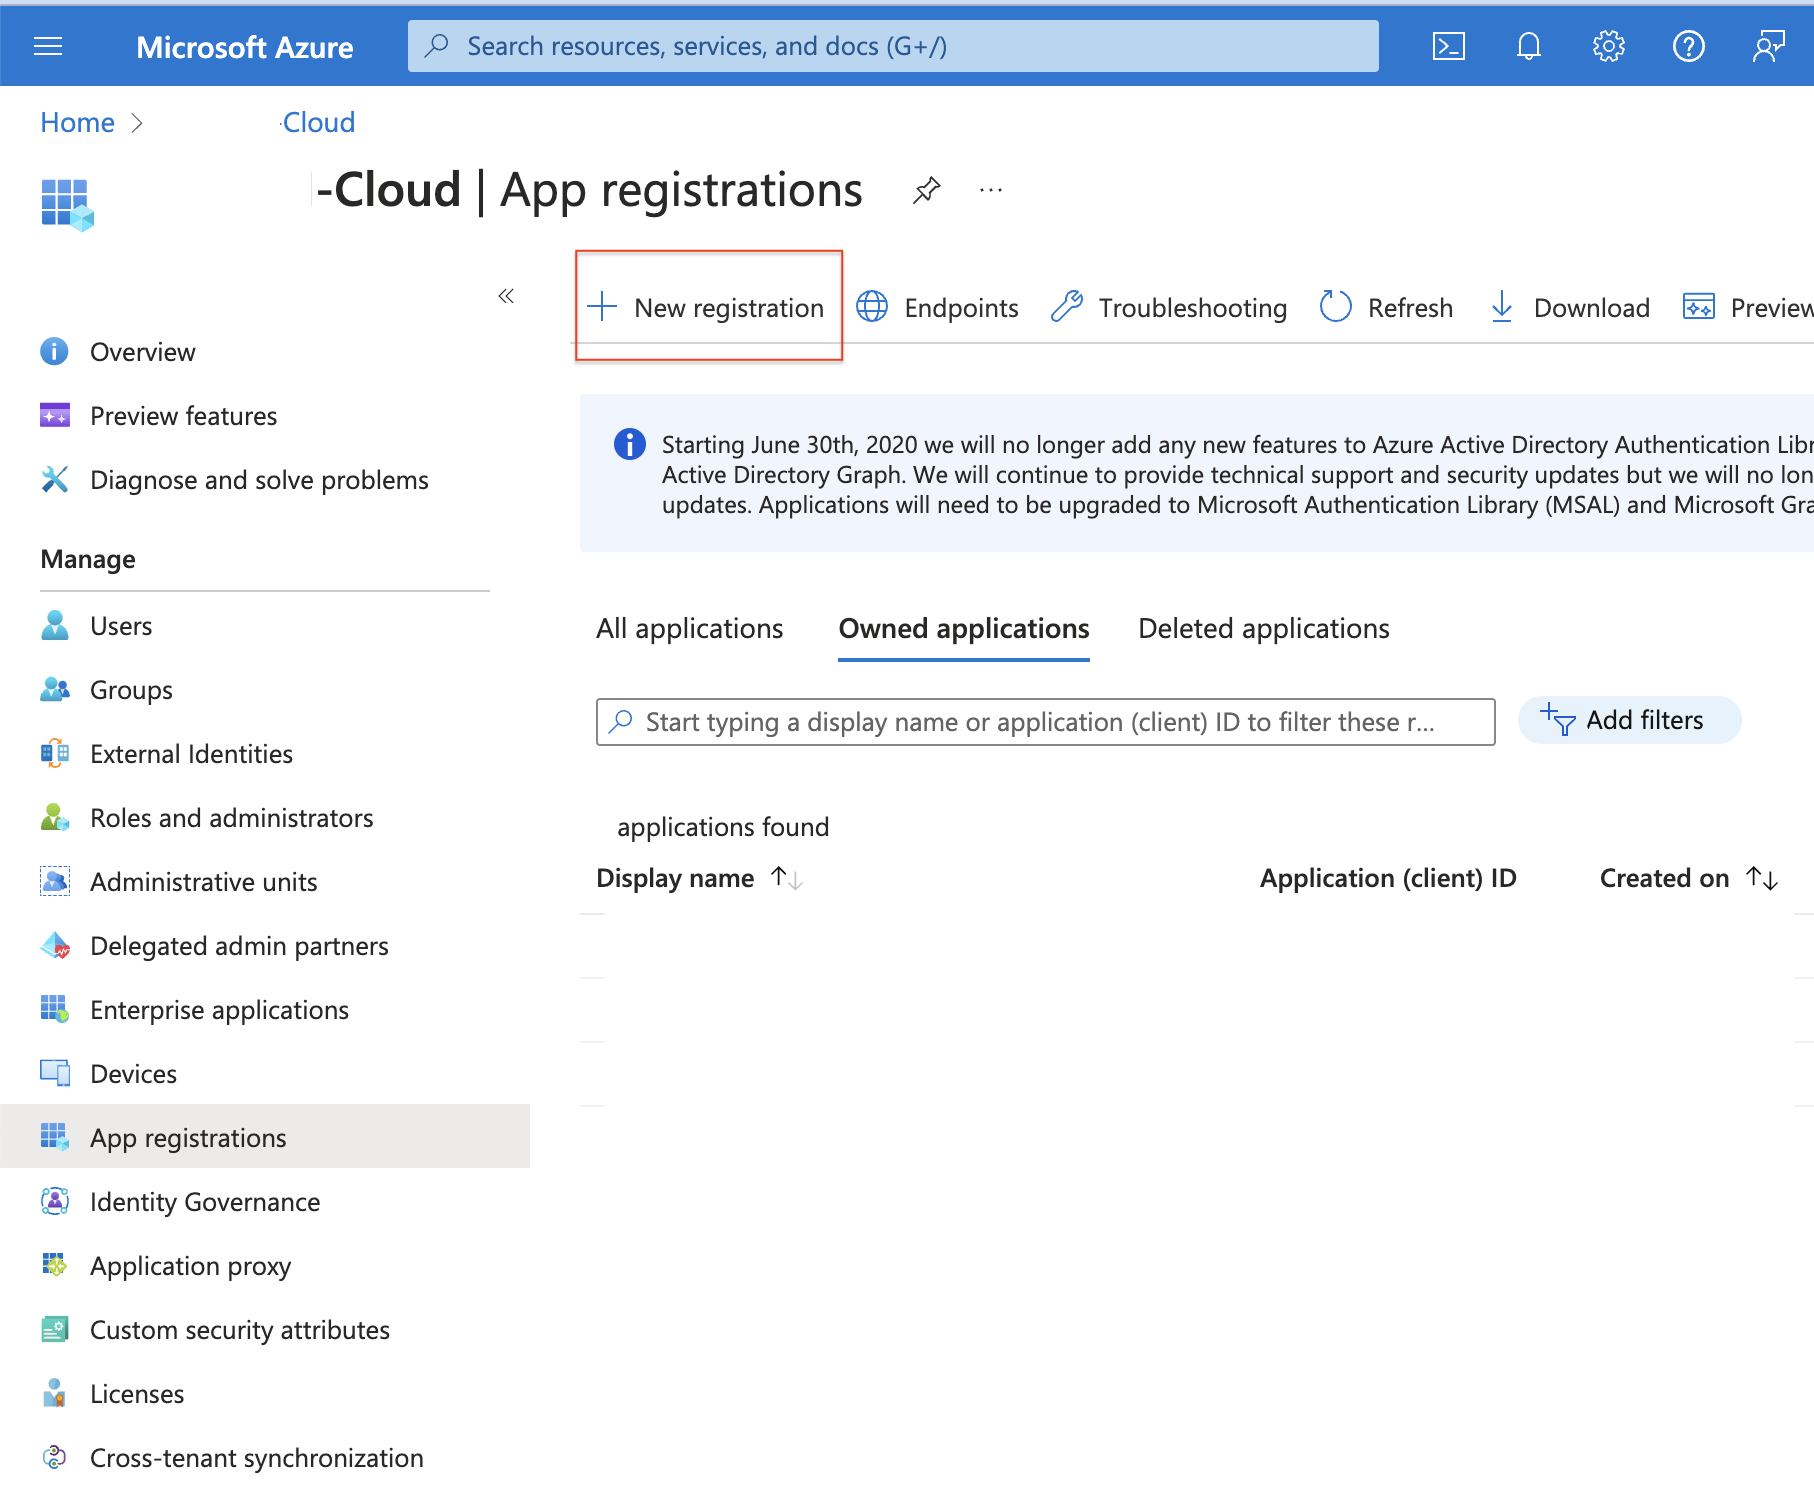
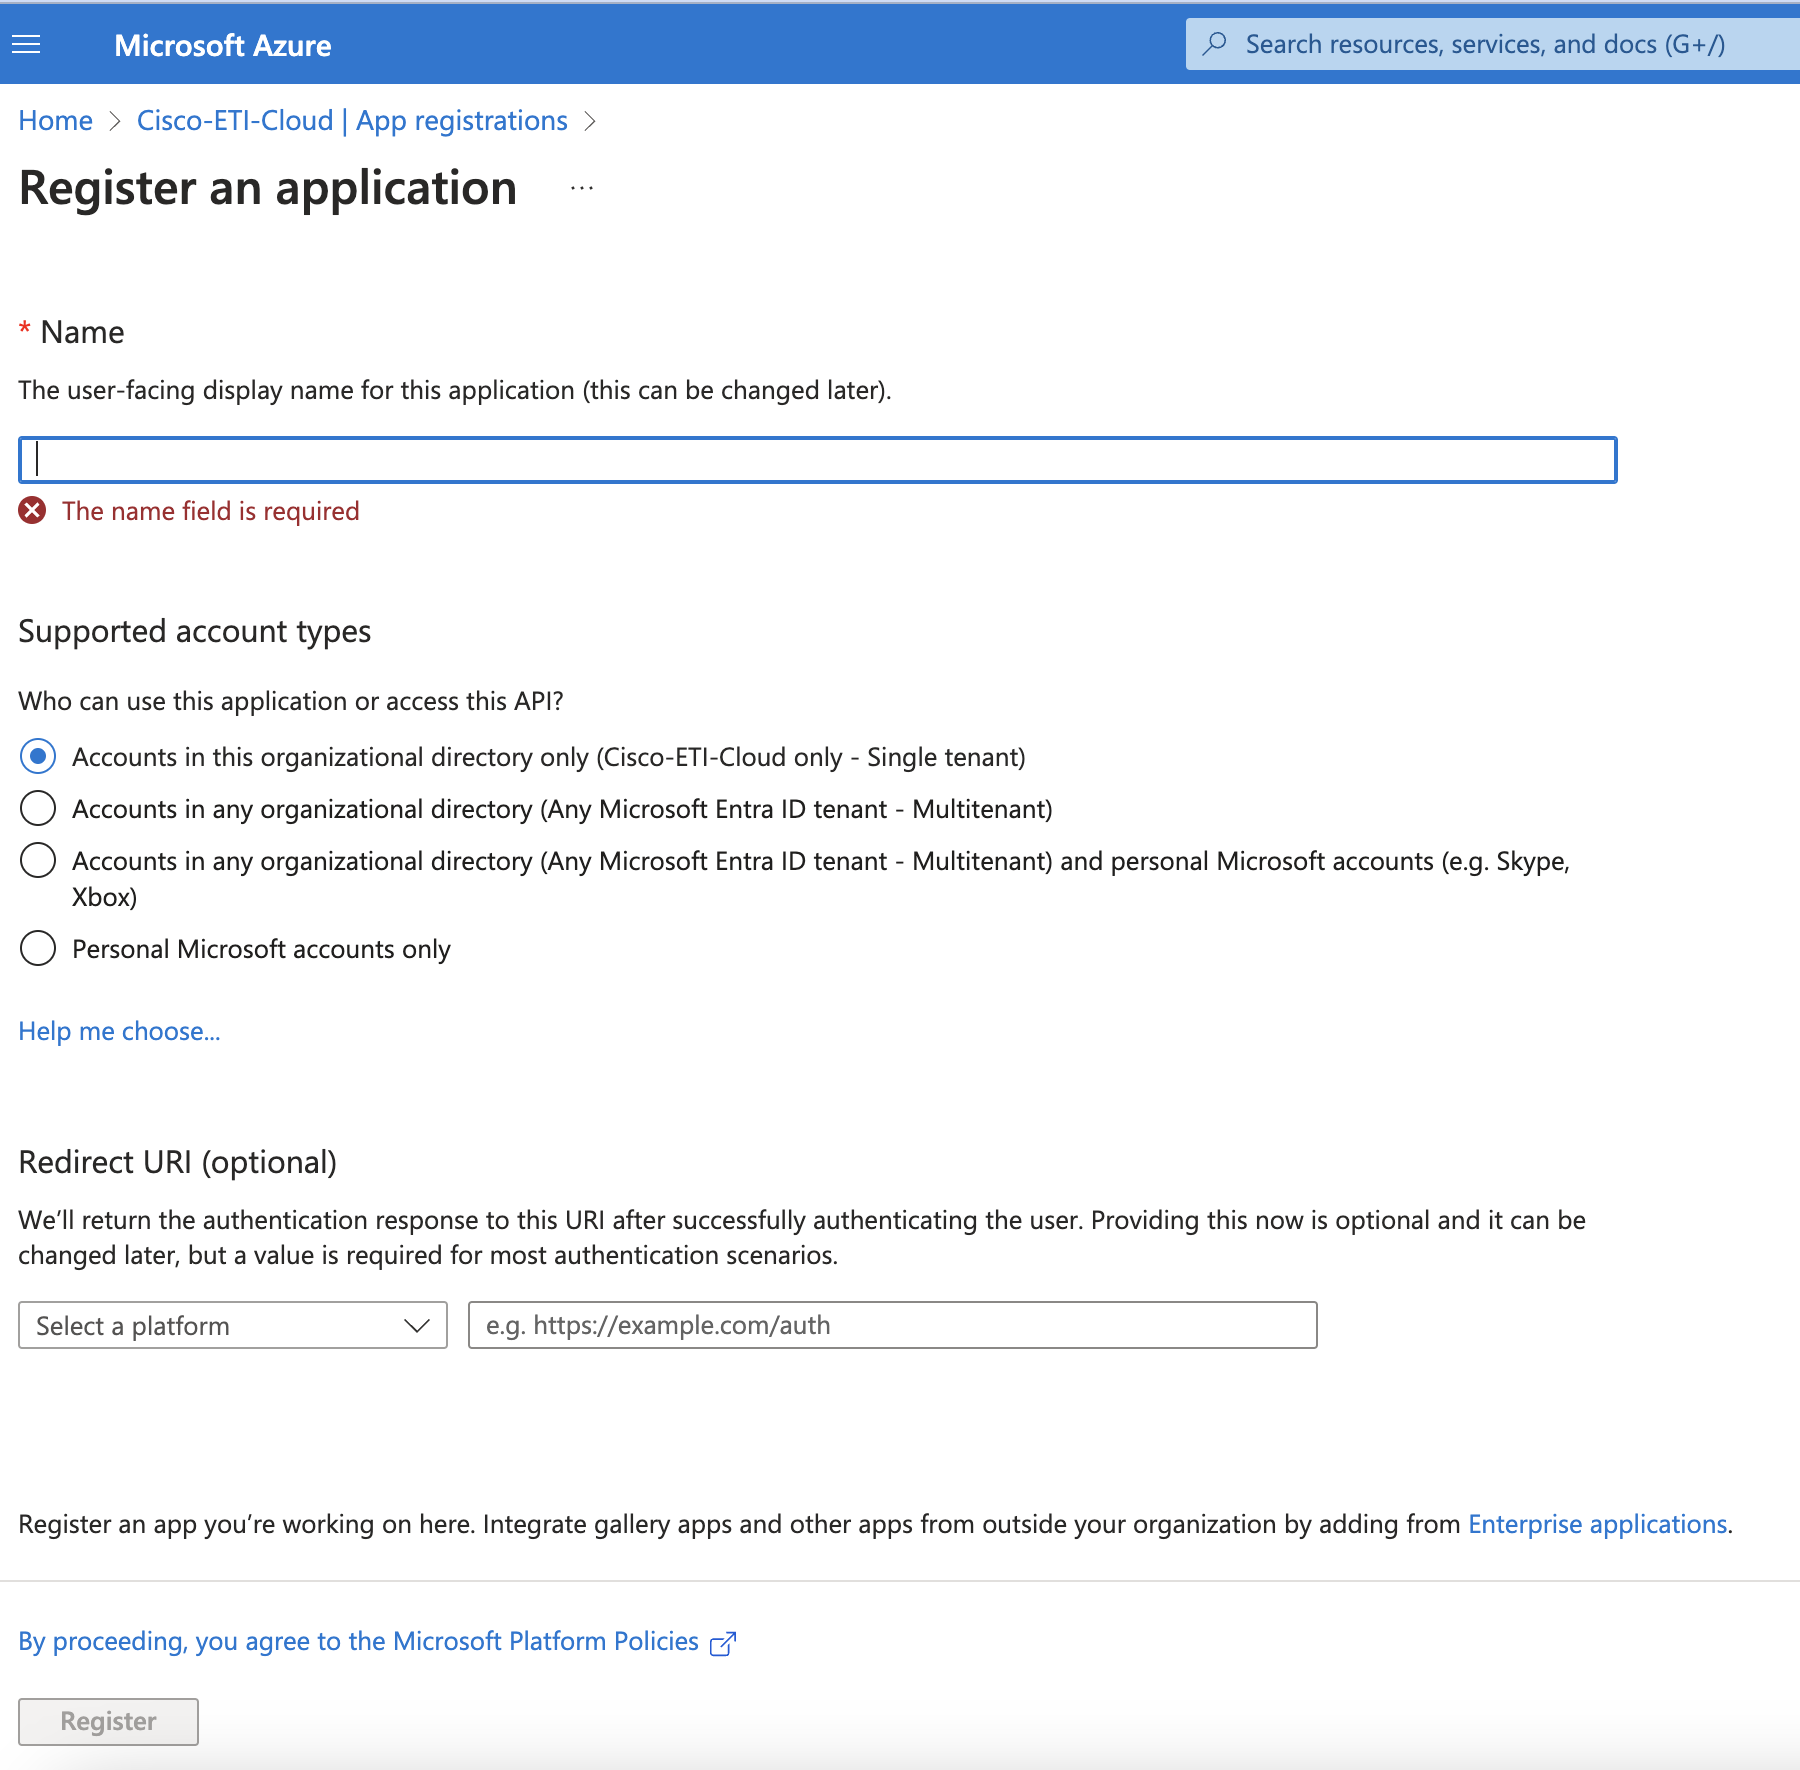
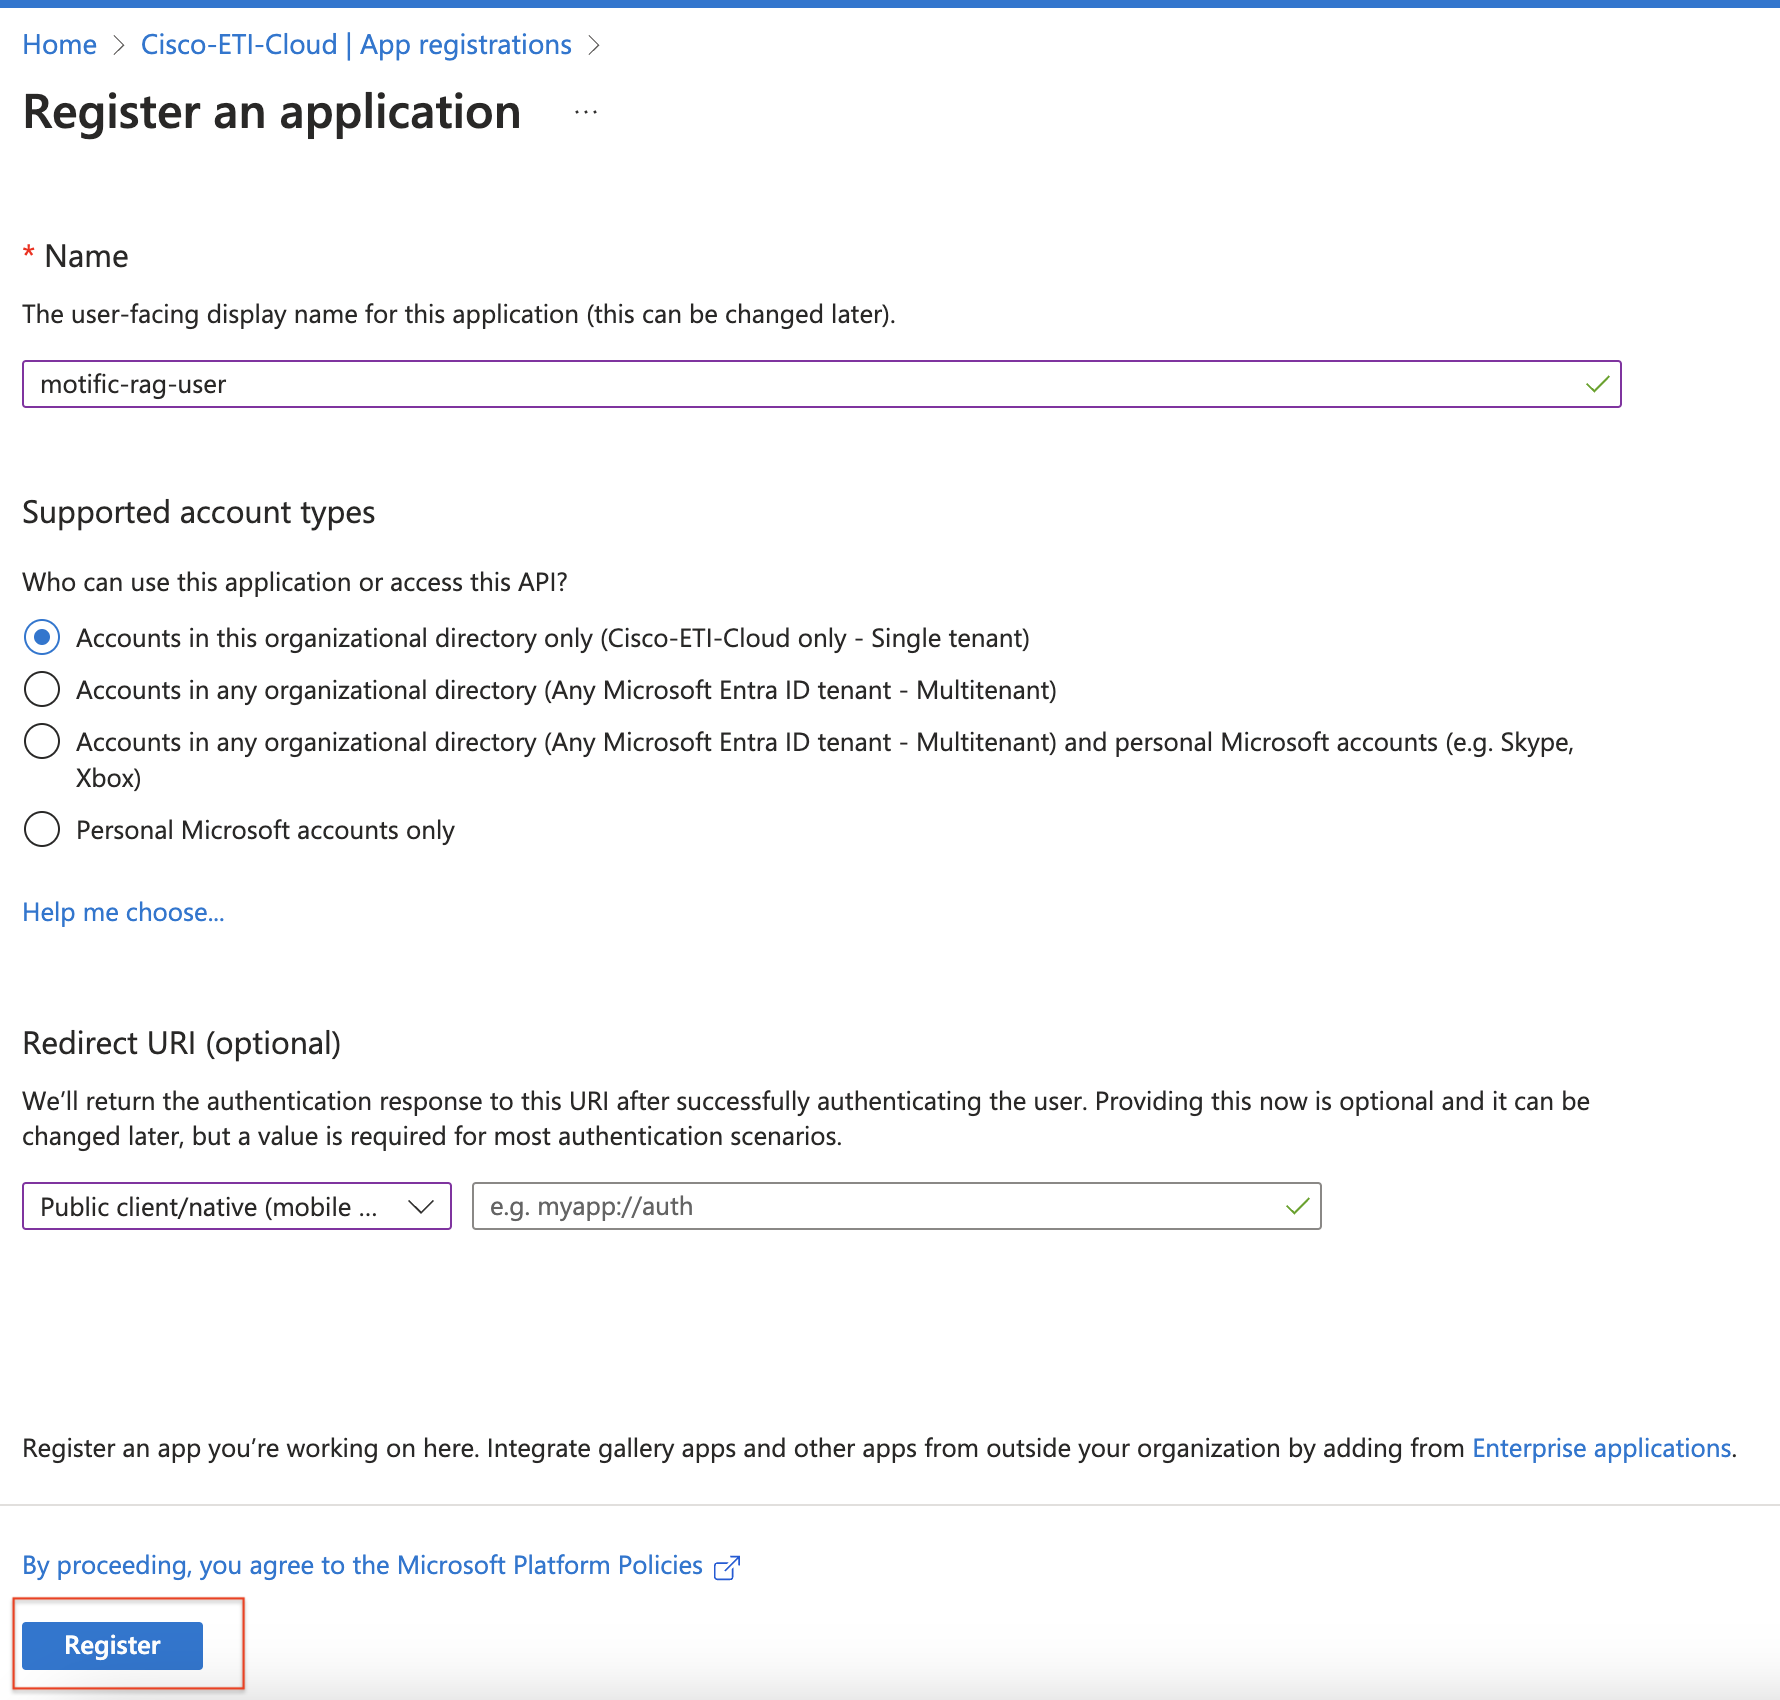
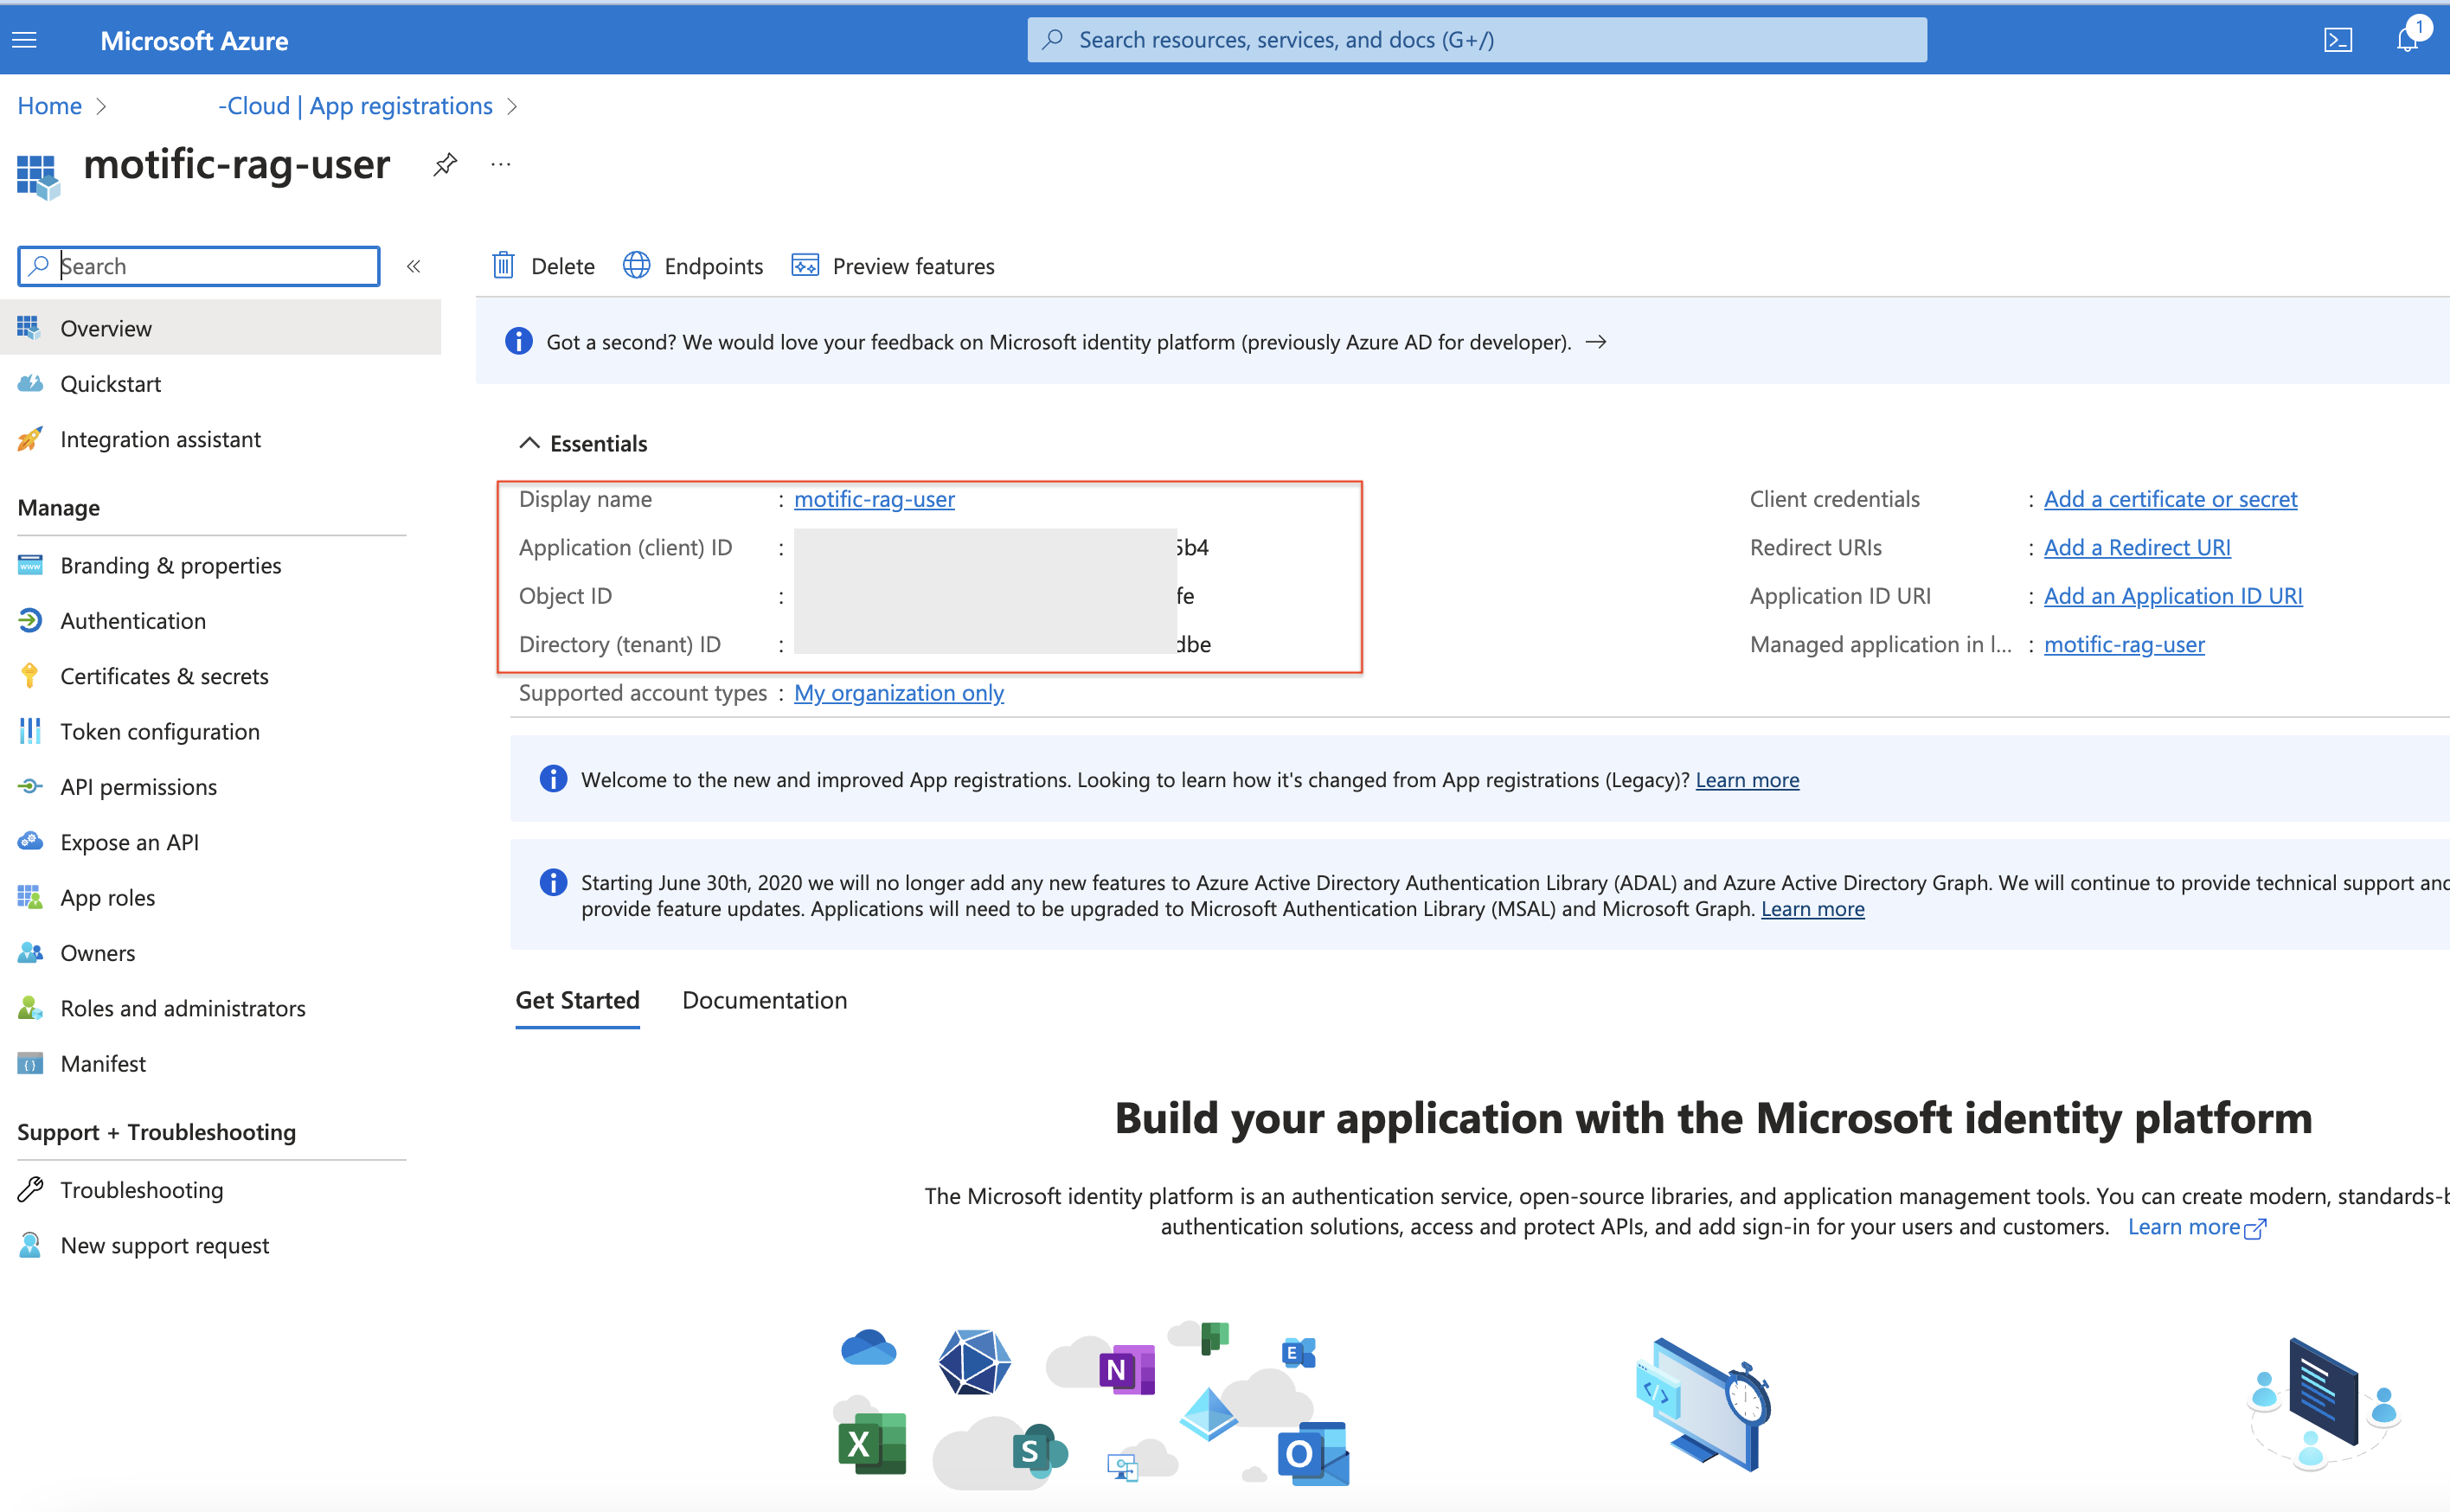
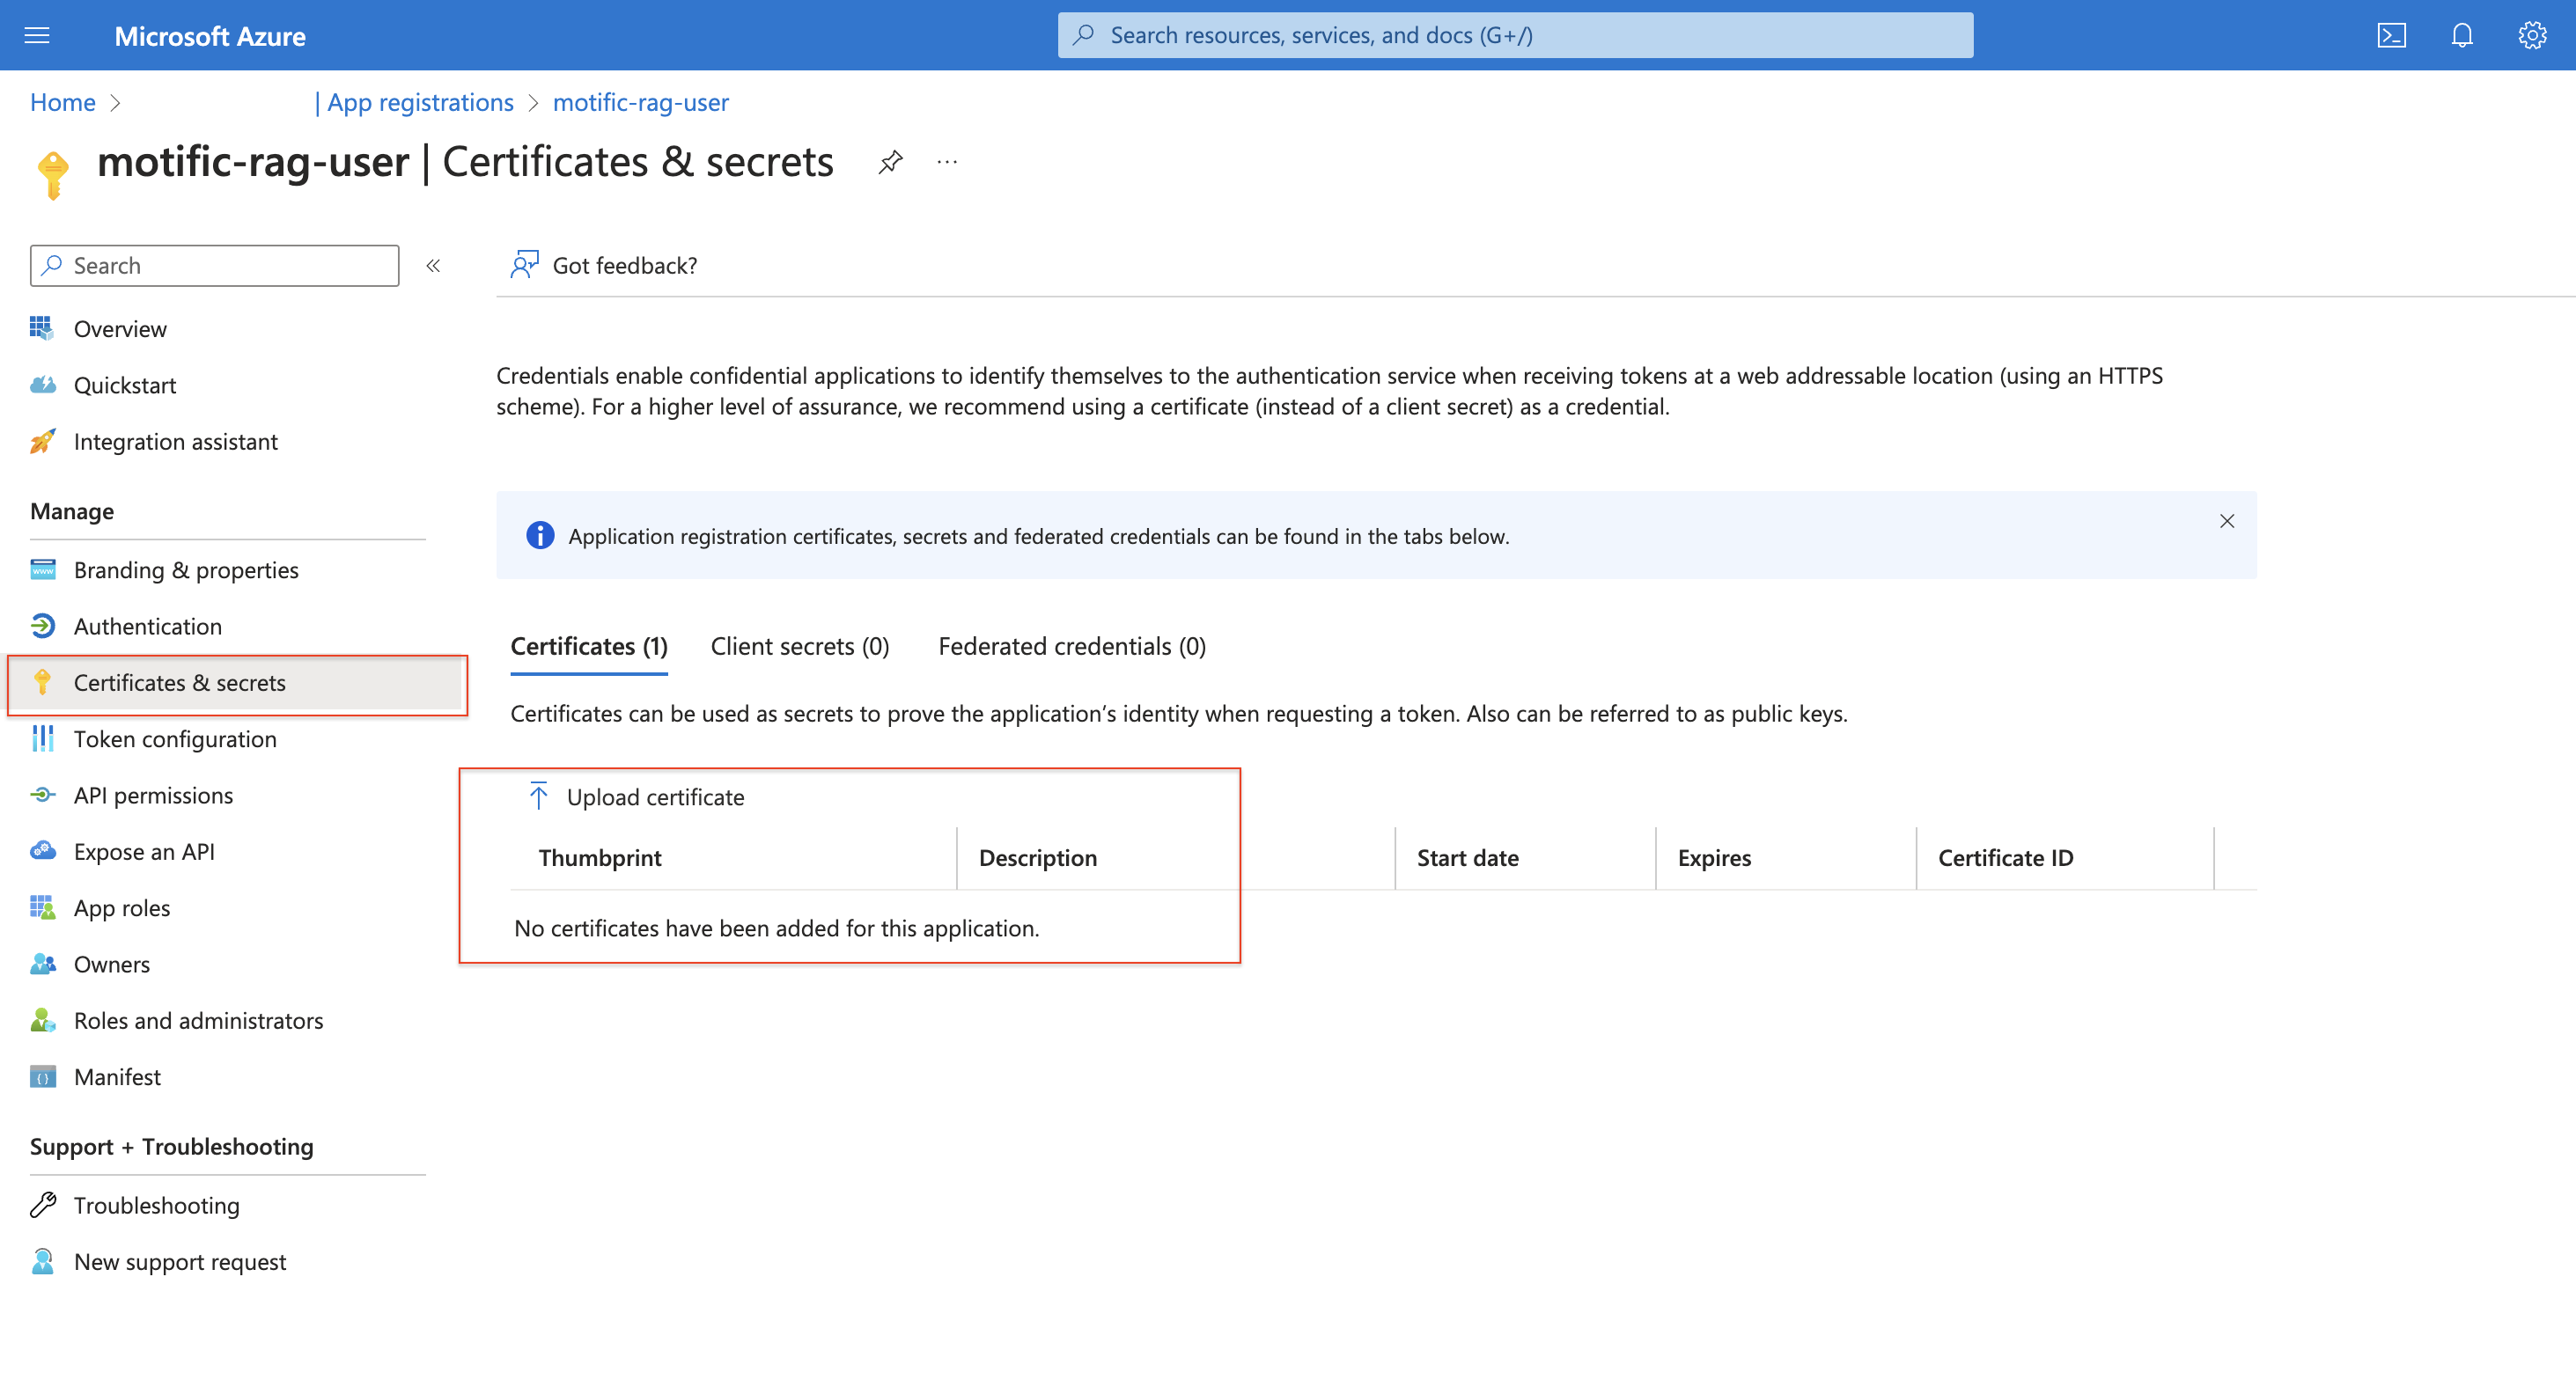
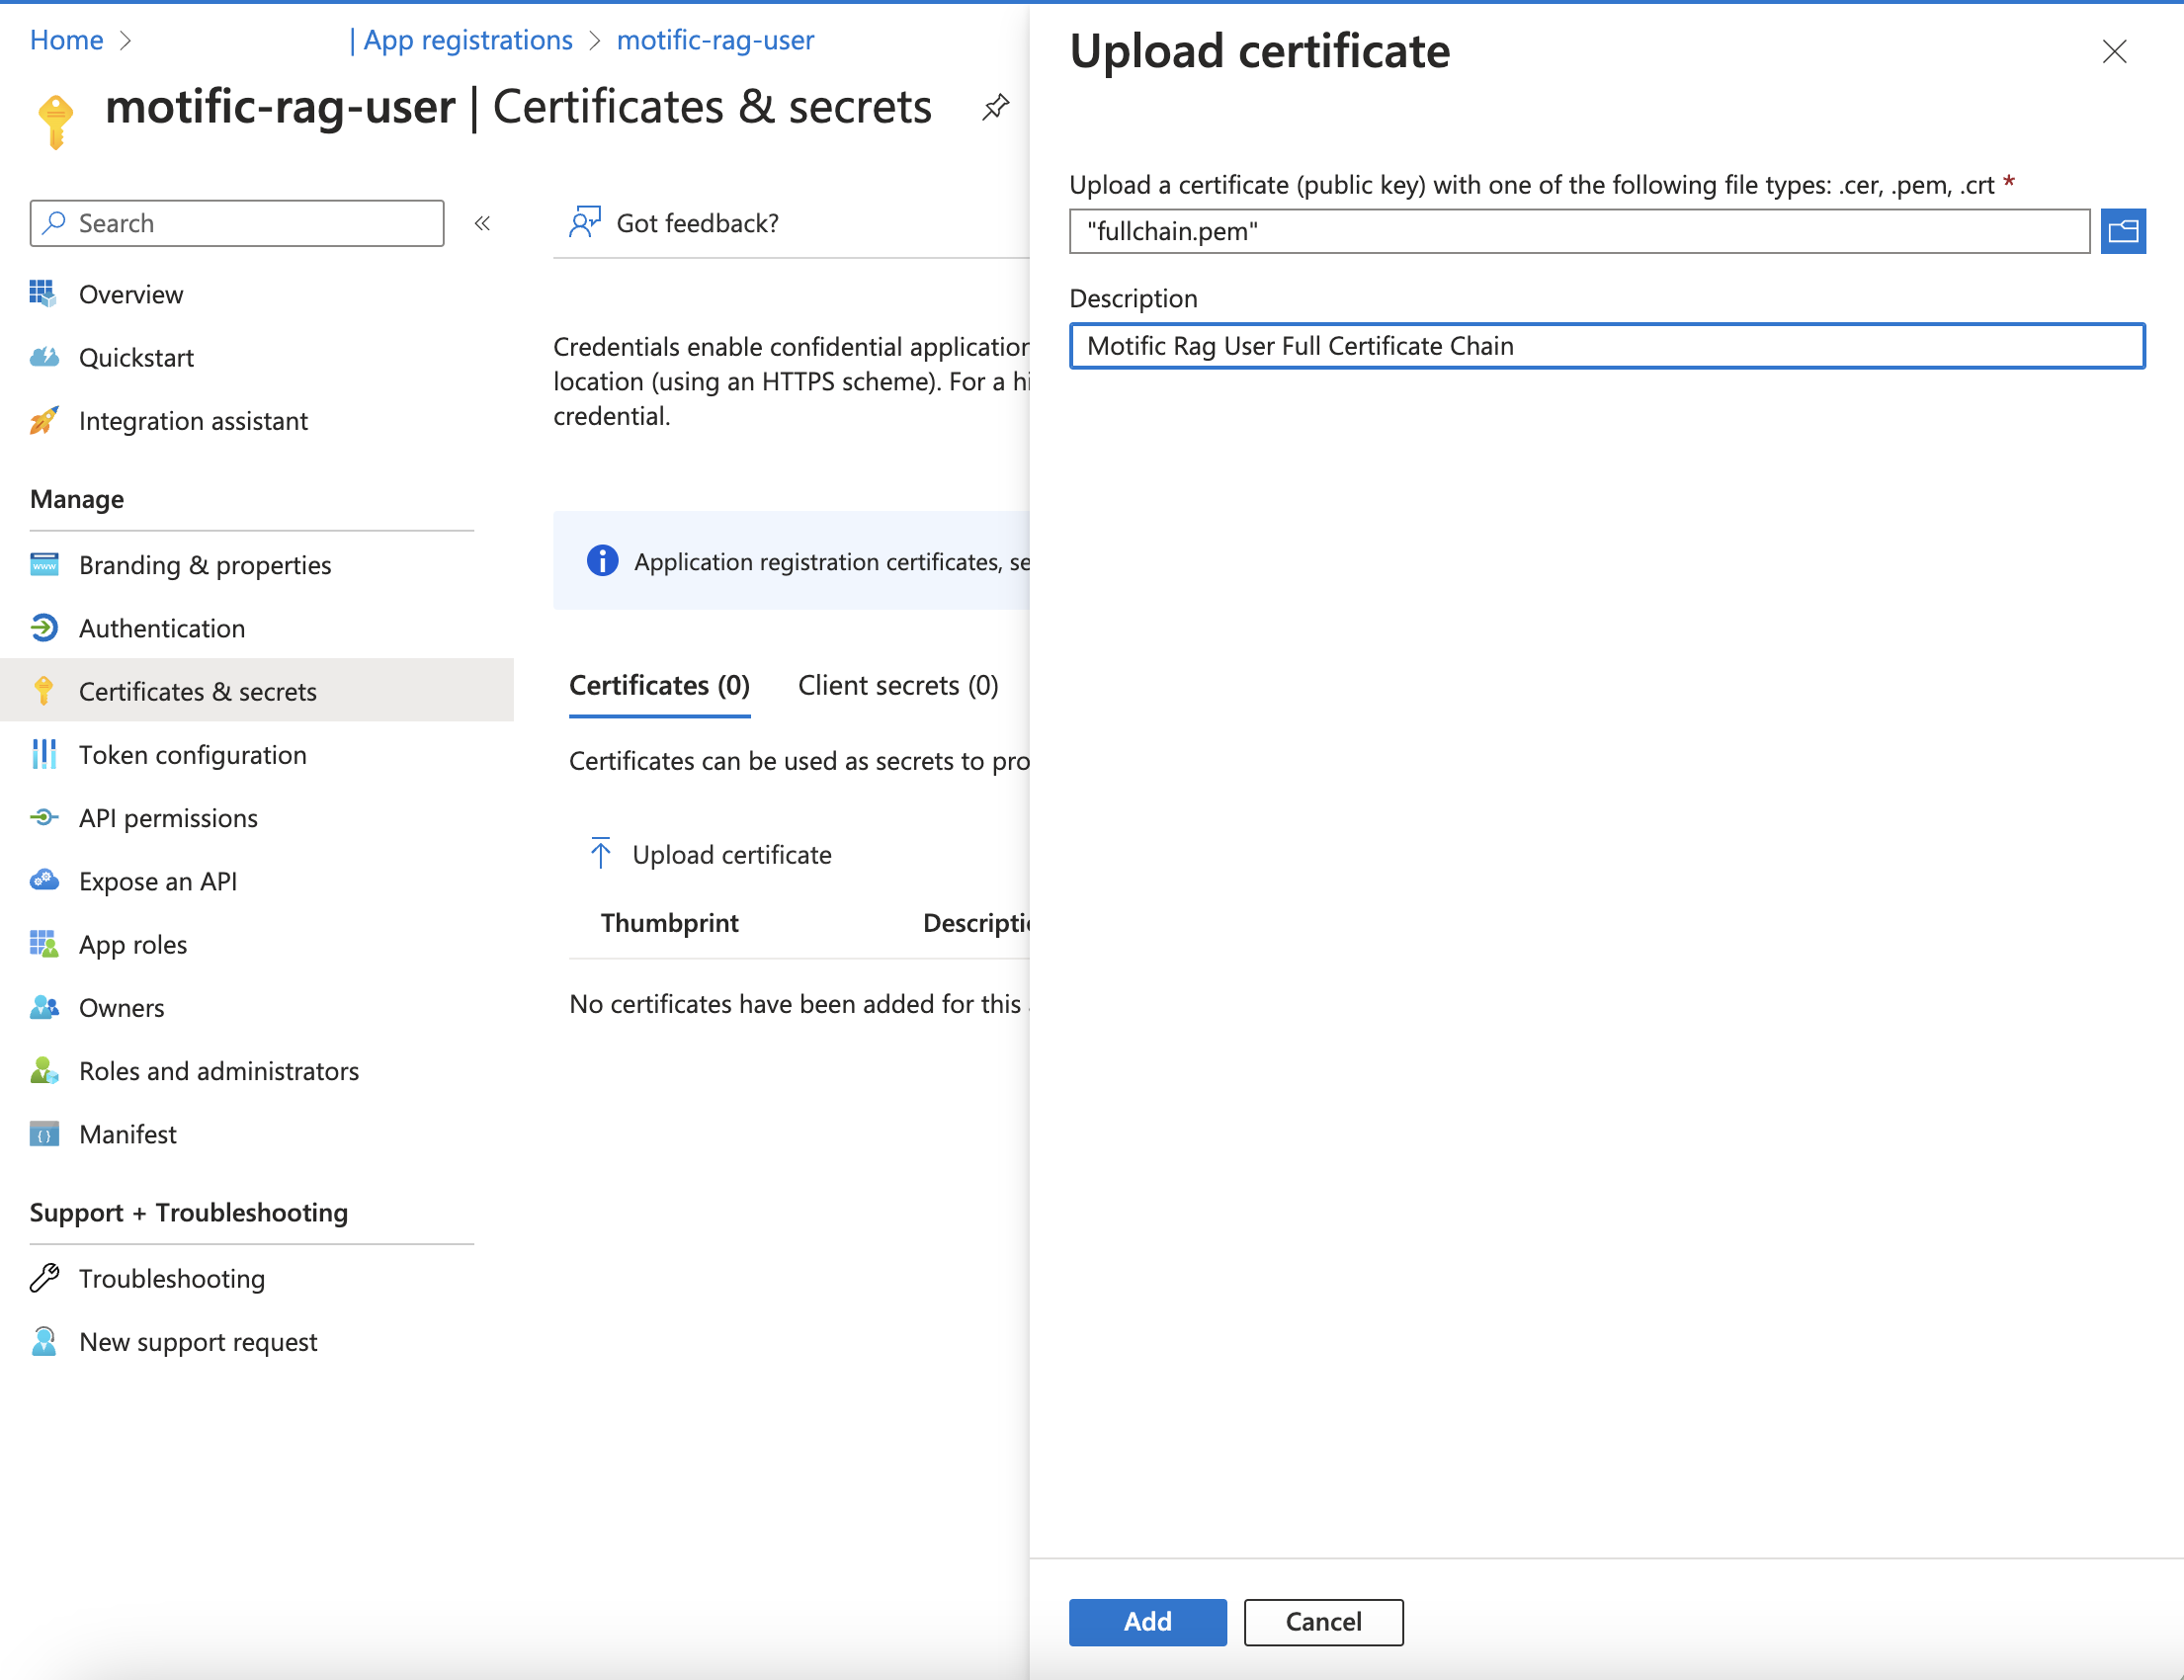
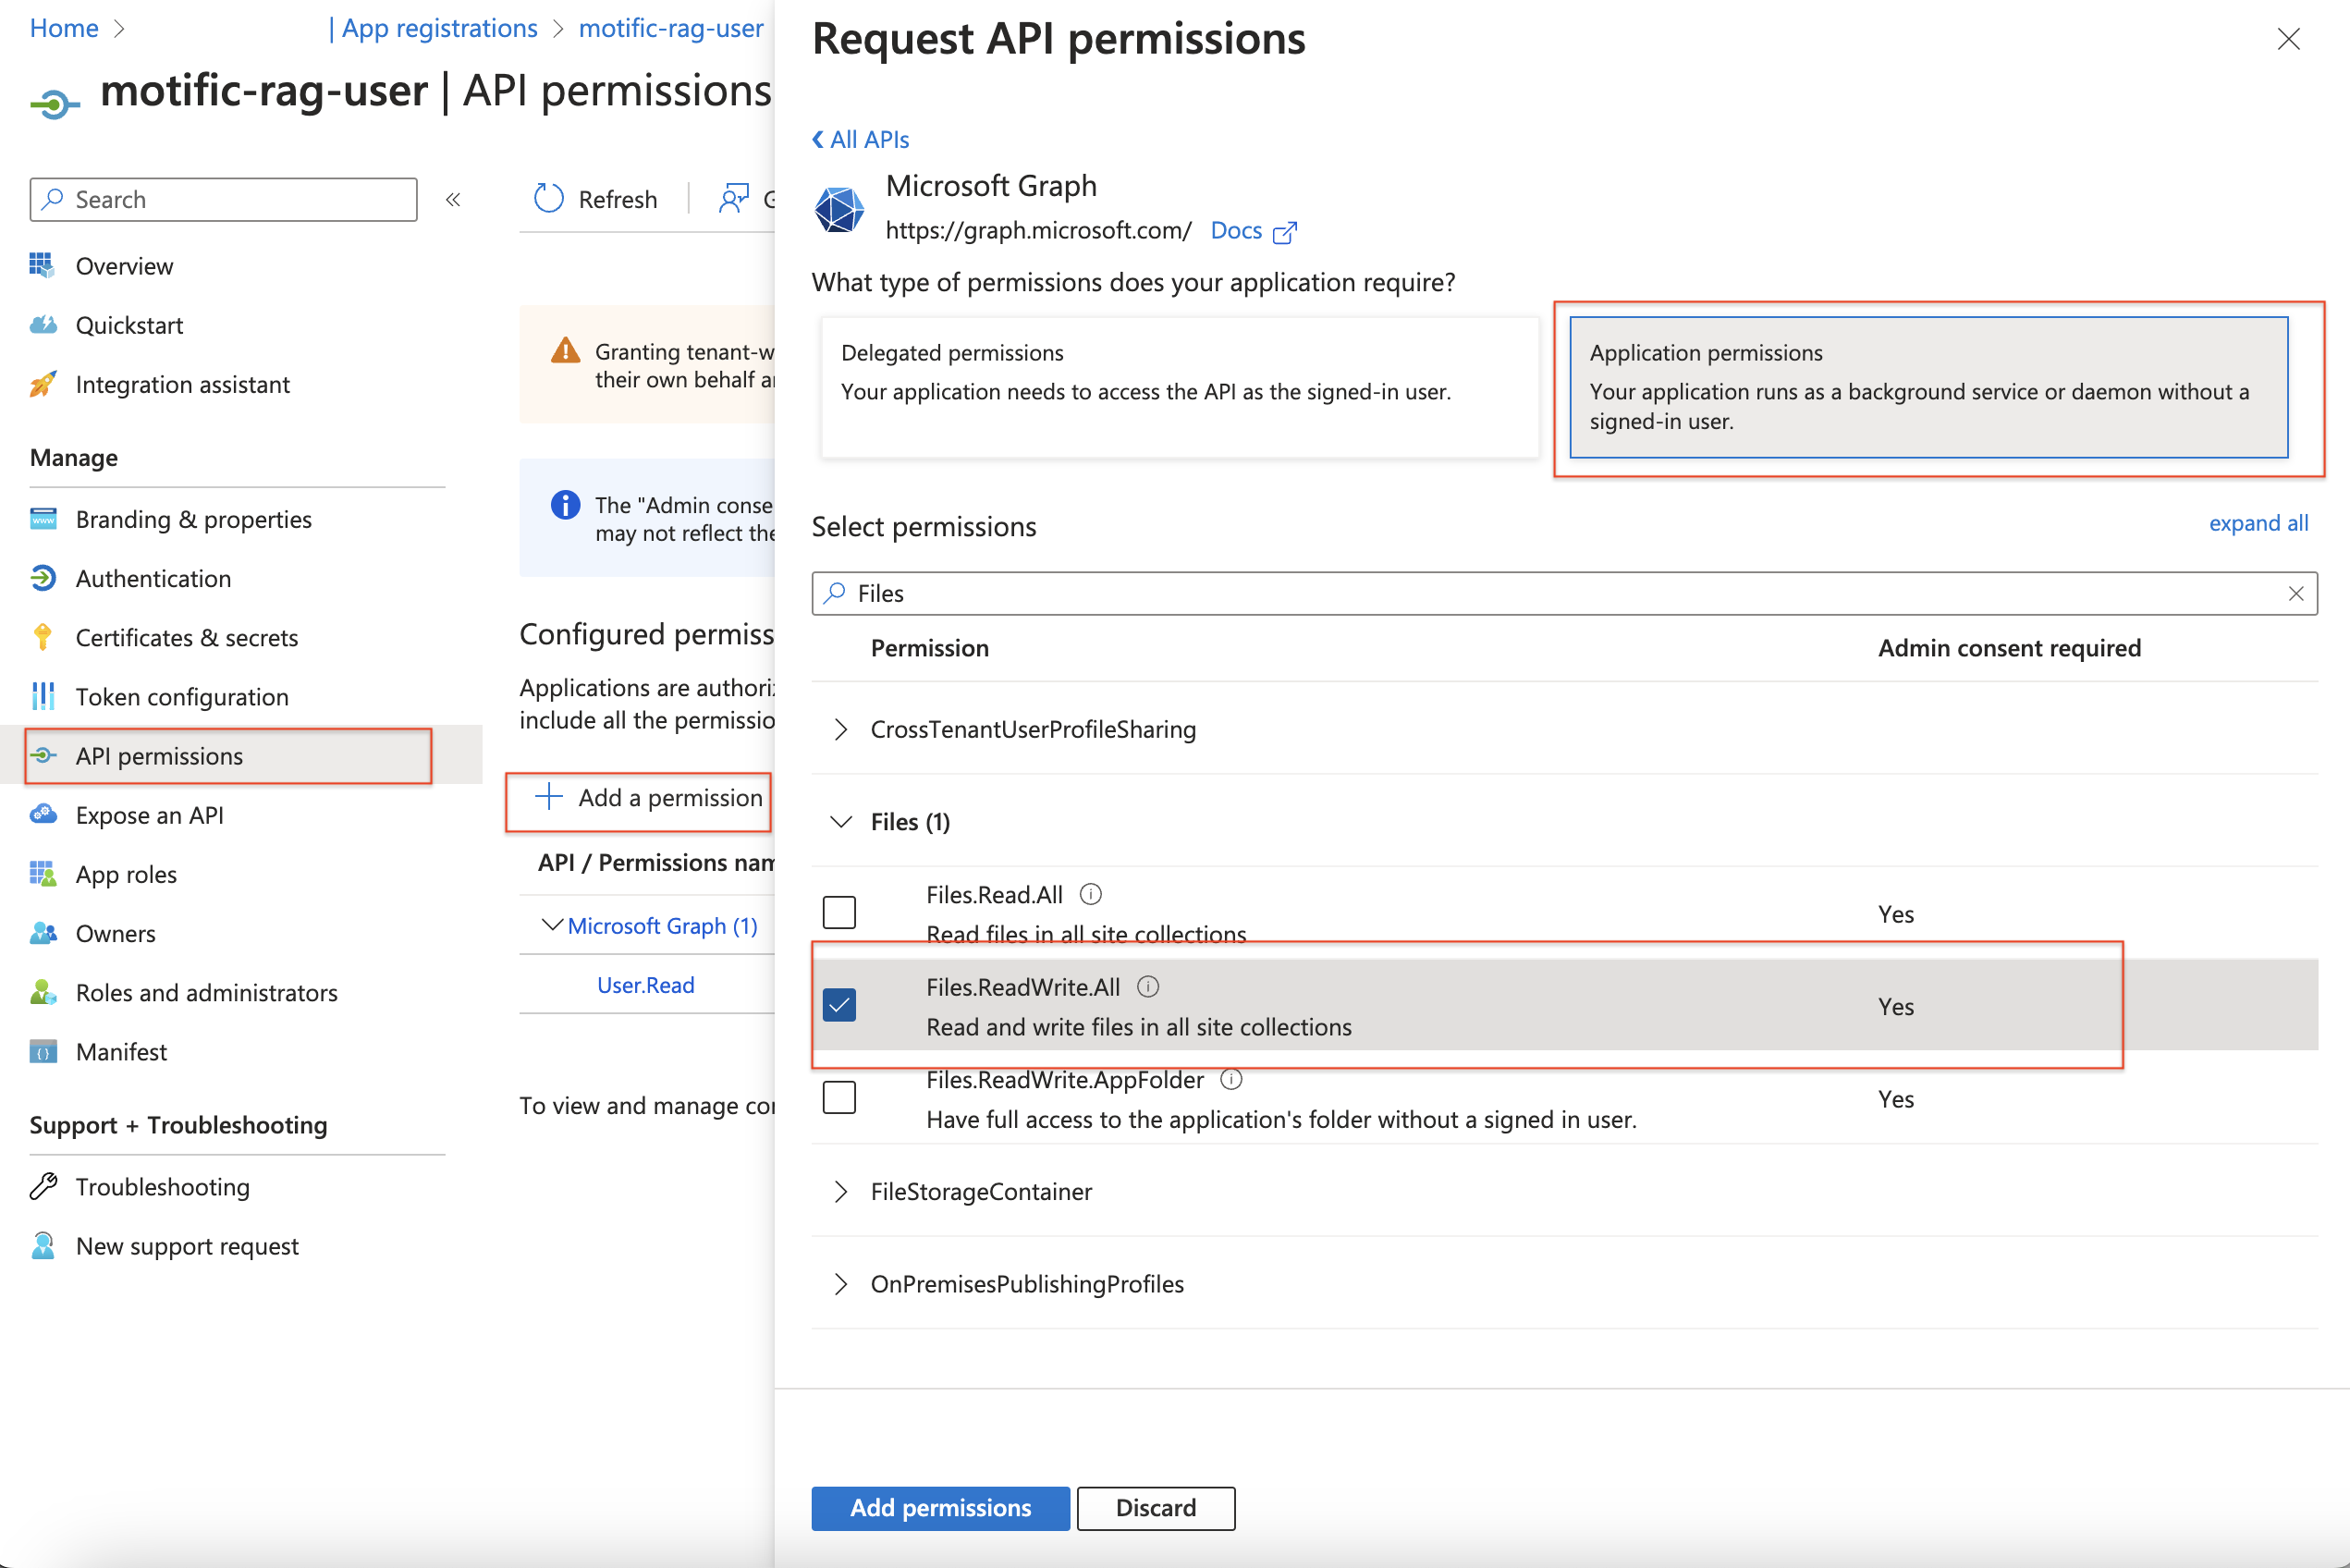
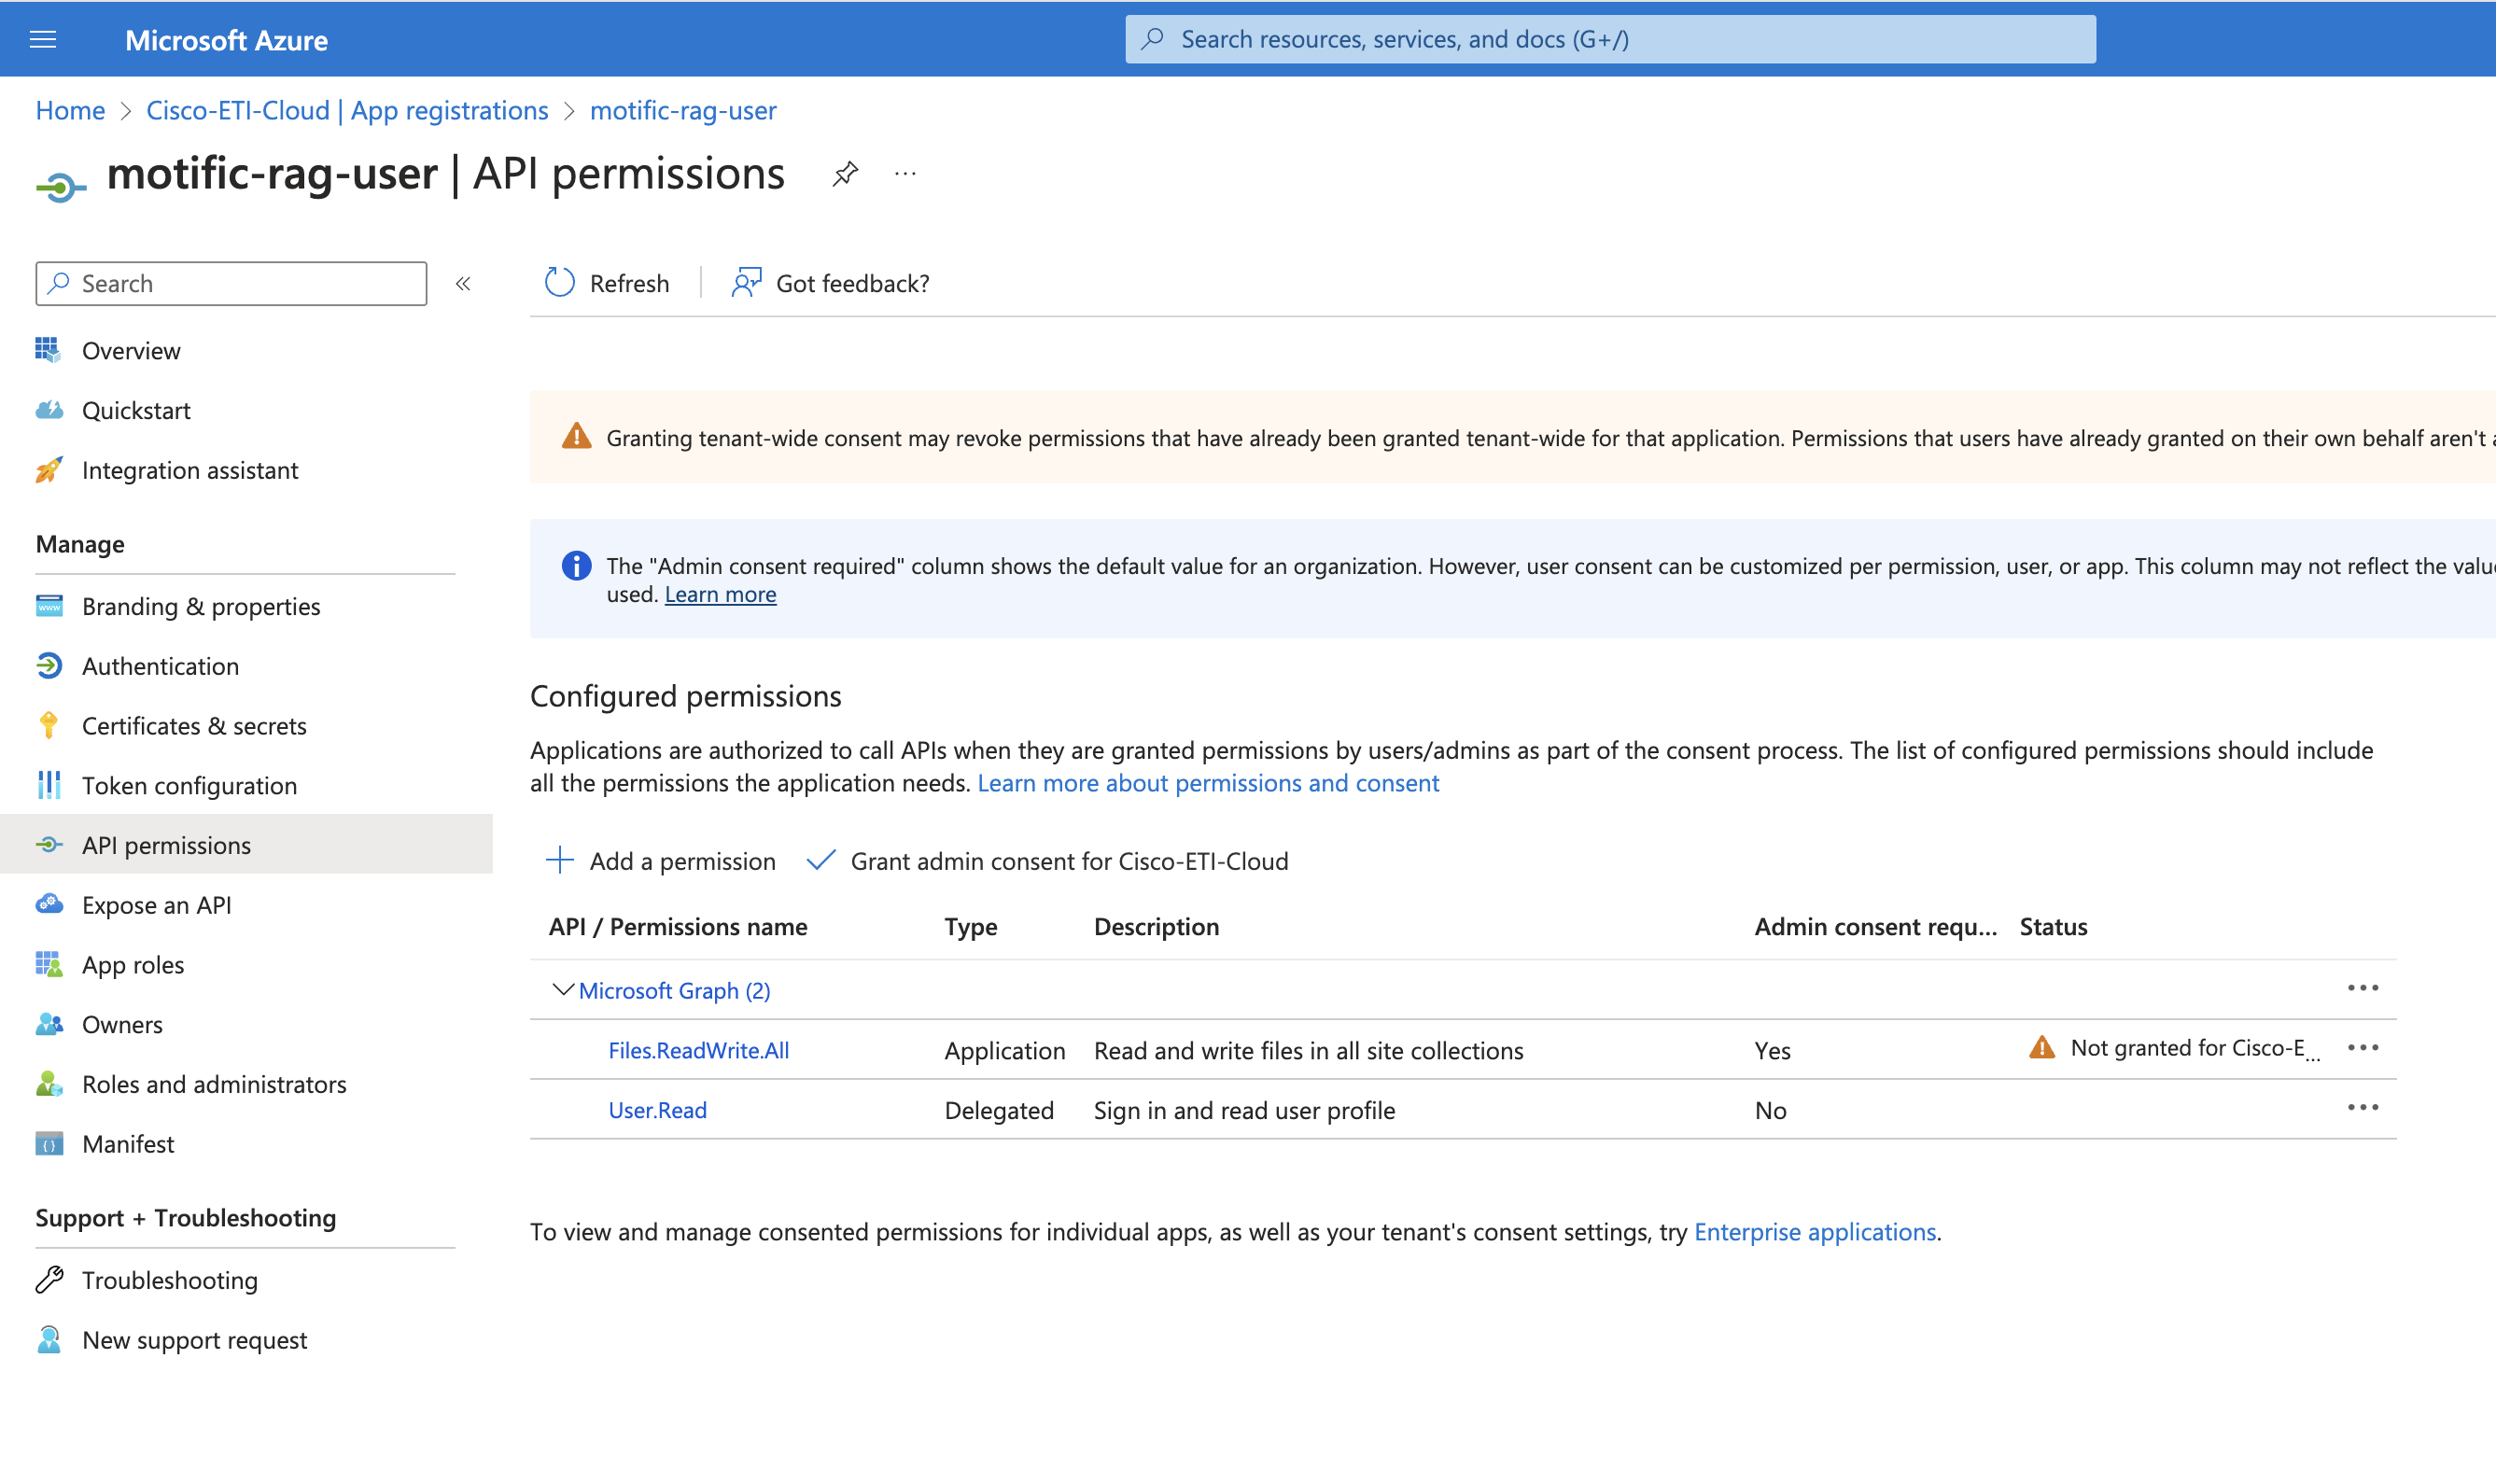
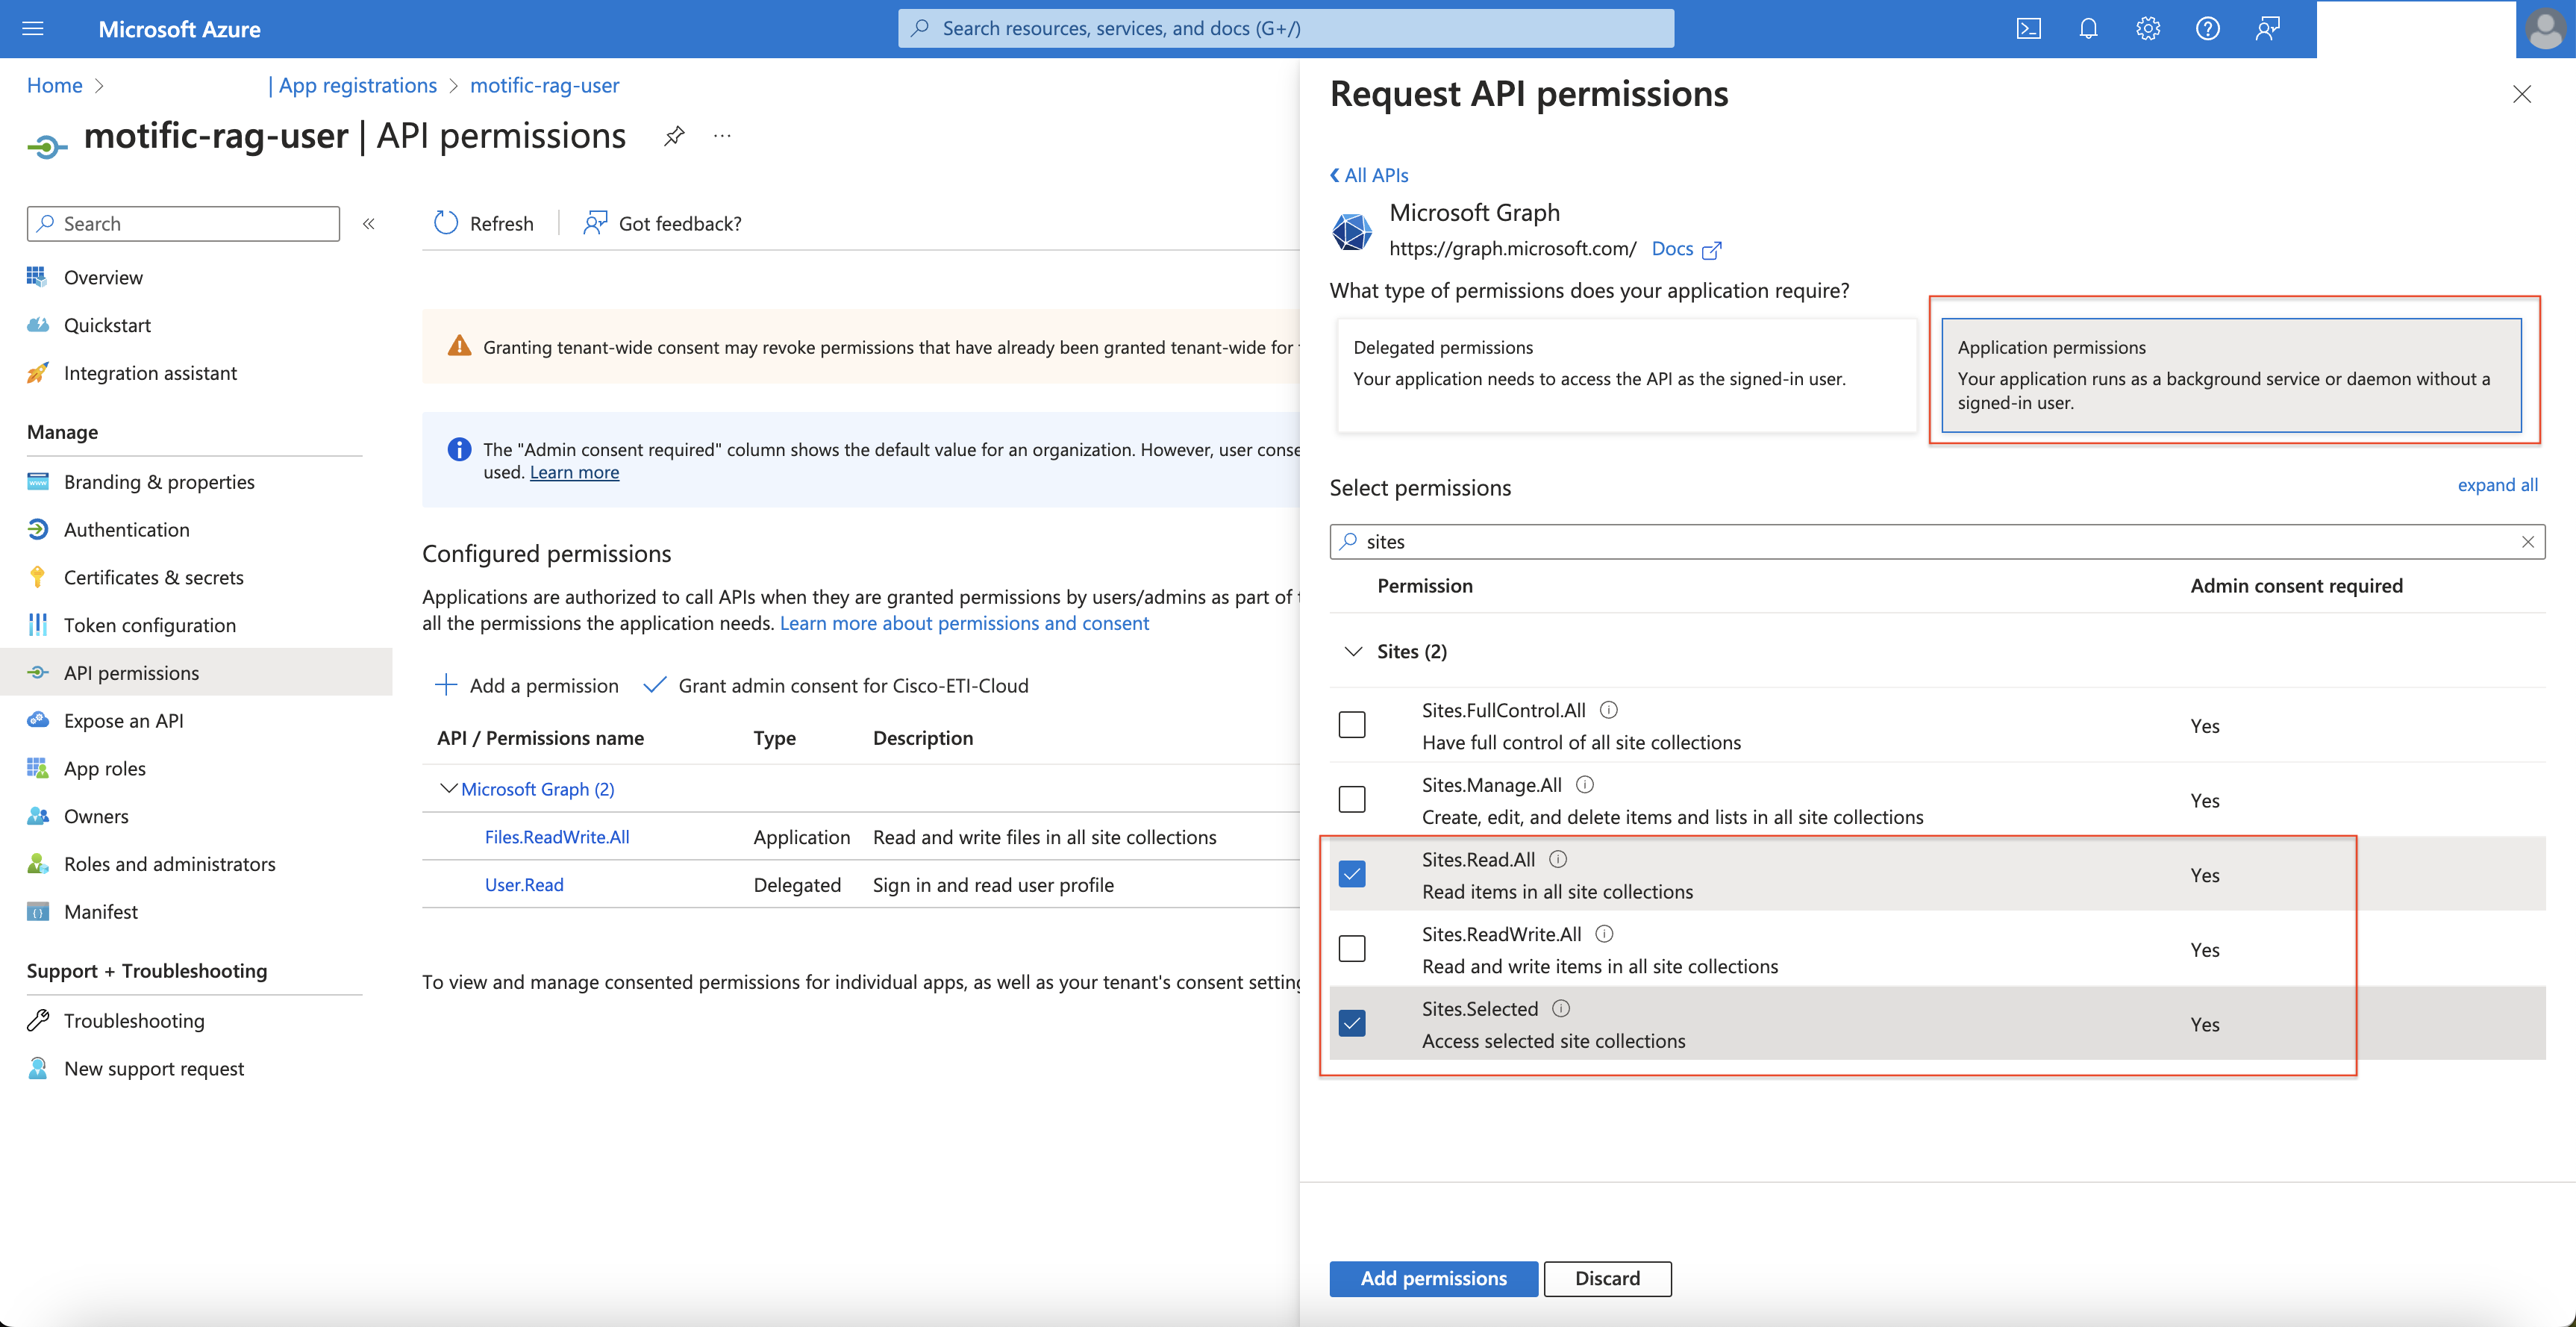
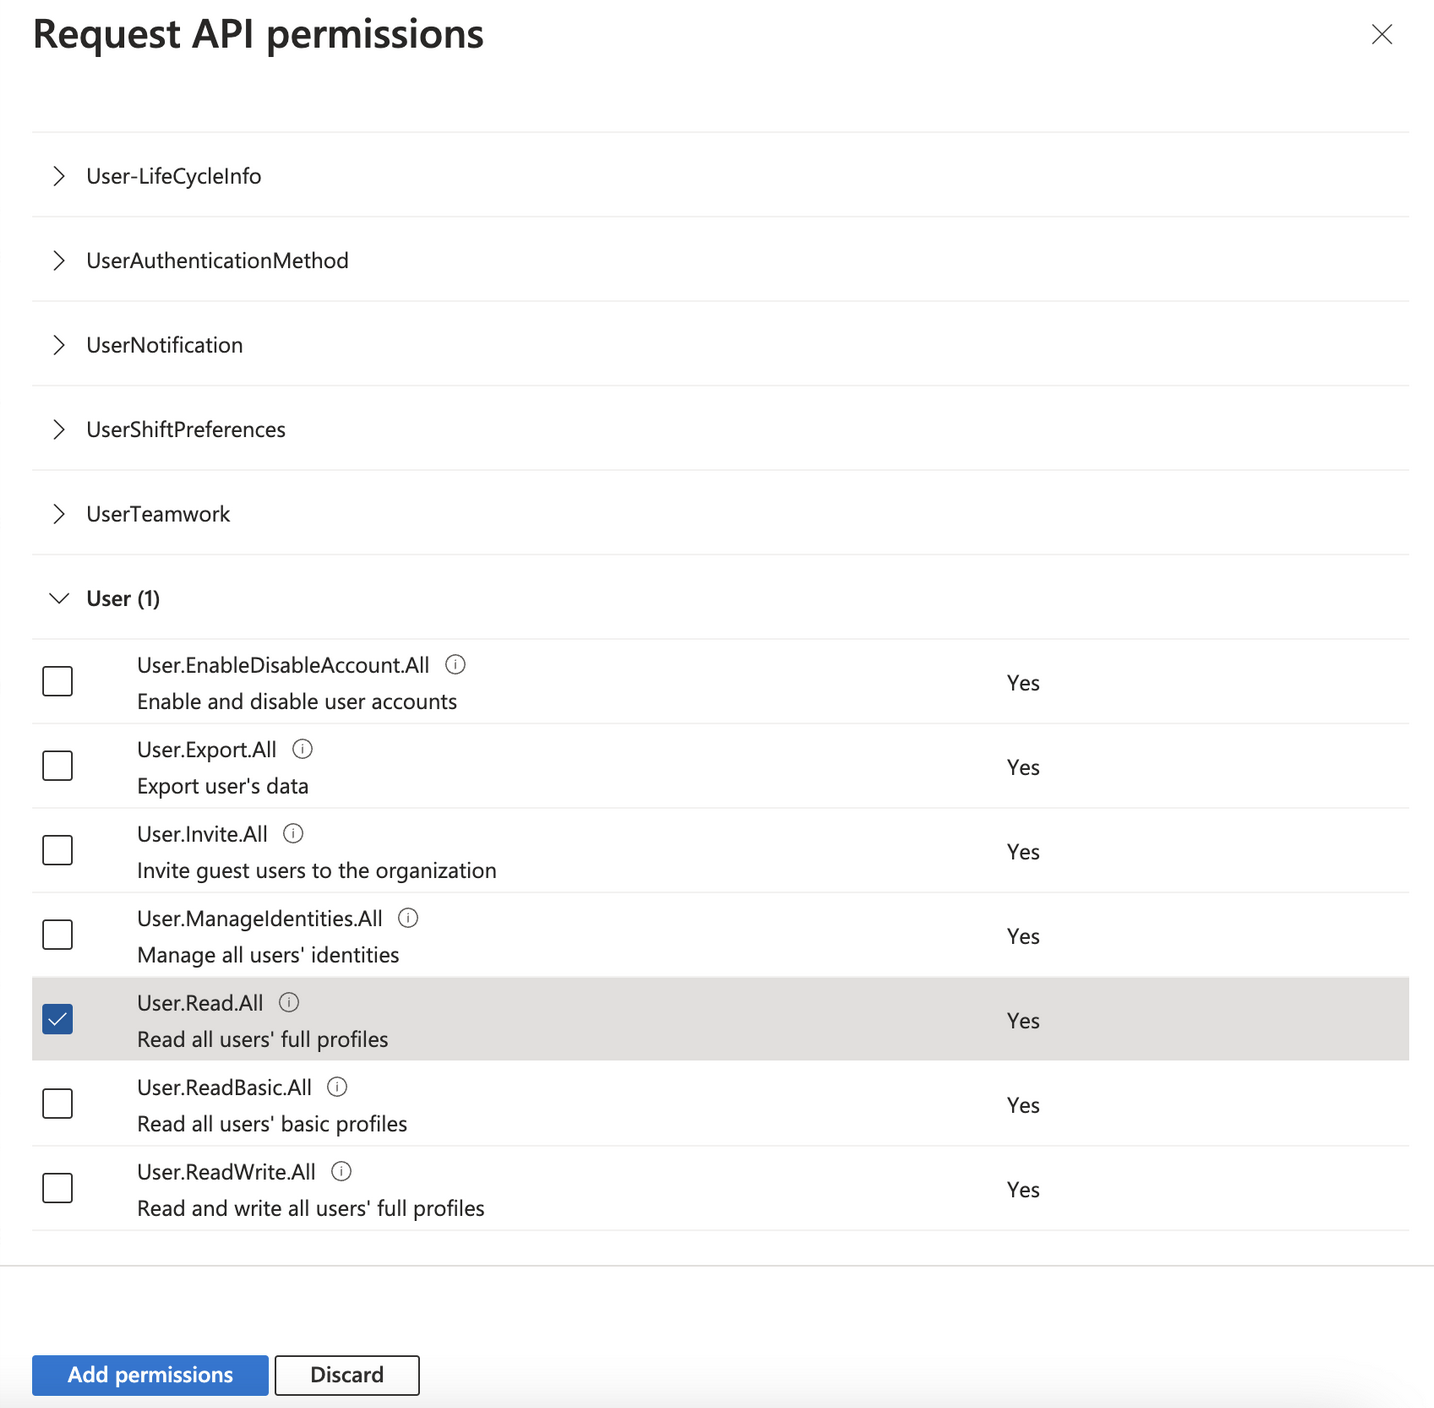
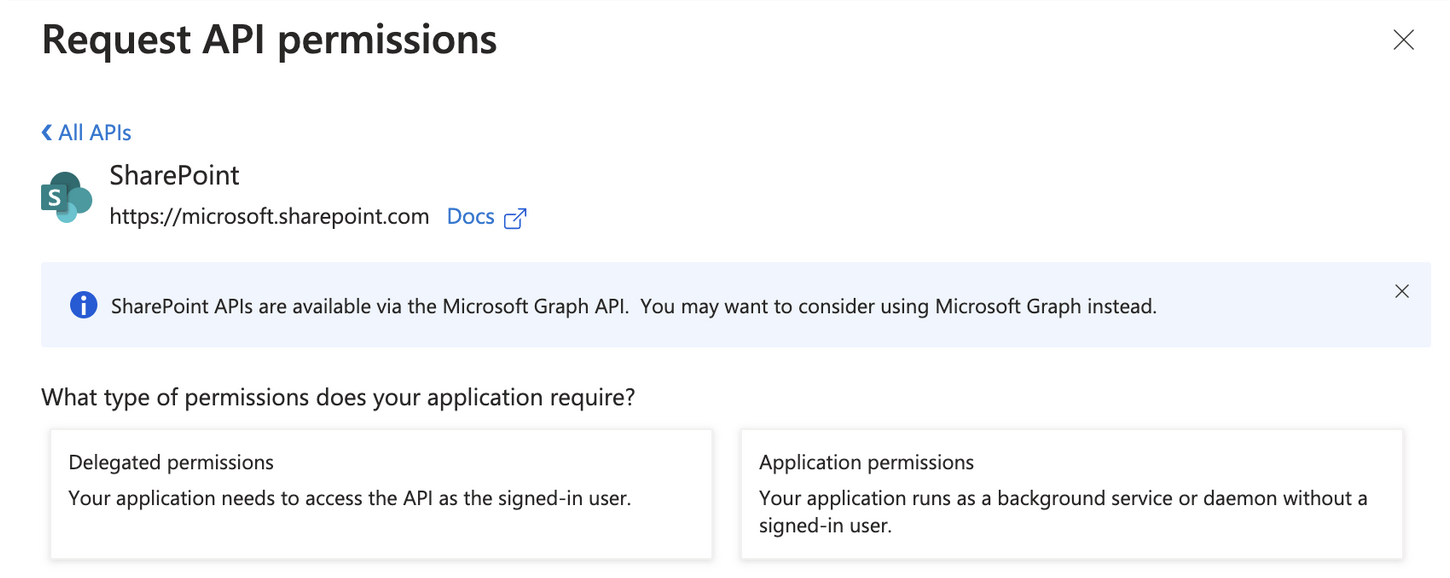
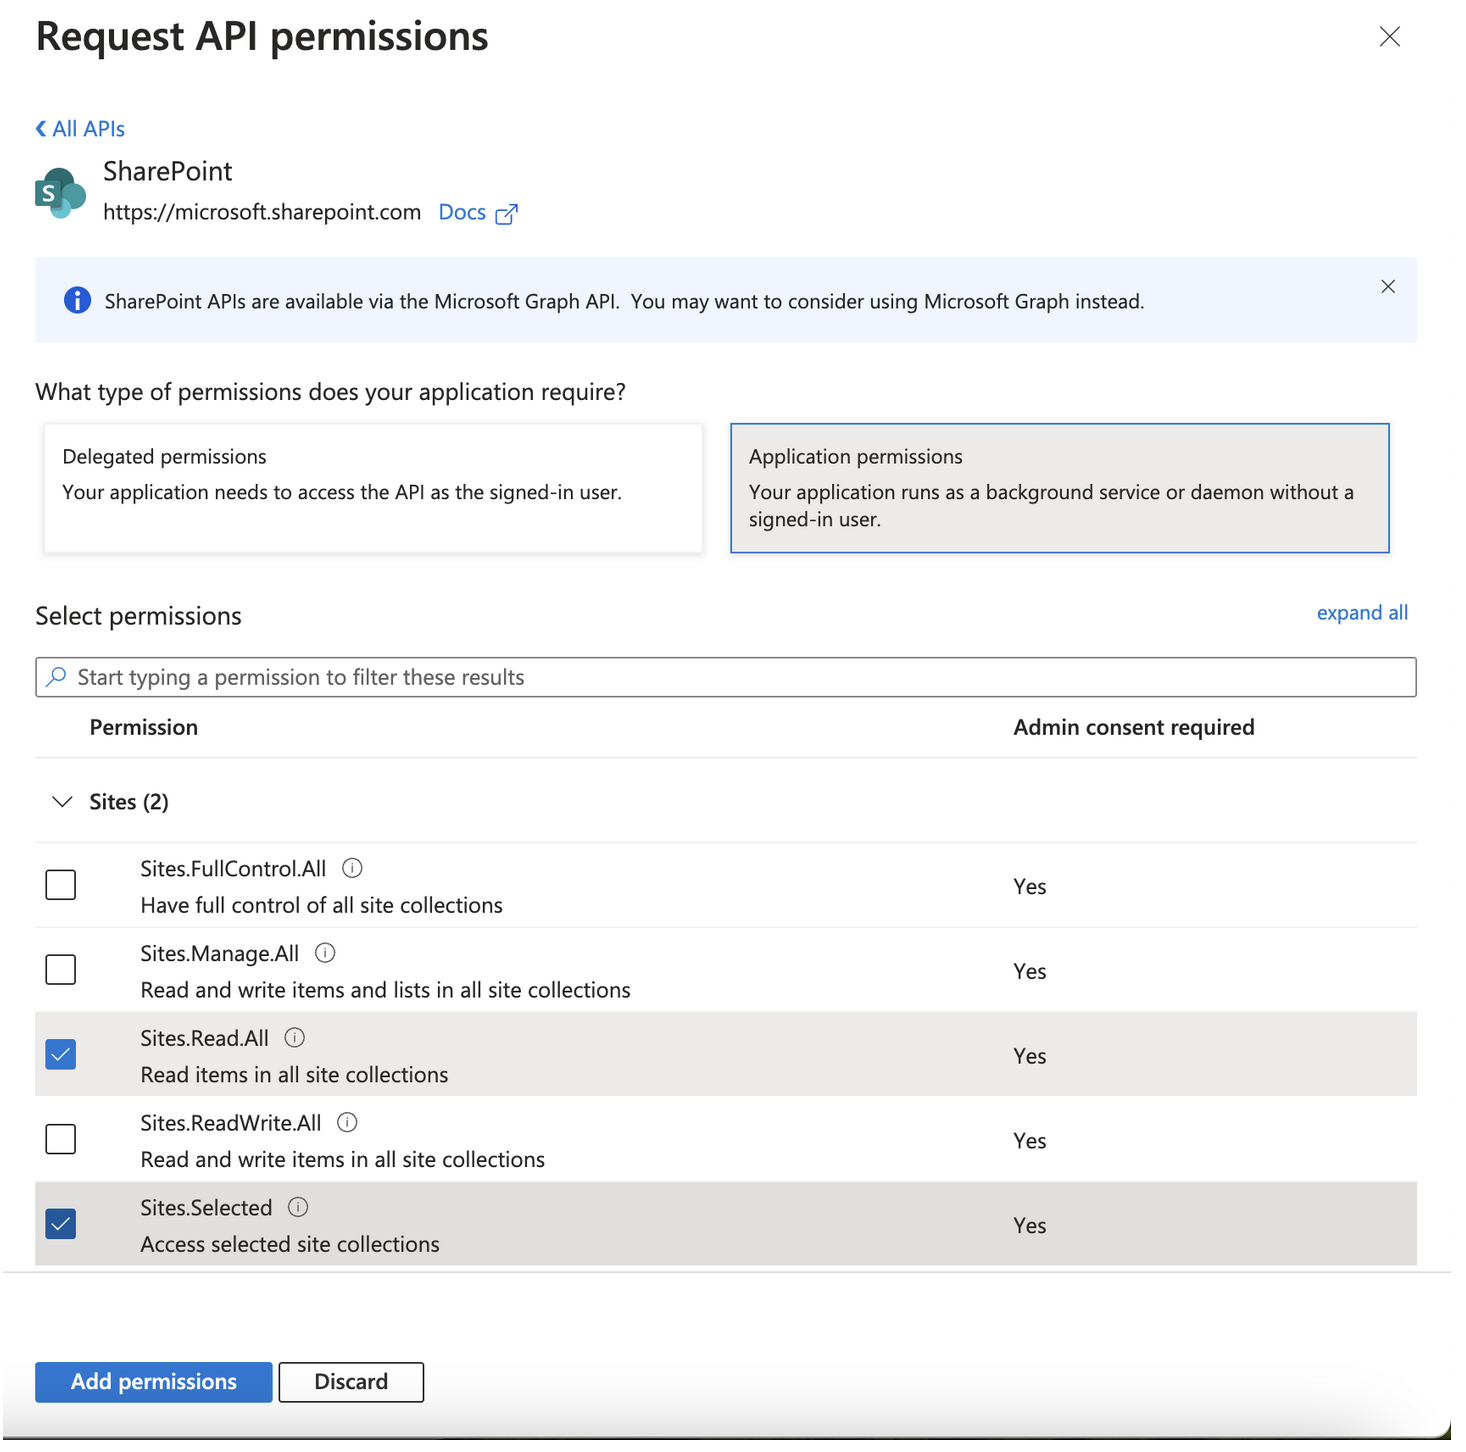
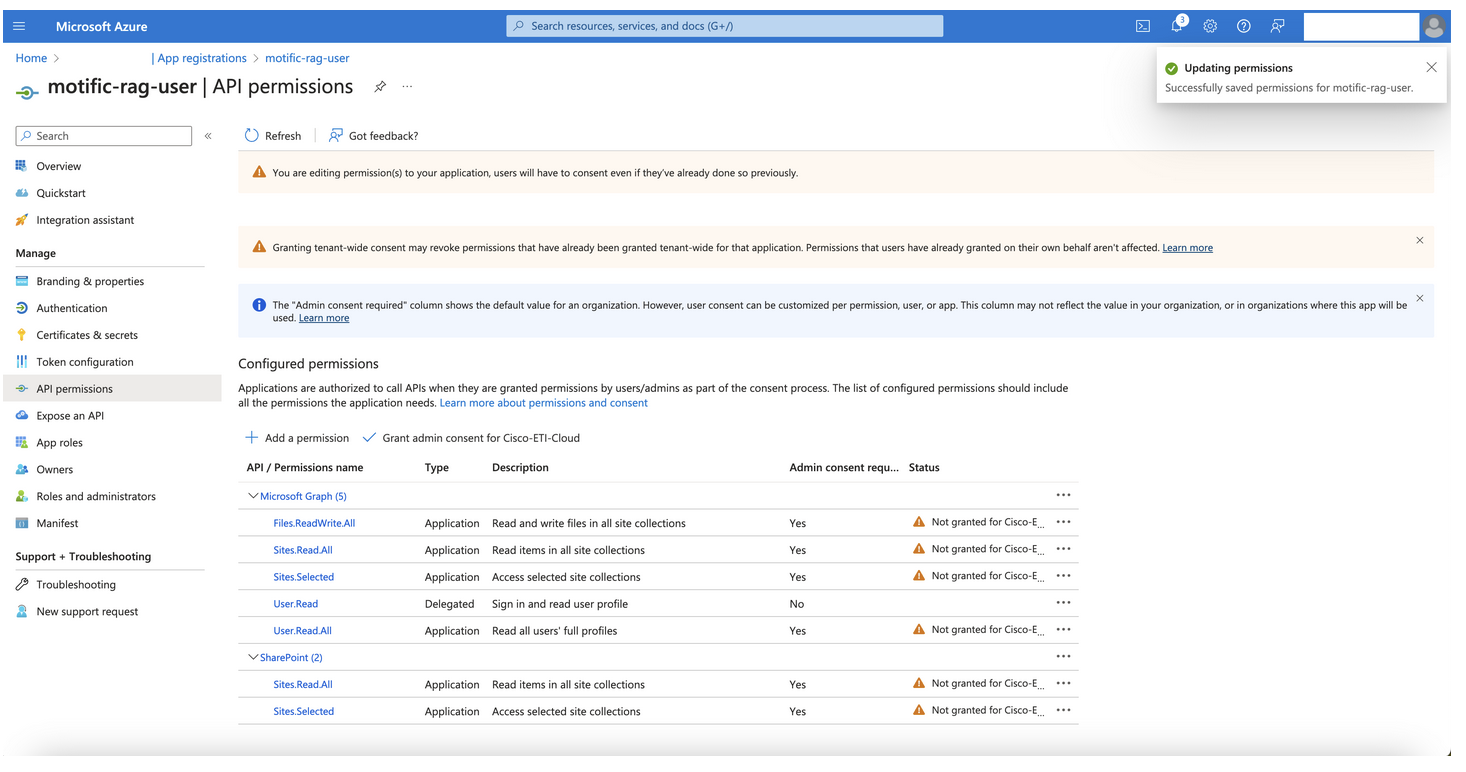

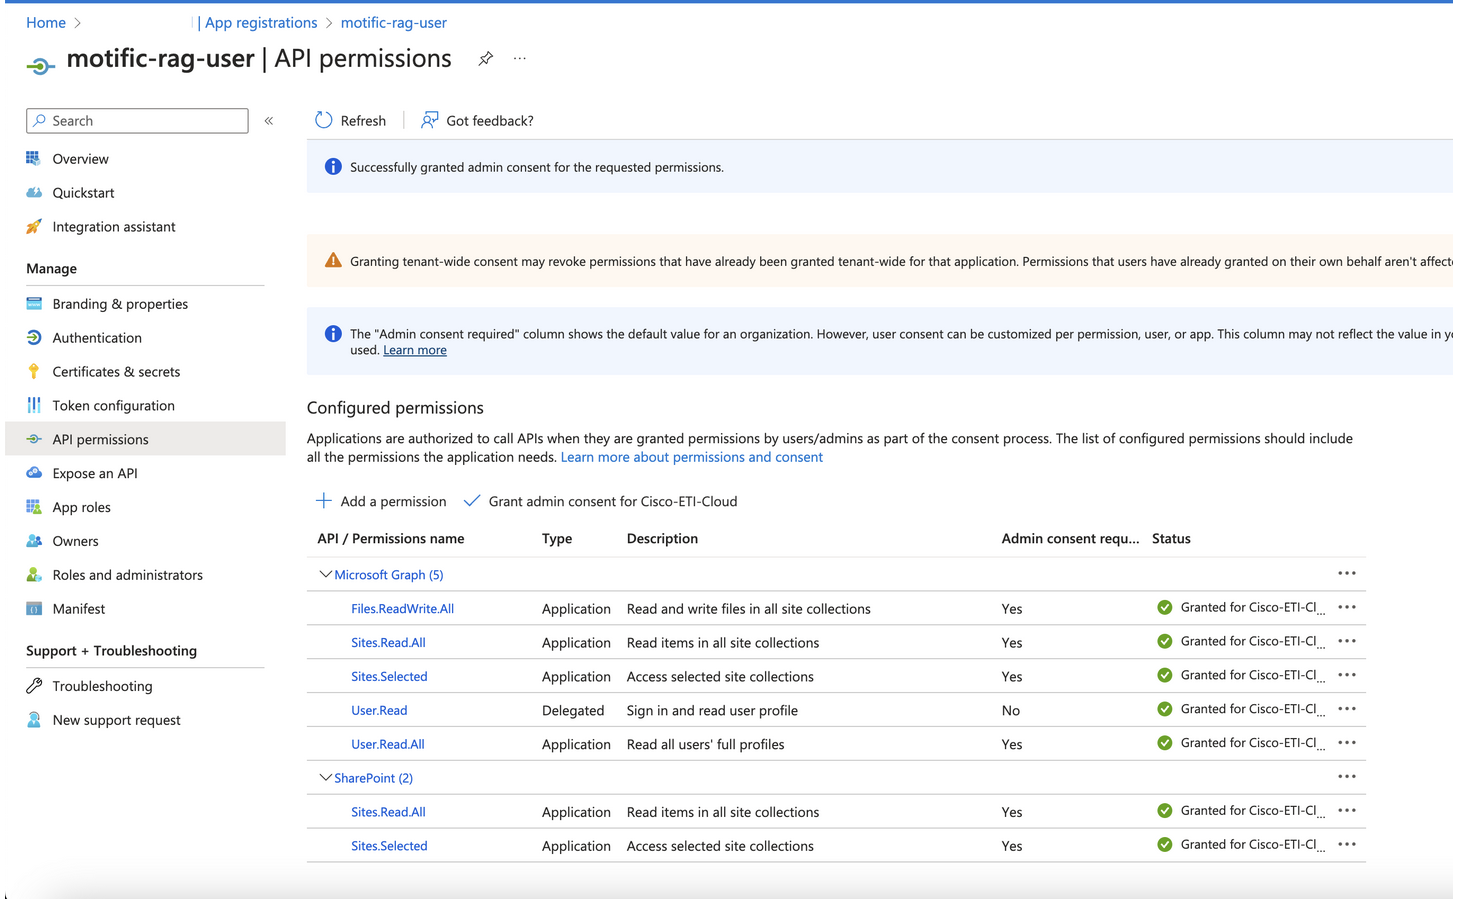
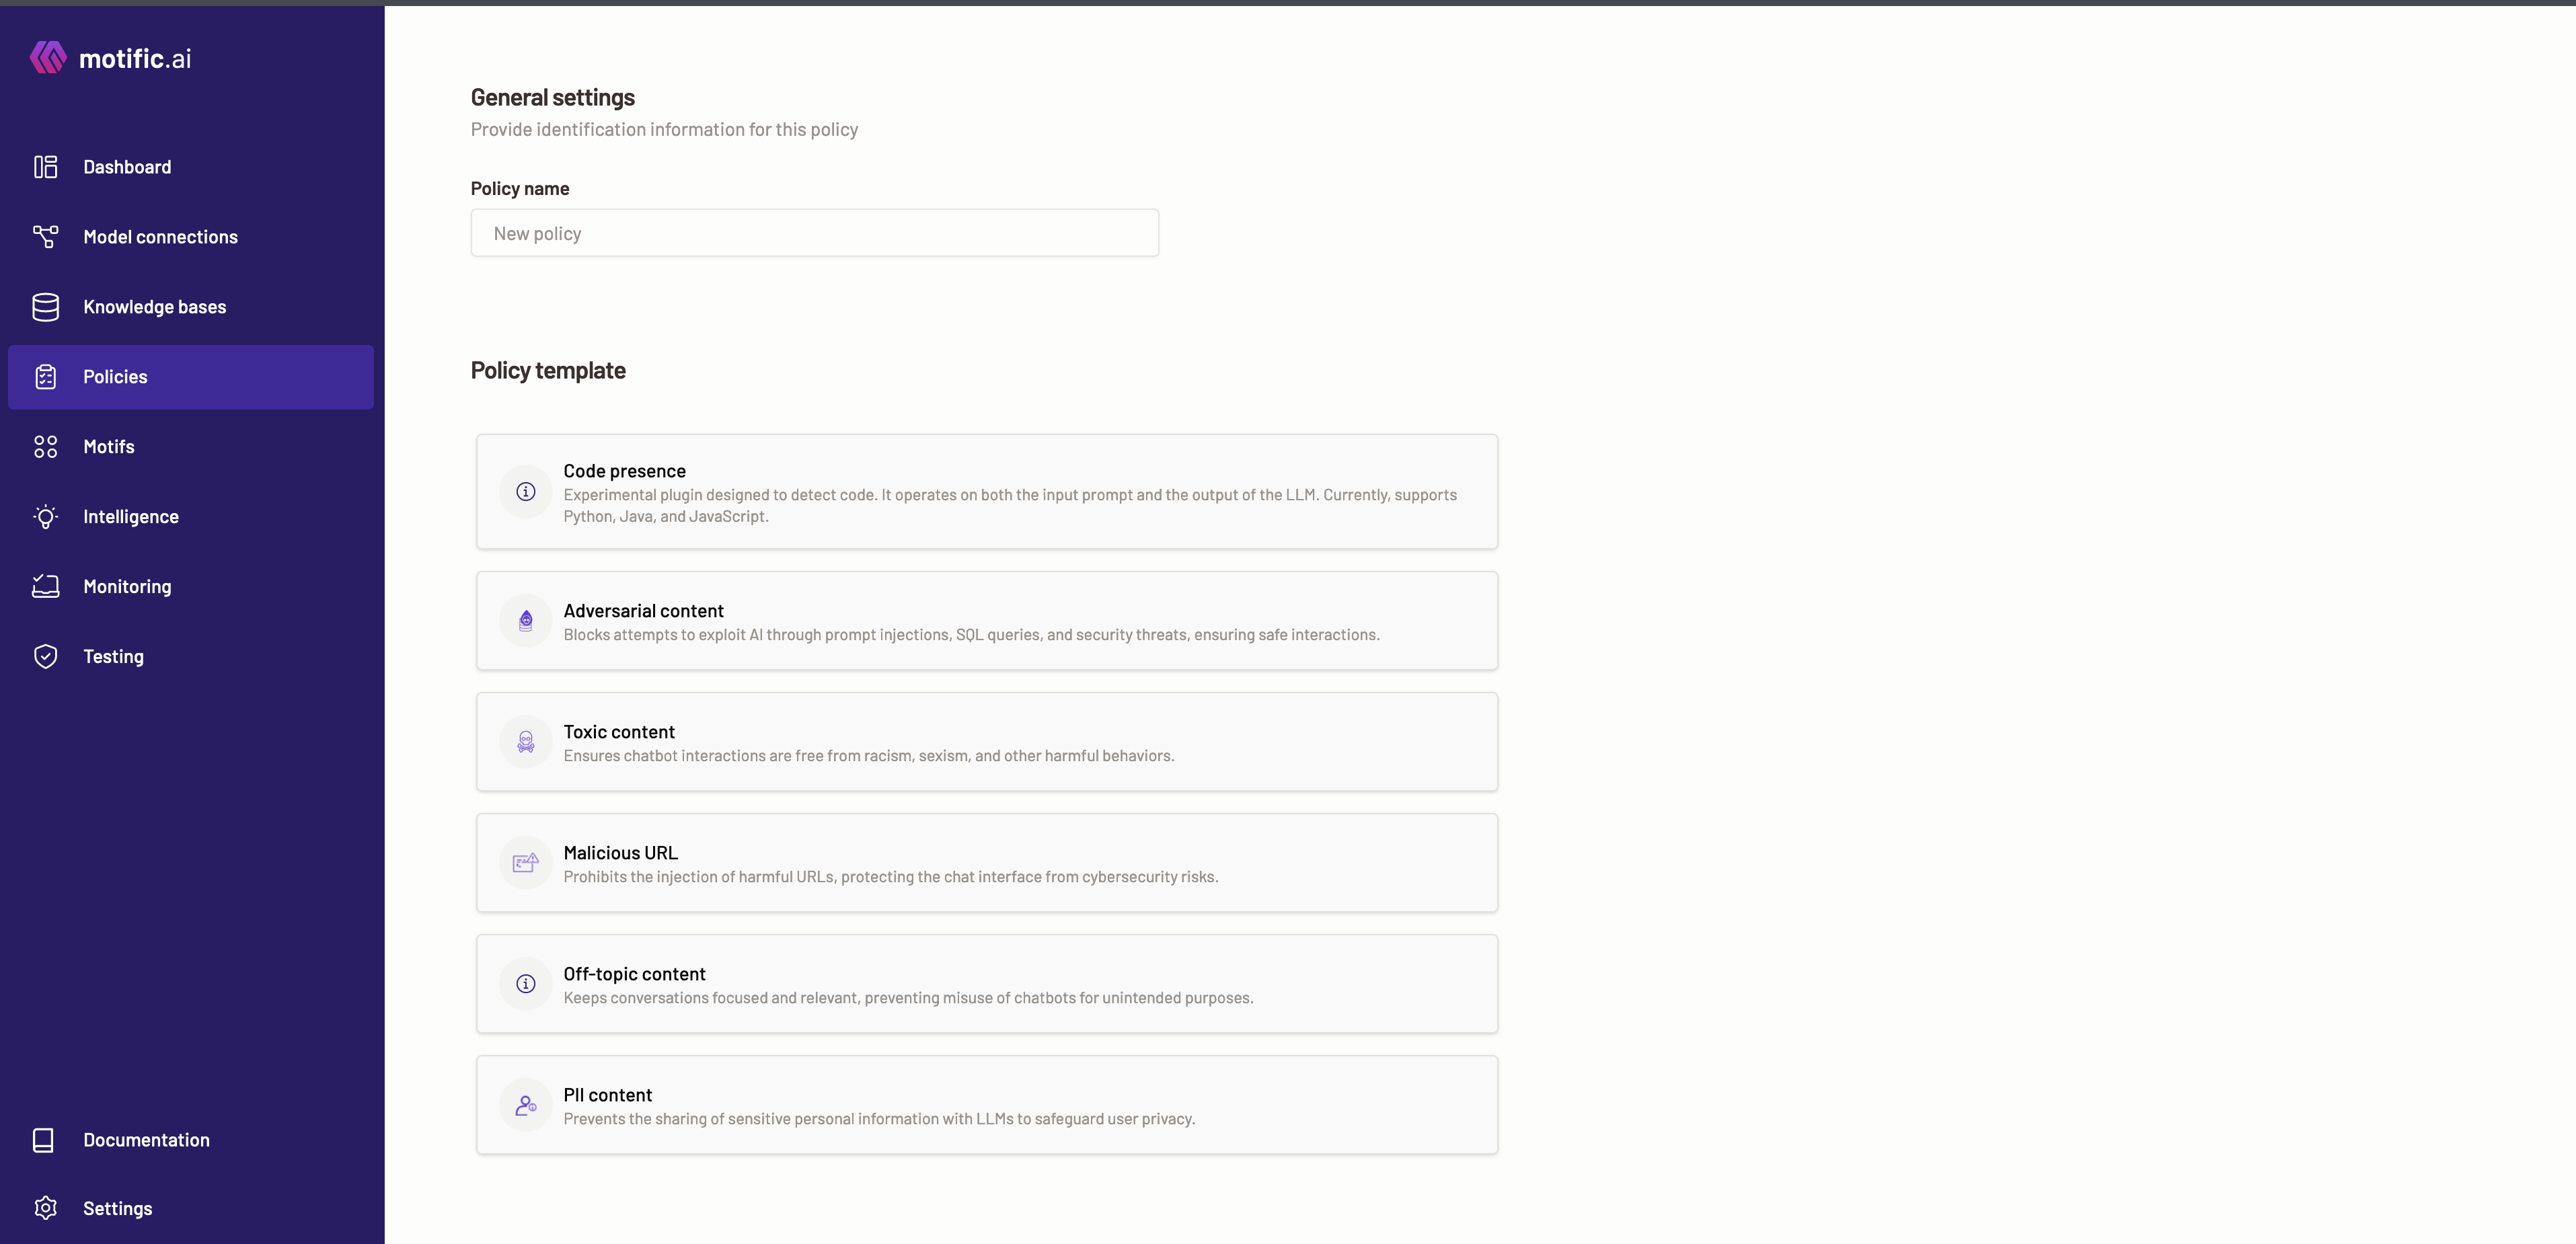
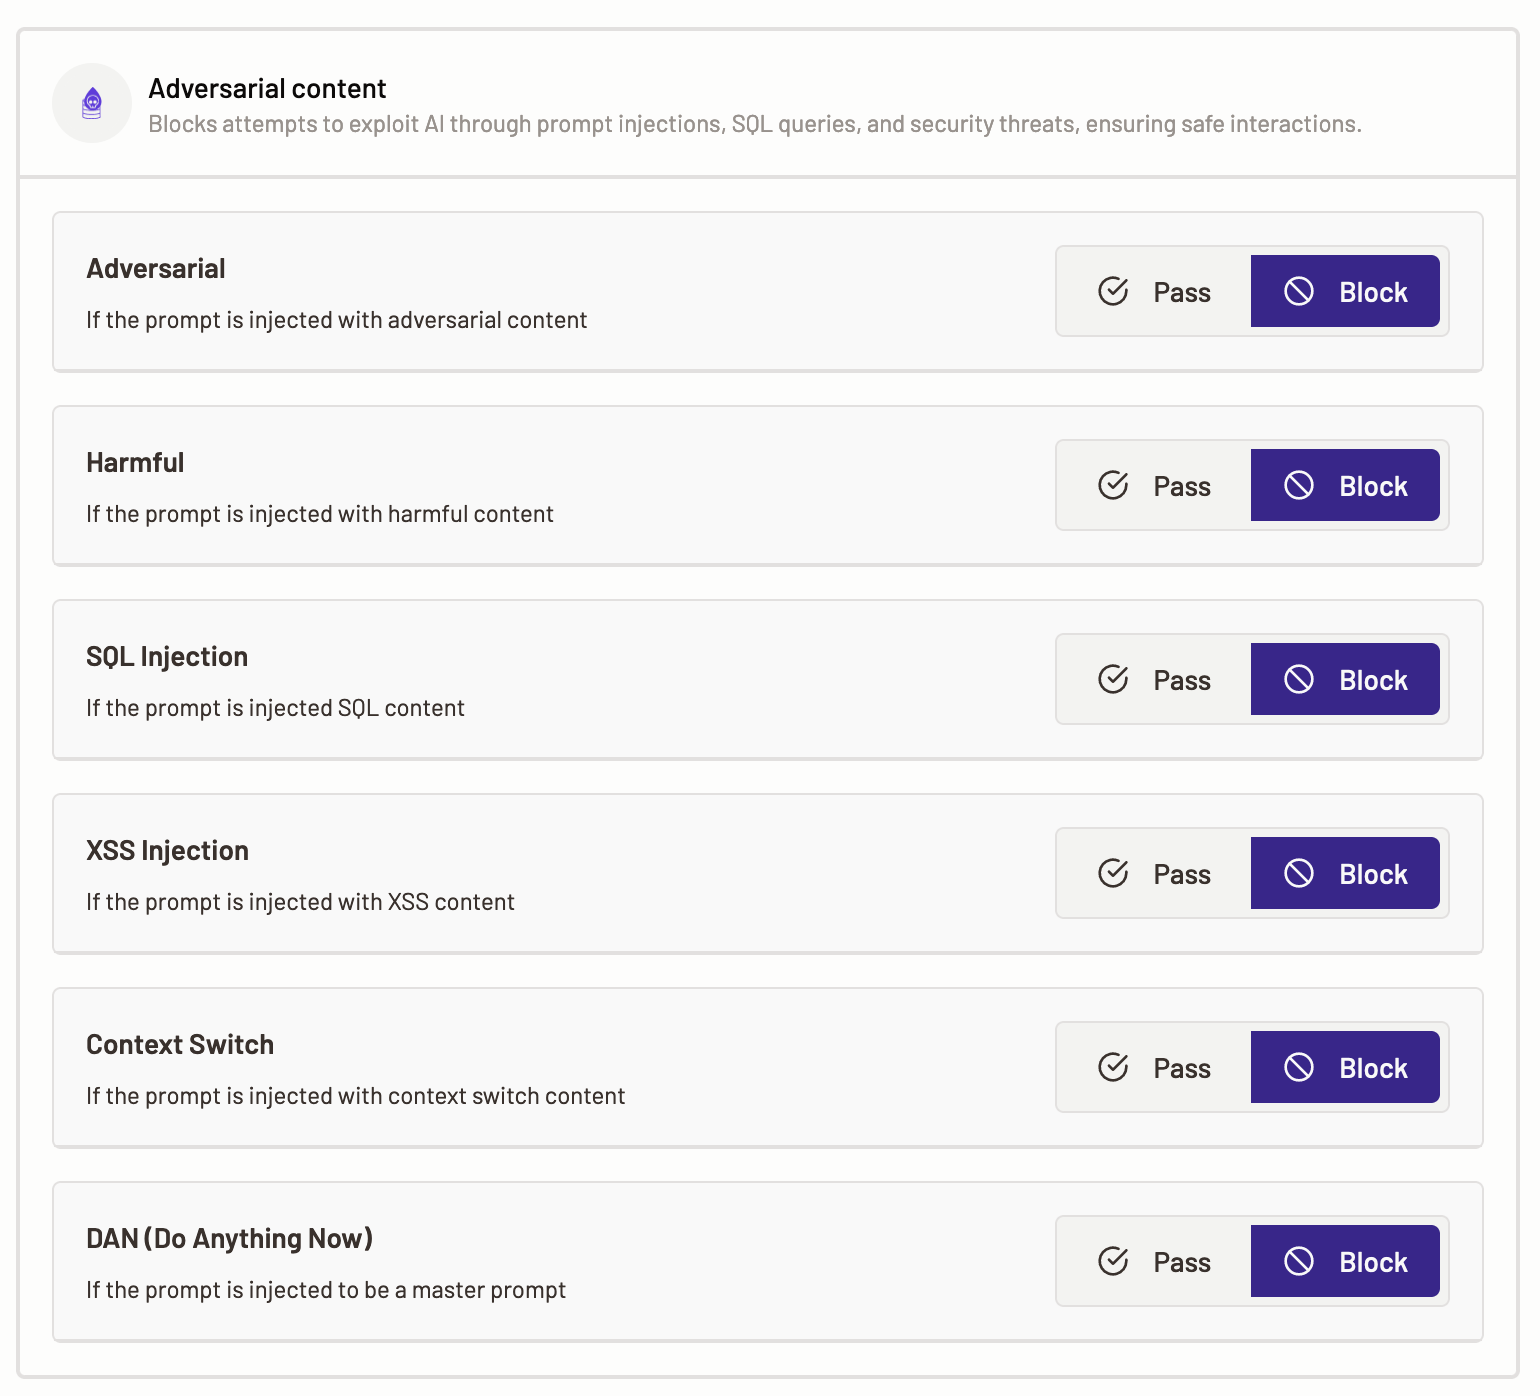
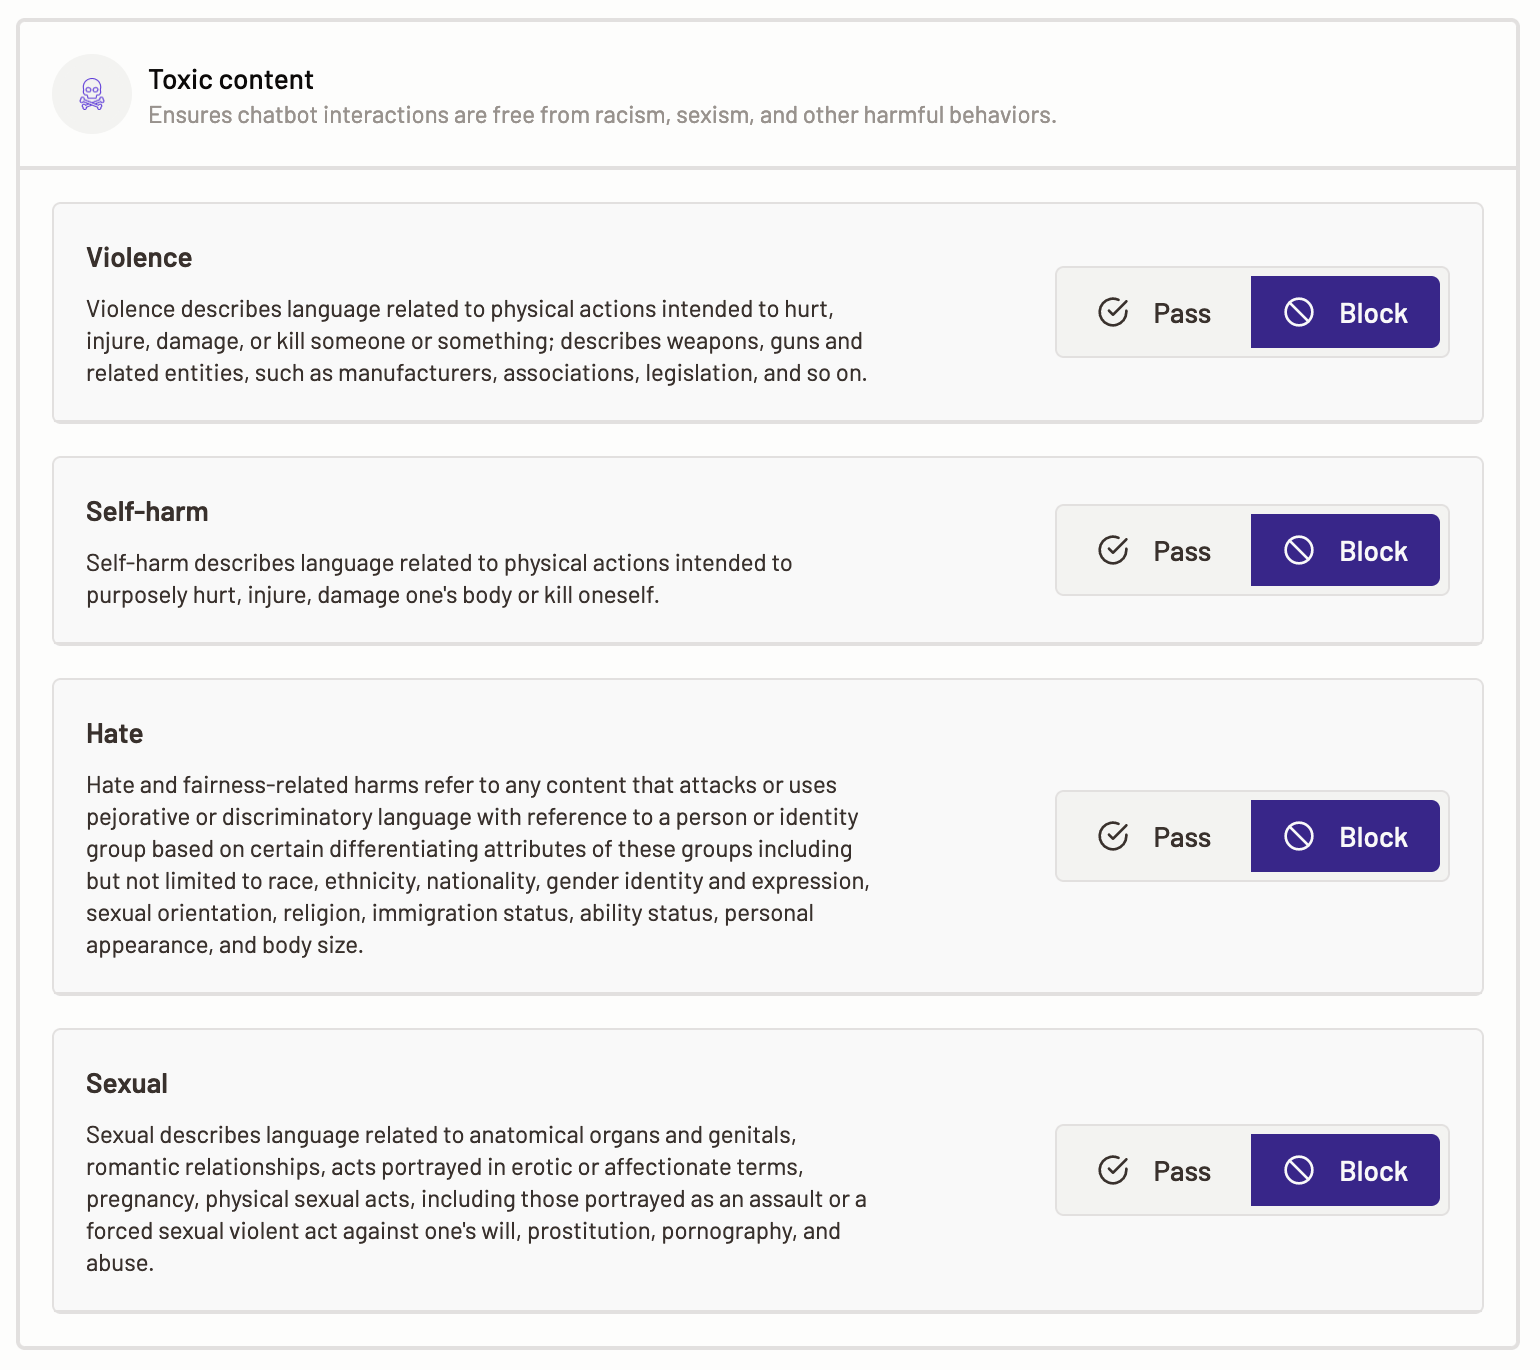
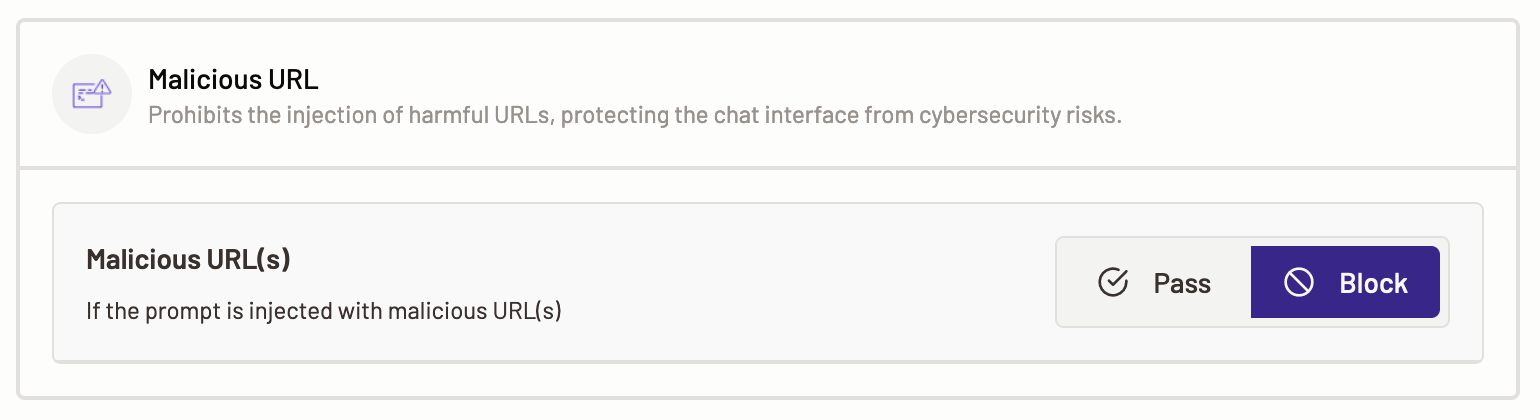
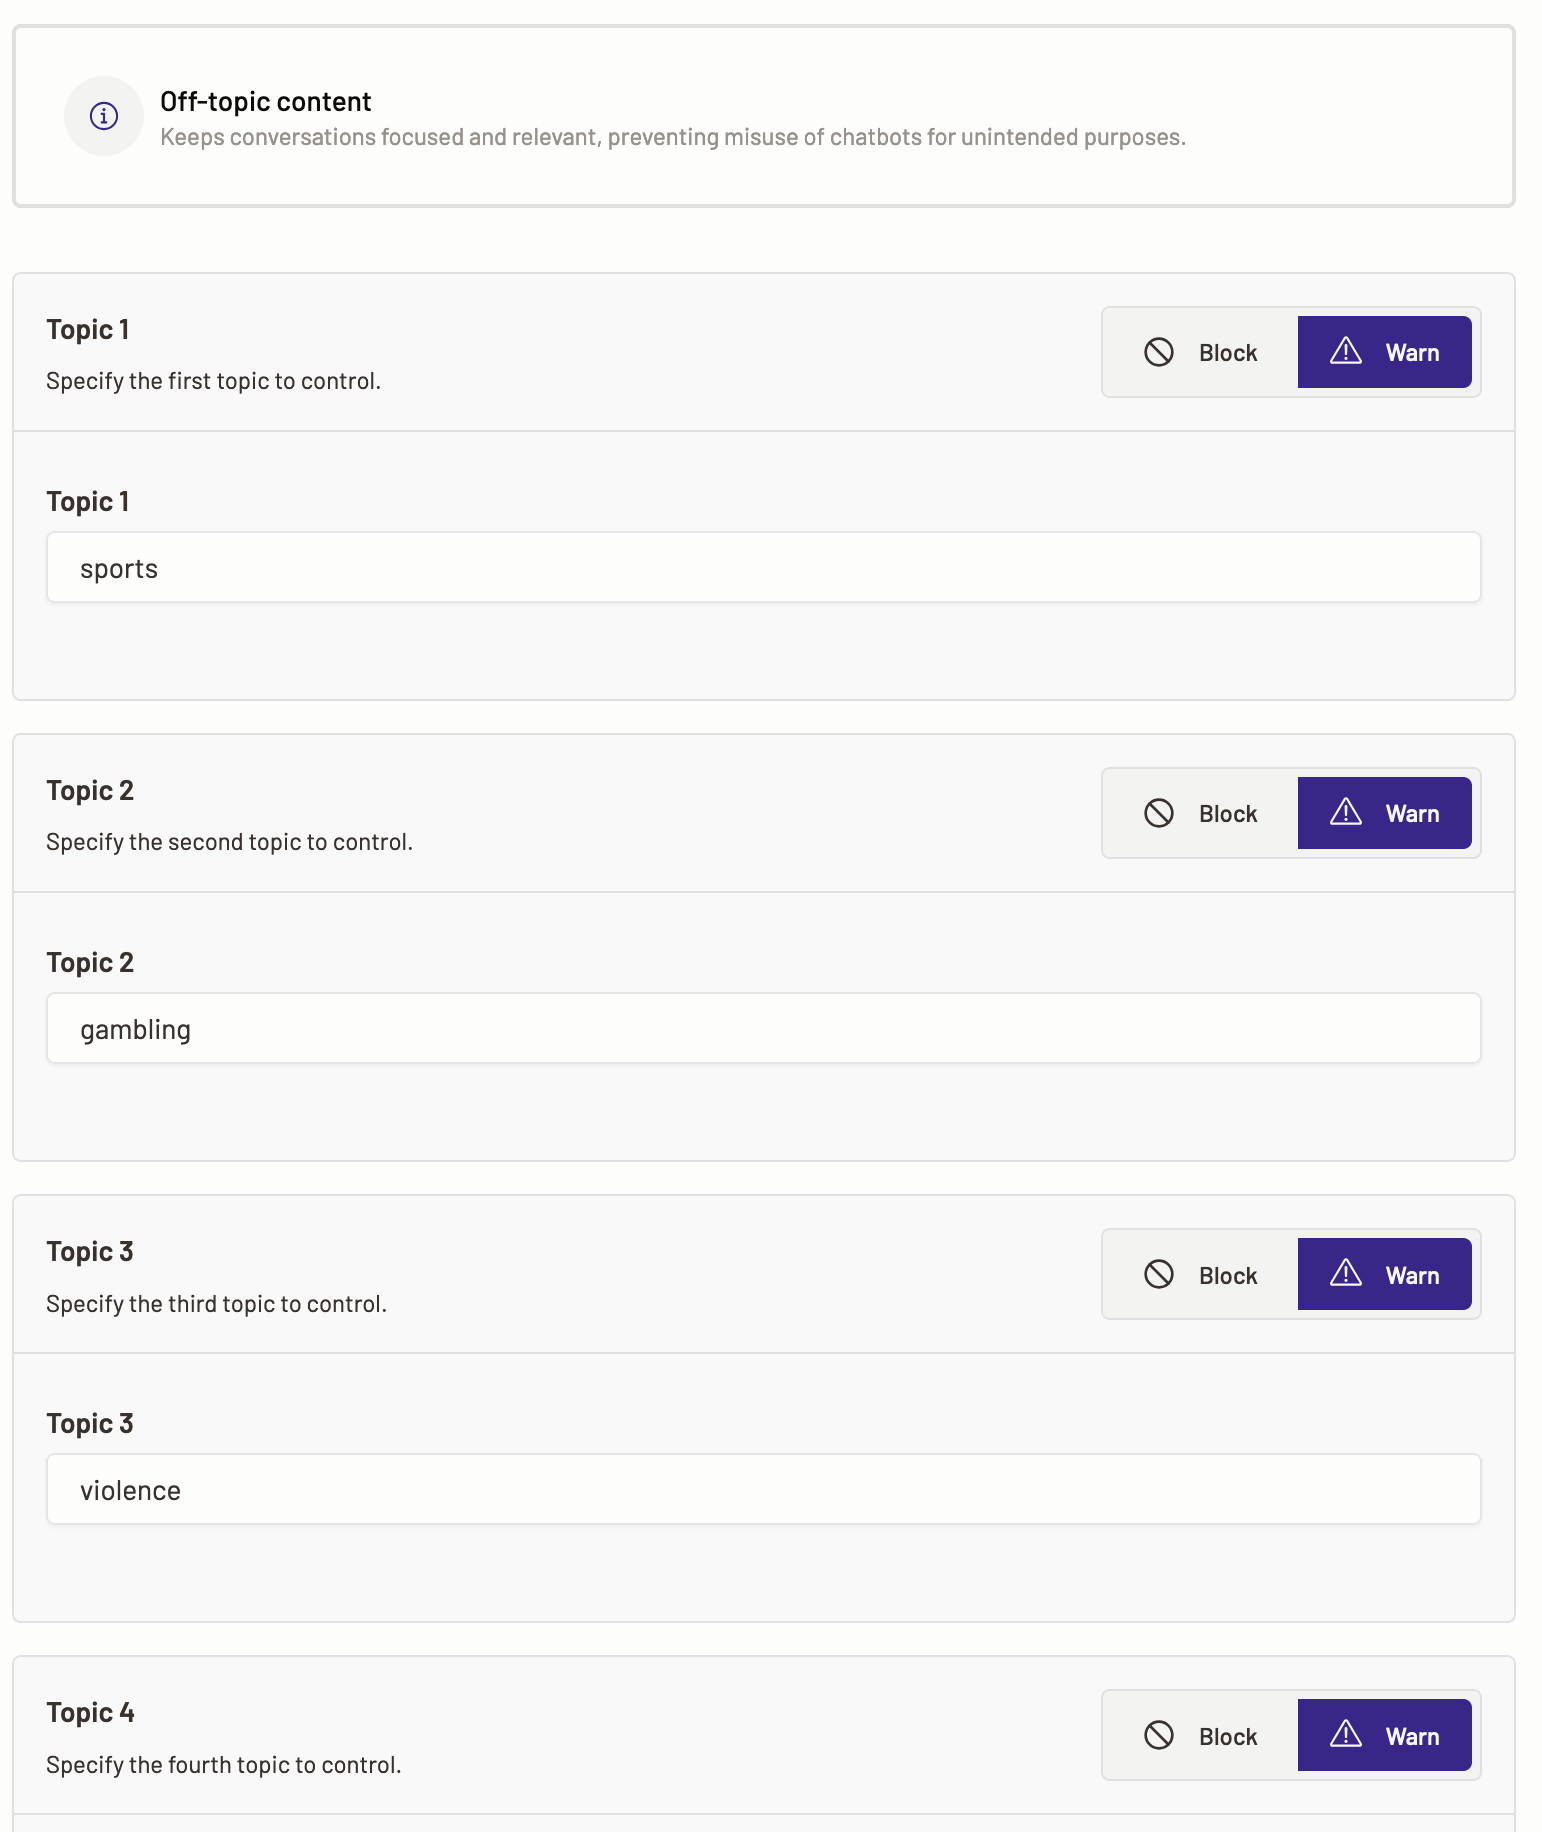
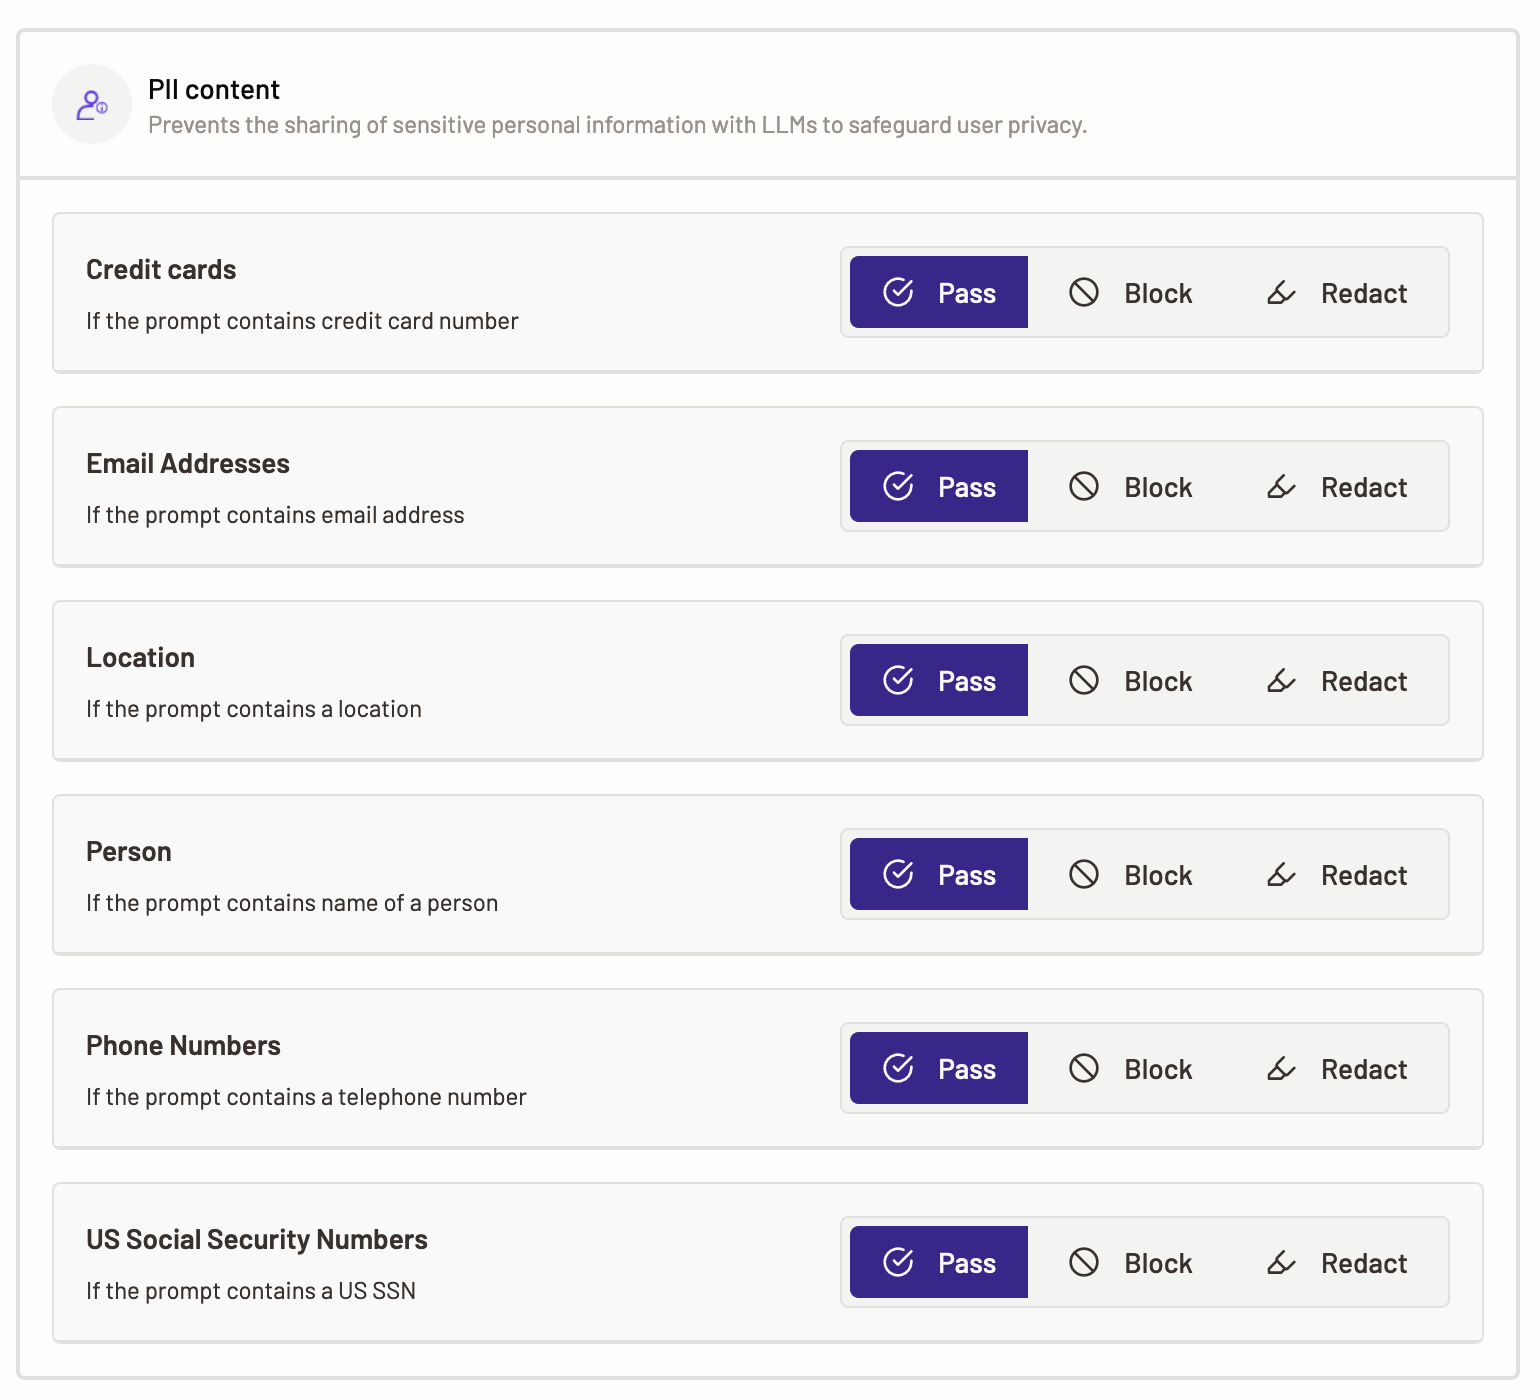
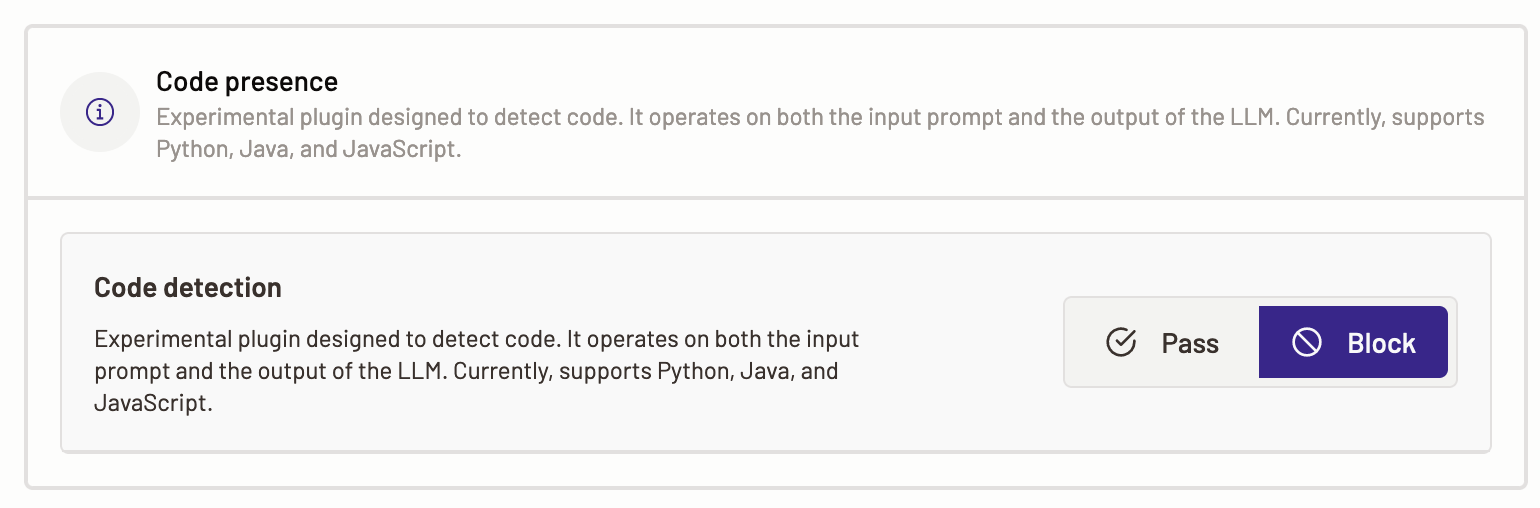
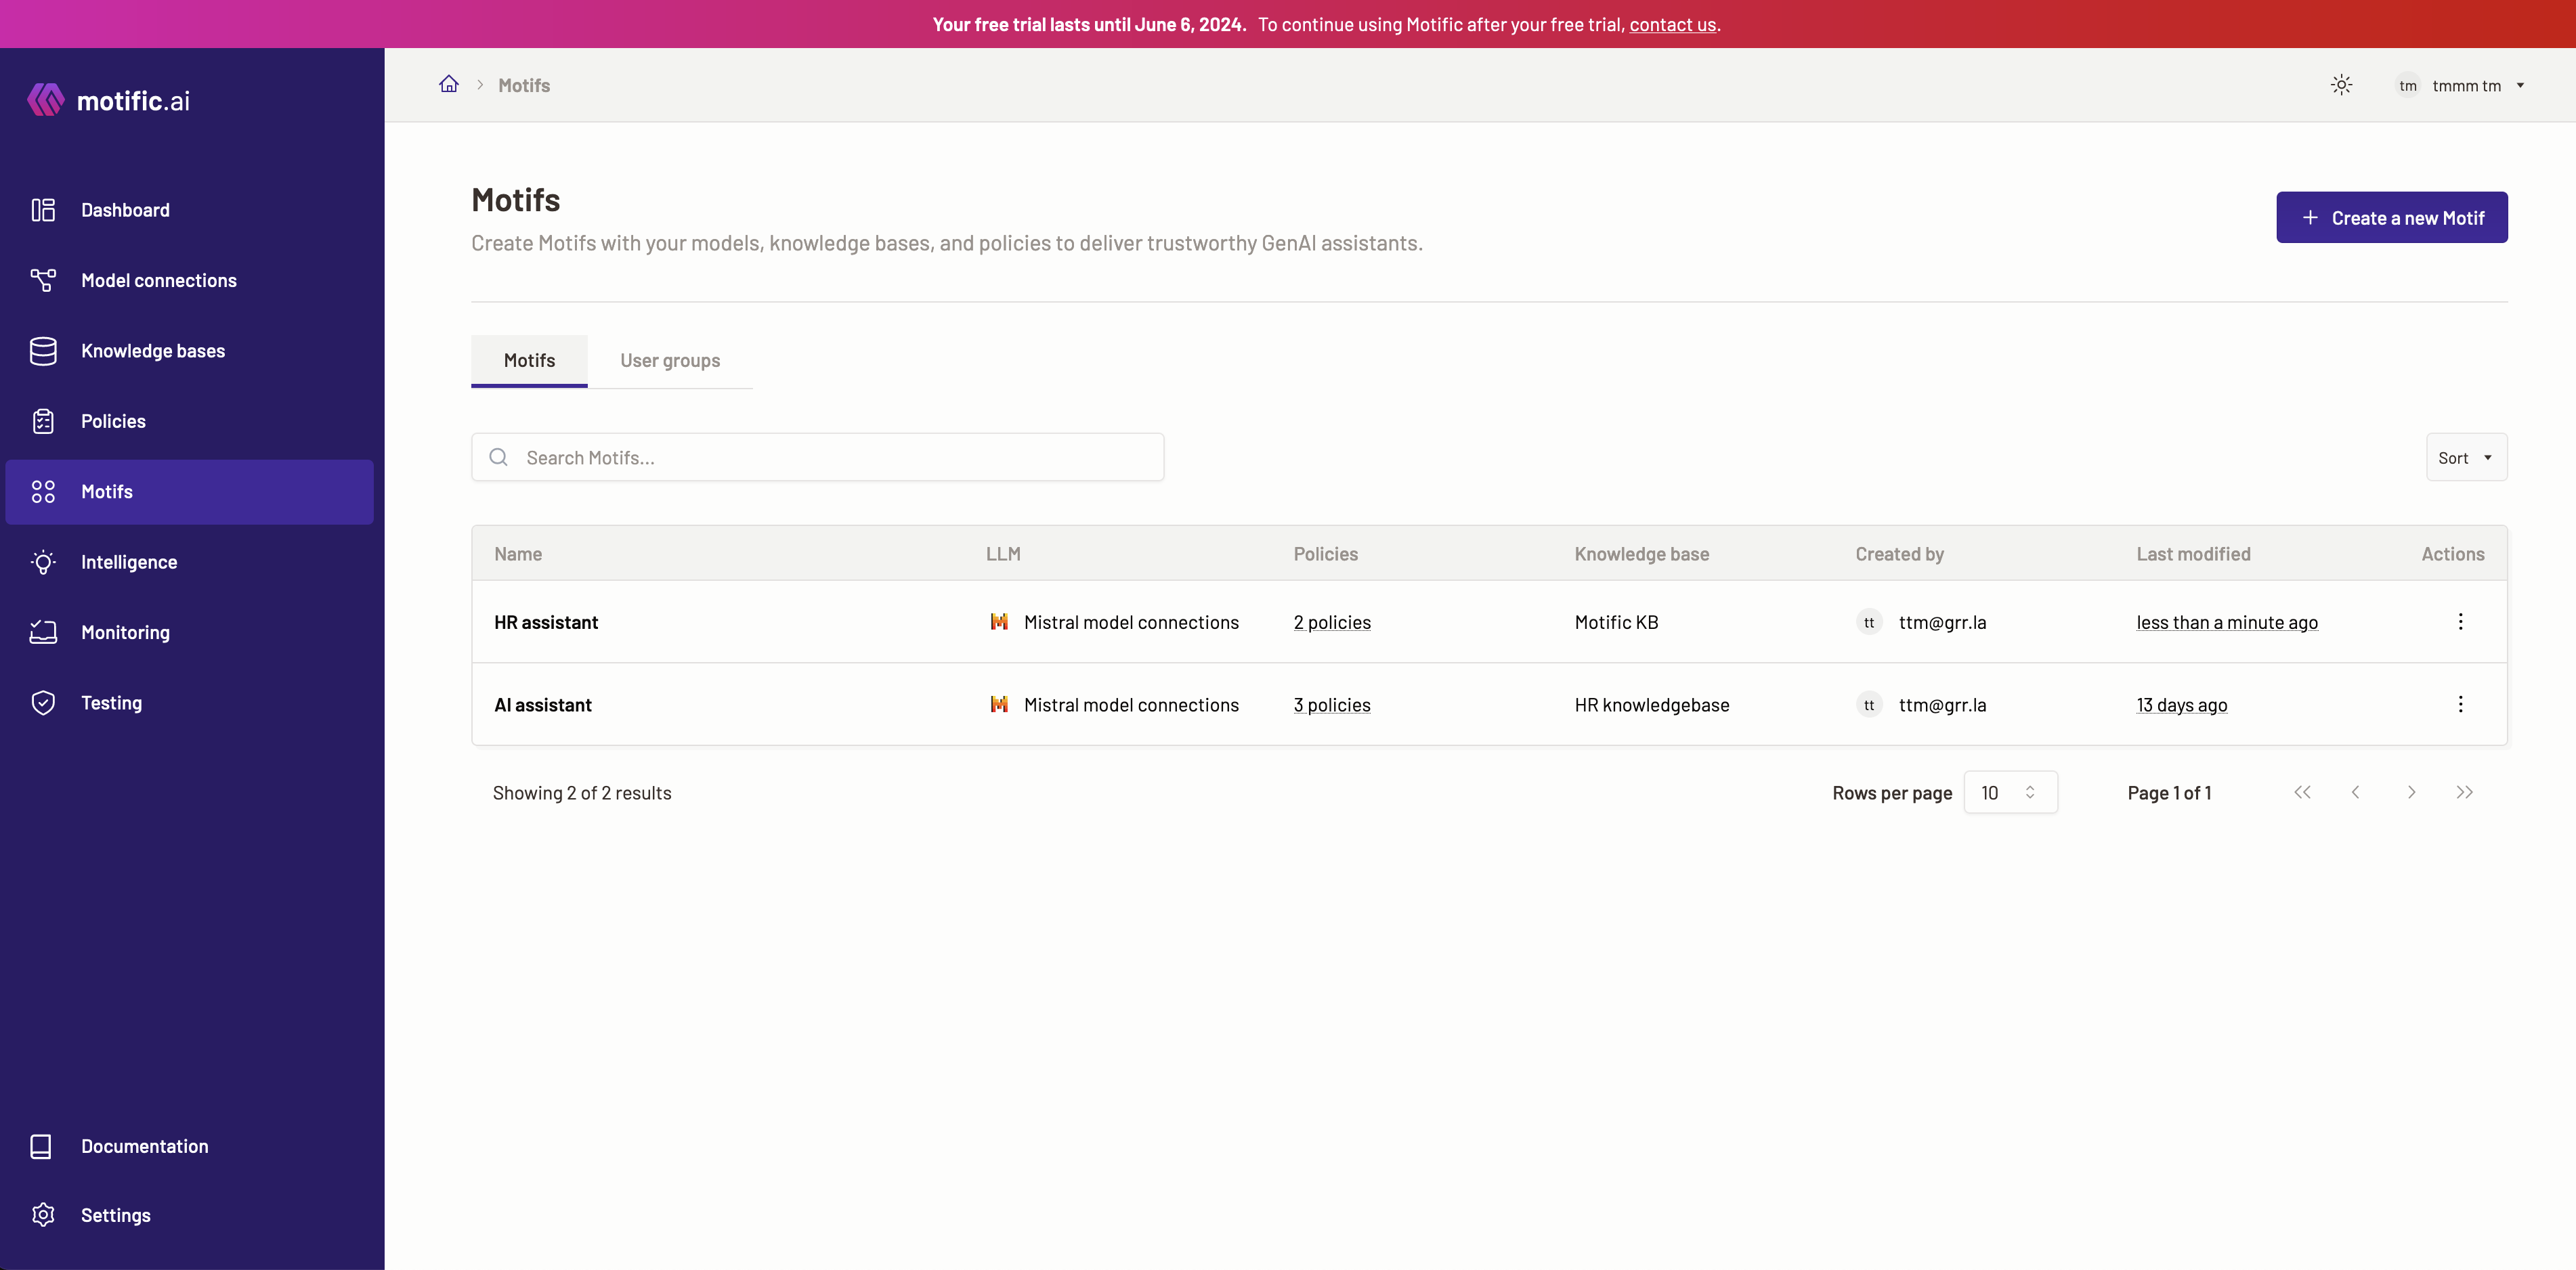


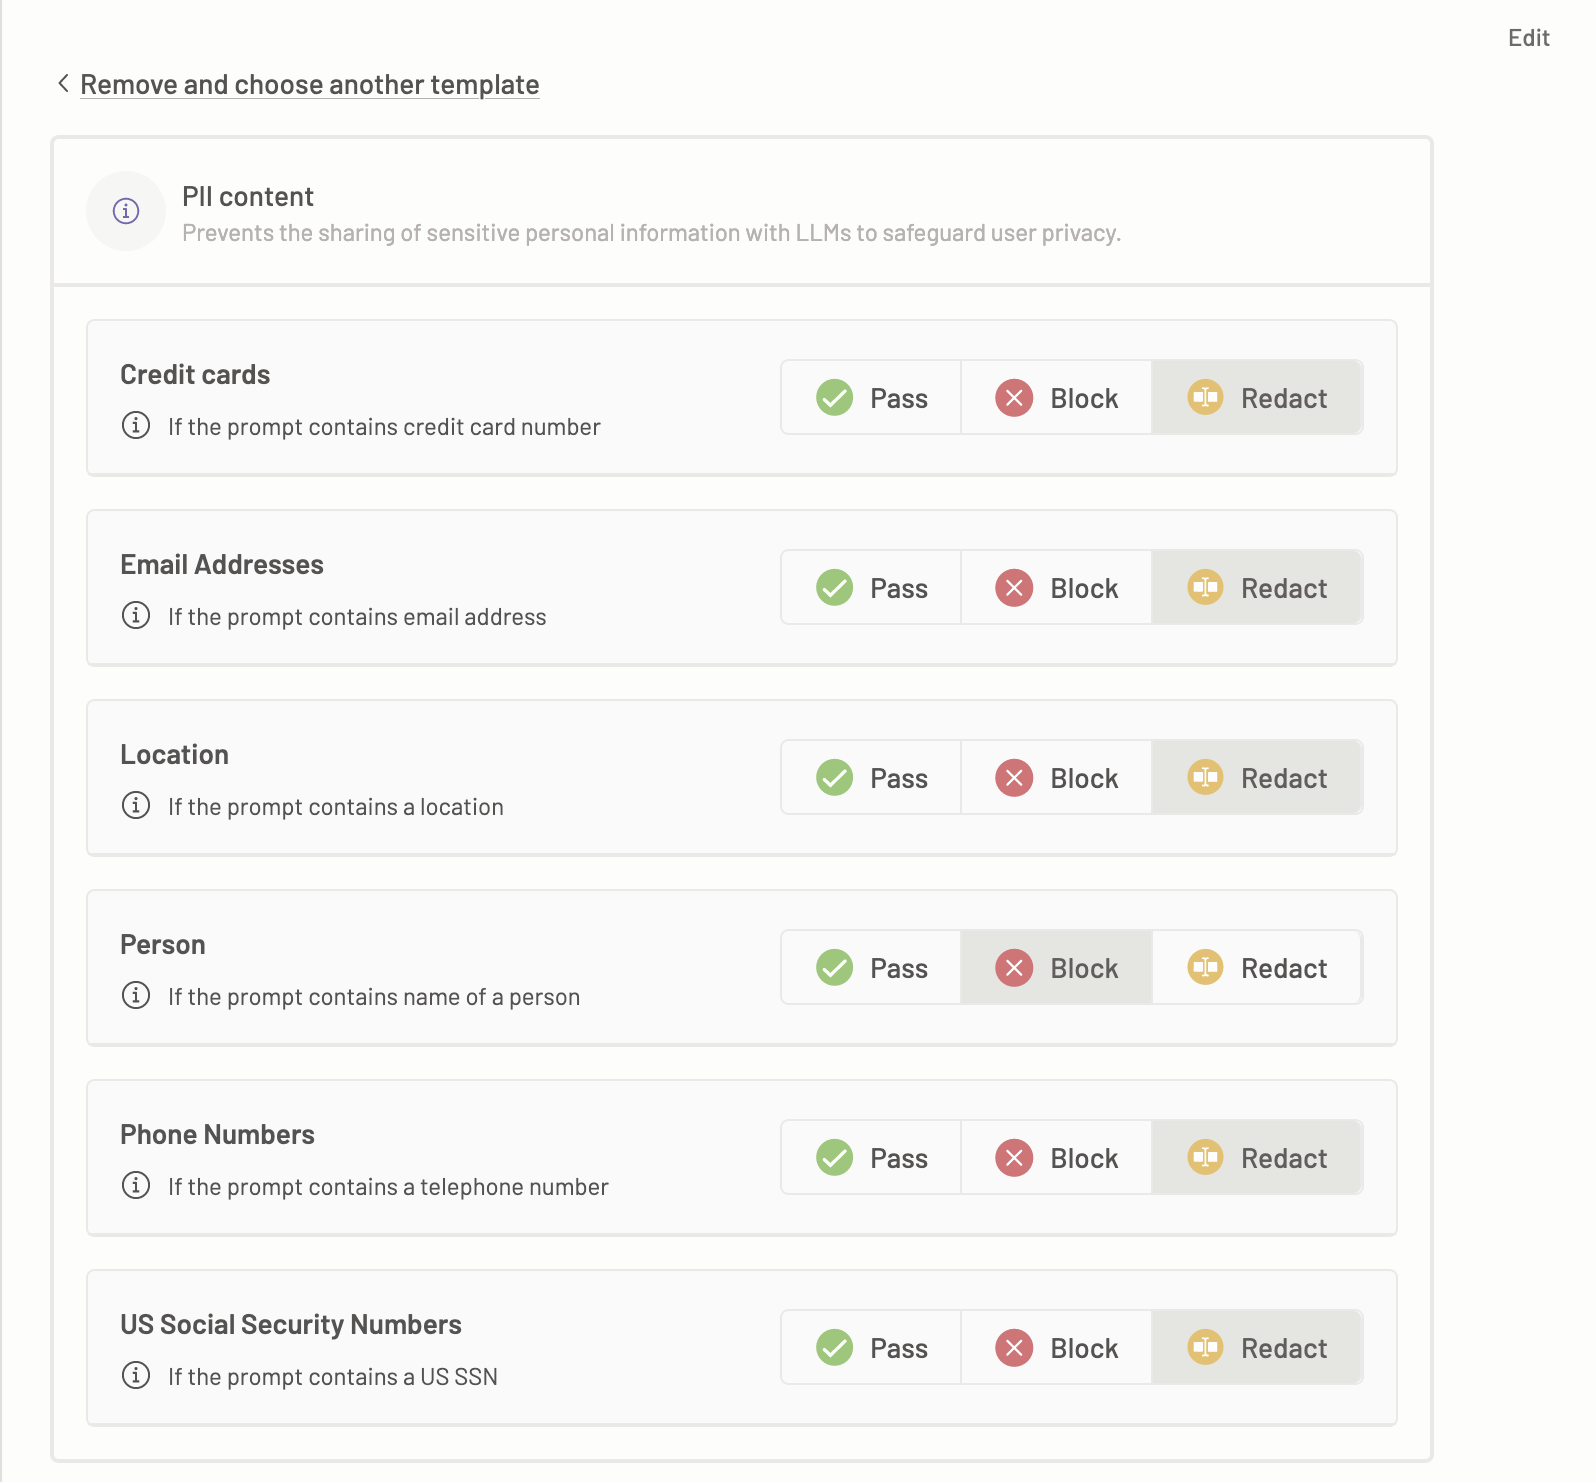


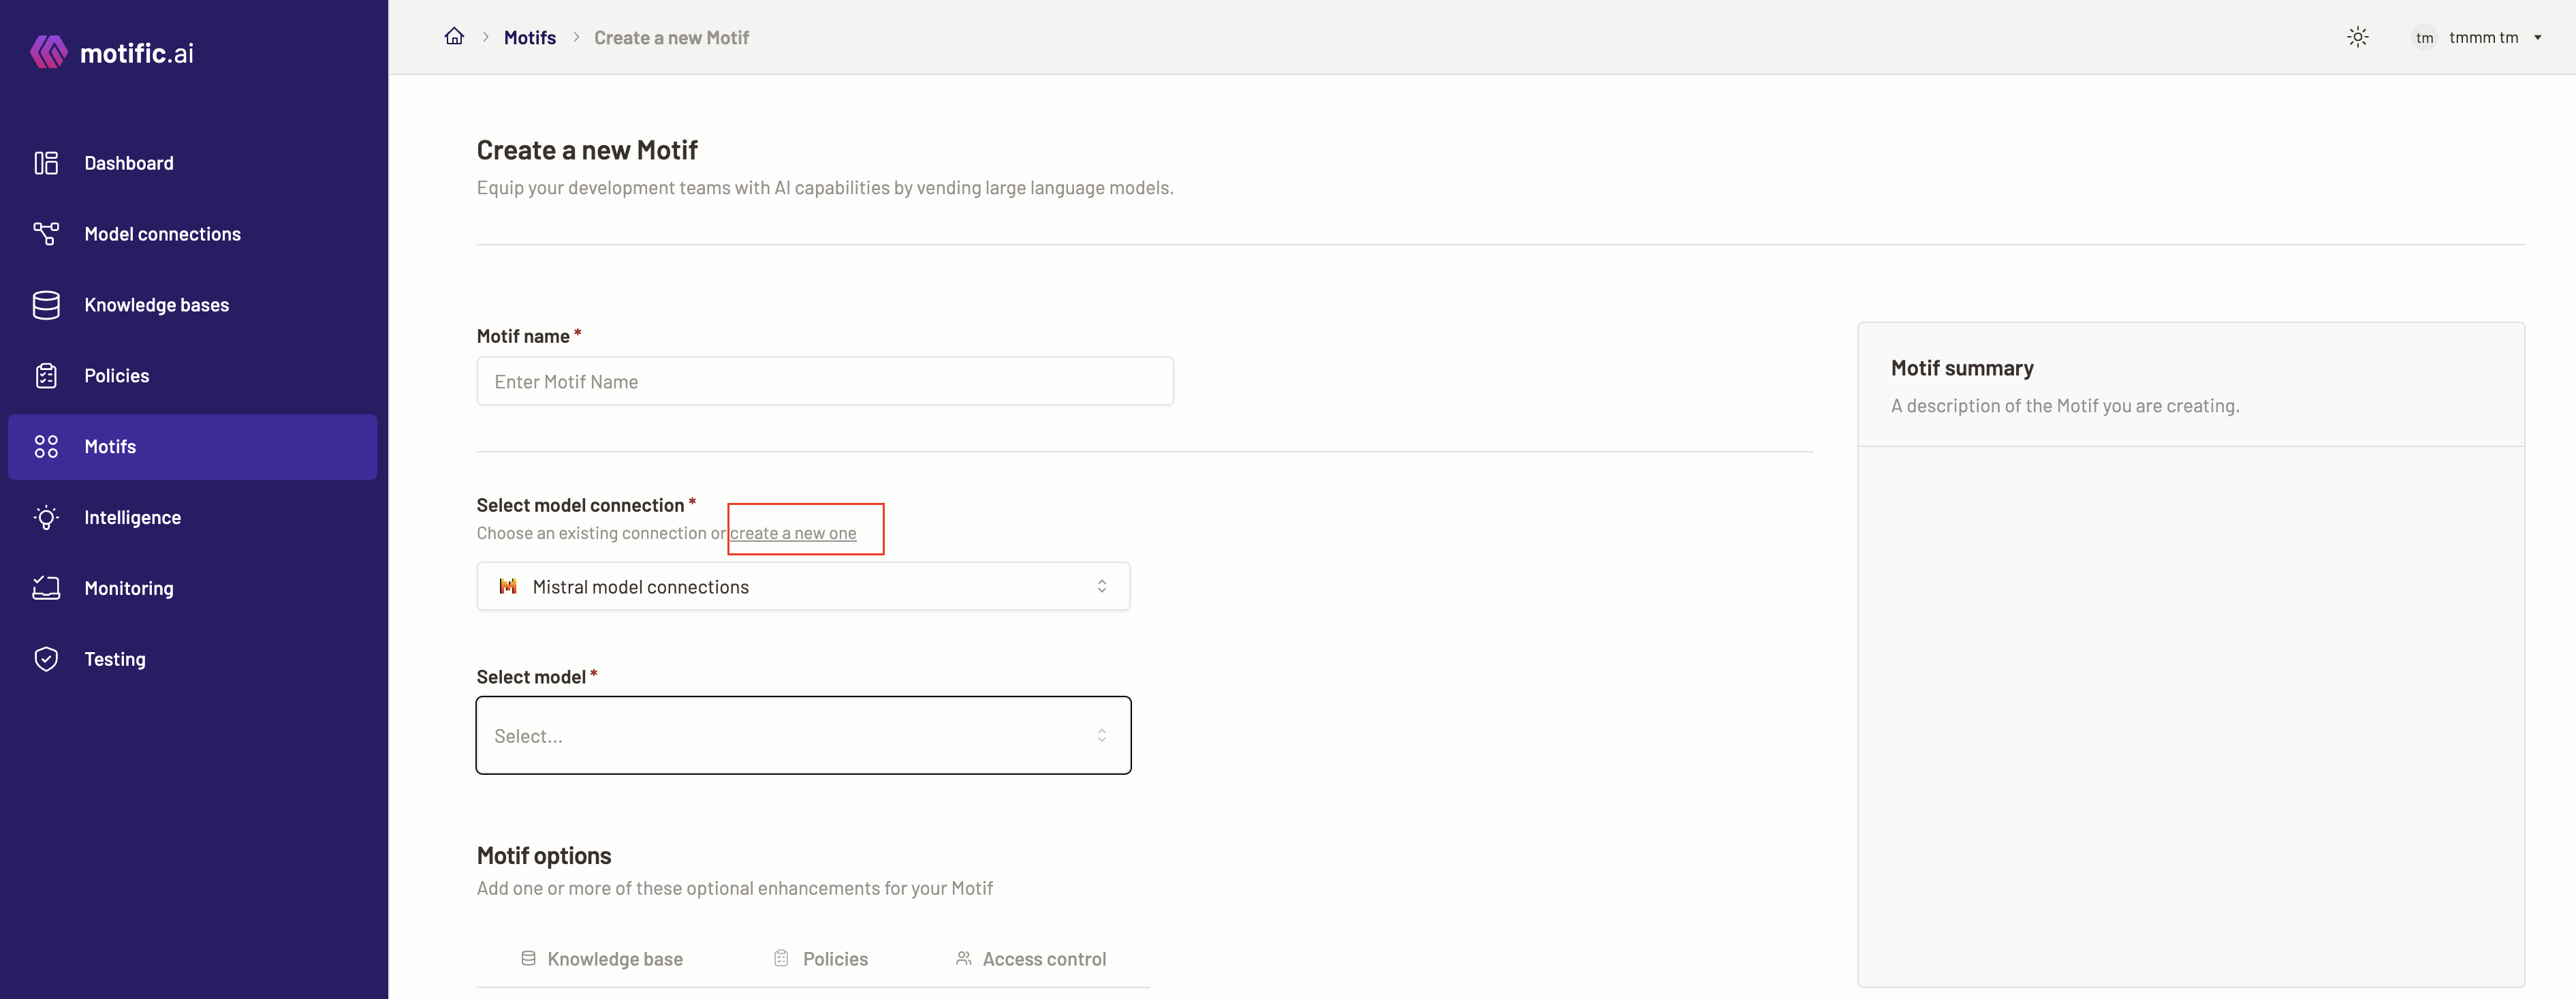
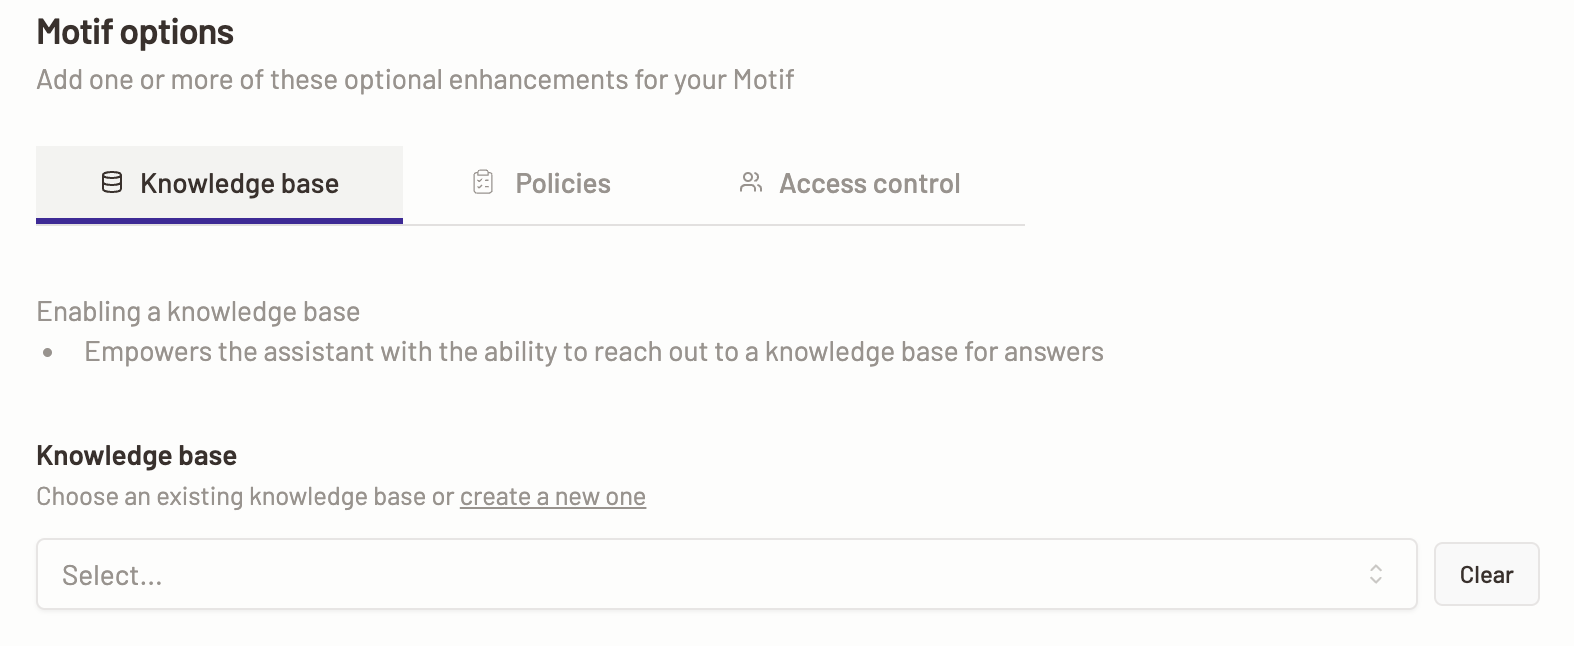
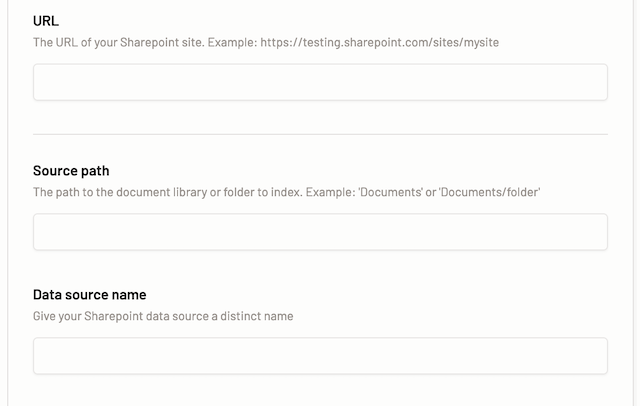
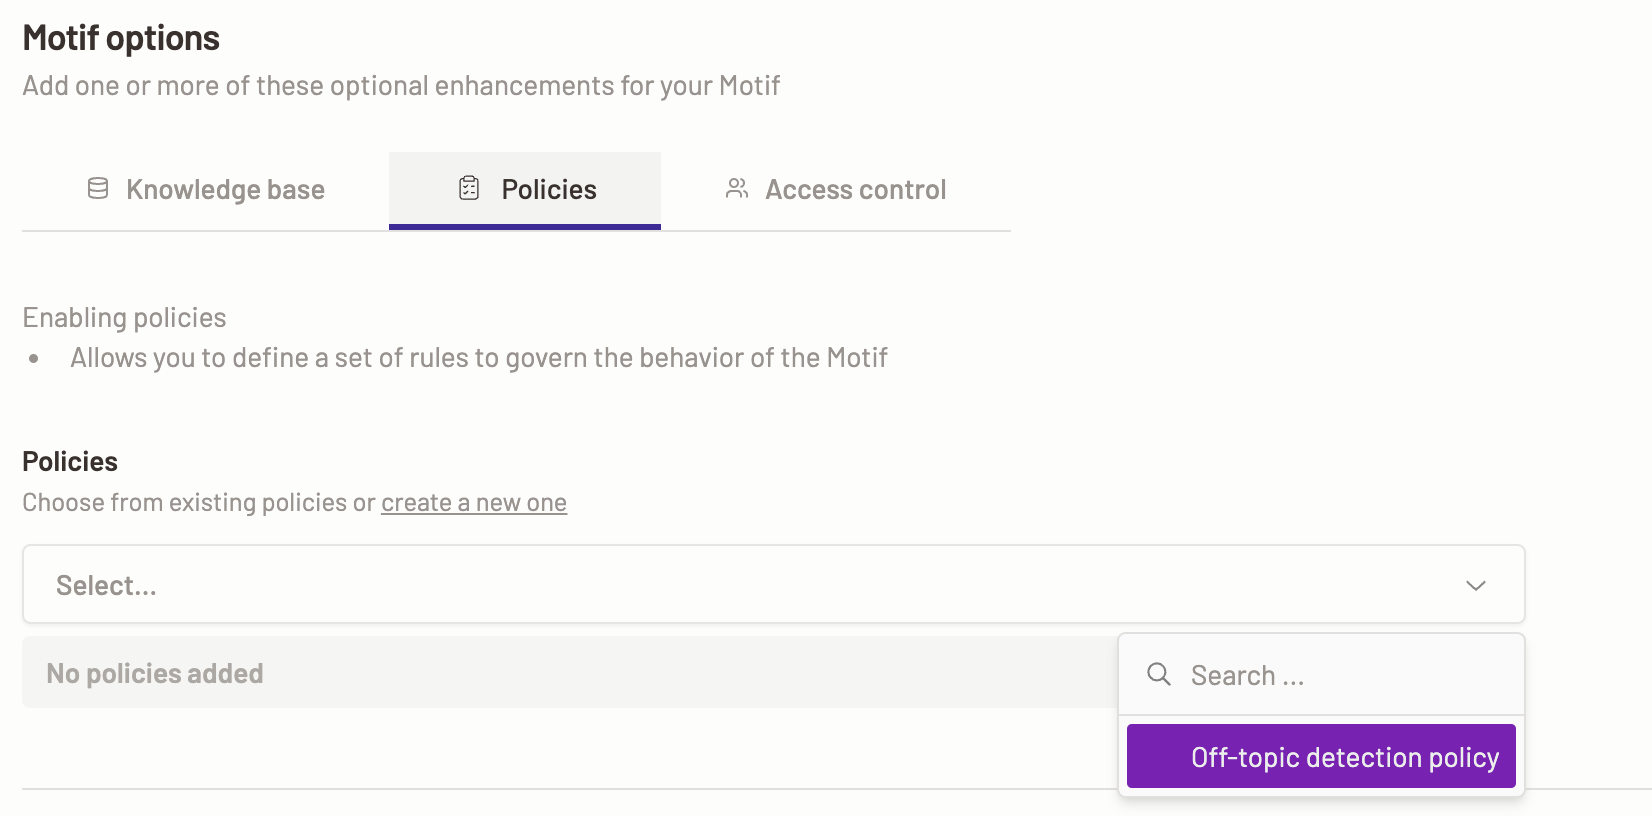
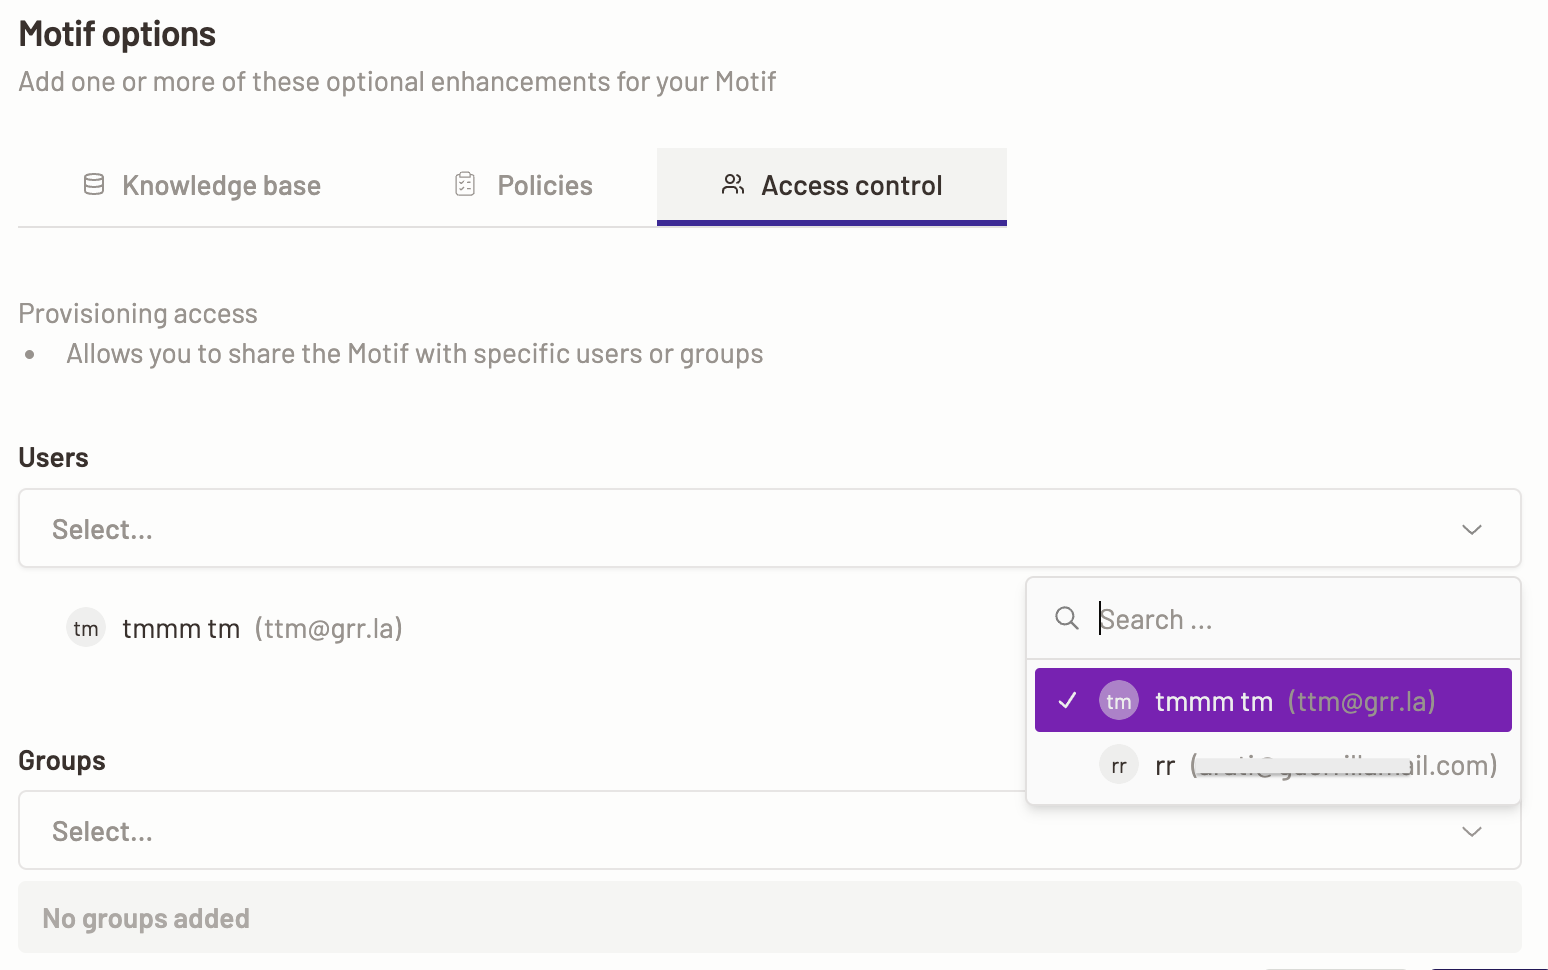
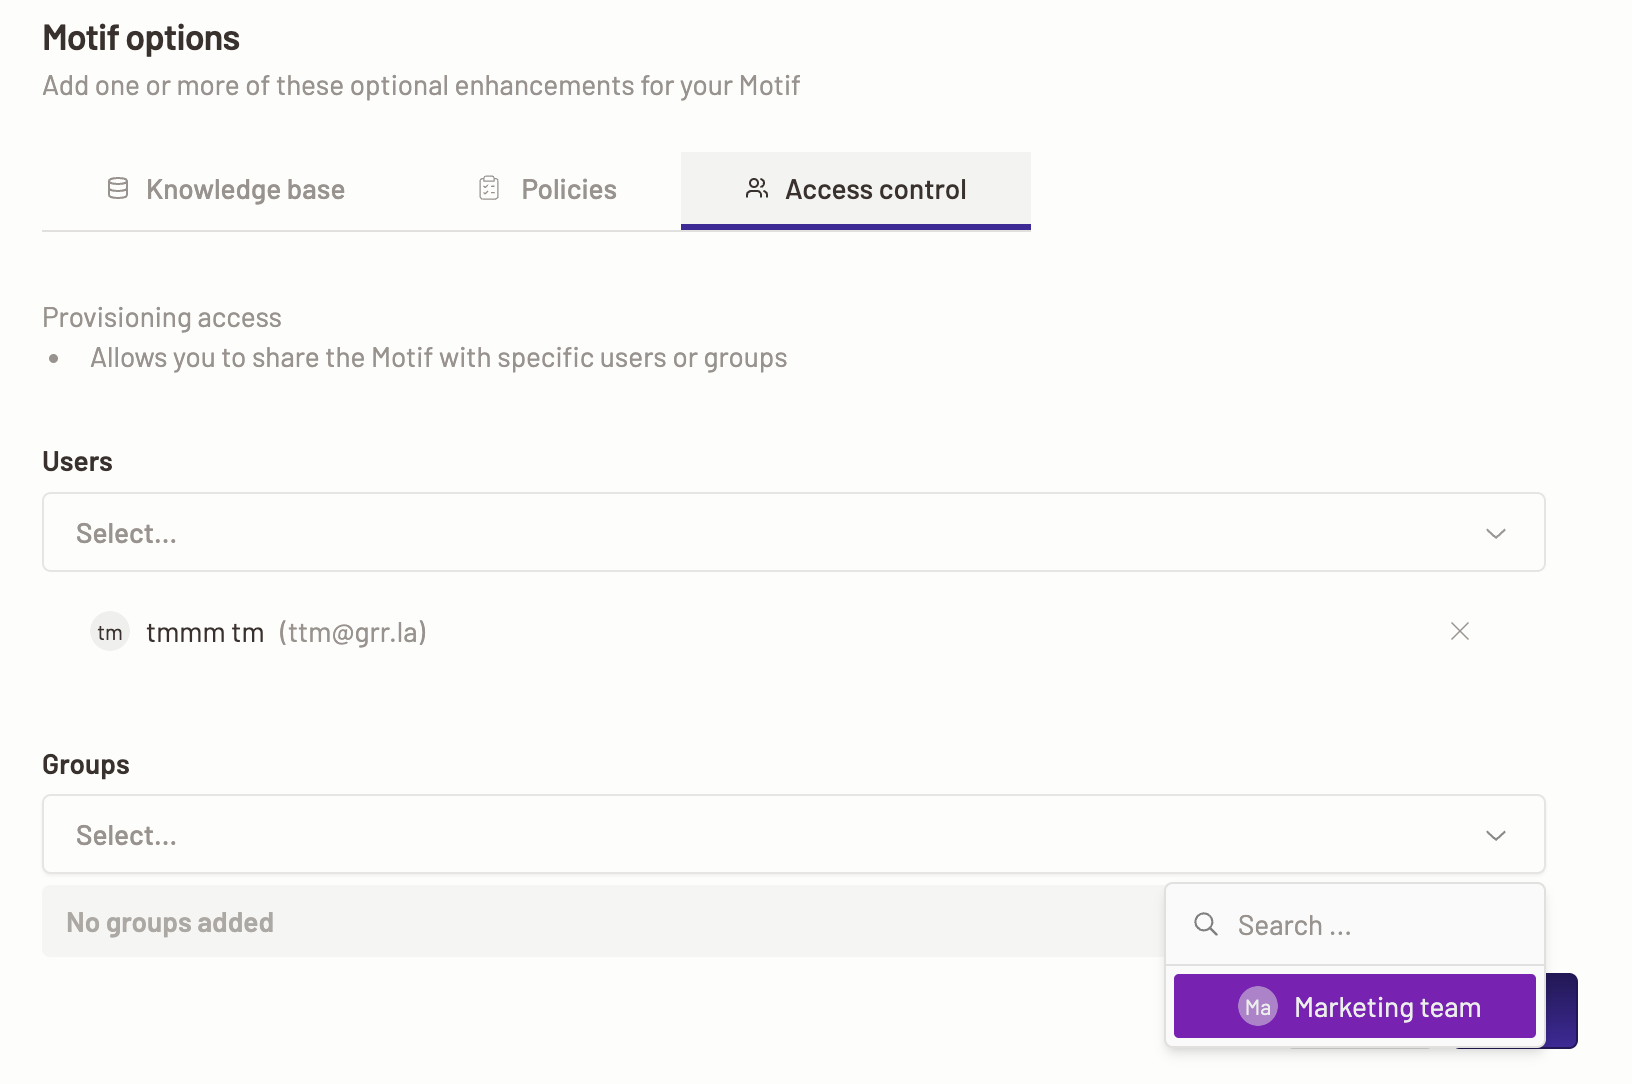
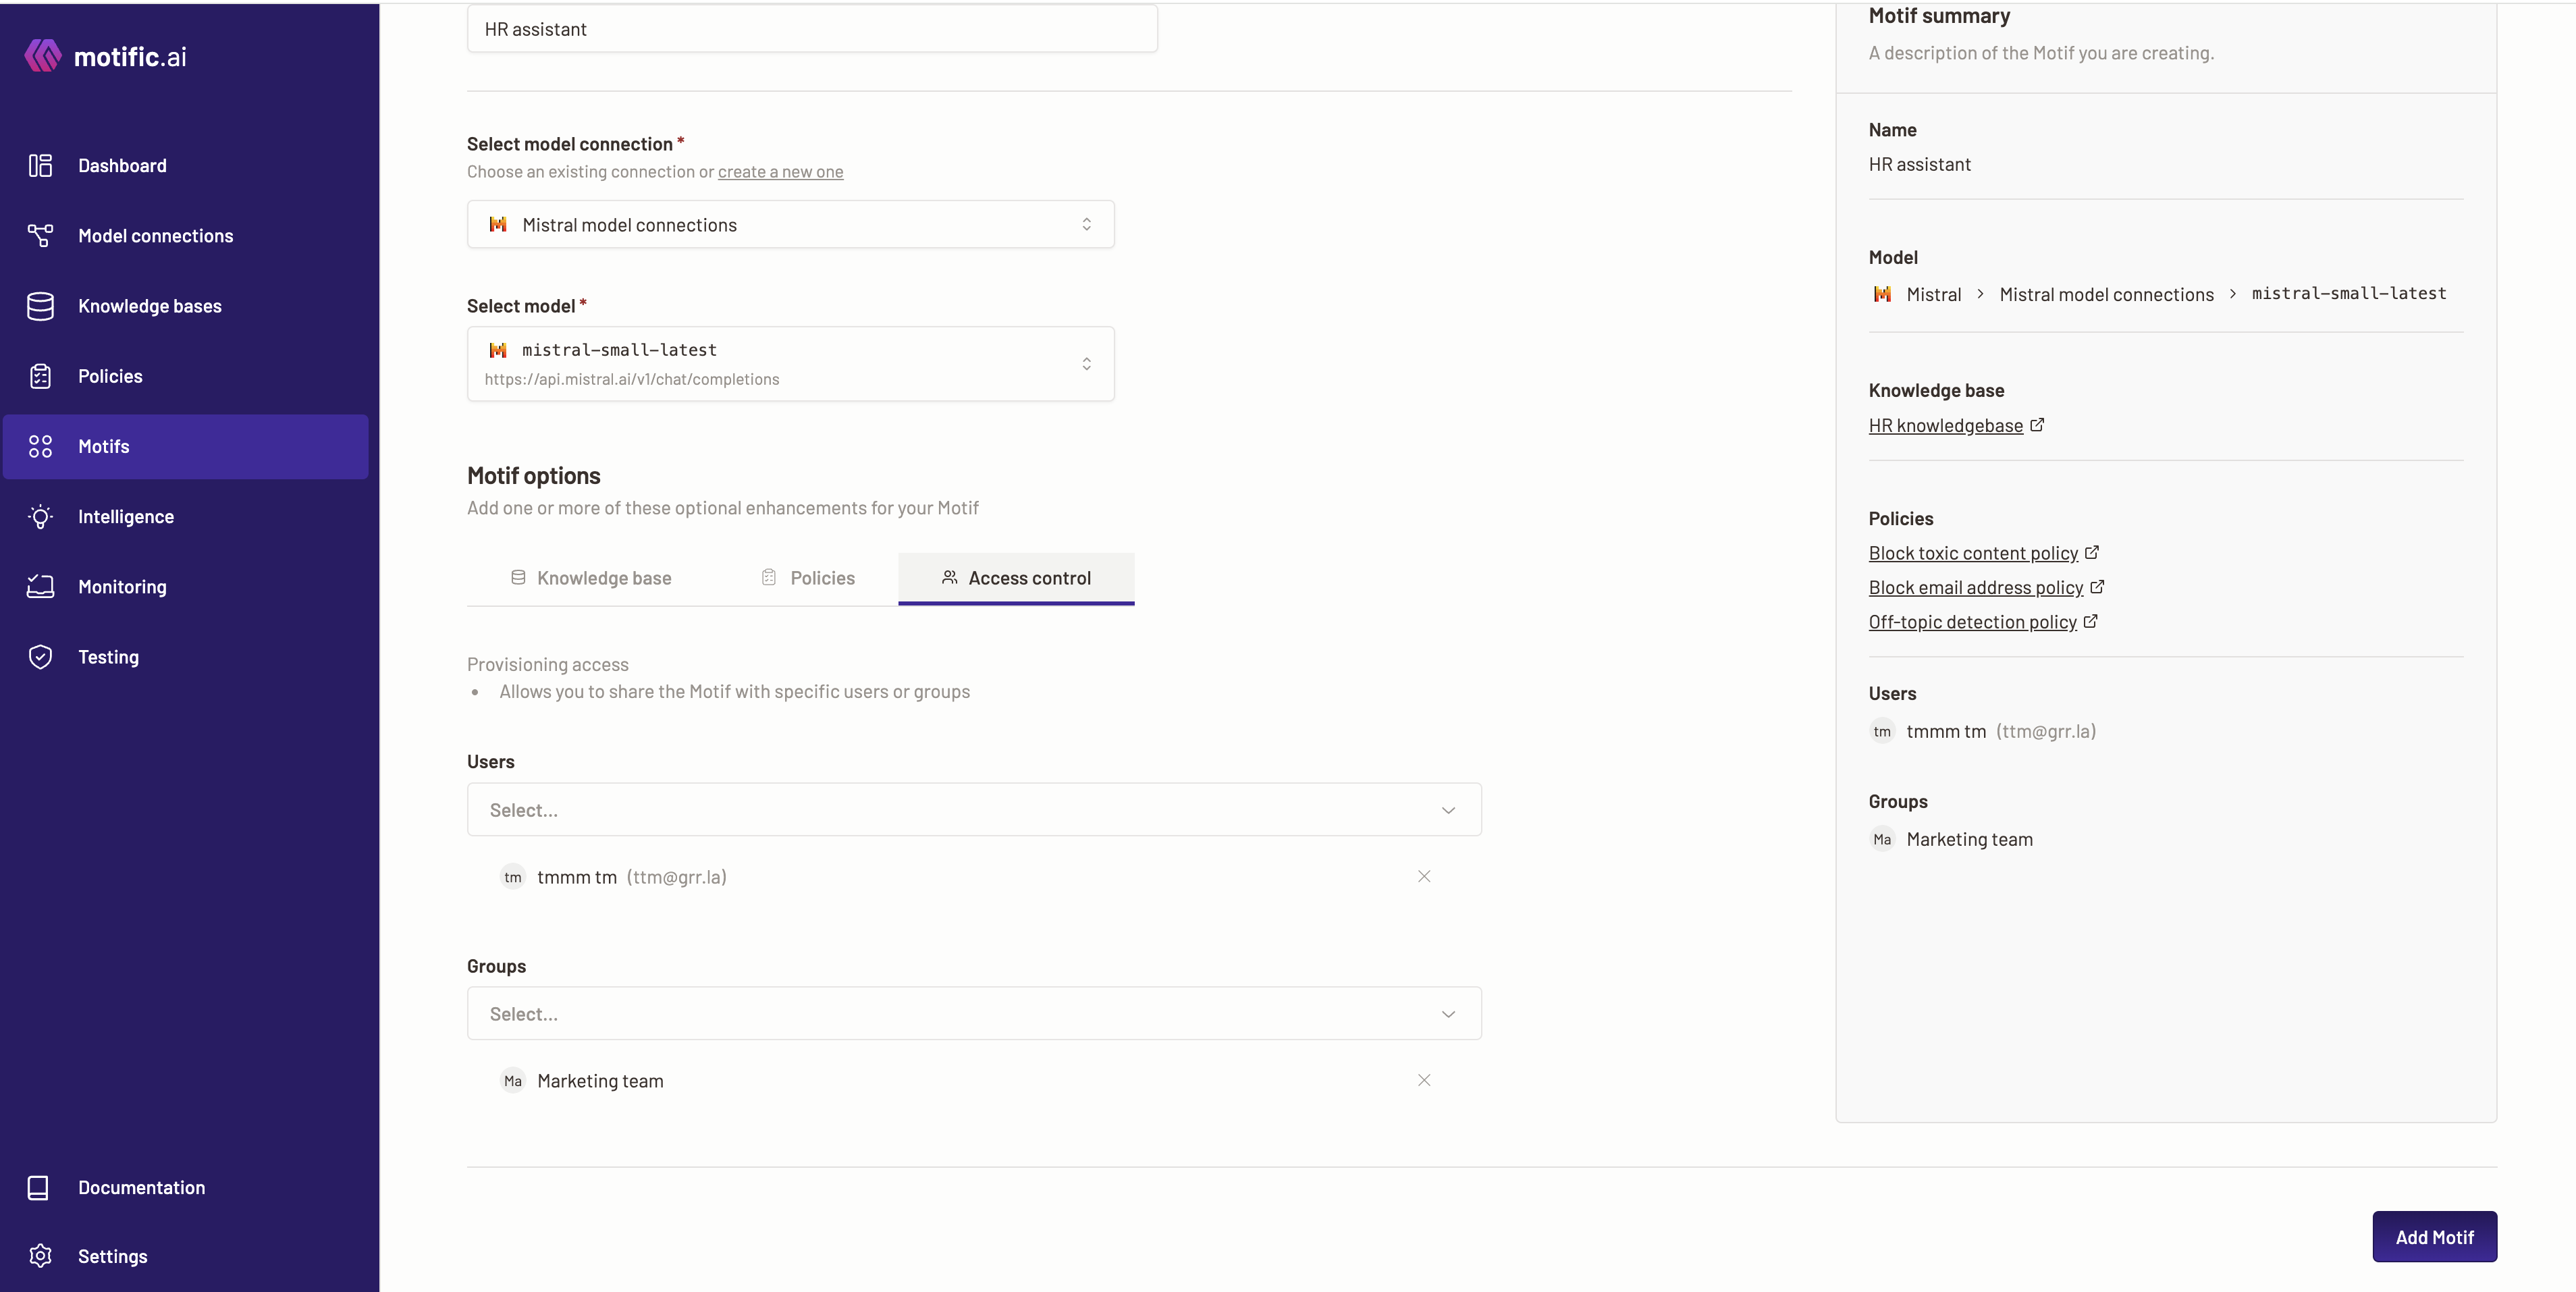


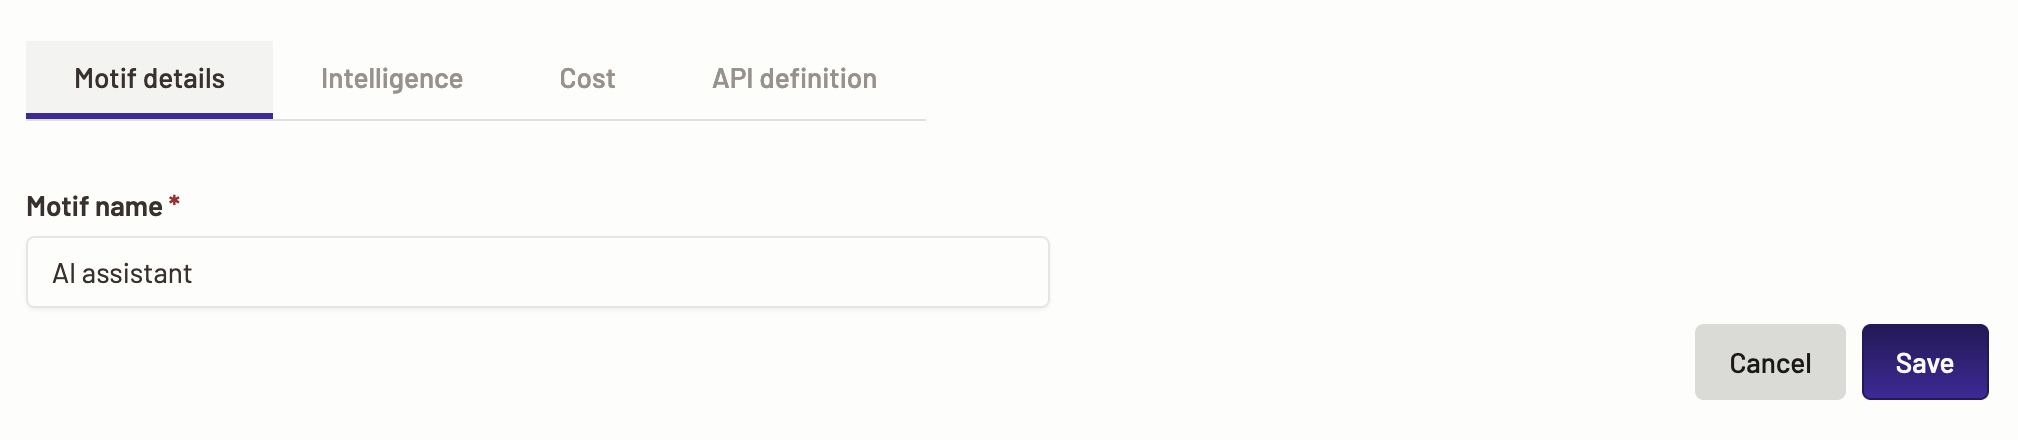
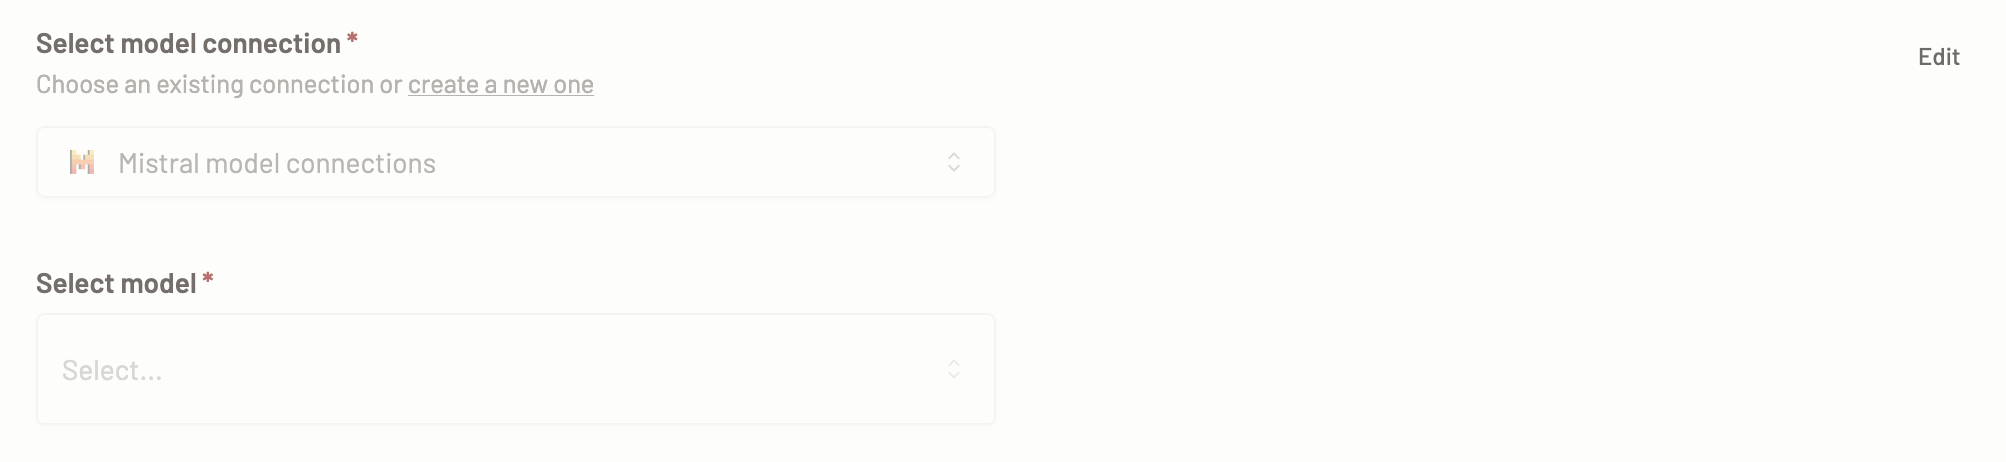
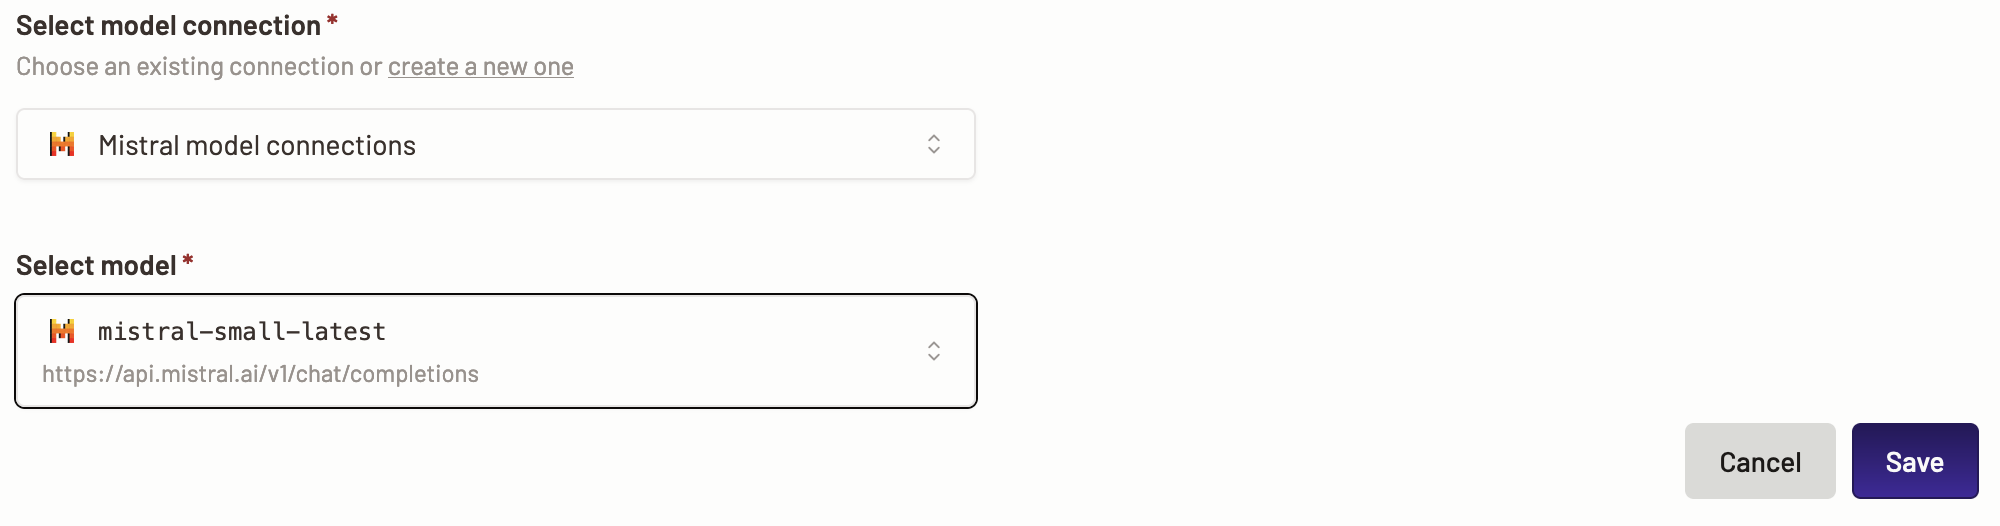
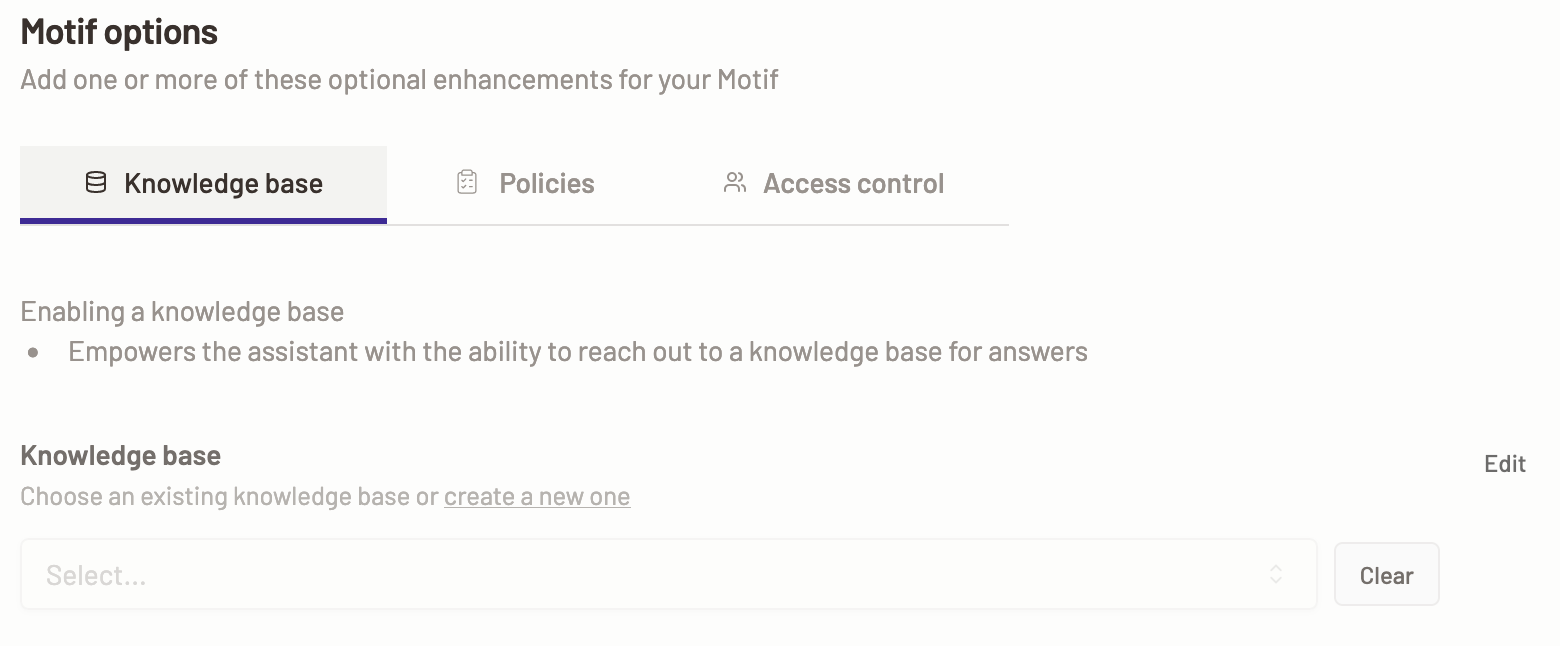
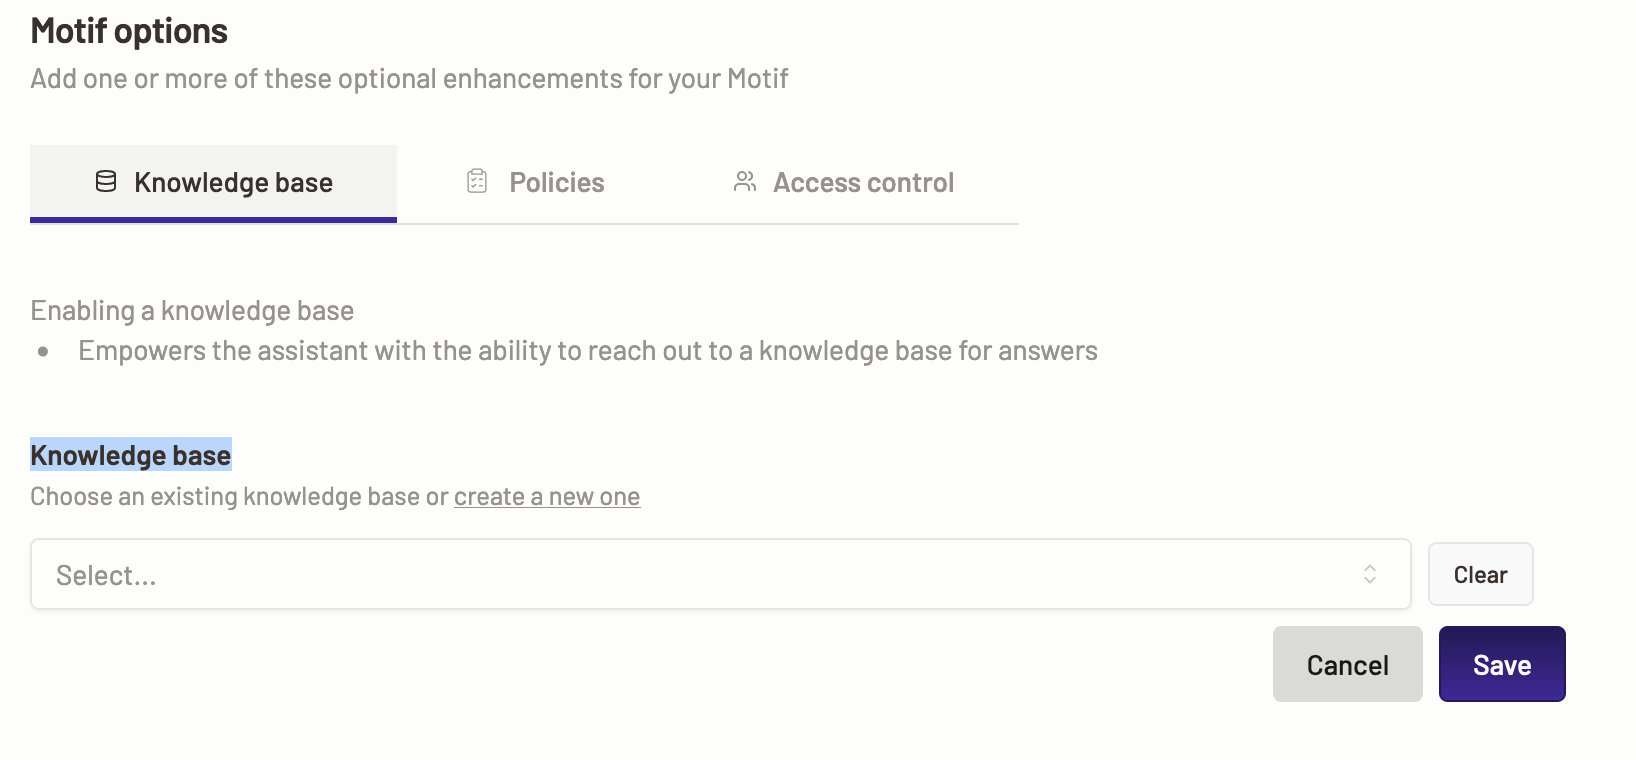
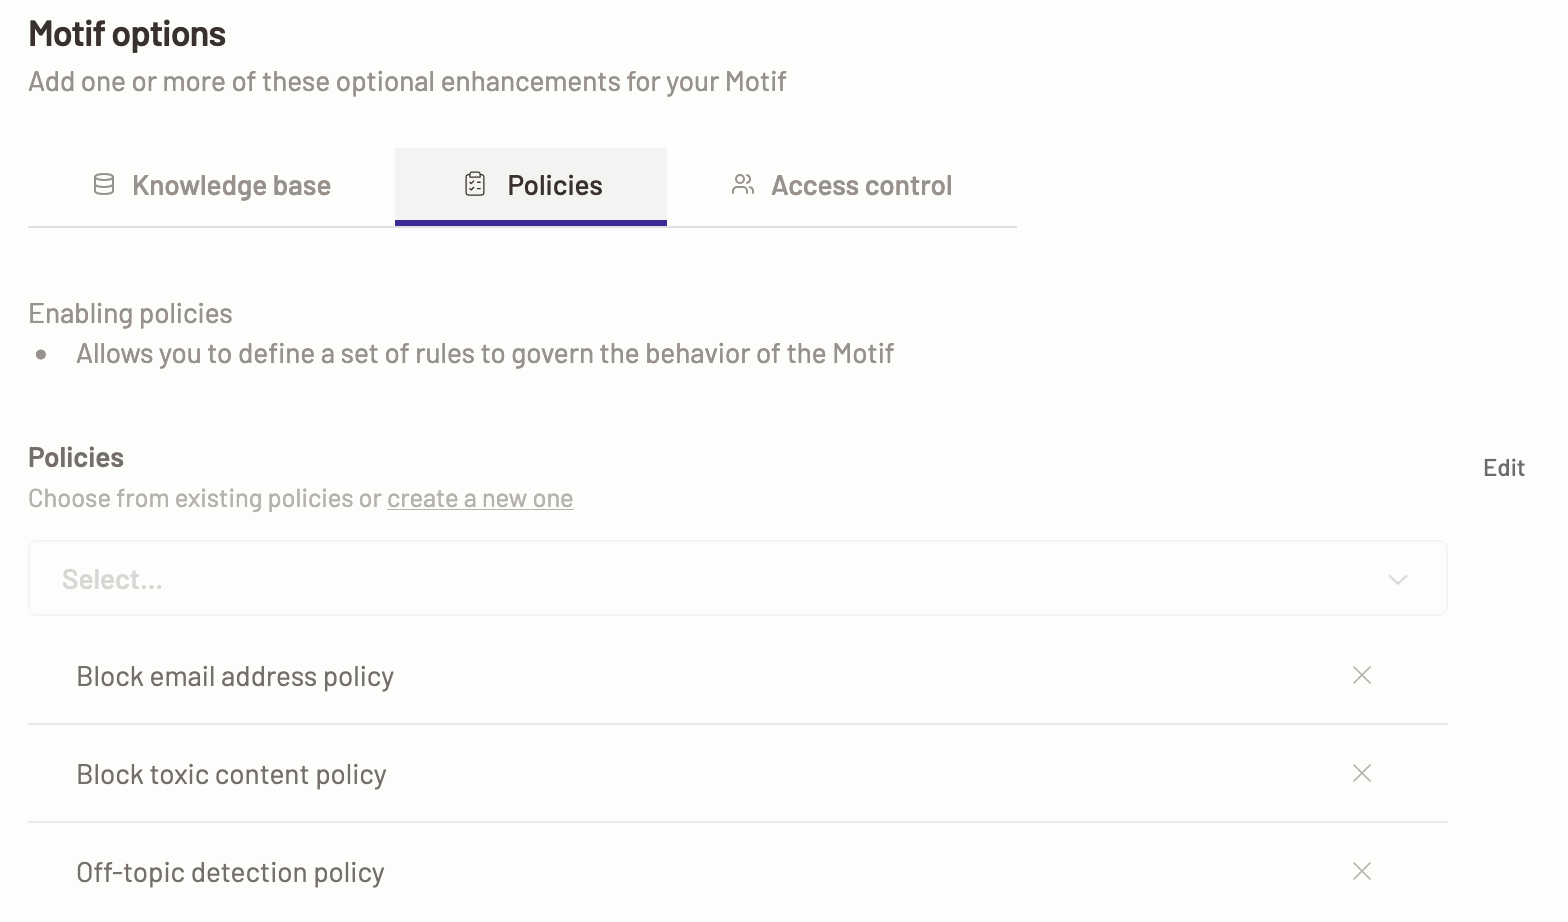
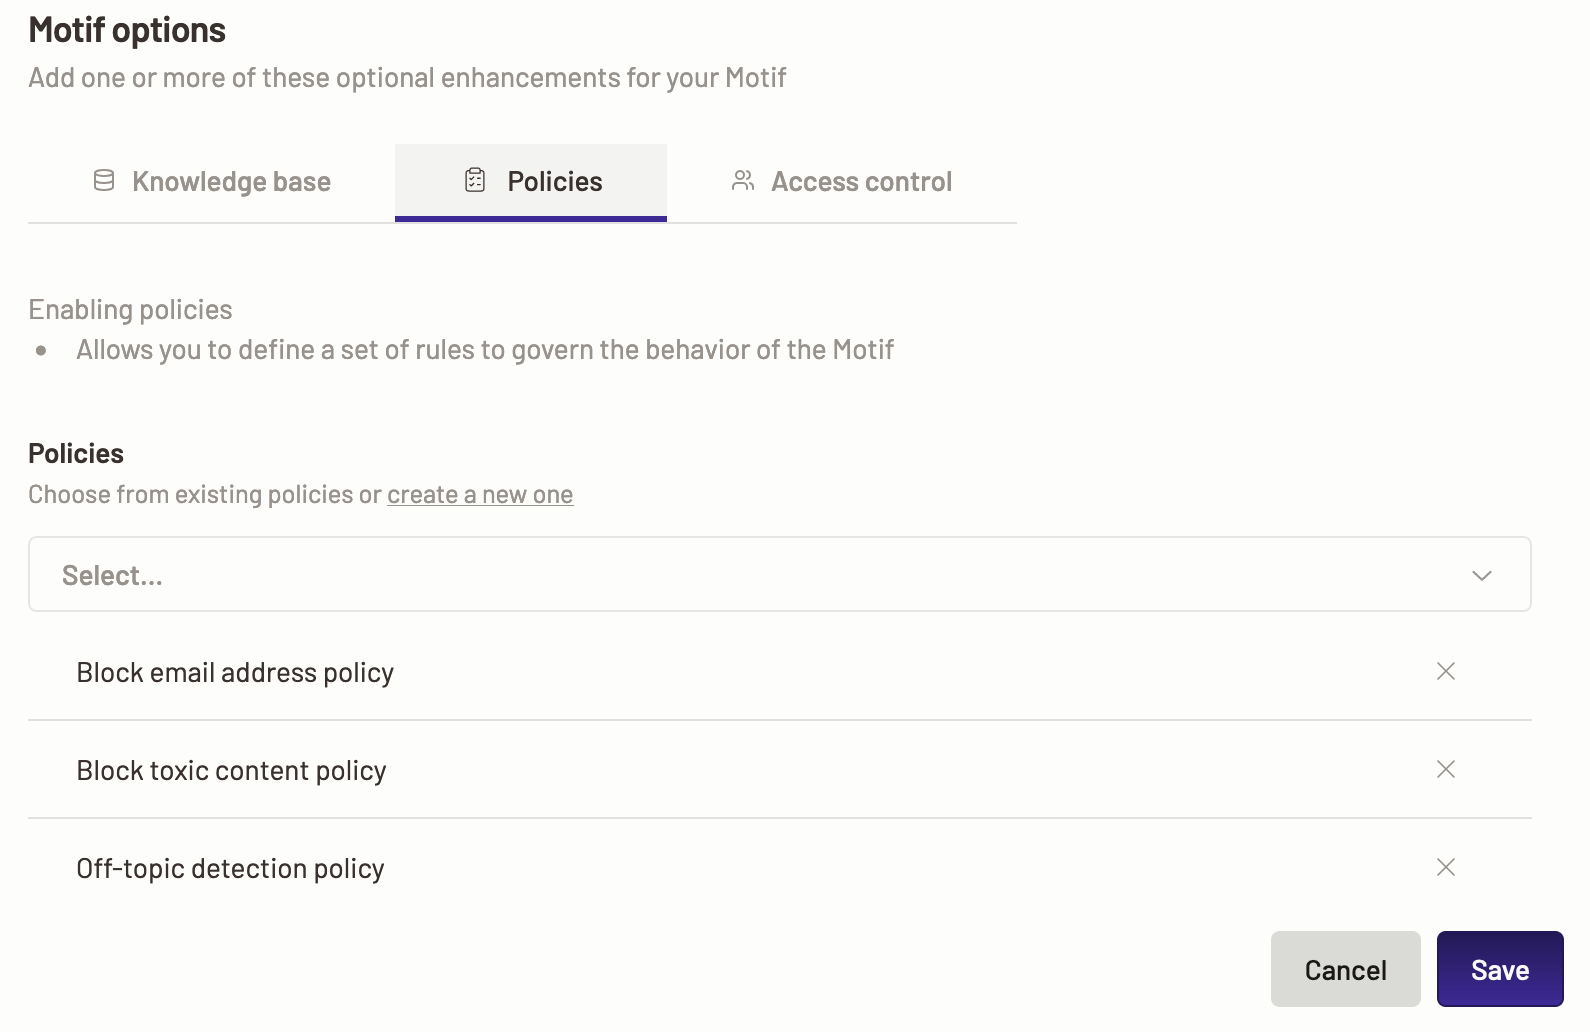
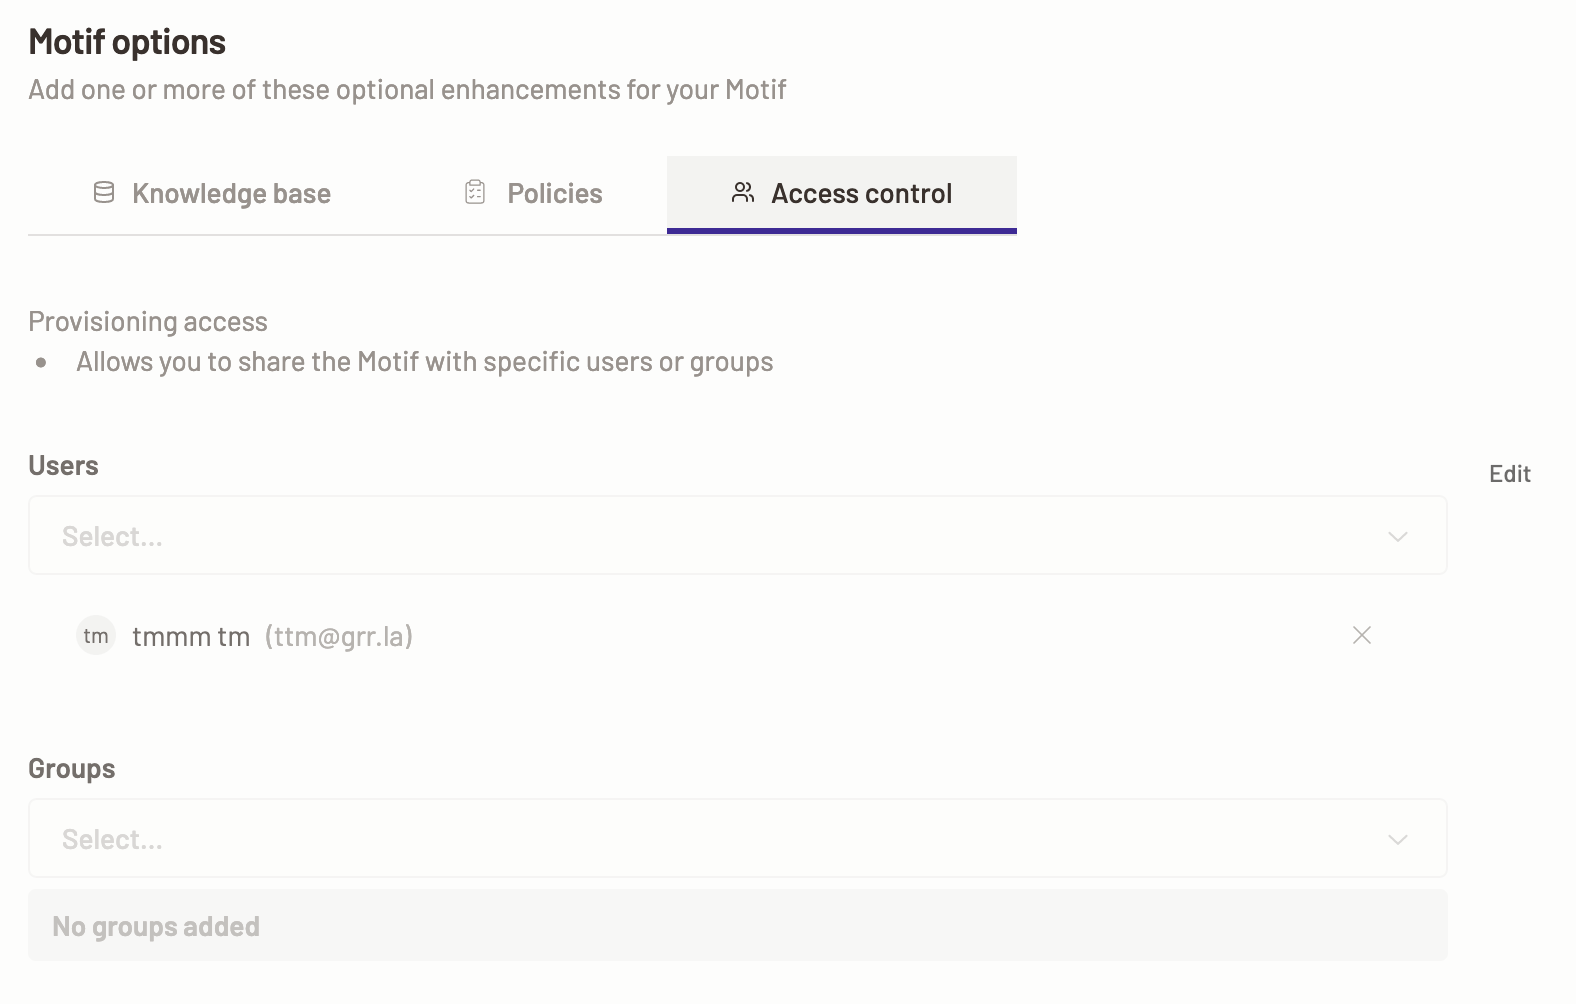
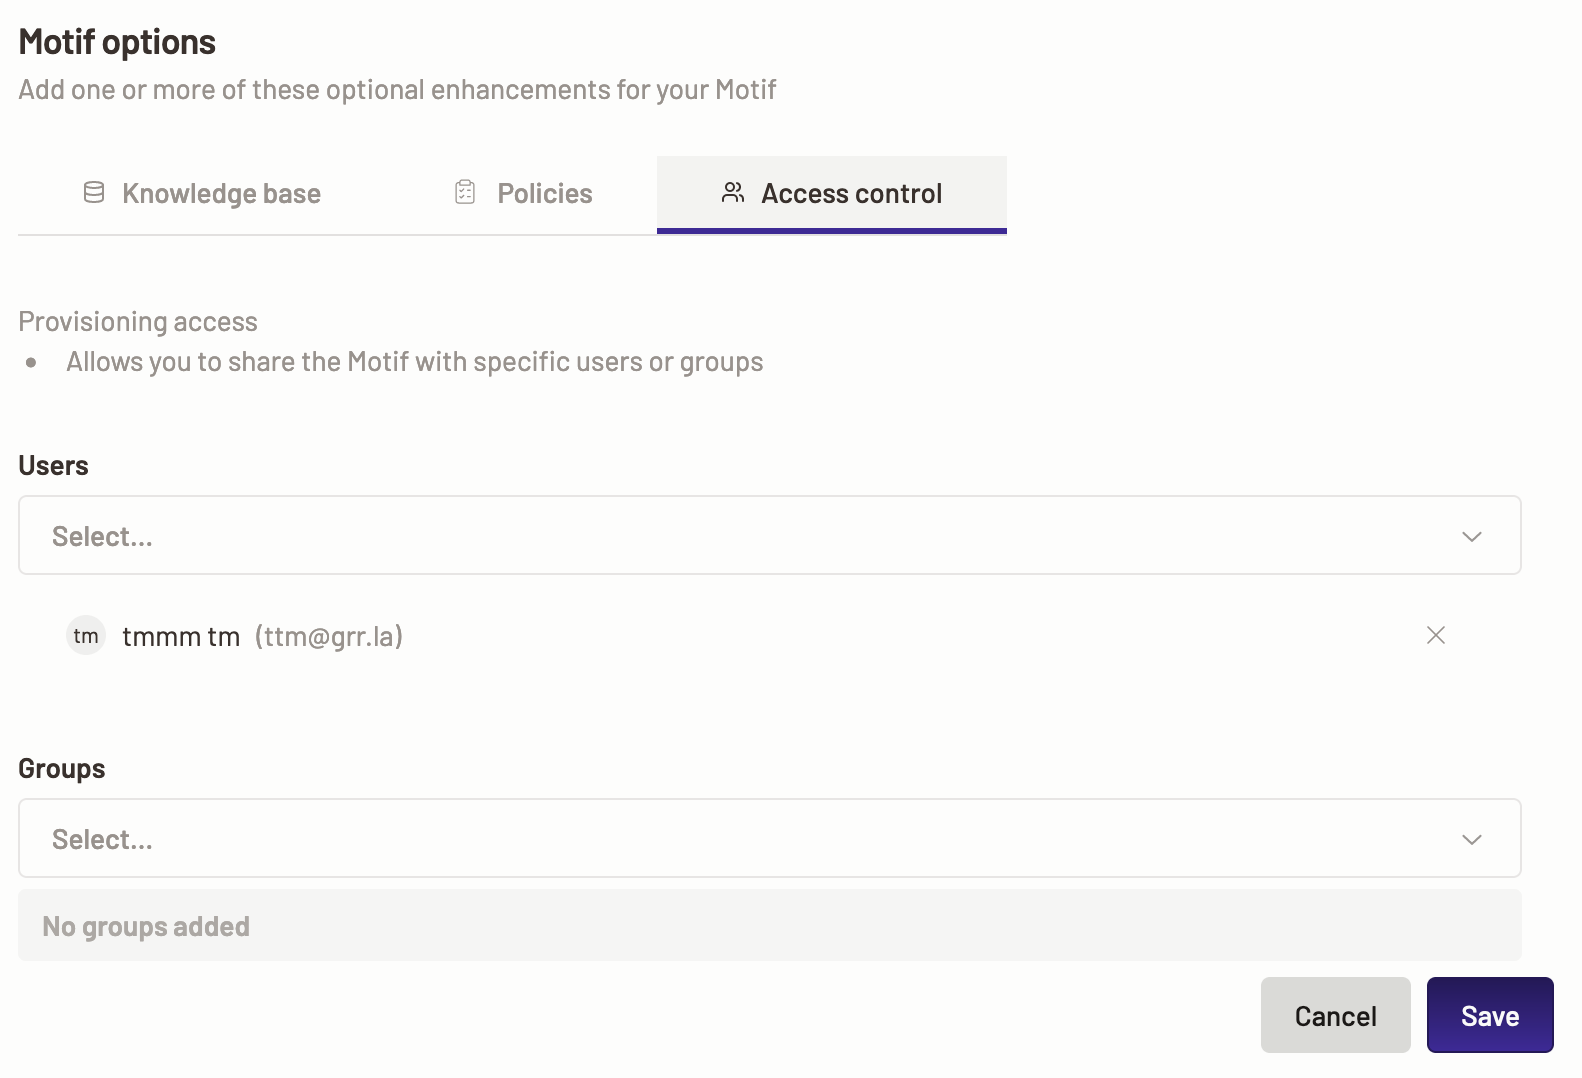
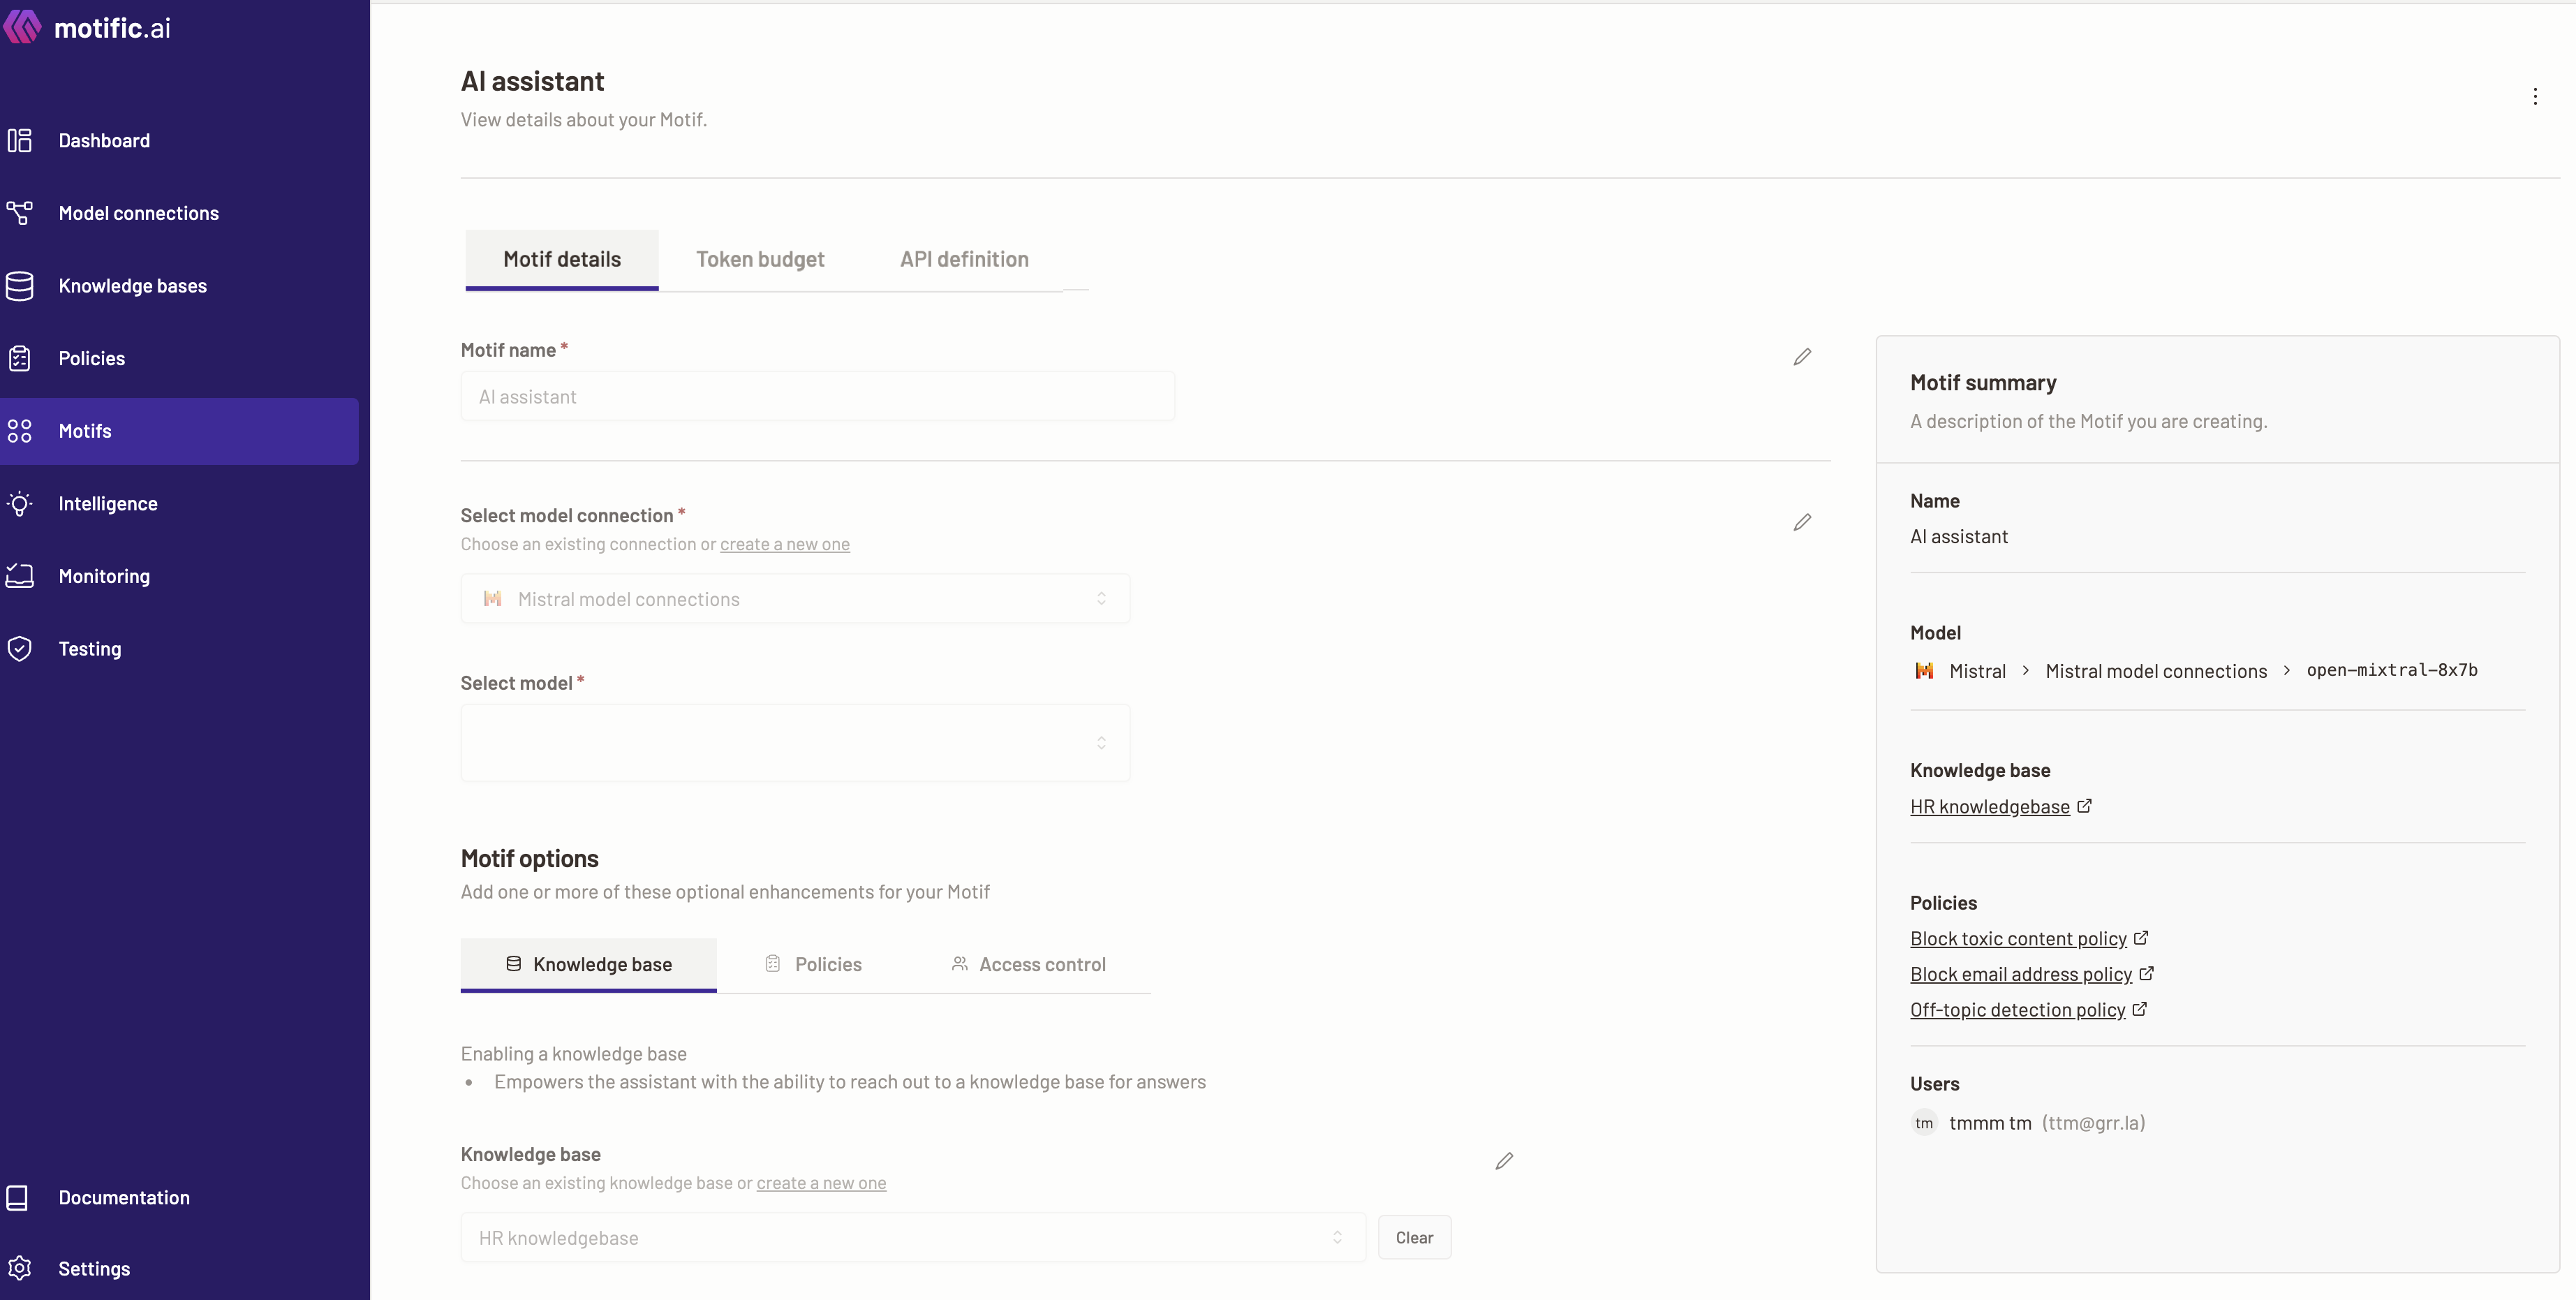
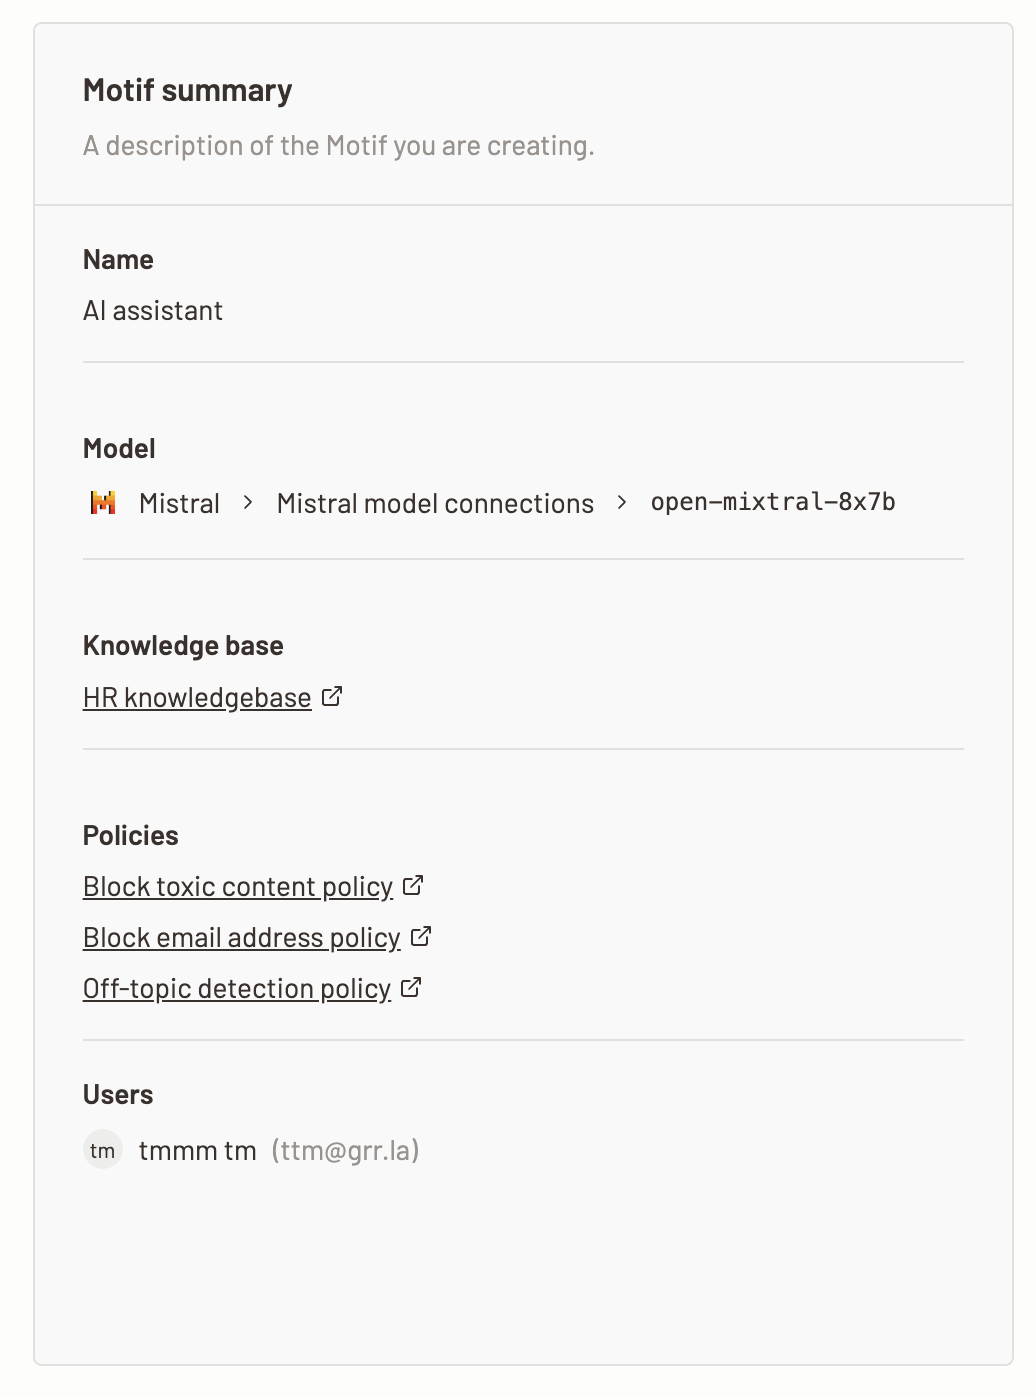
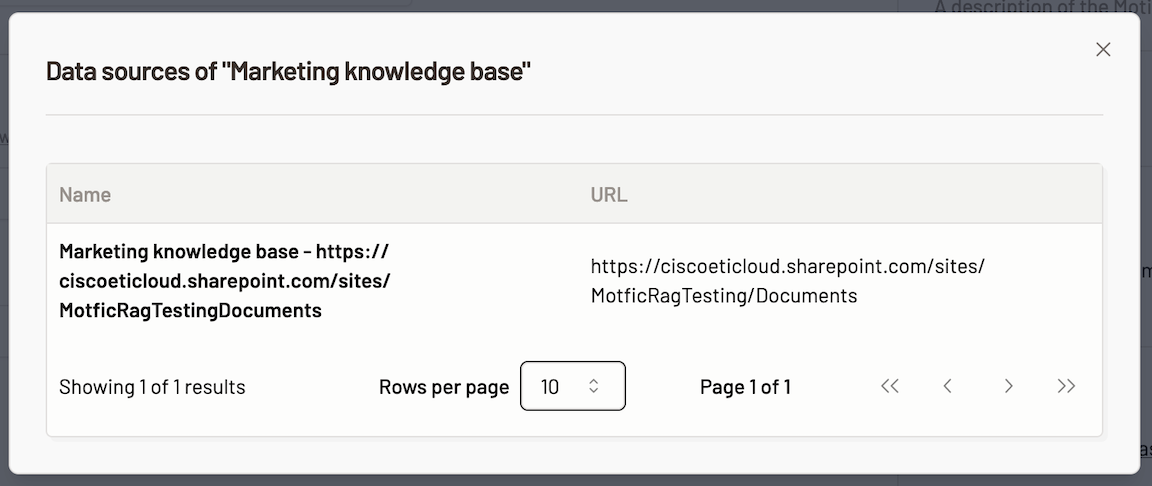
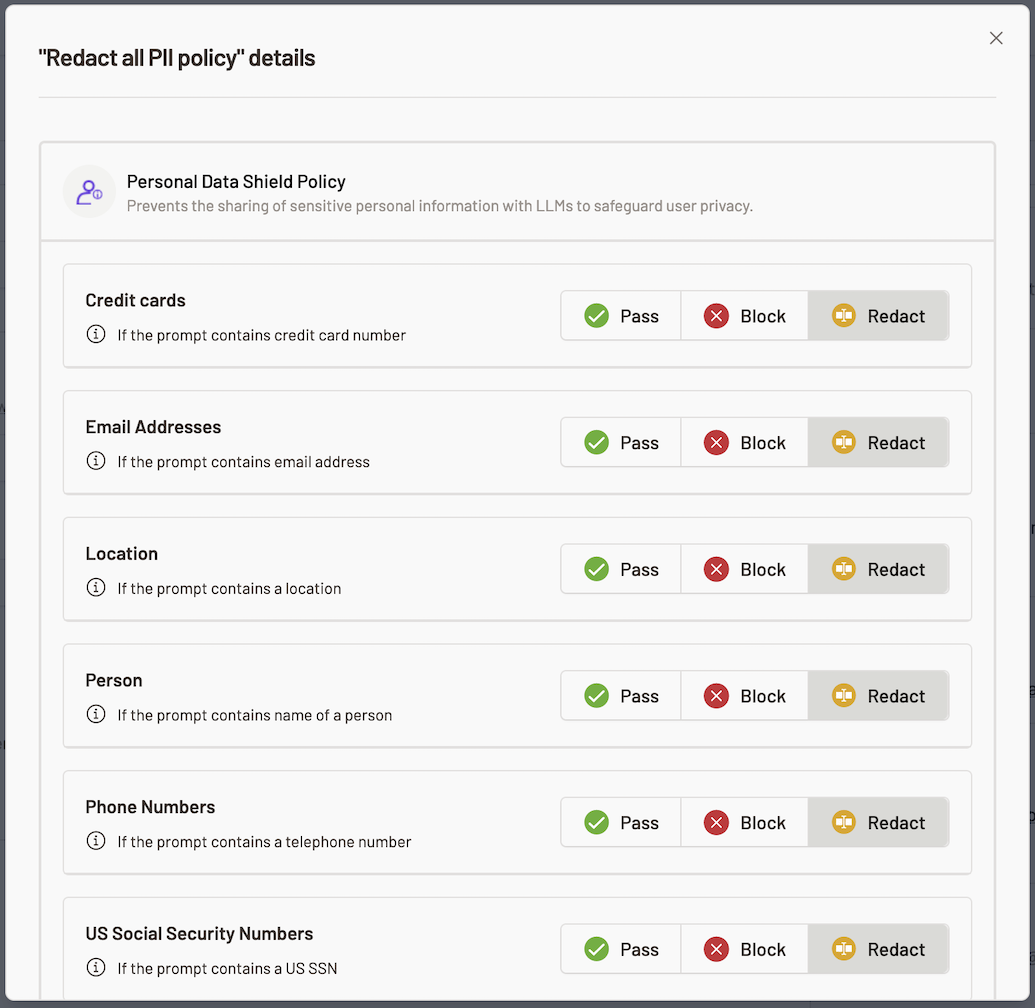
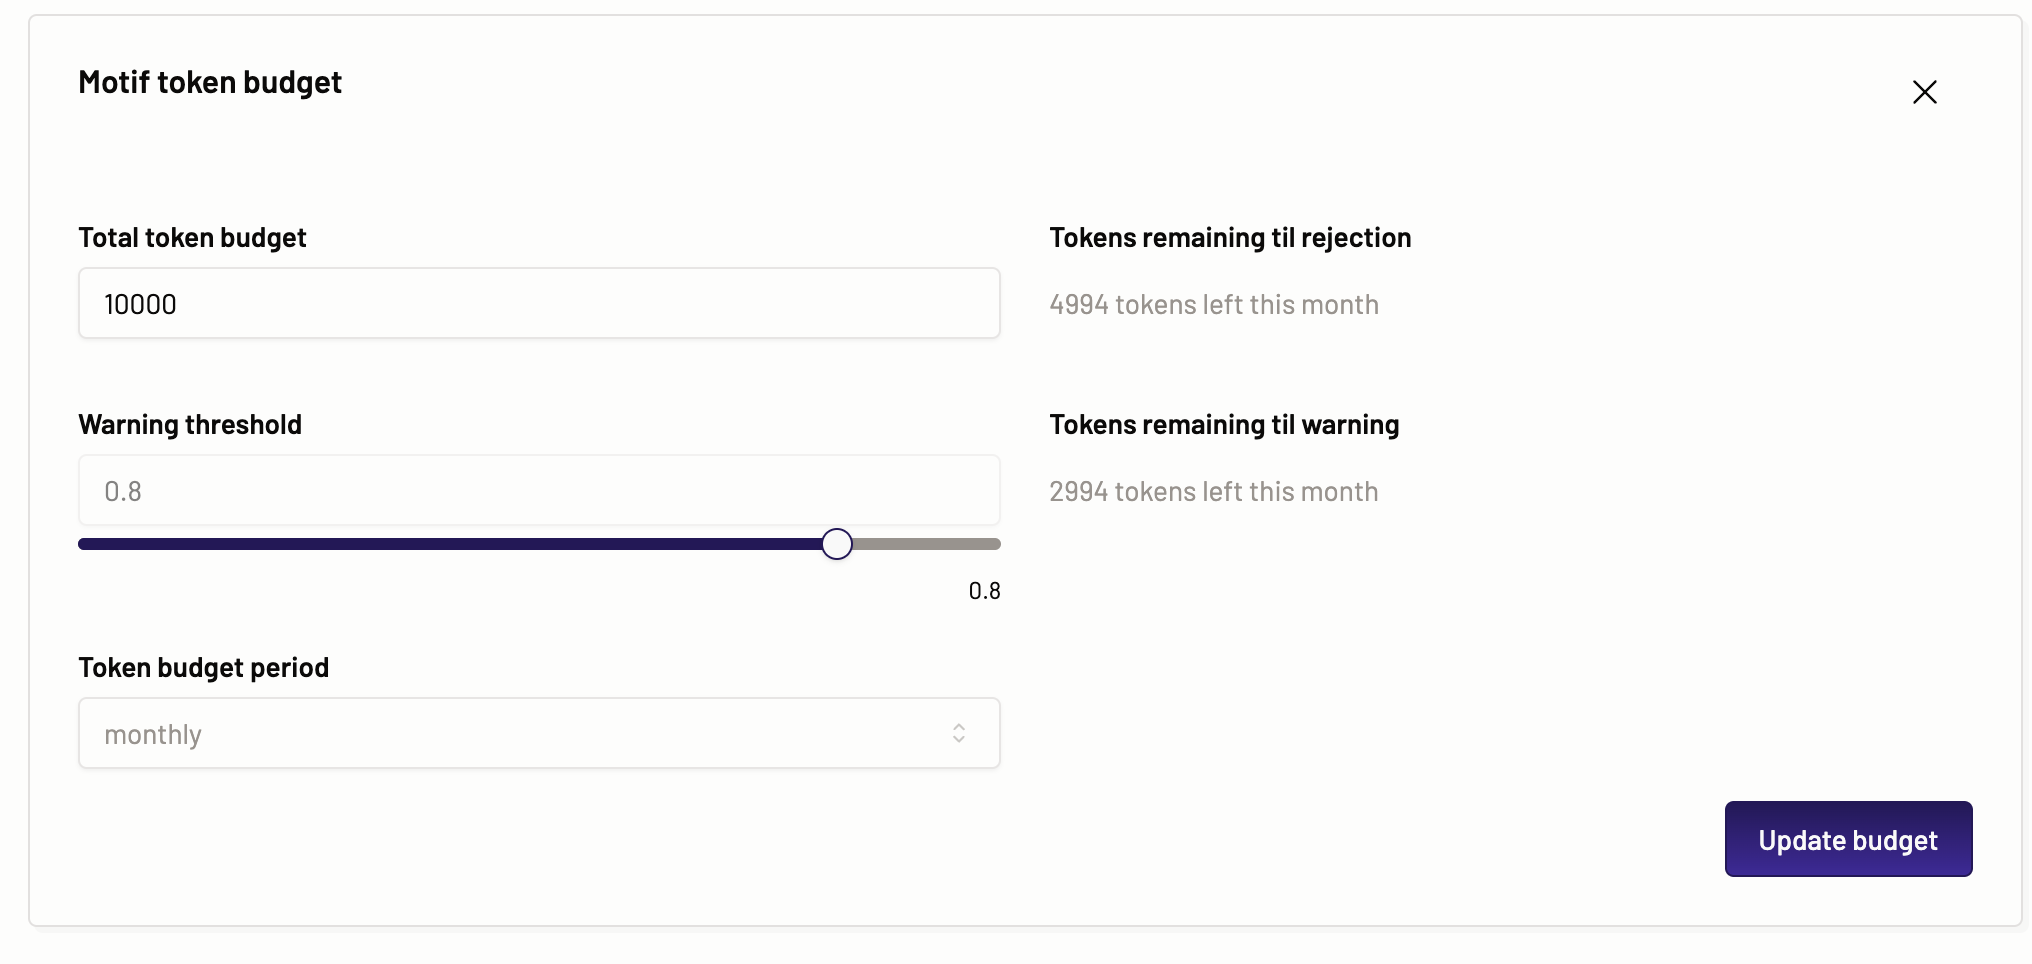
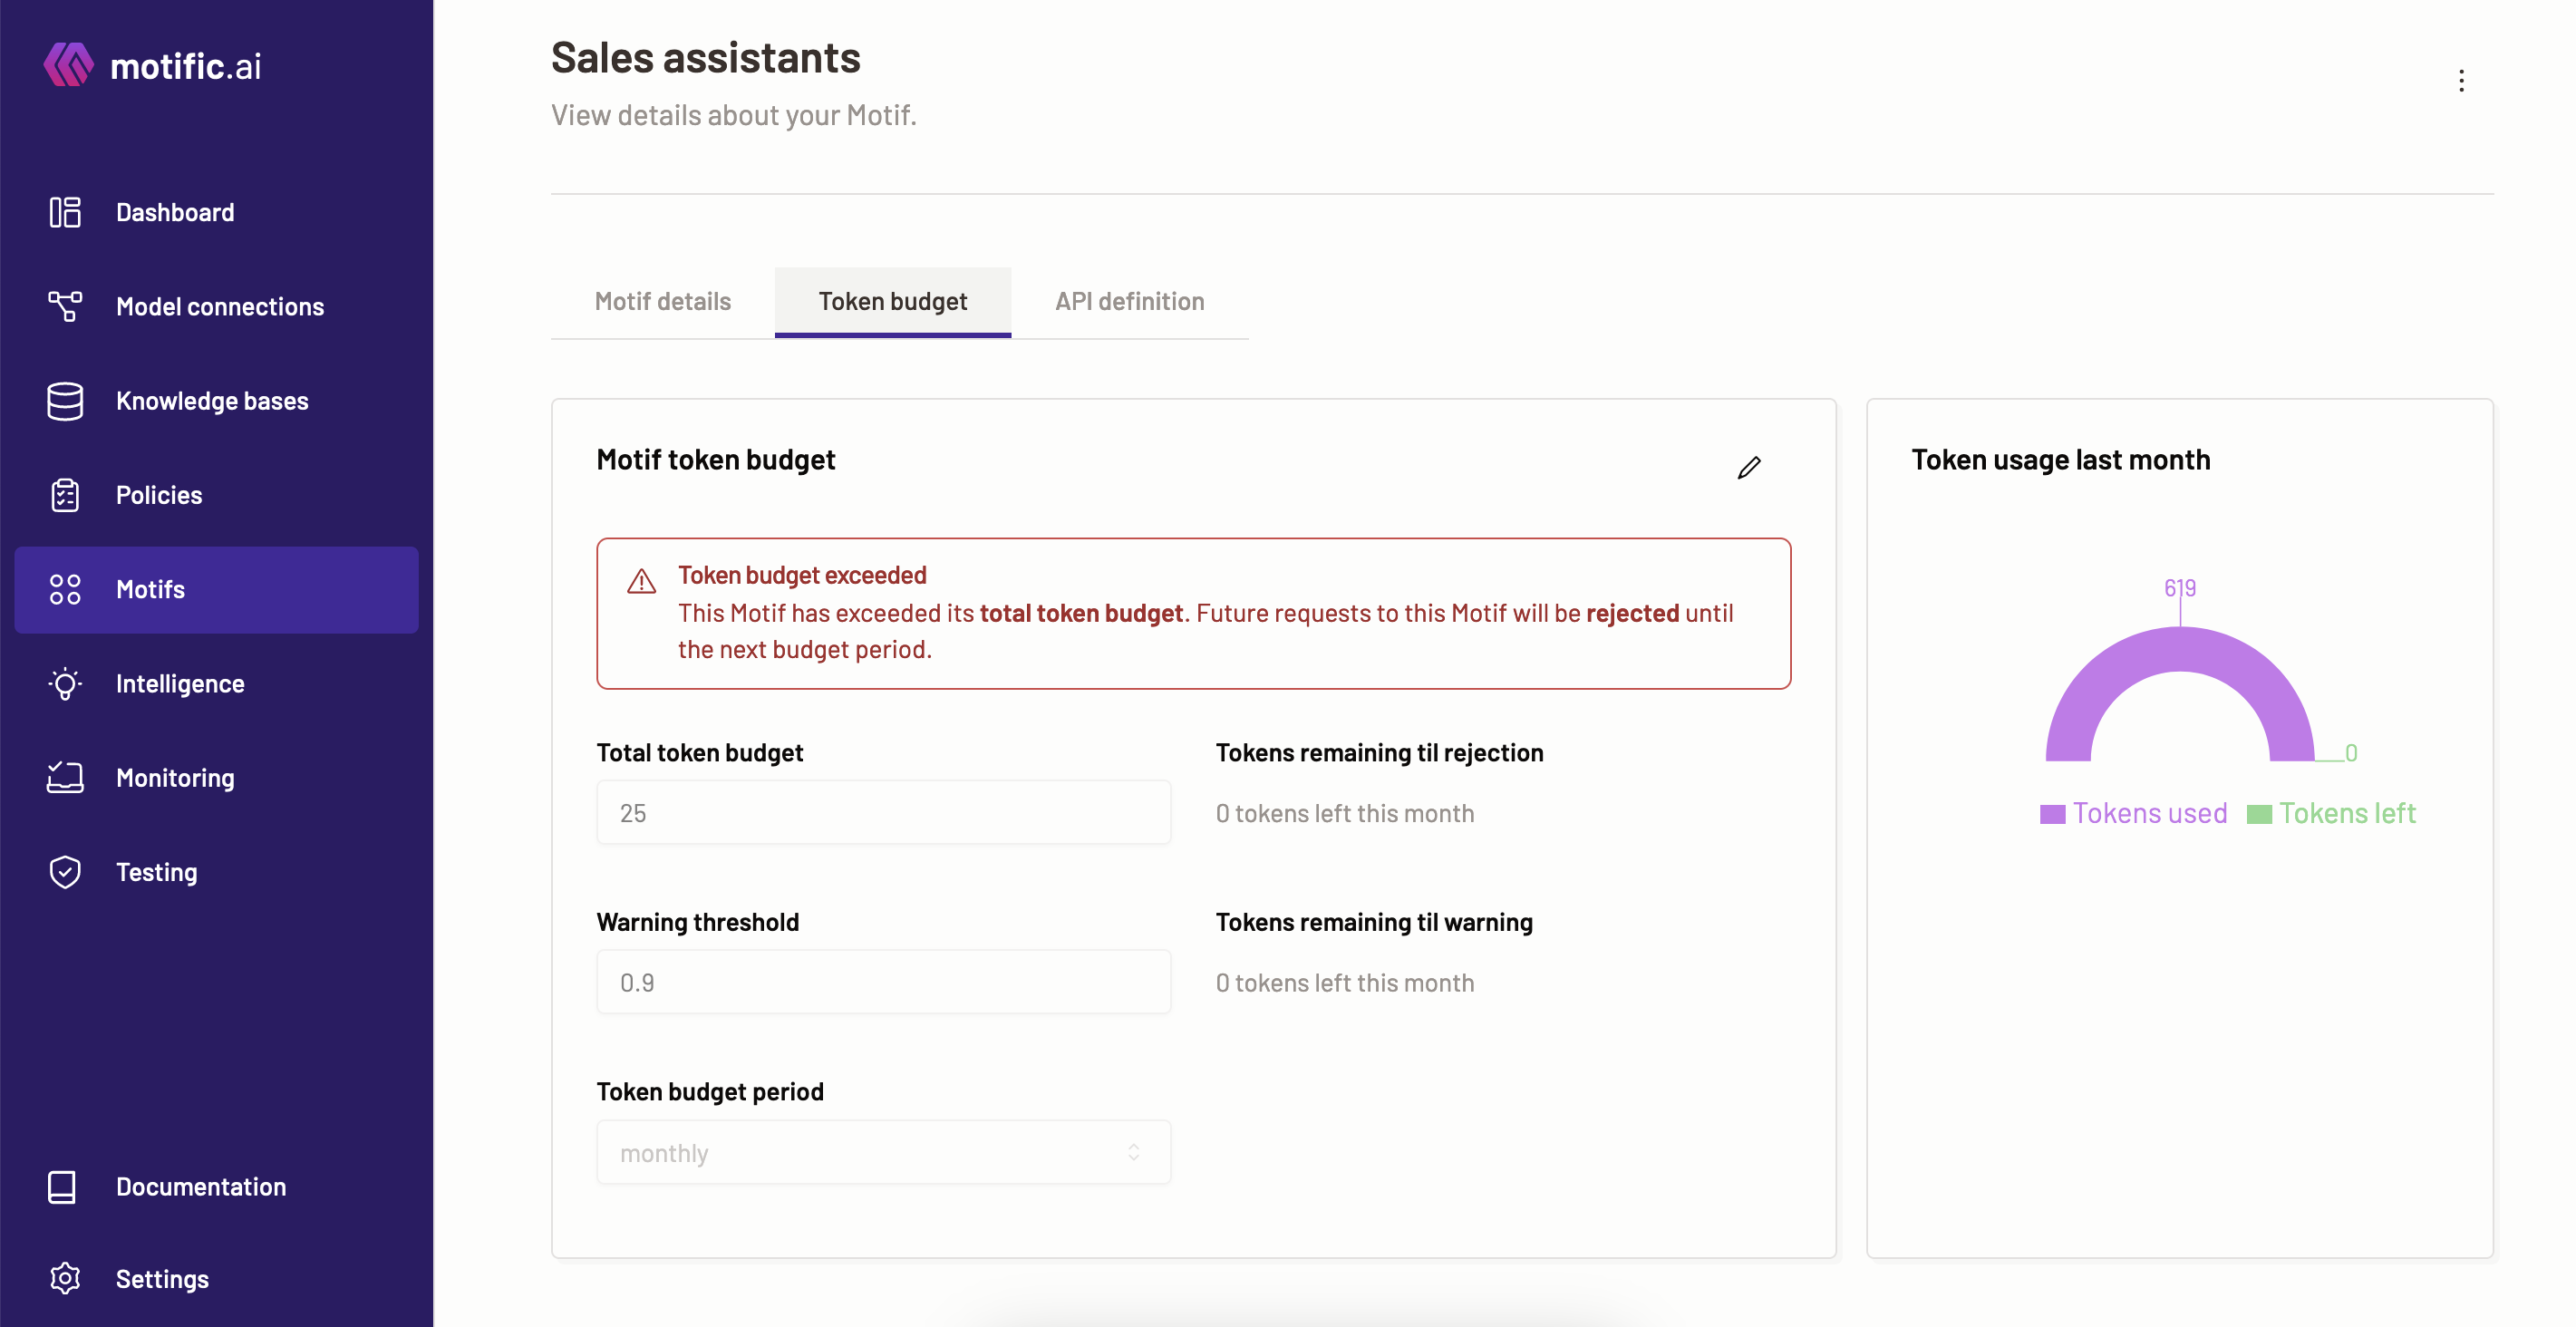
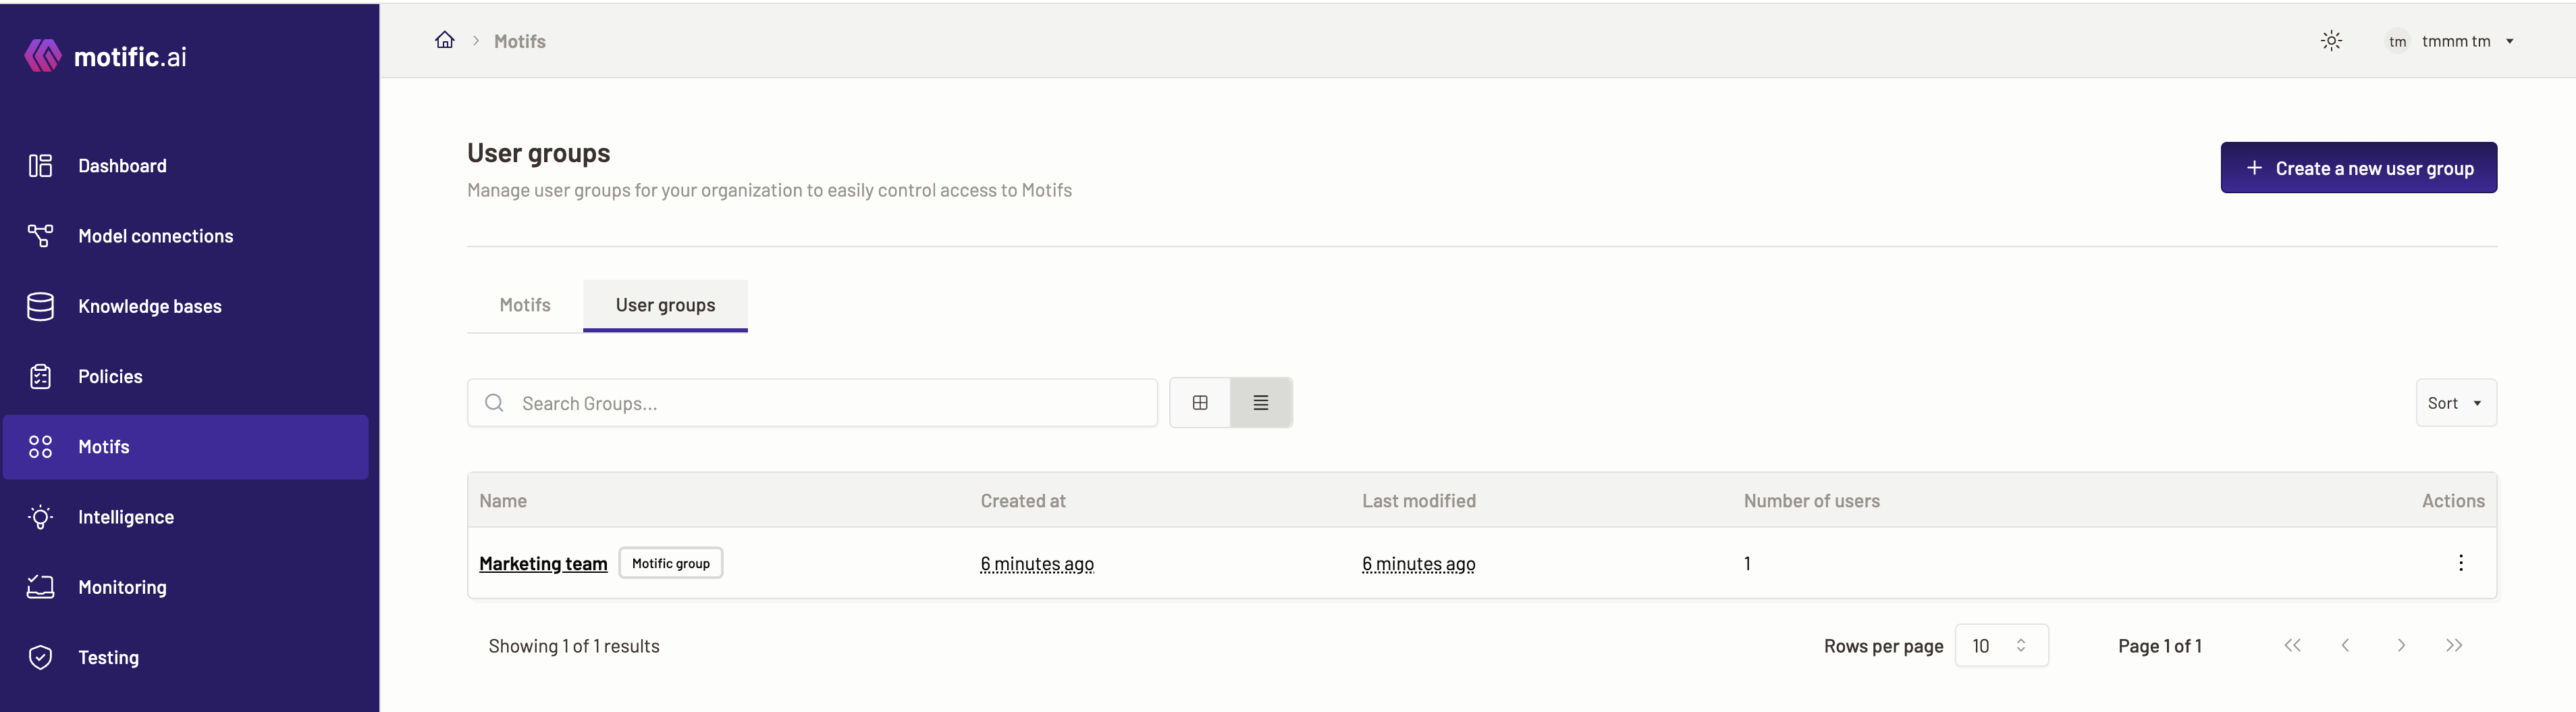
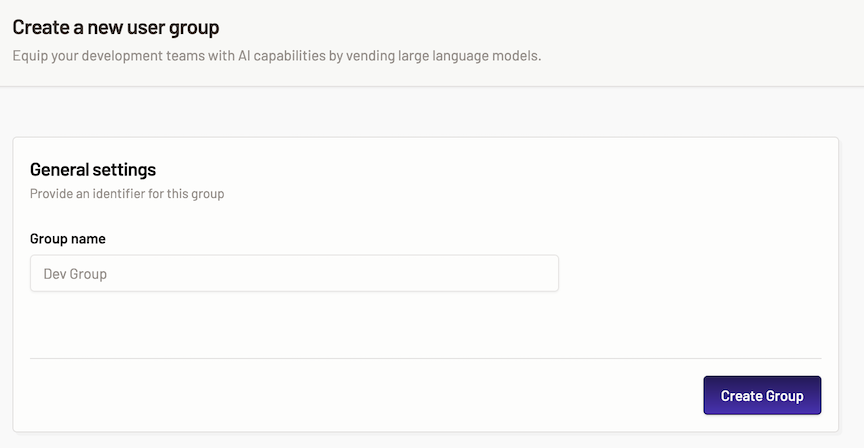
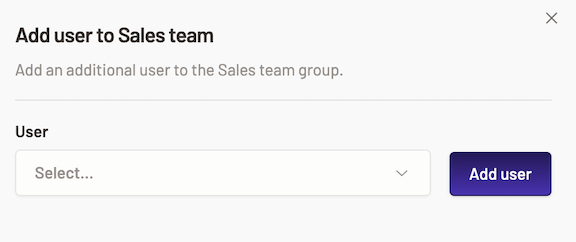
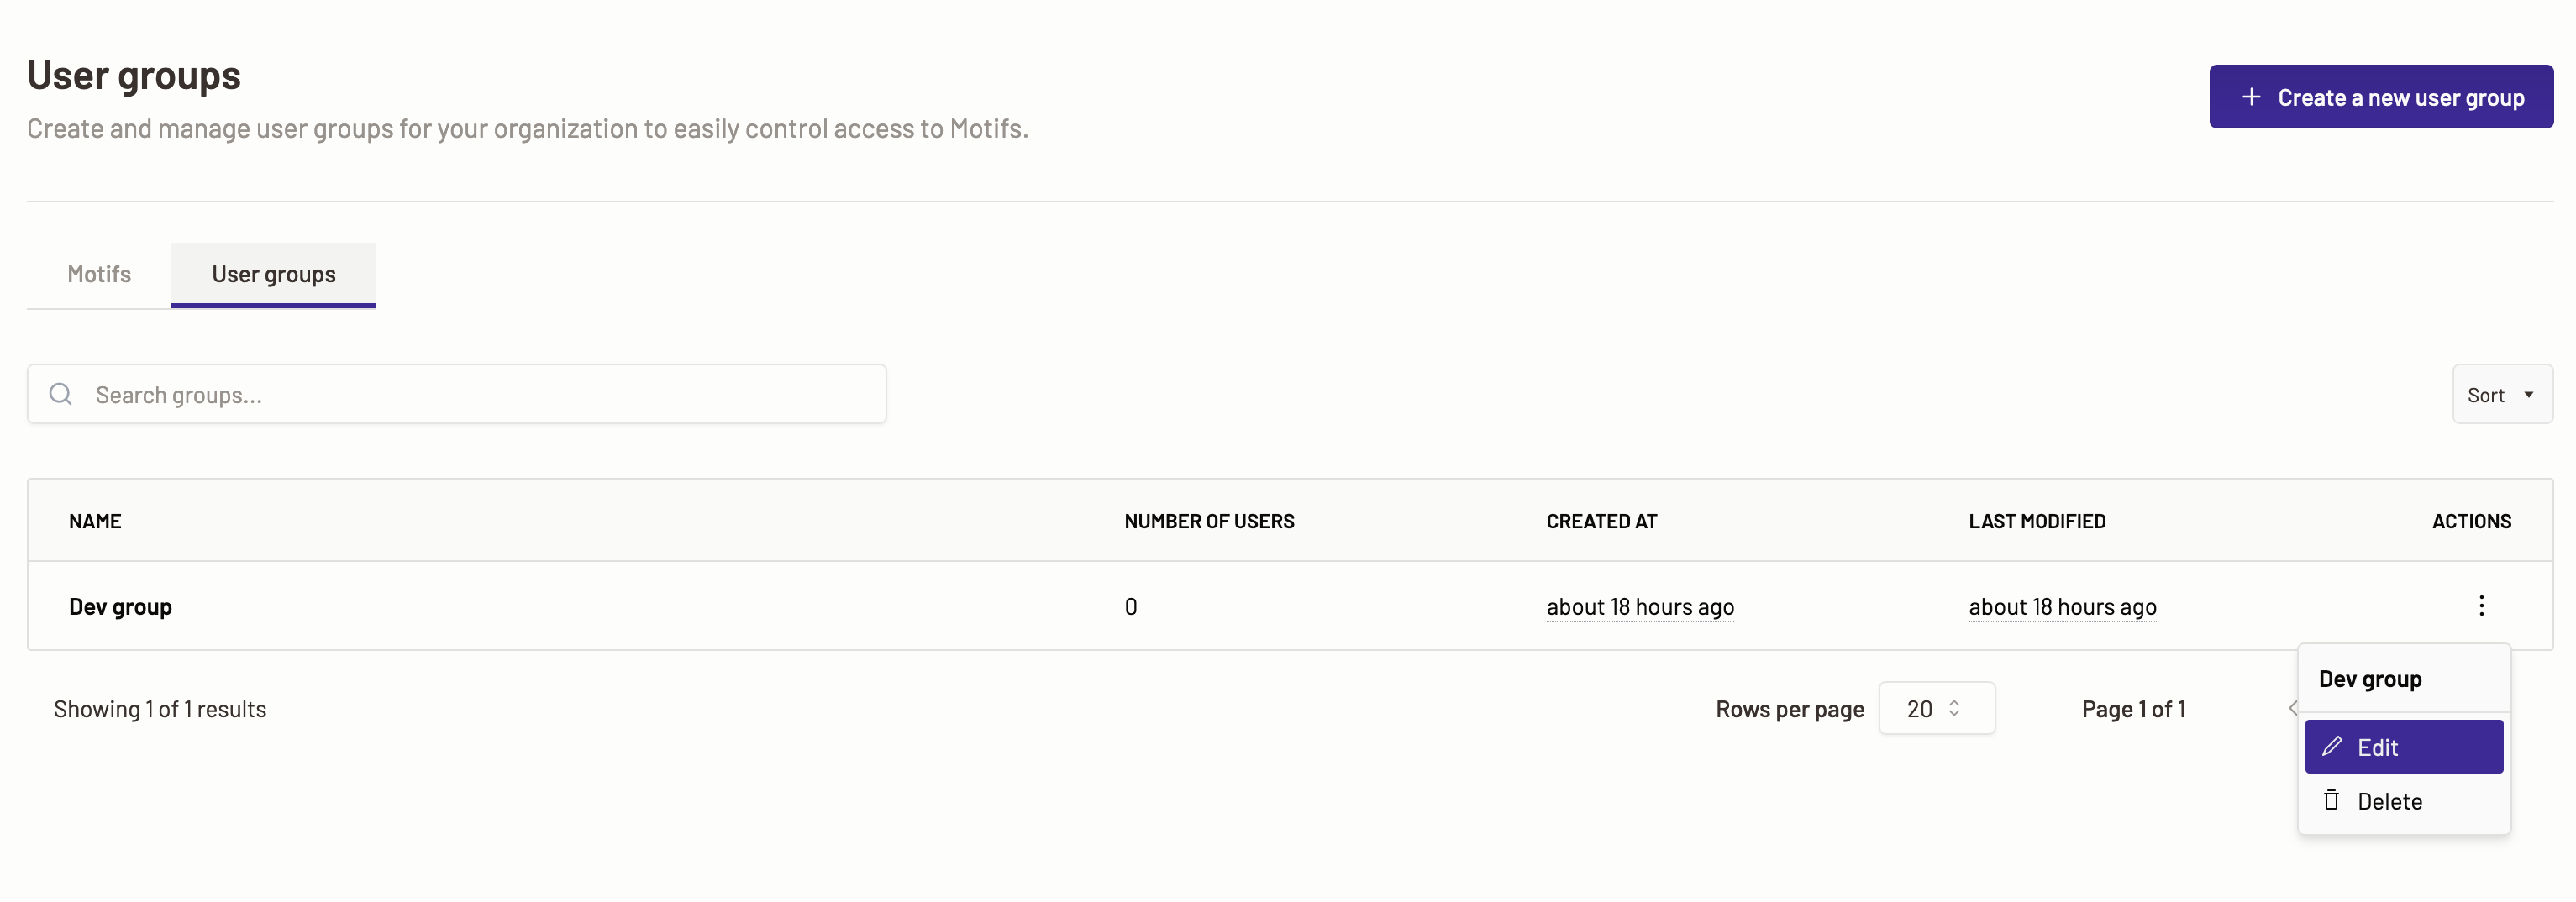
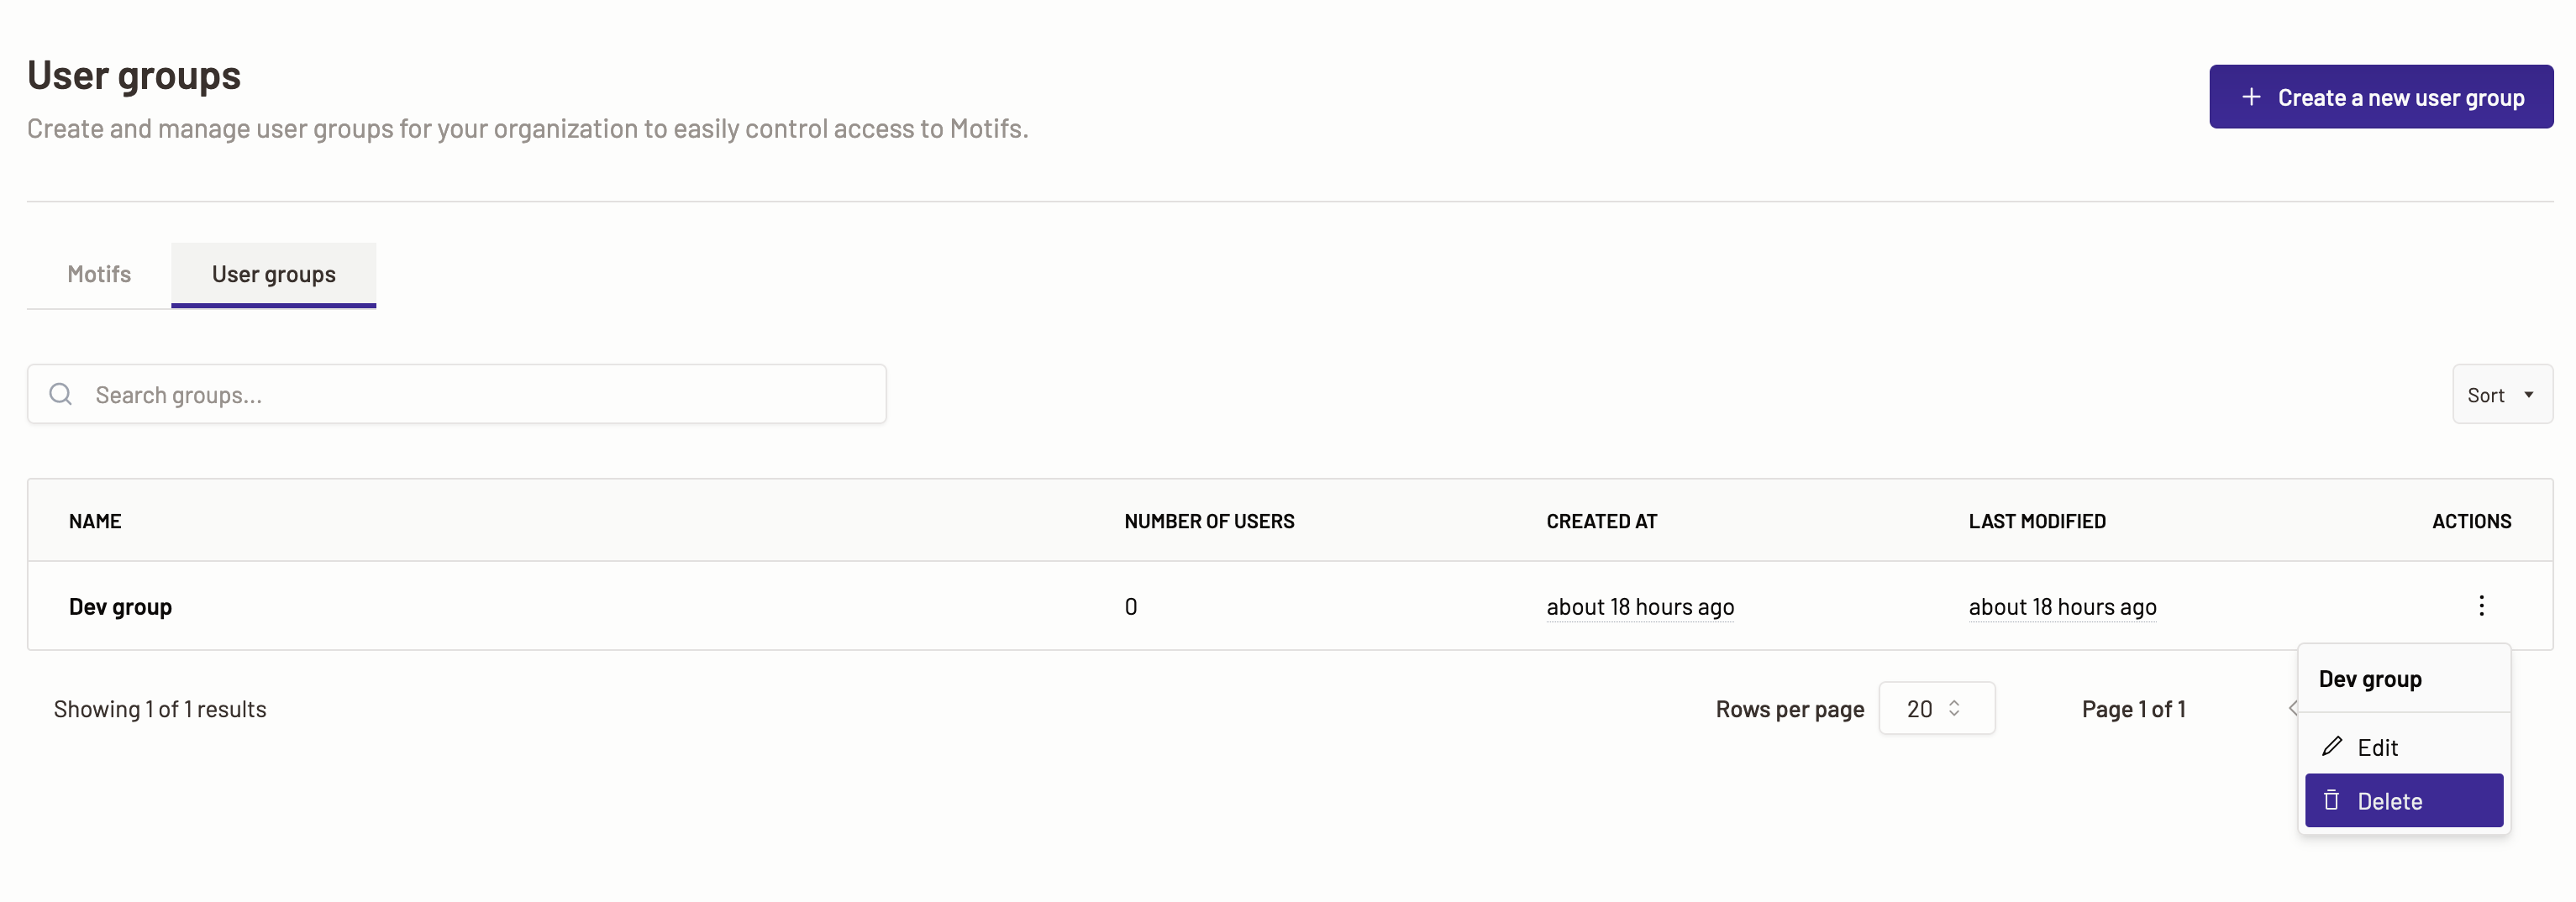
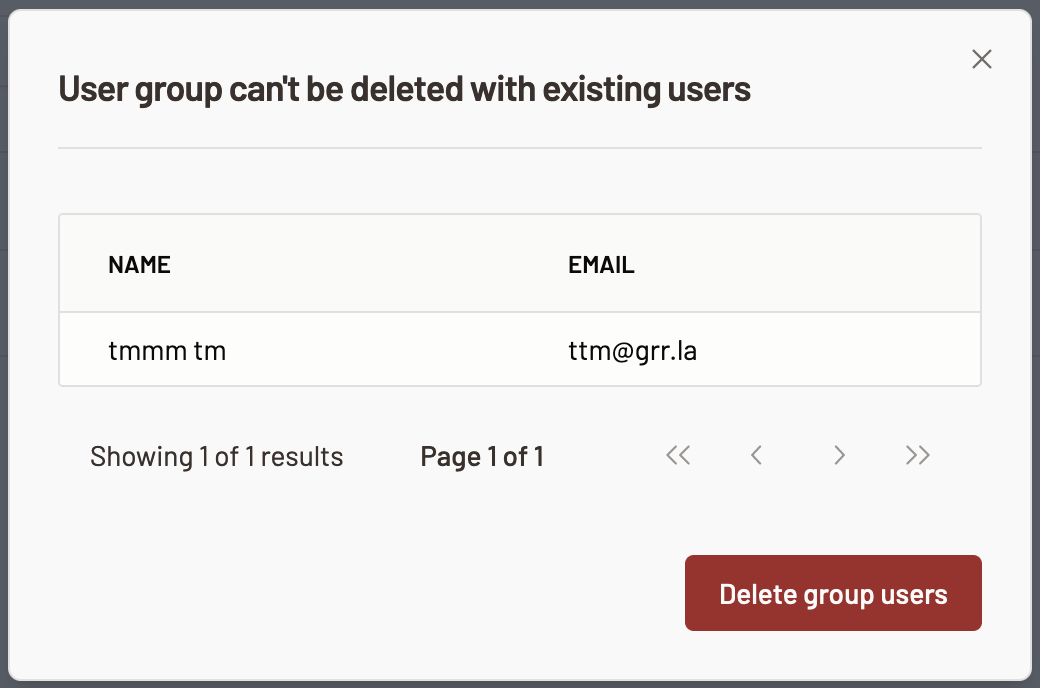


 The following details can be viewed:
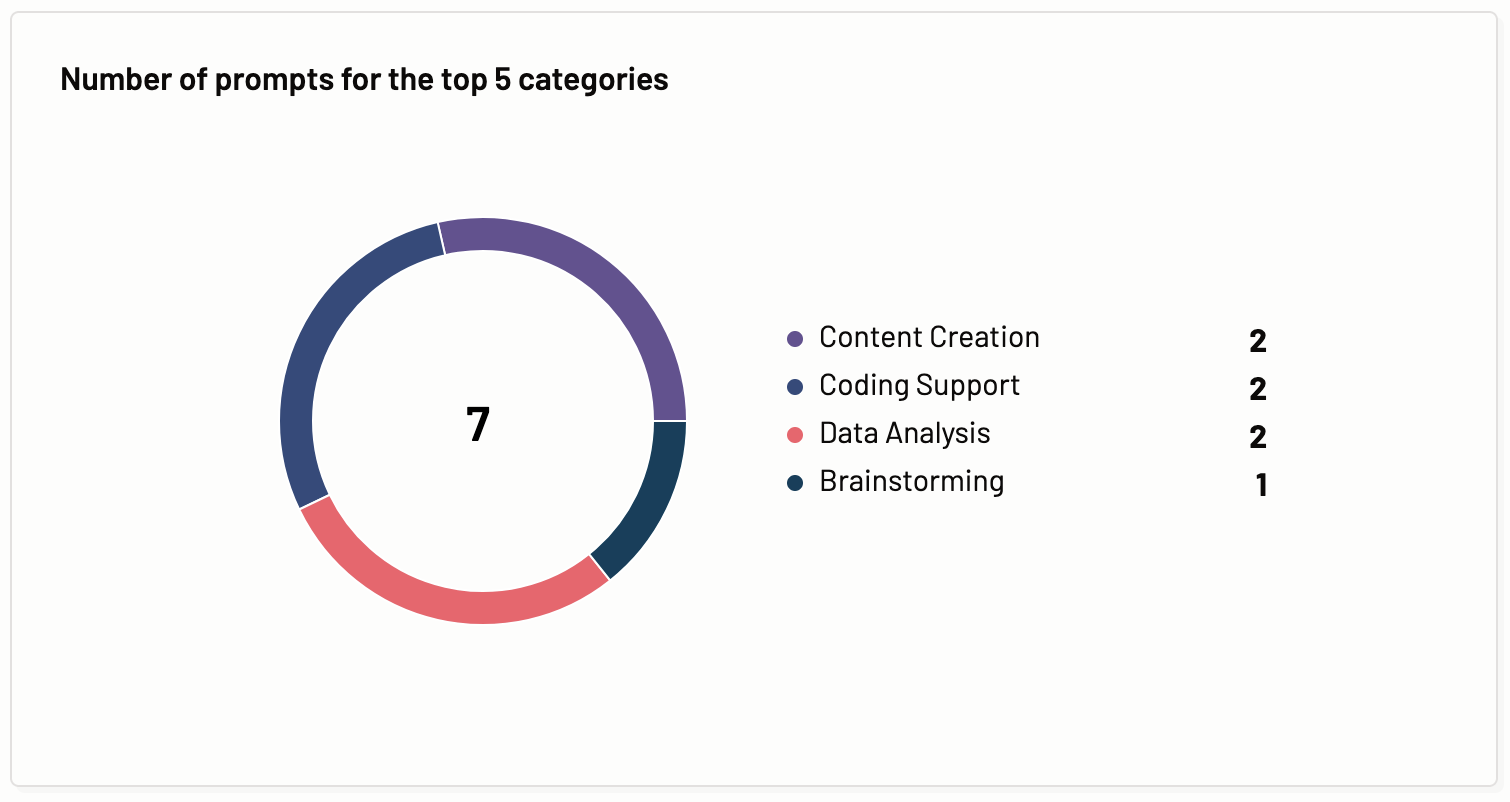
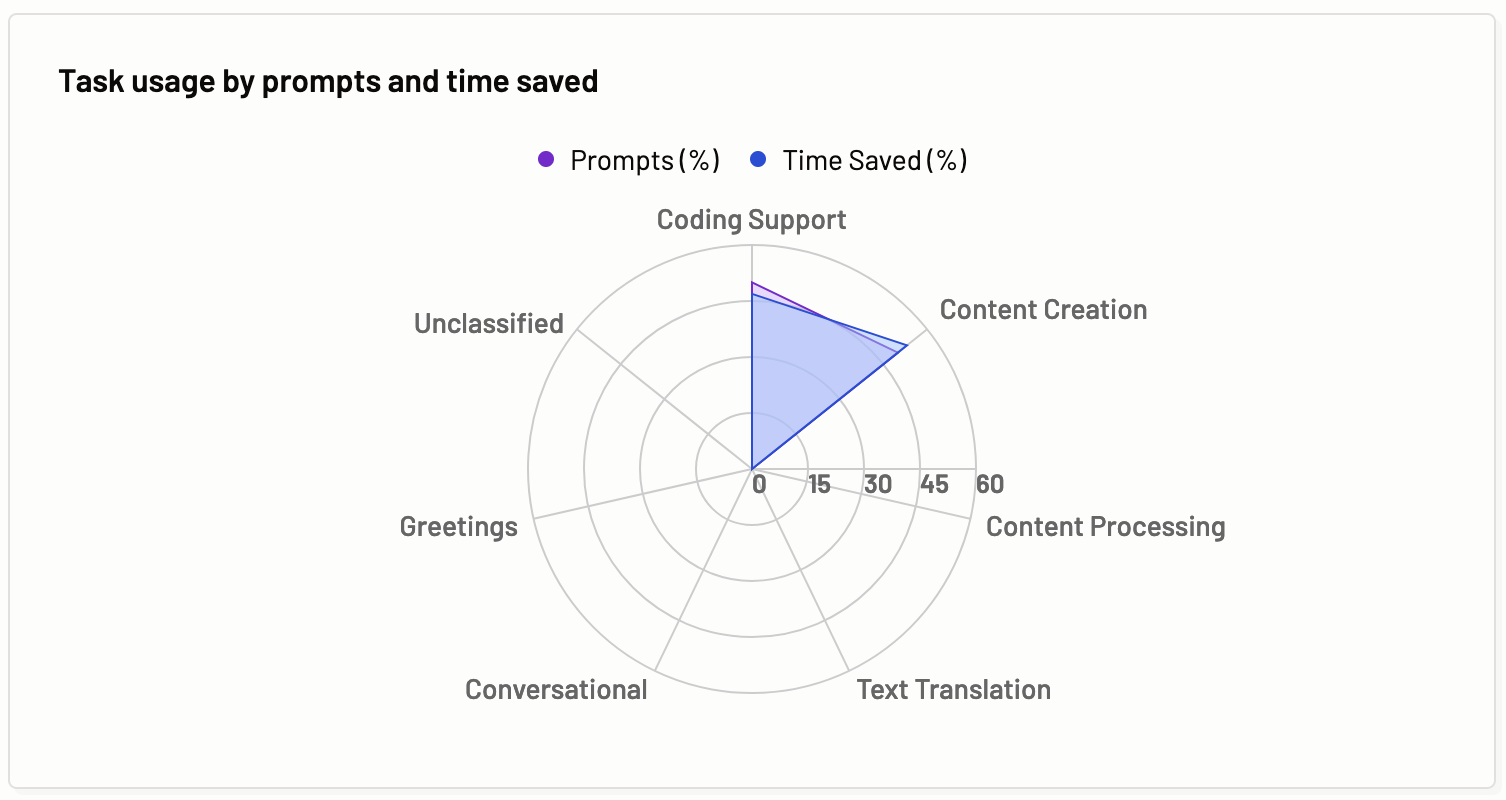
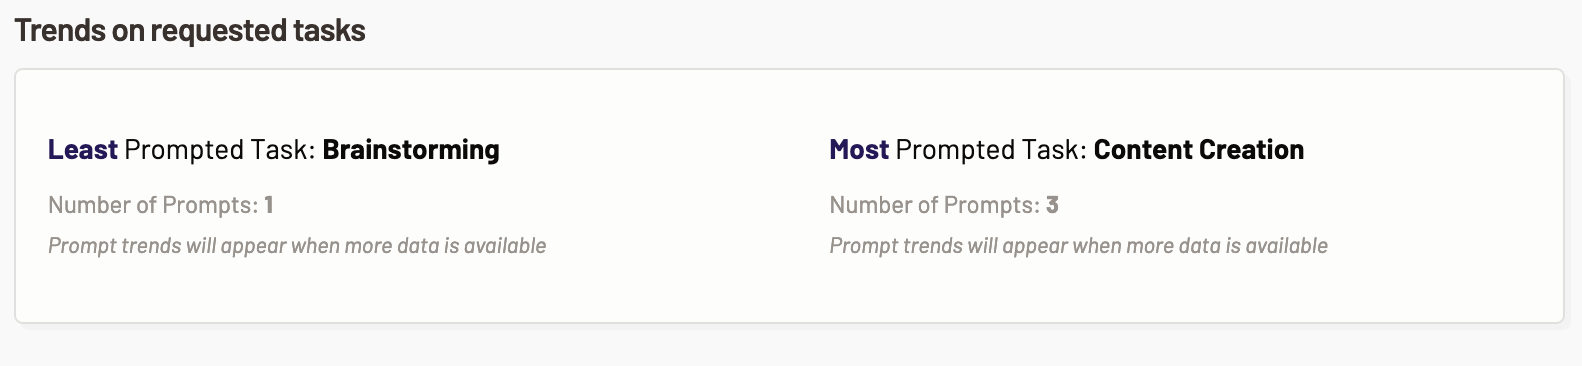
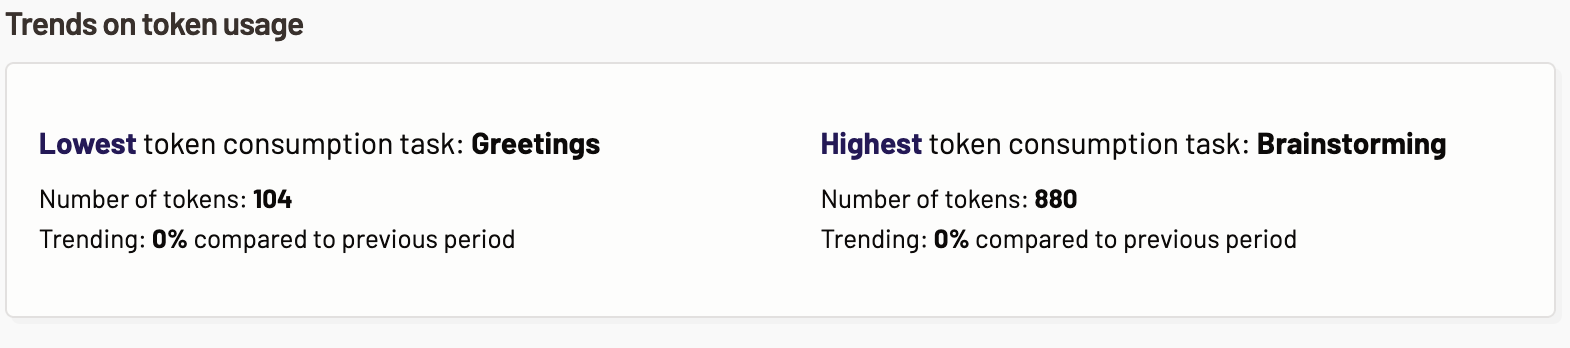
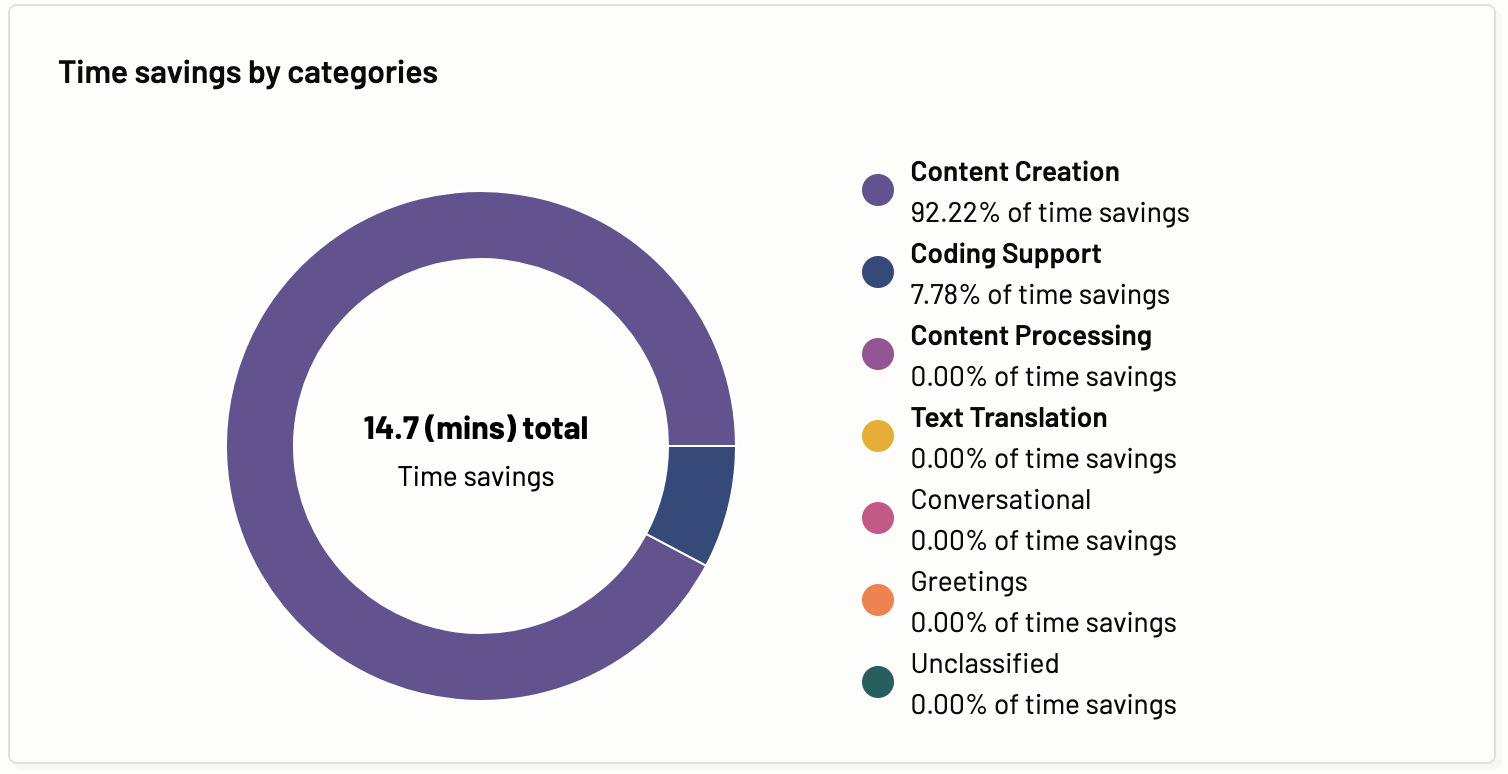
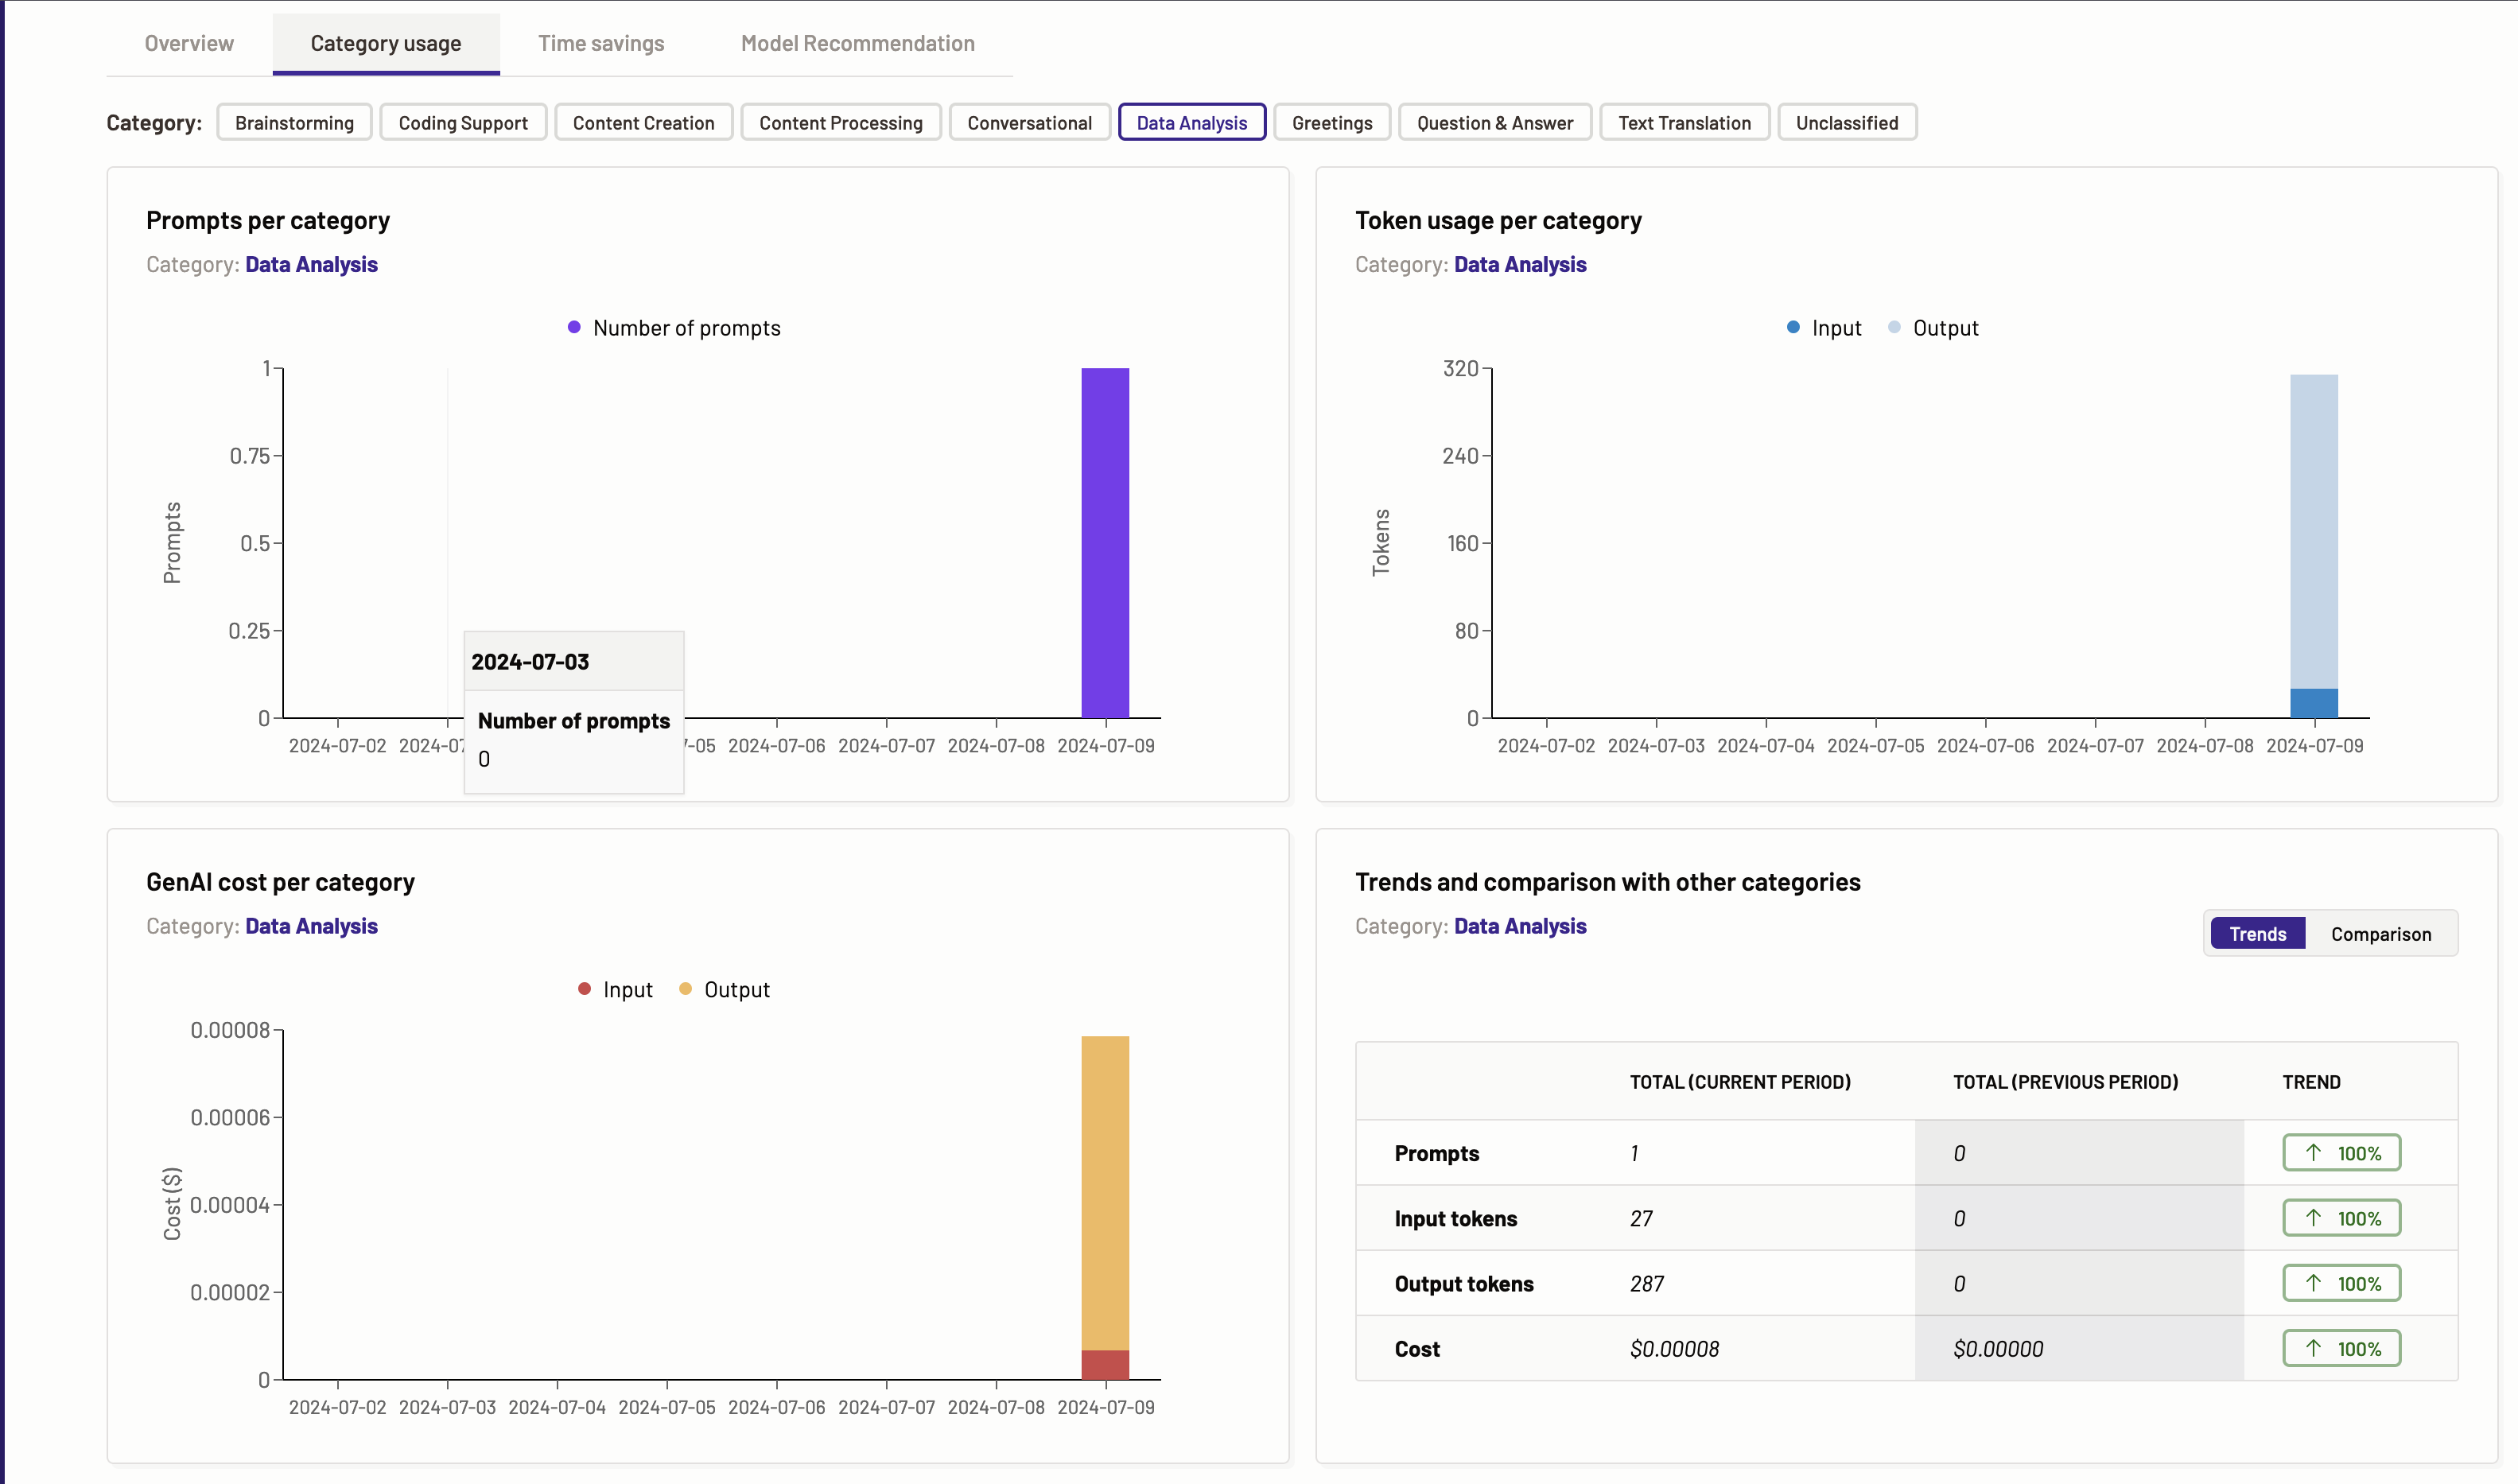
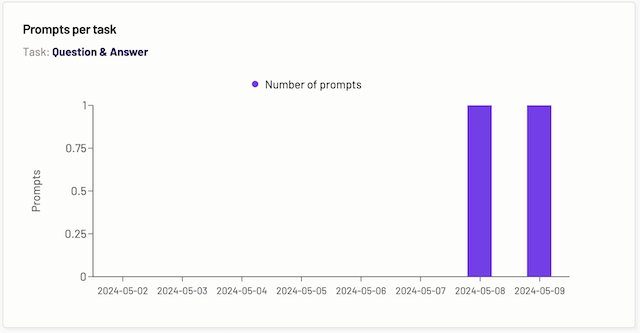
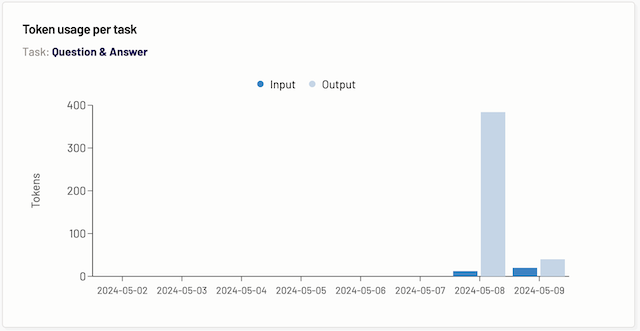
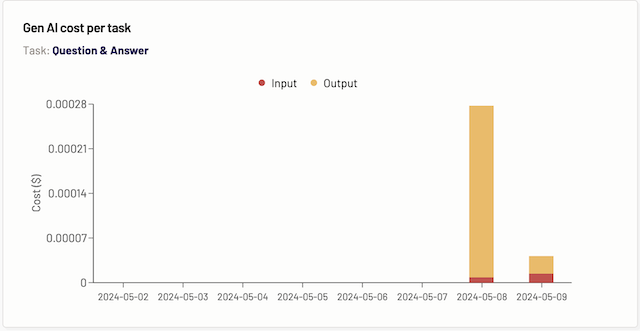
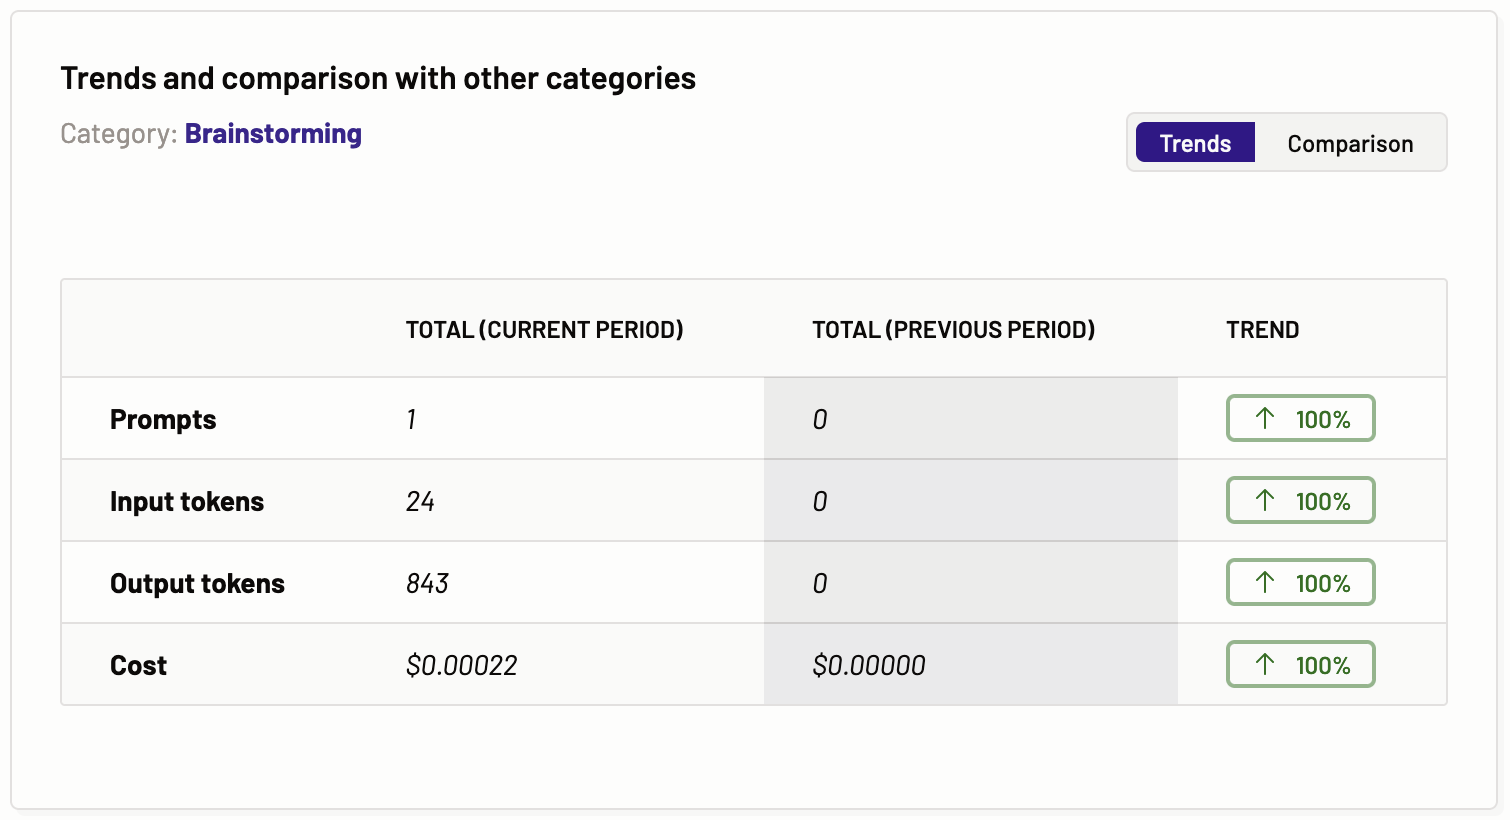
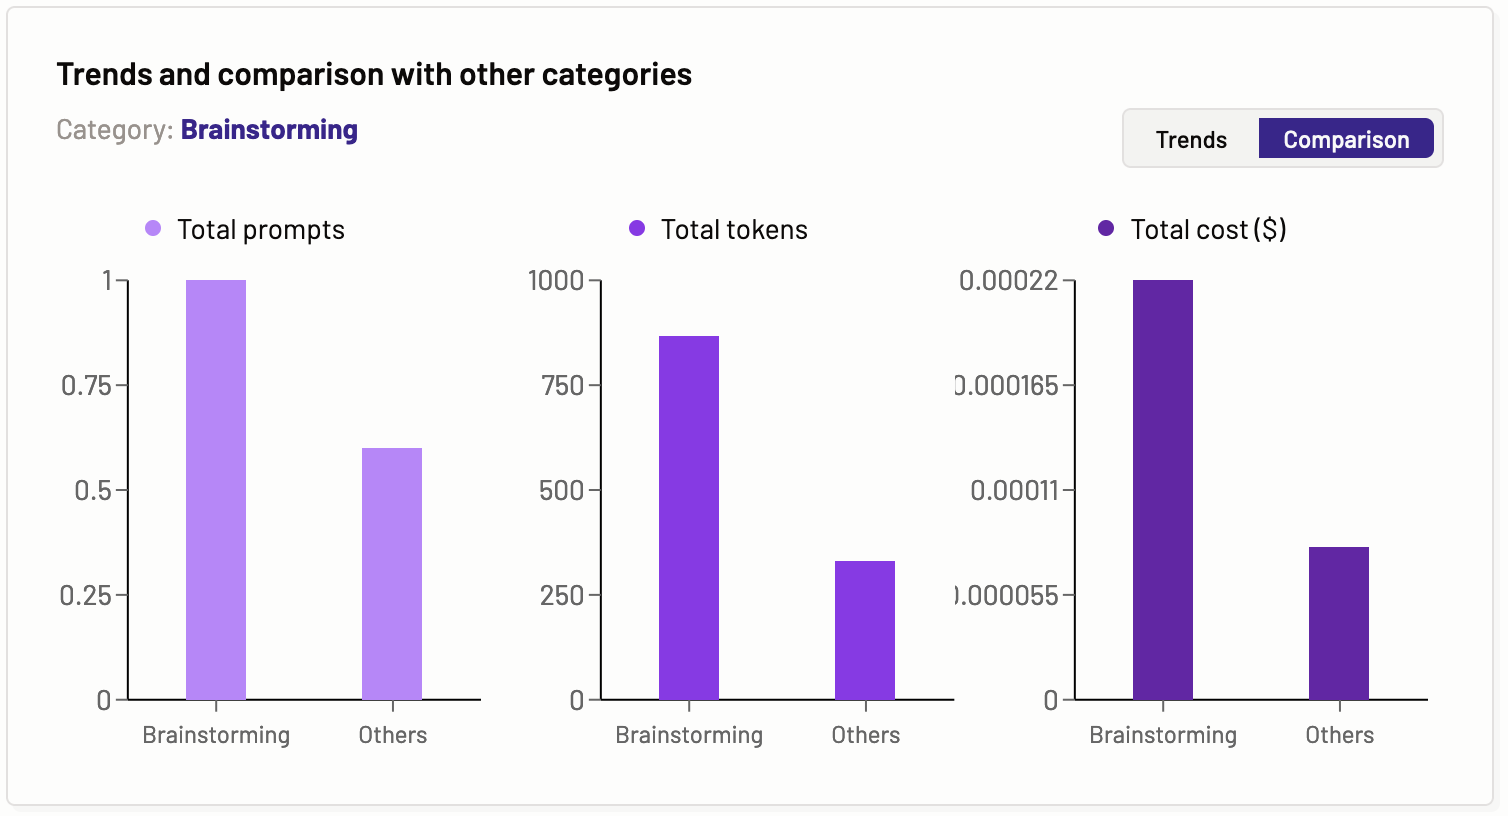
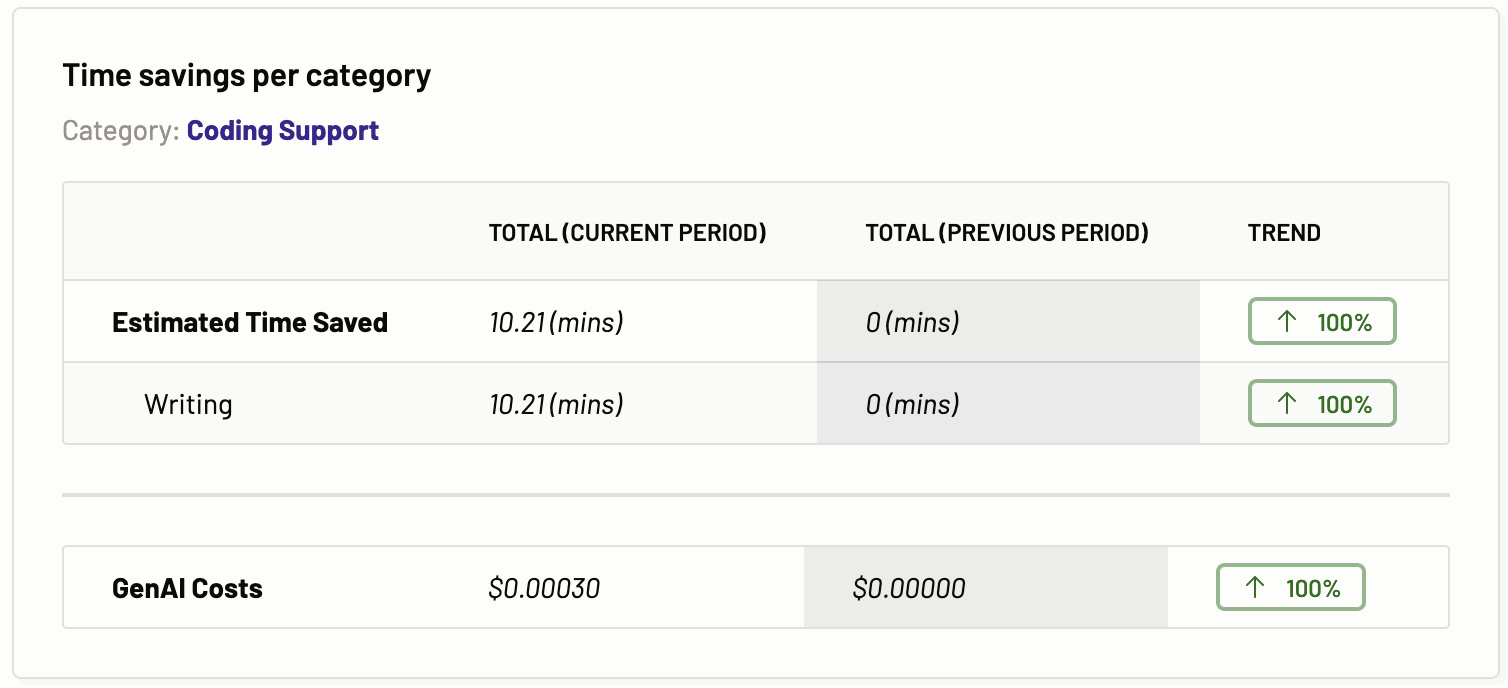
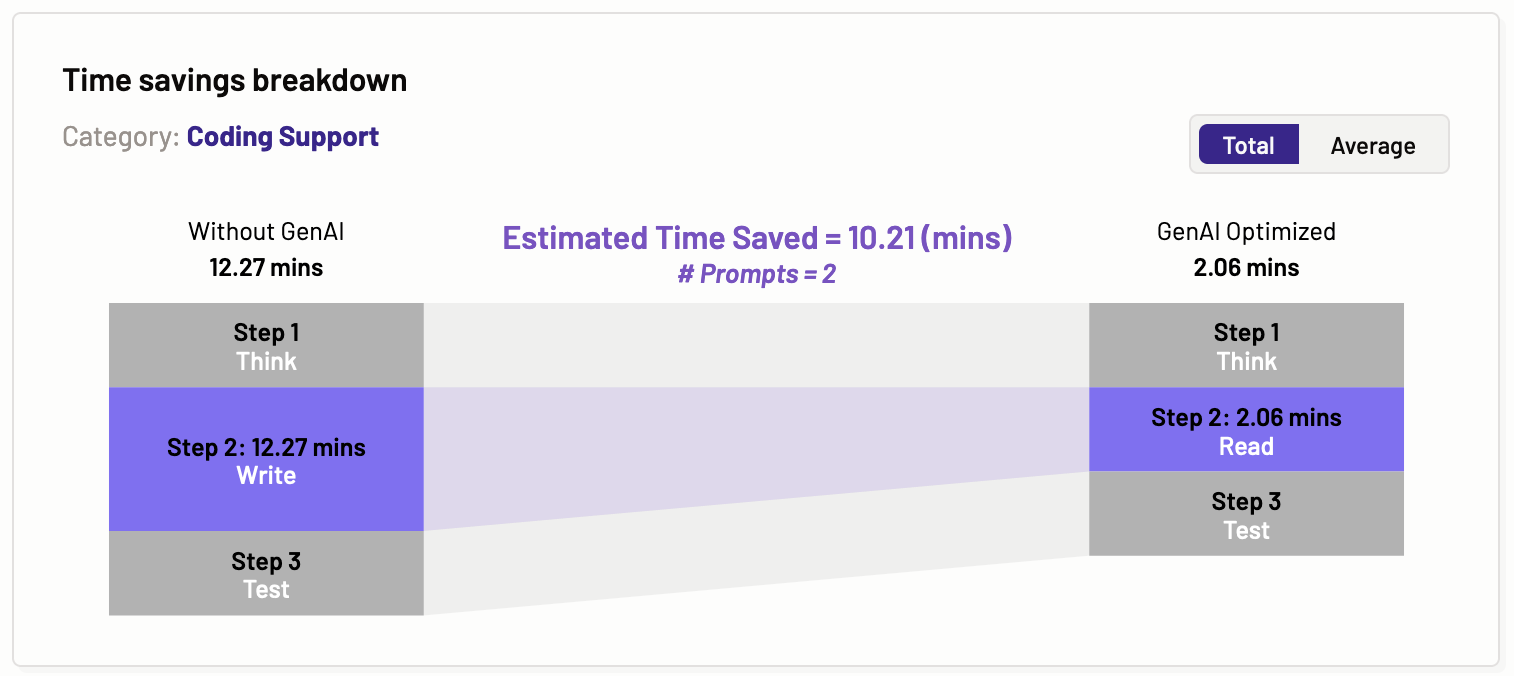
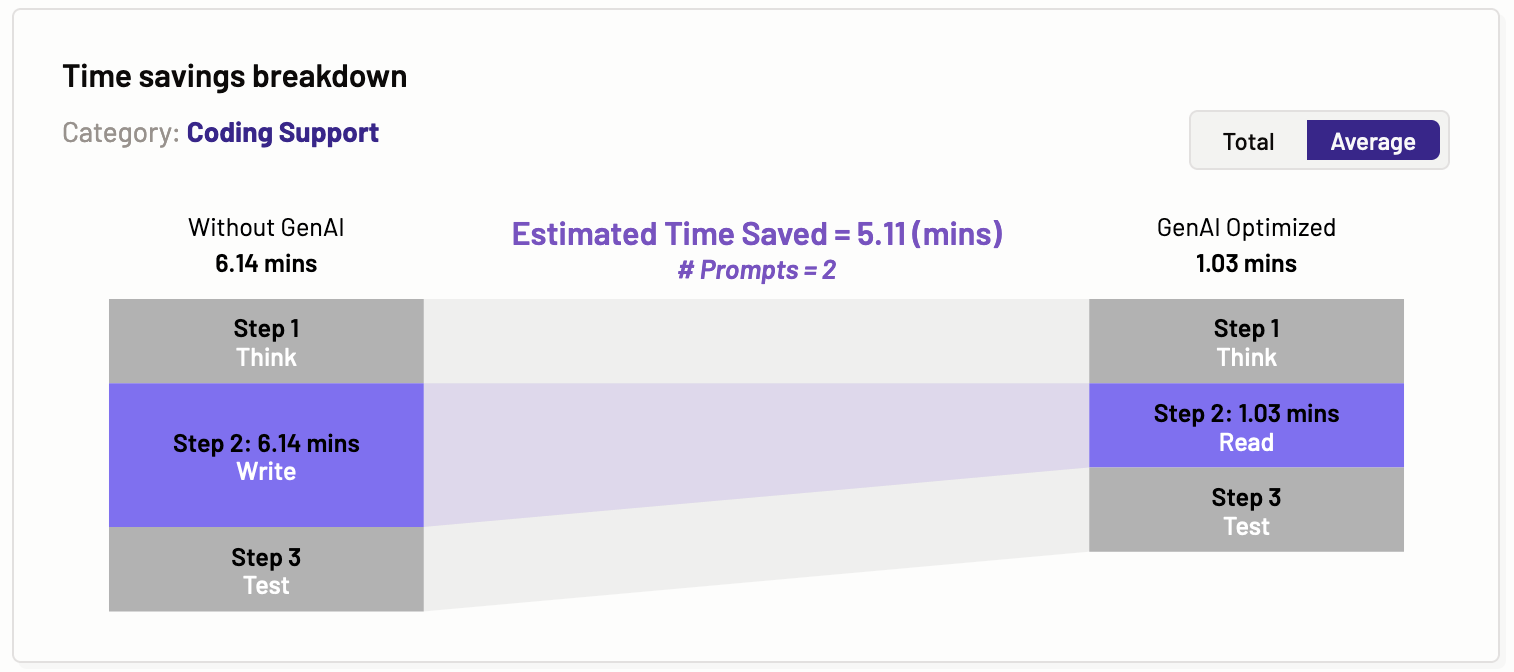
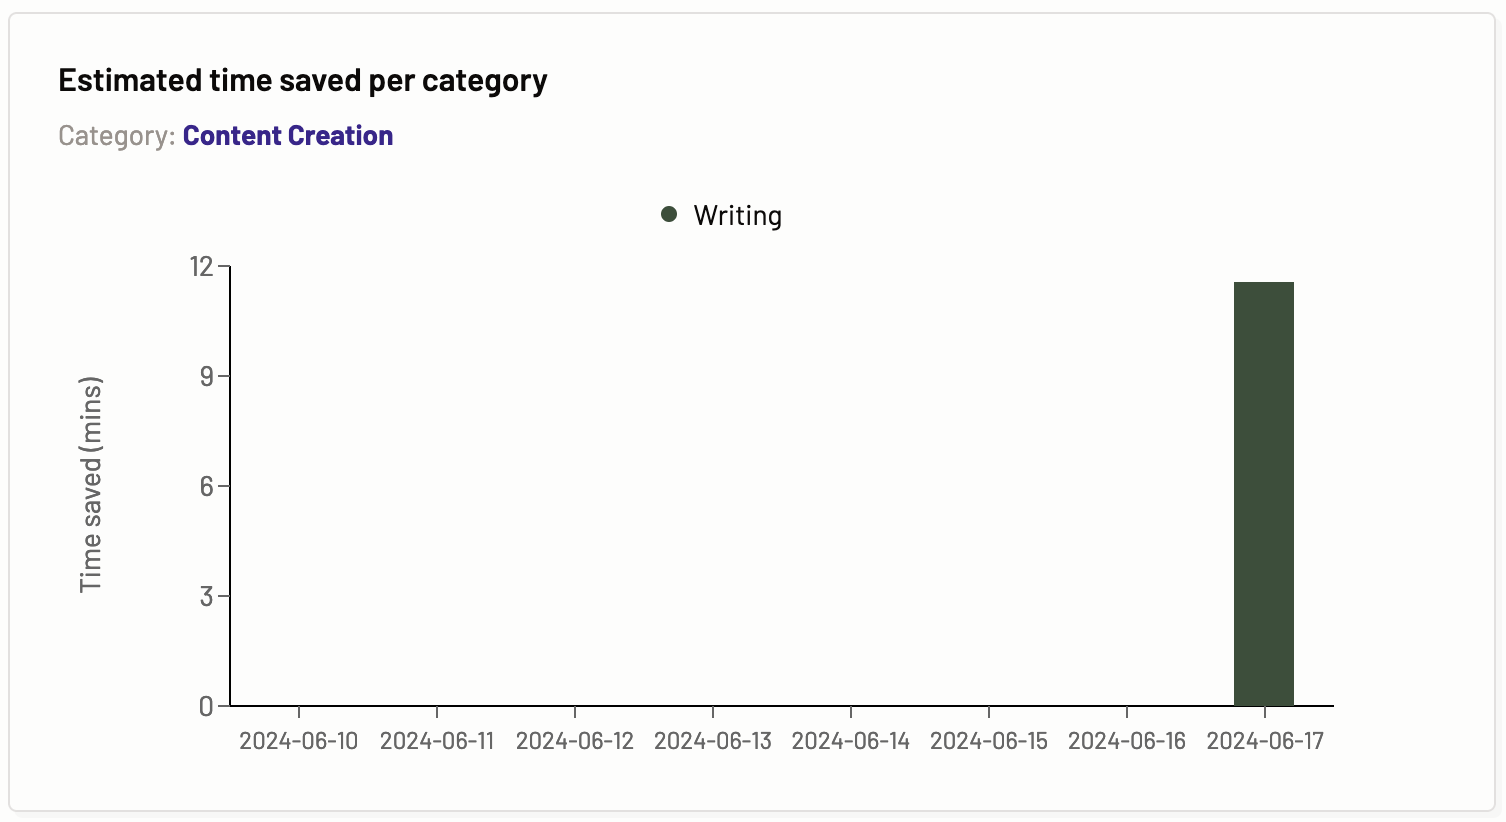
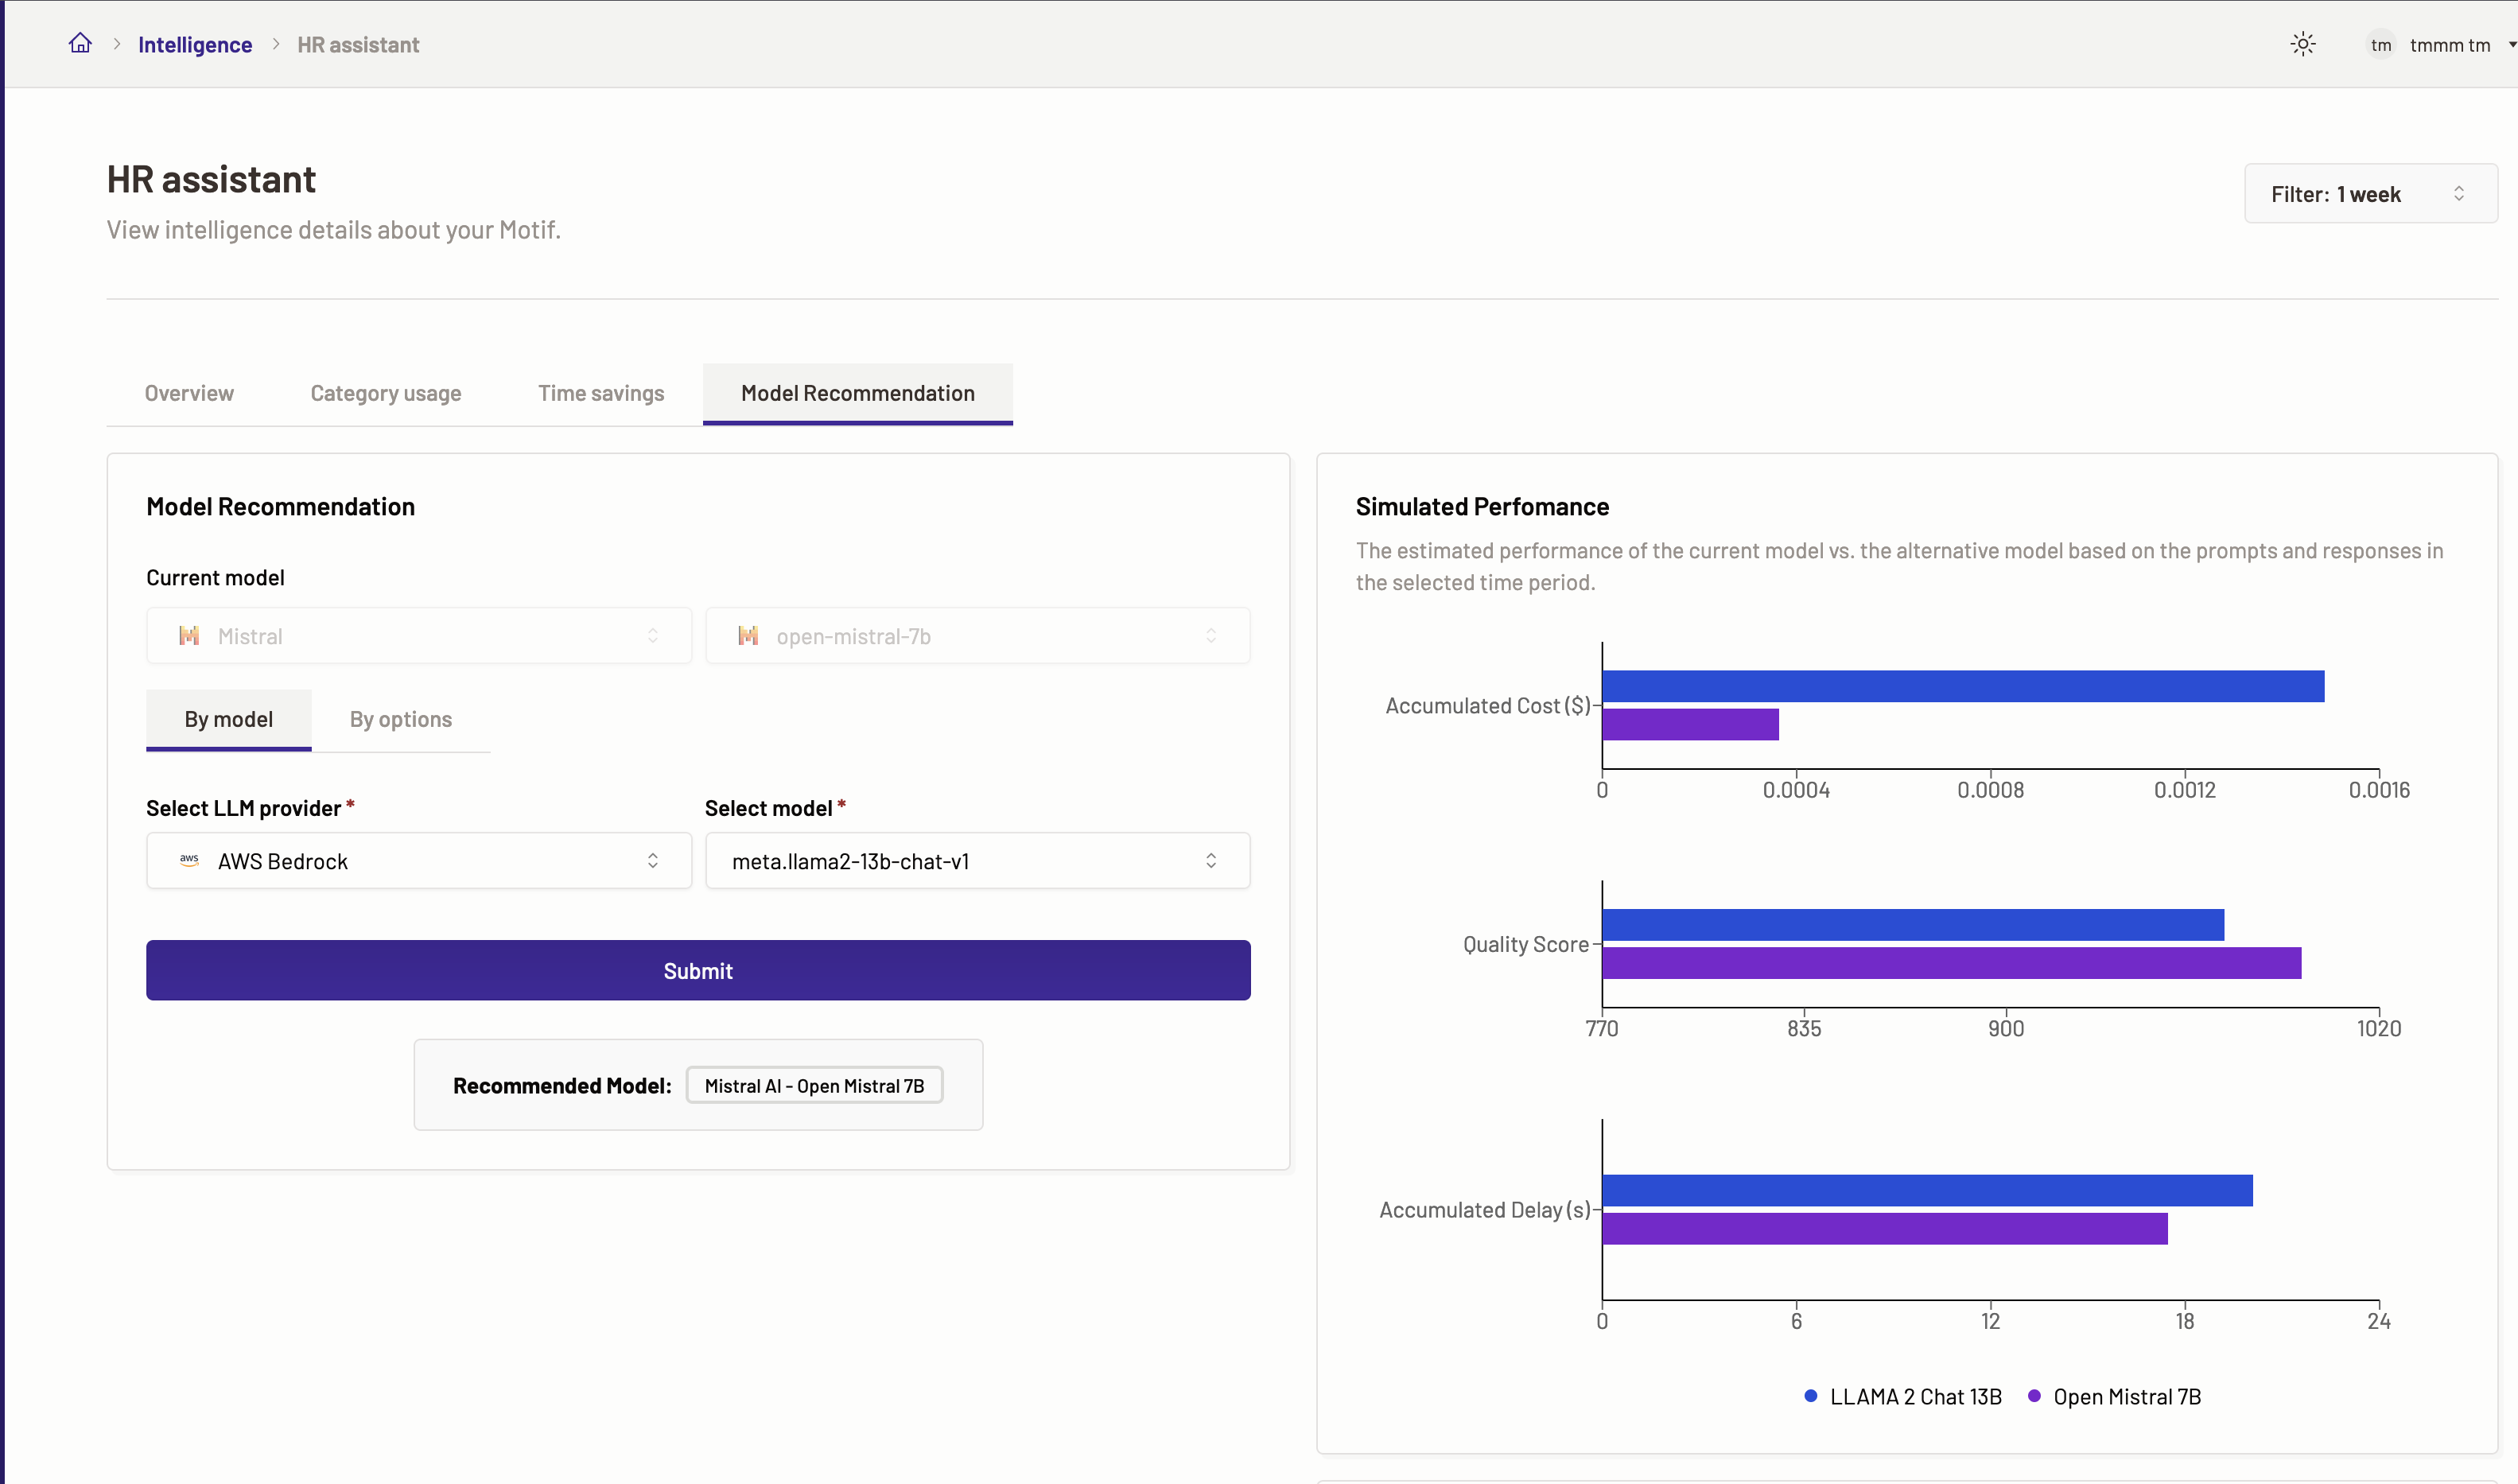
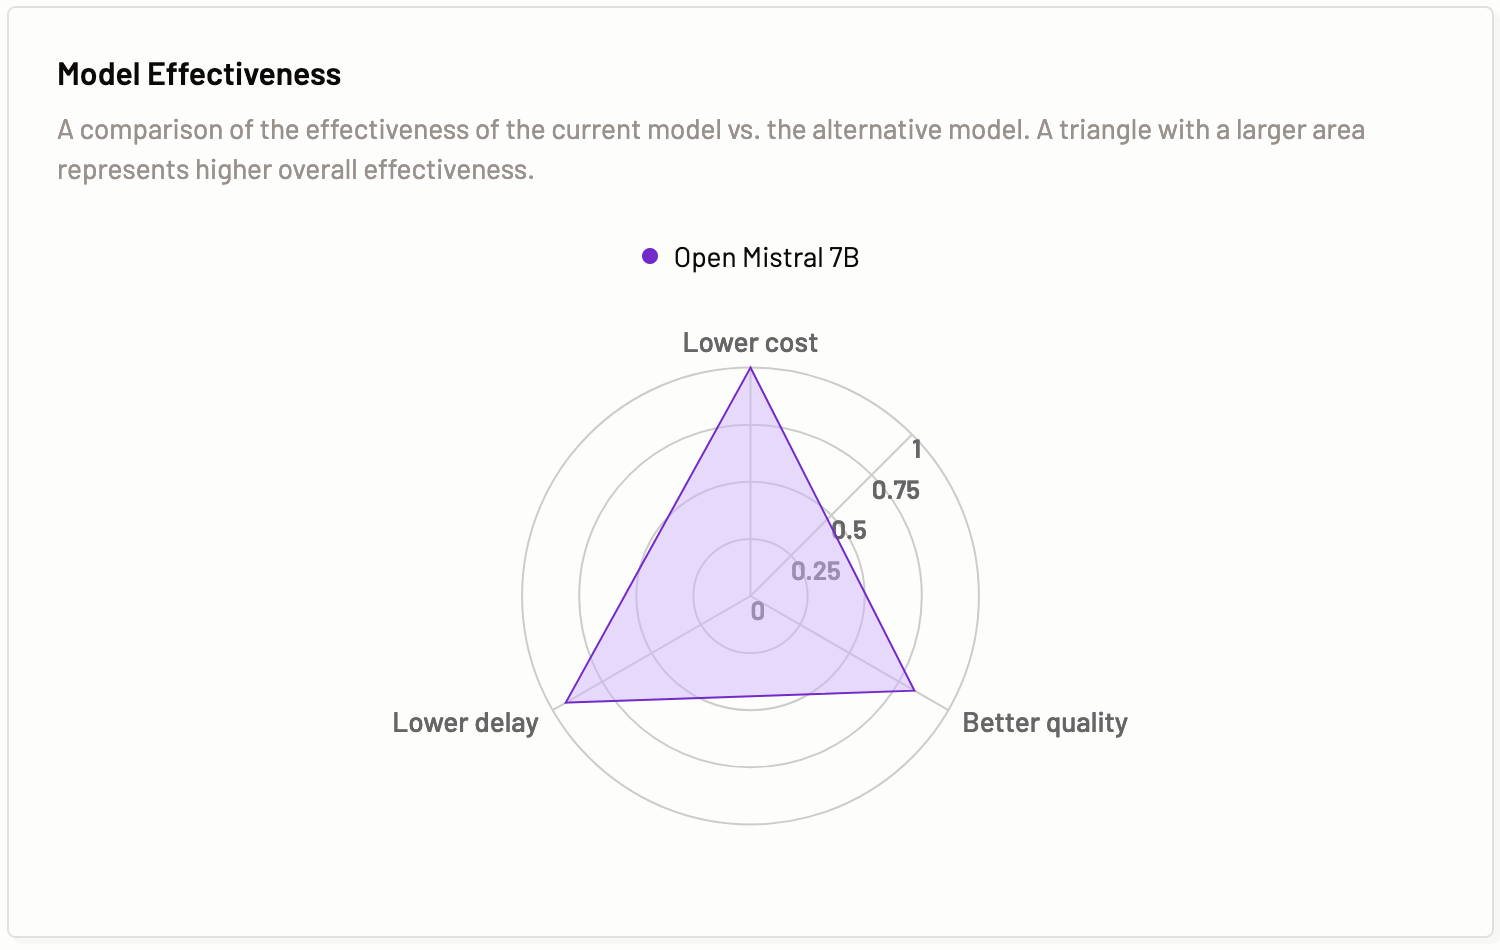

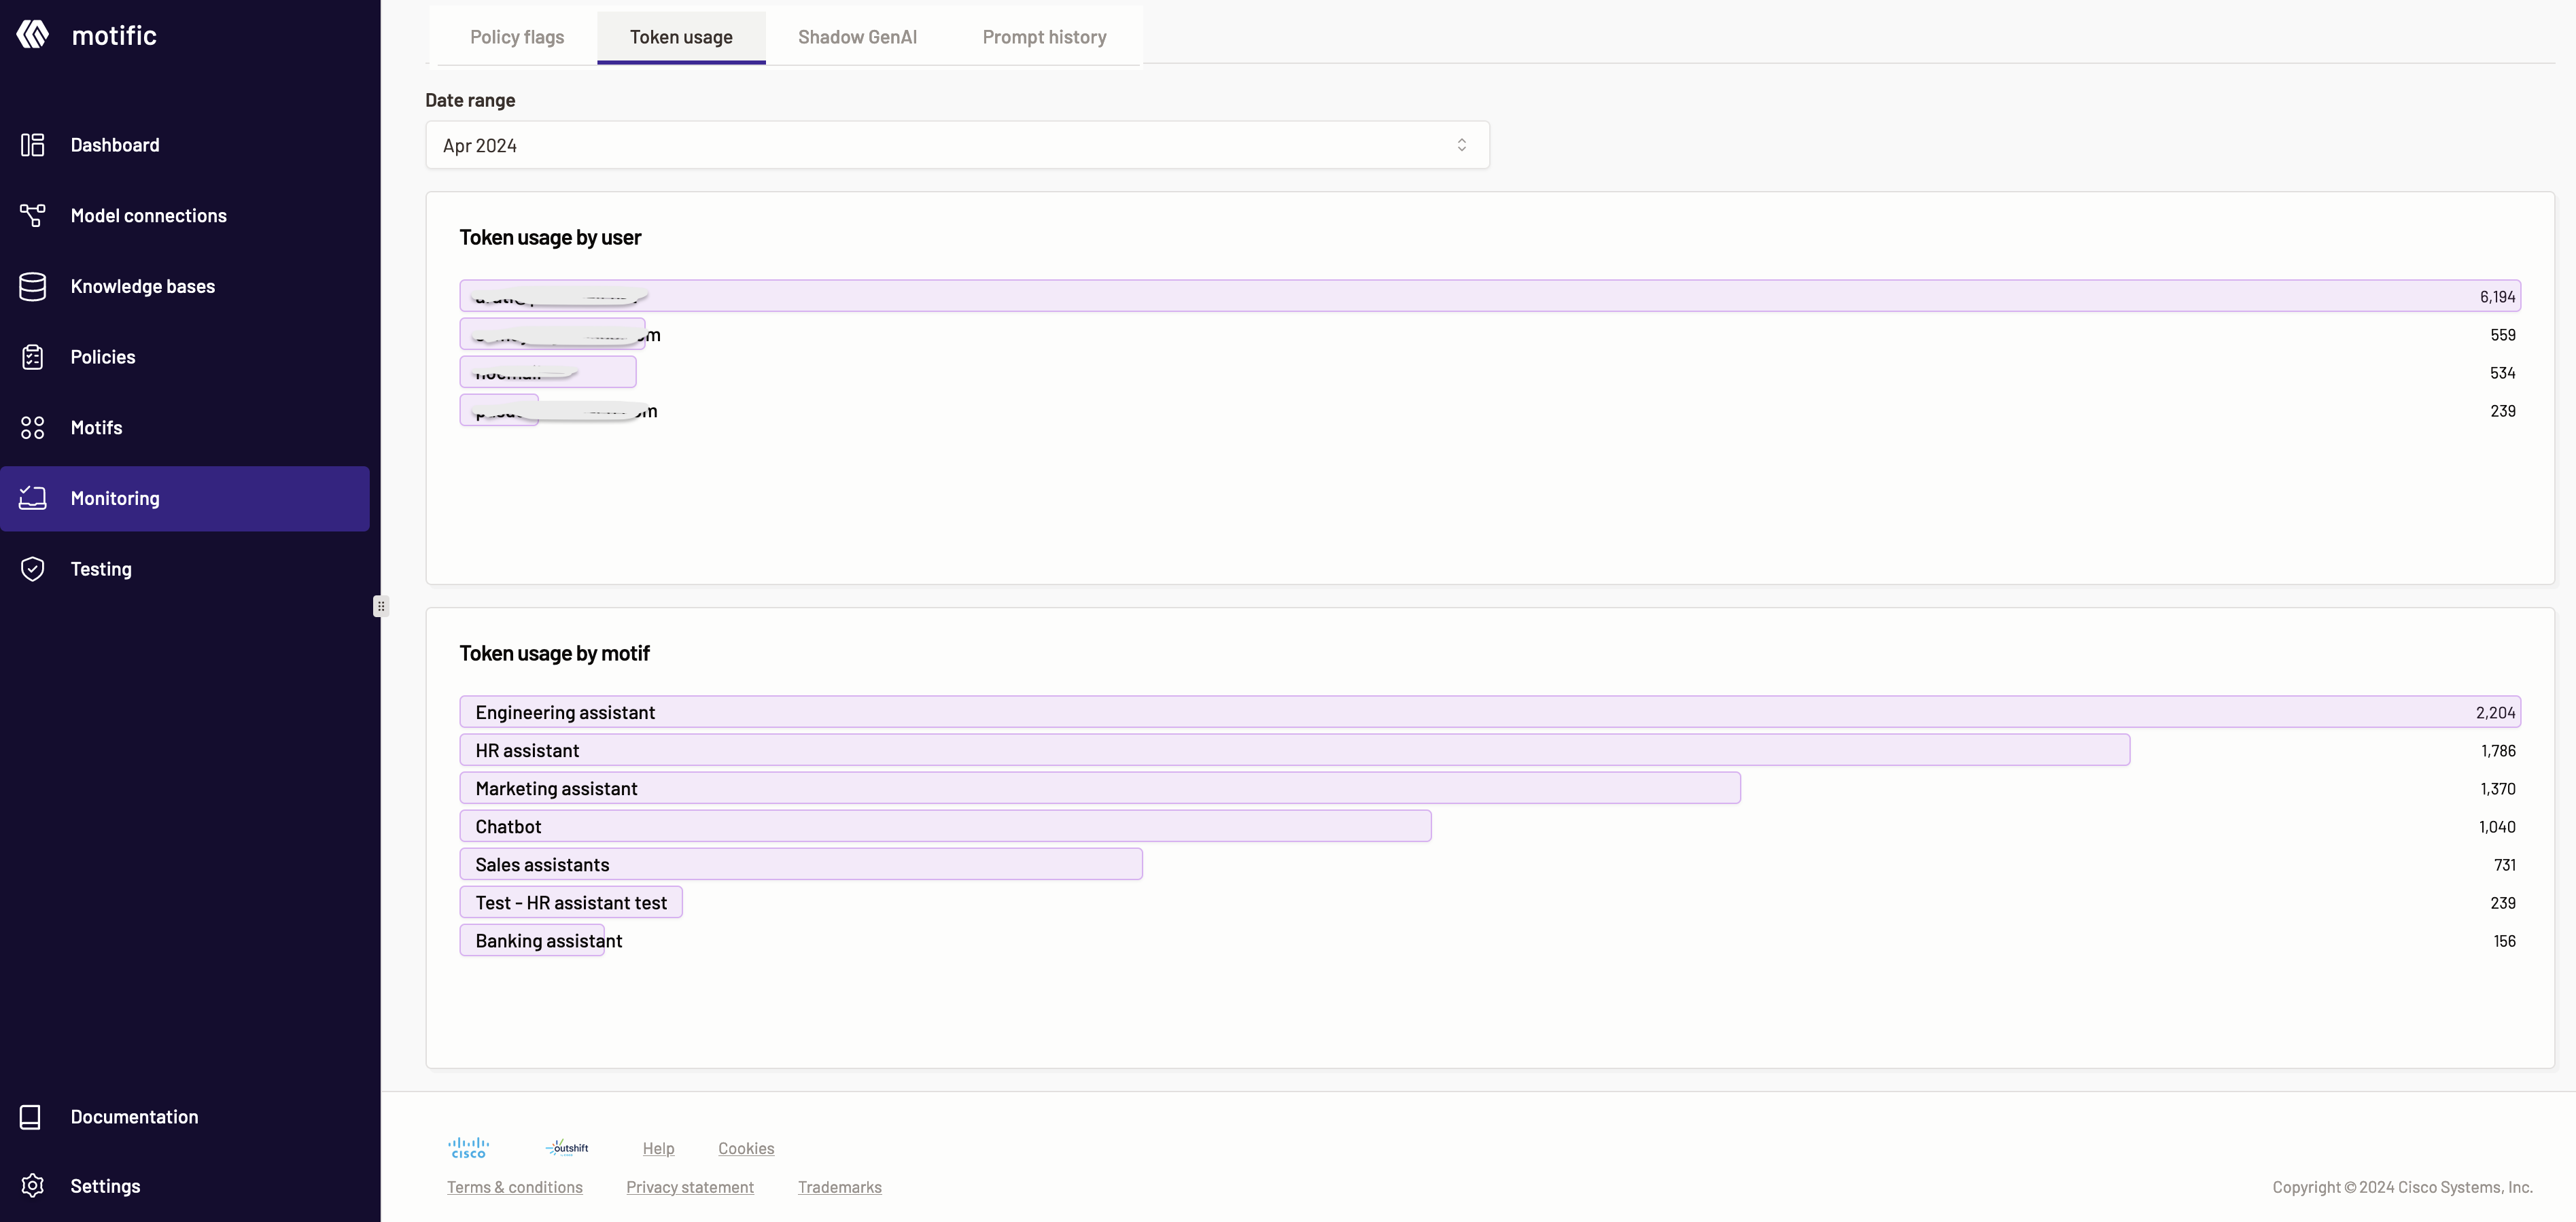
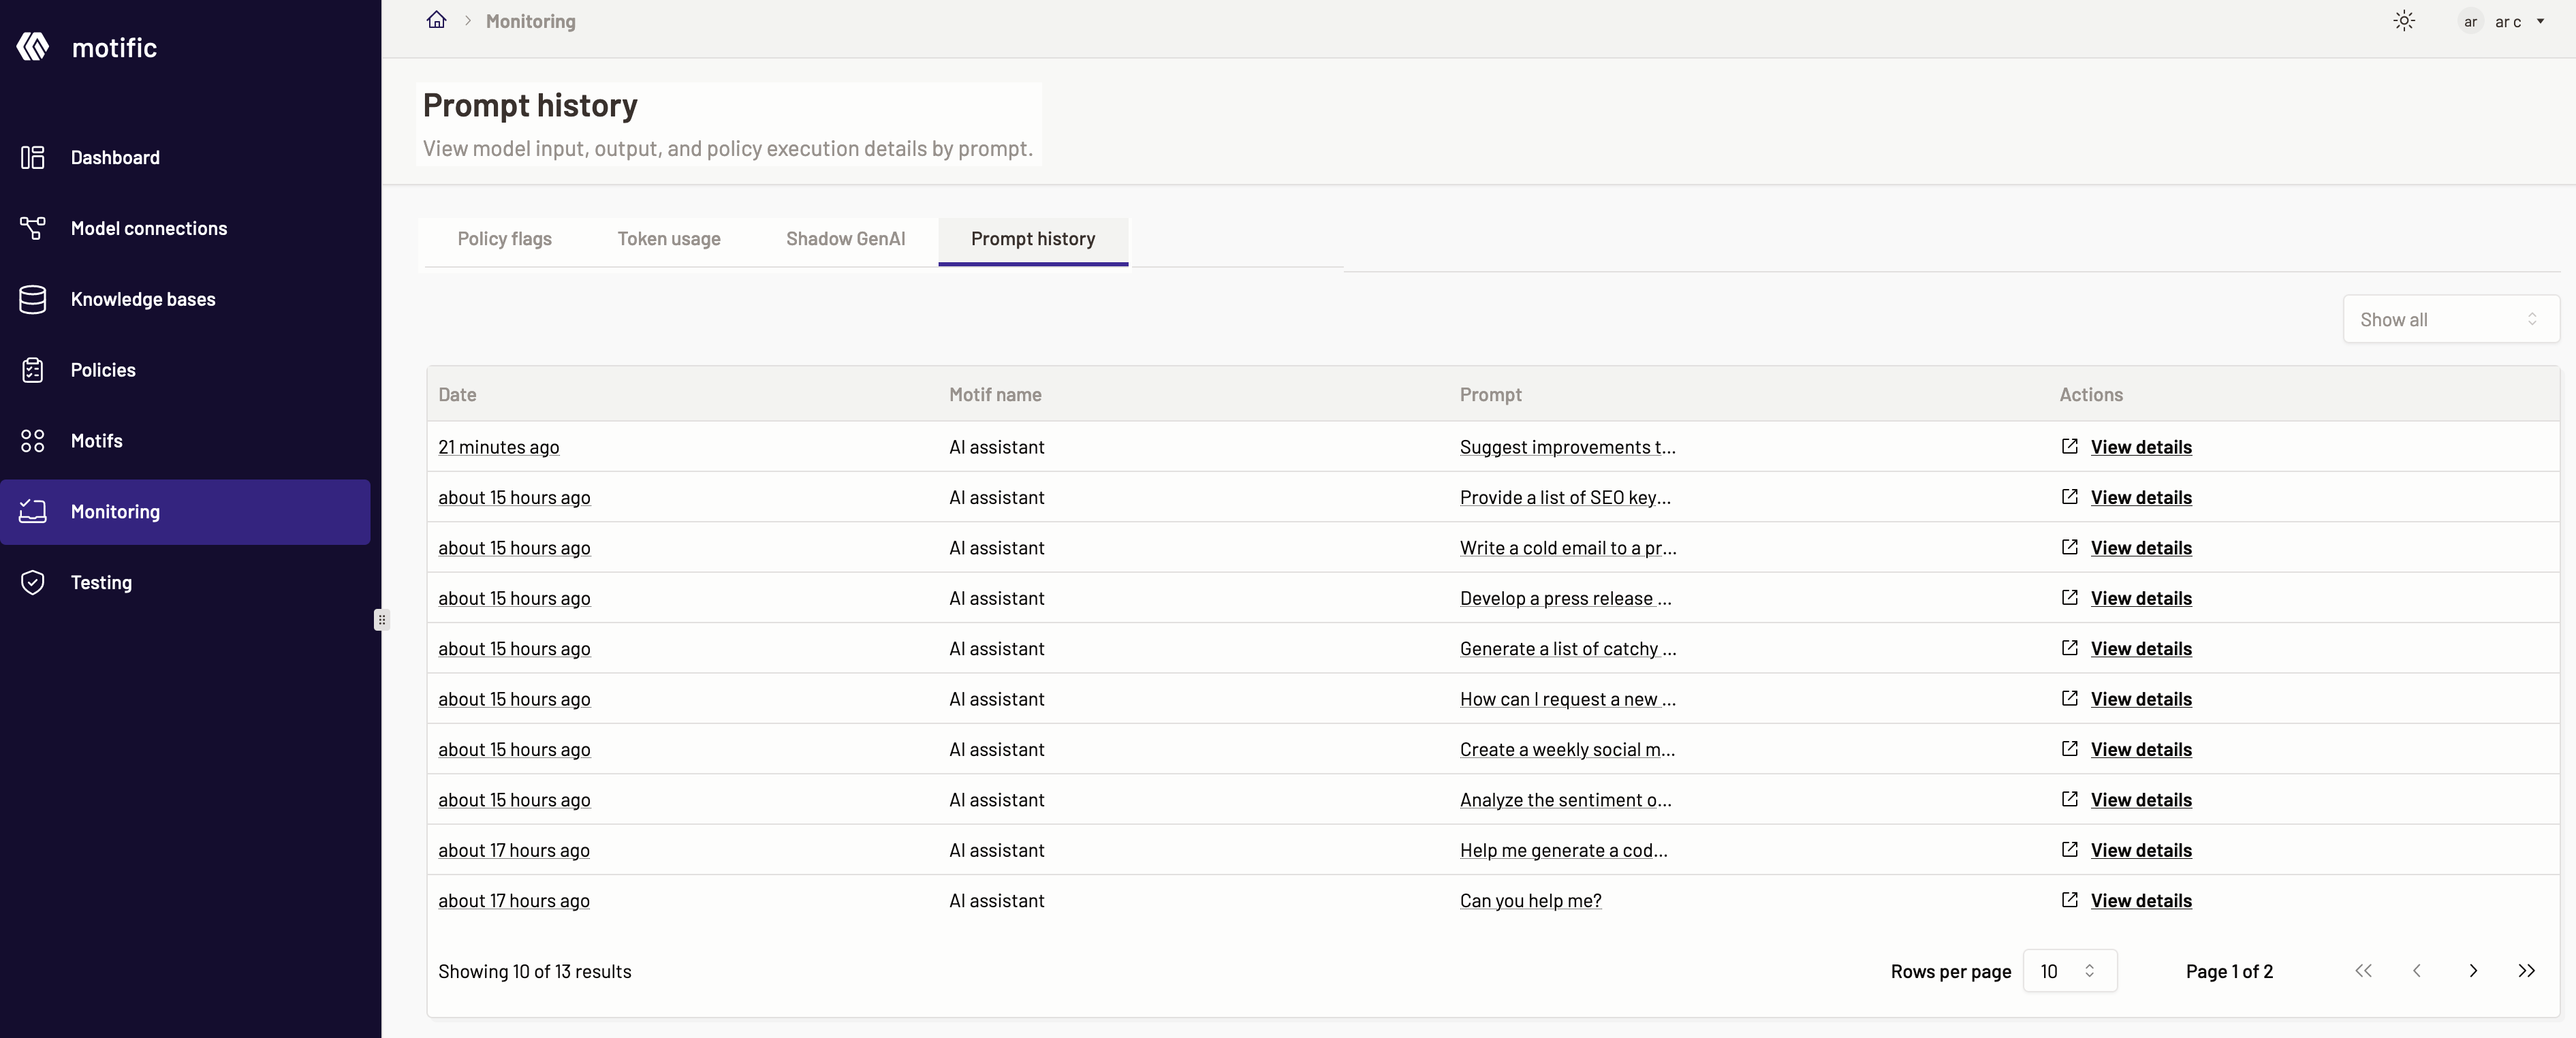
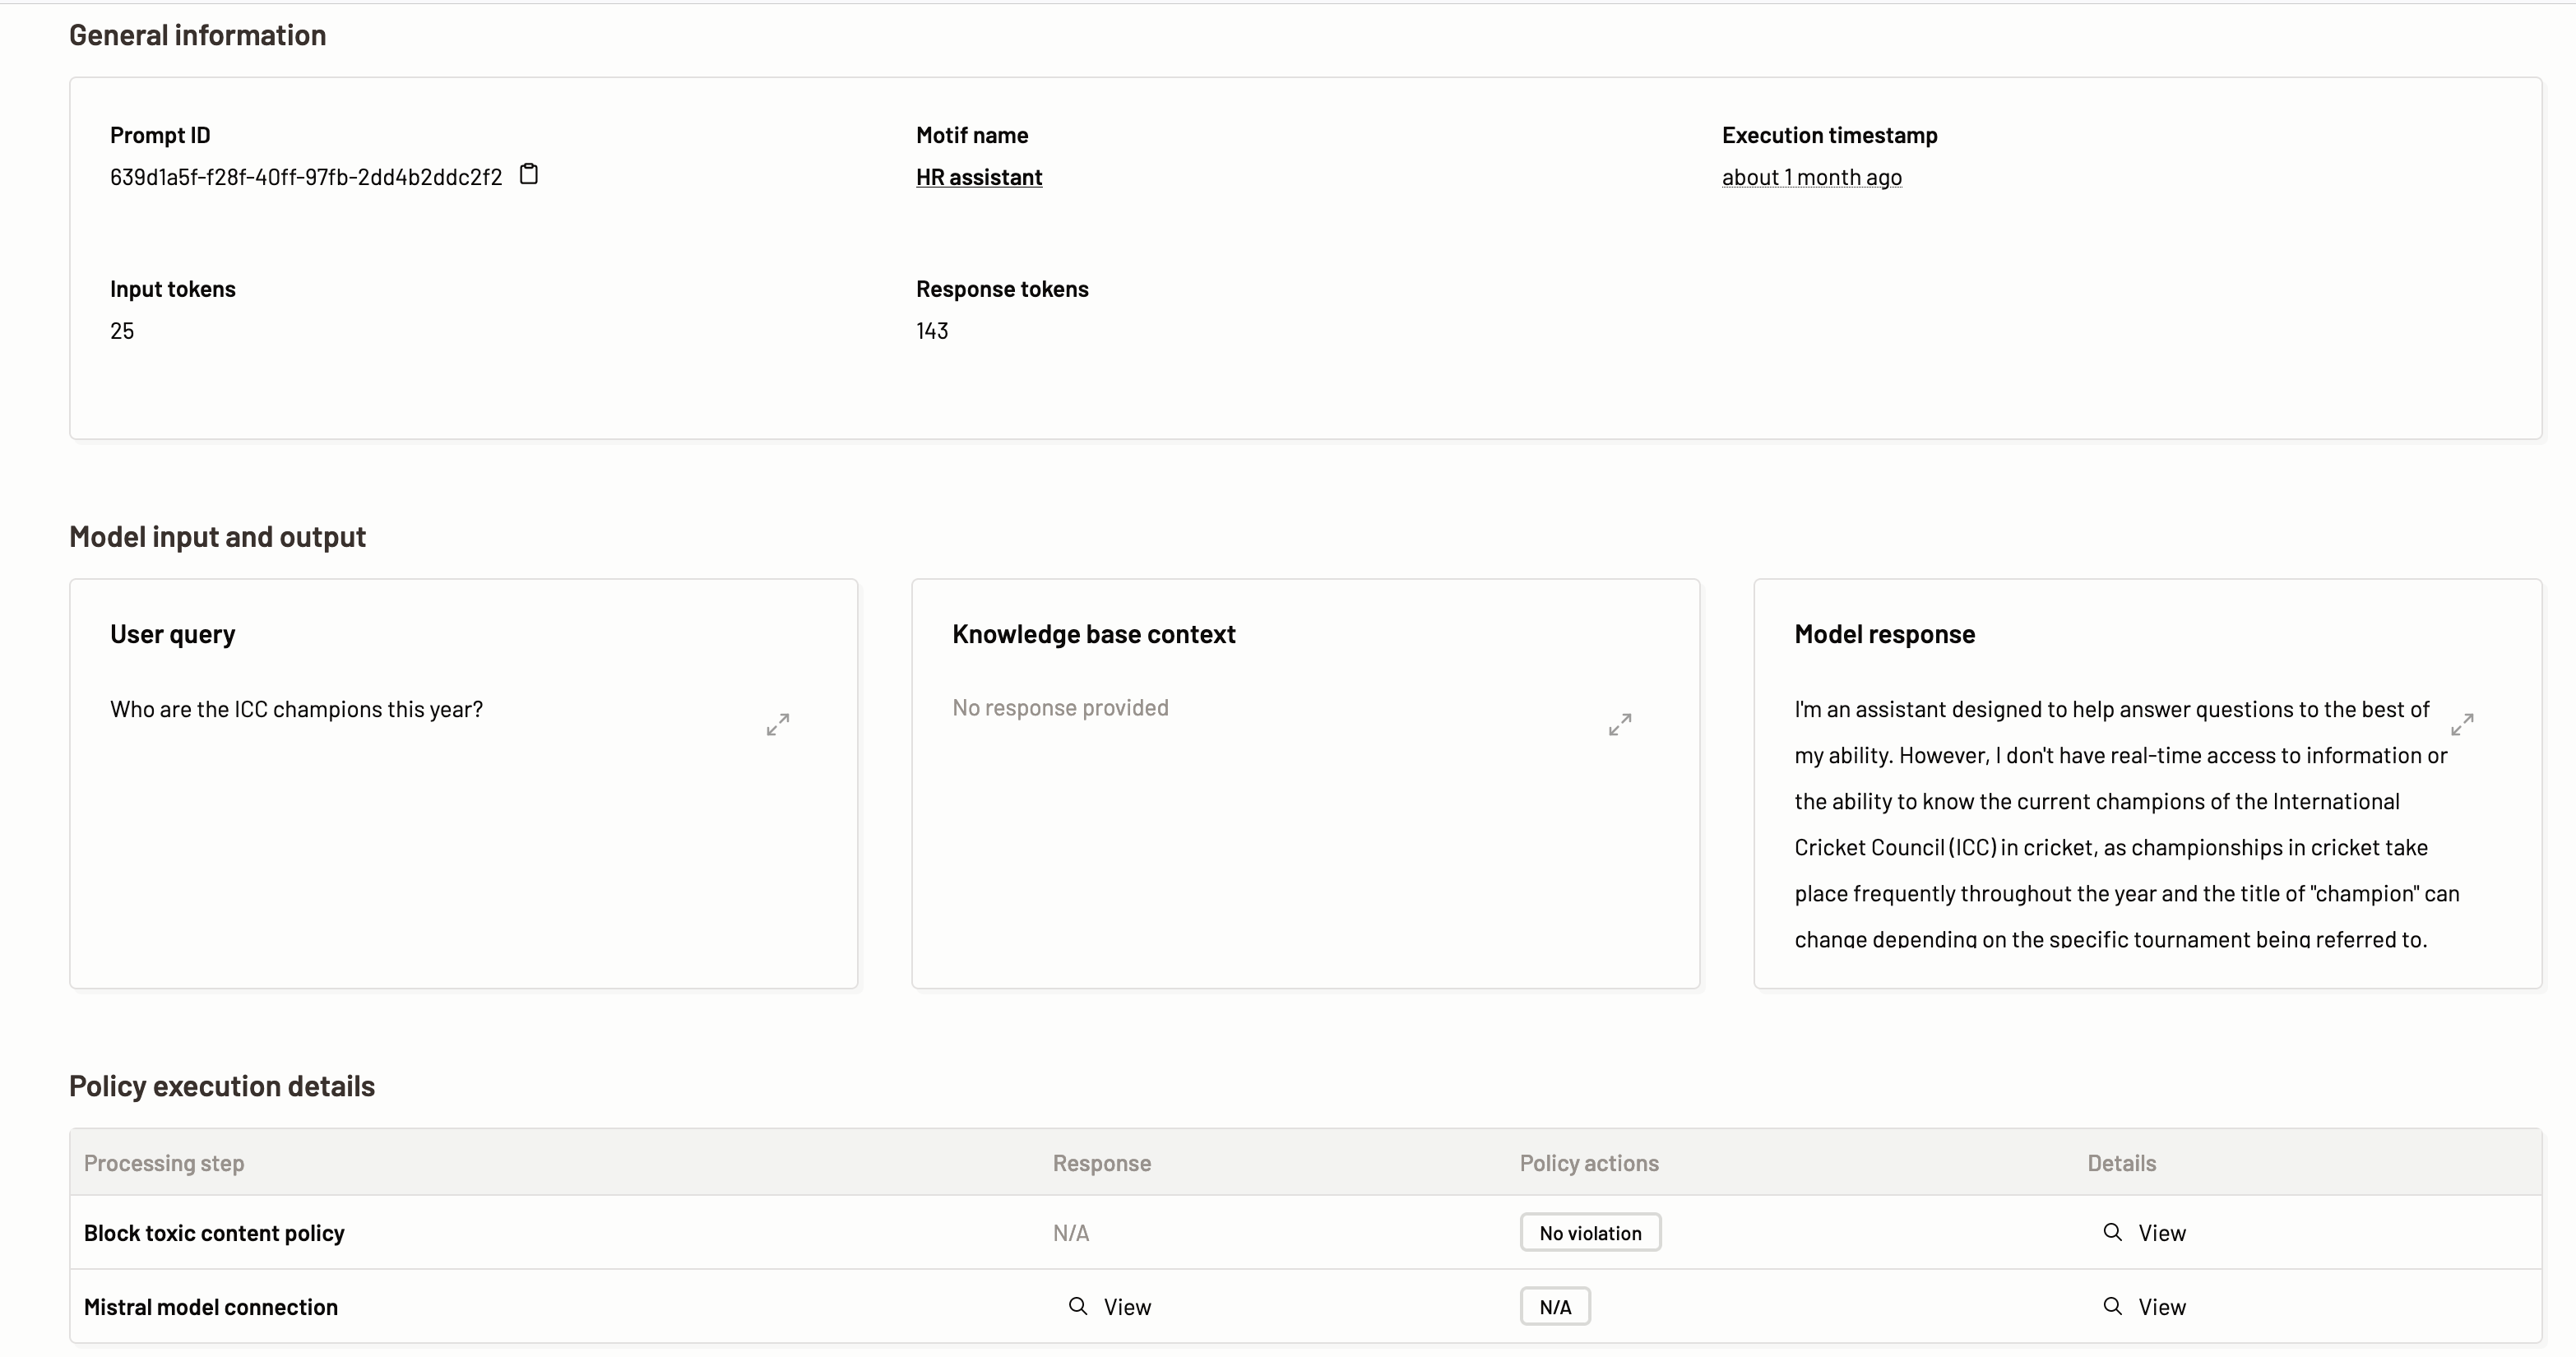 This section provides general information about the prompt.
 The profiler shows the sequence of the prompt execution and the time elapsed at each step of the process right from the prompt submission to checking for policy violations to LLM response. When you hover over the graph you can view the details of the execution like response at each step, time taken to execute the step, and the policy action.
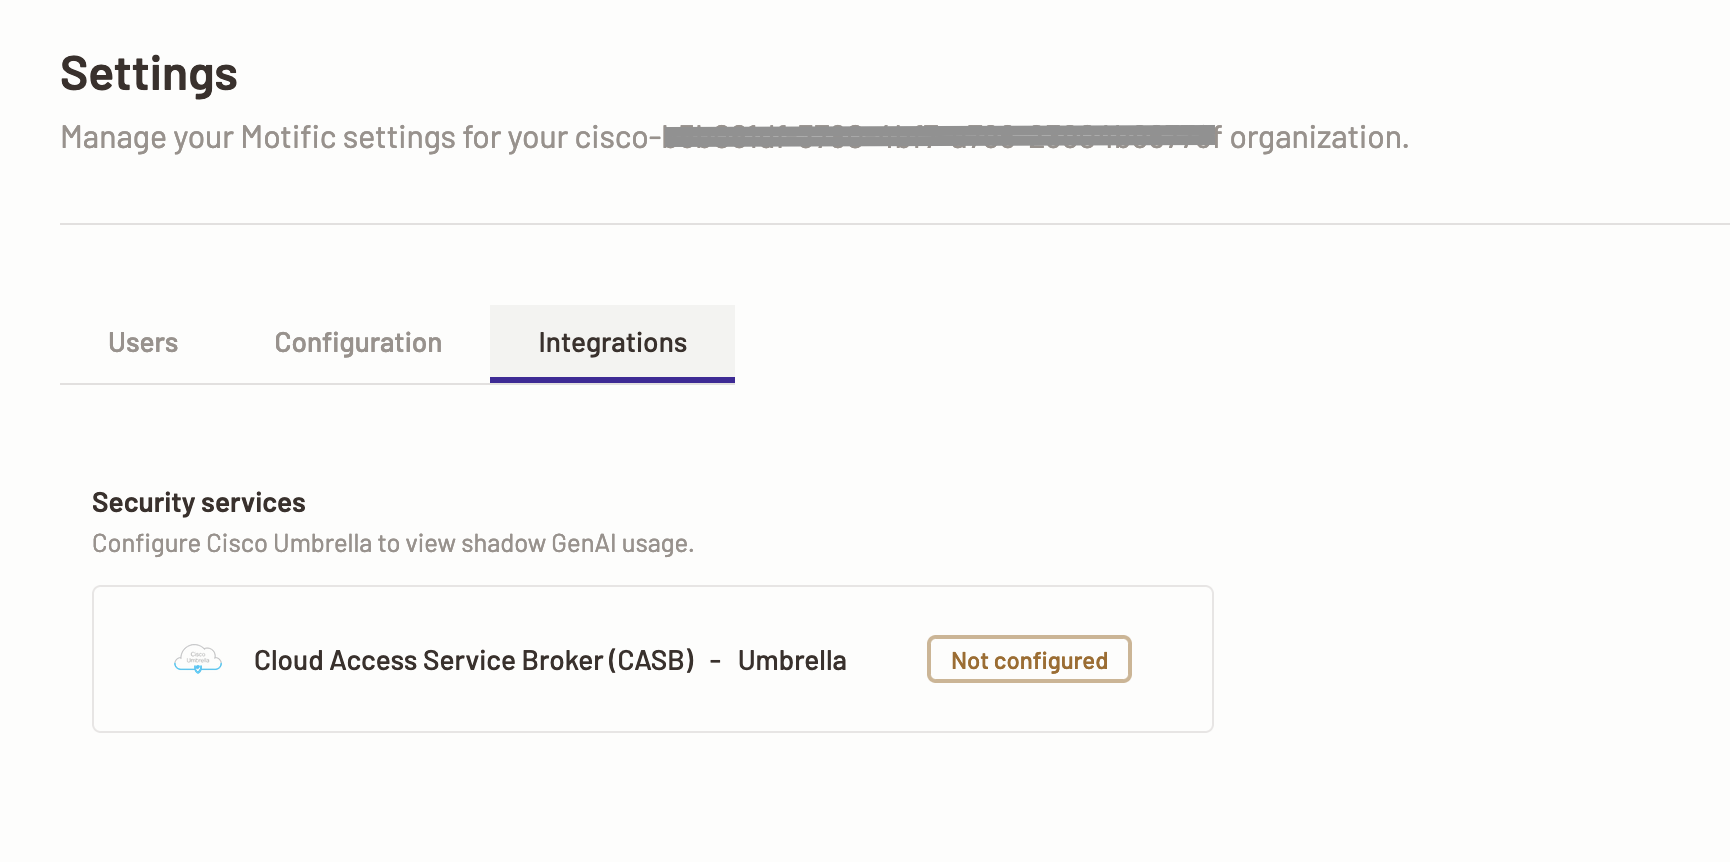
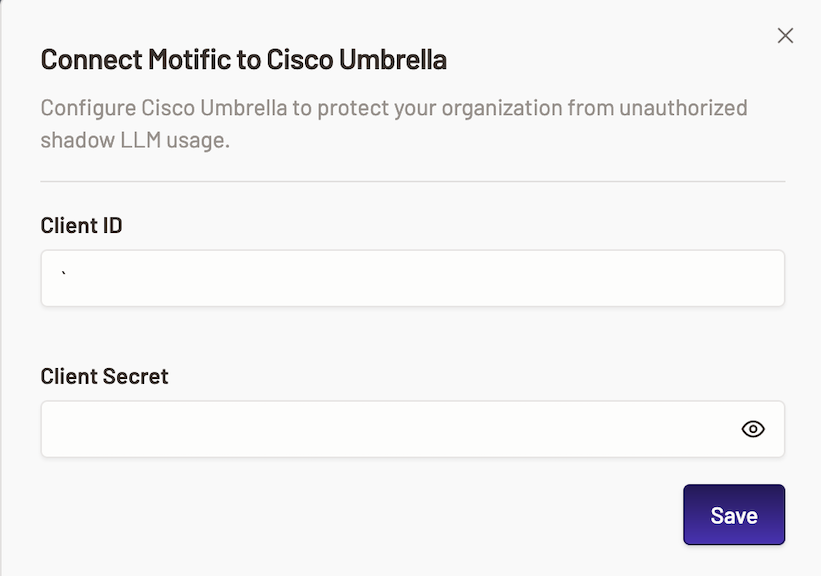

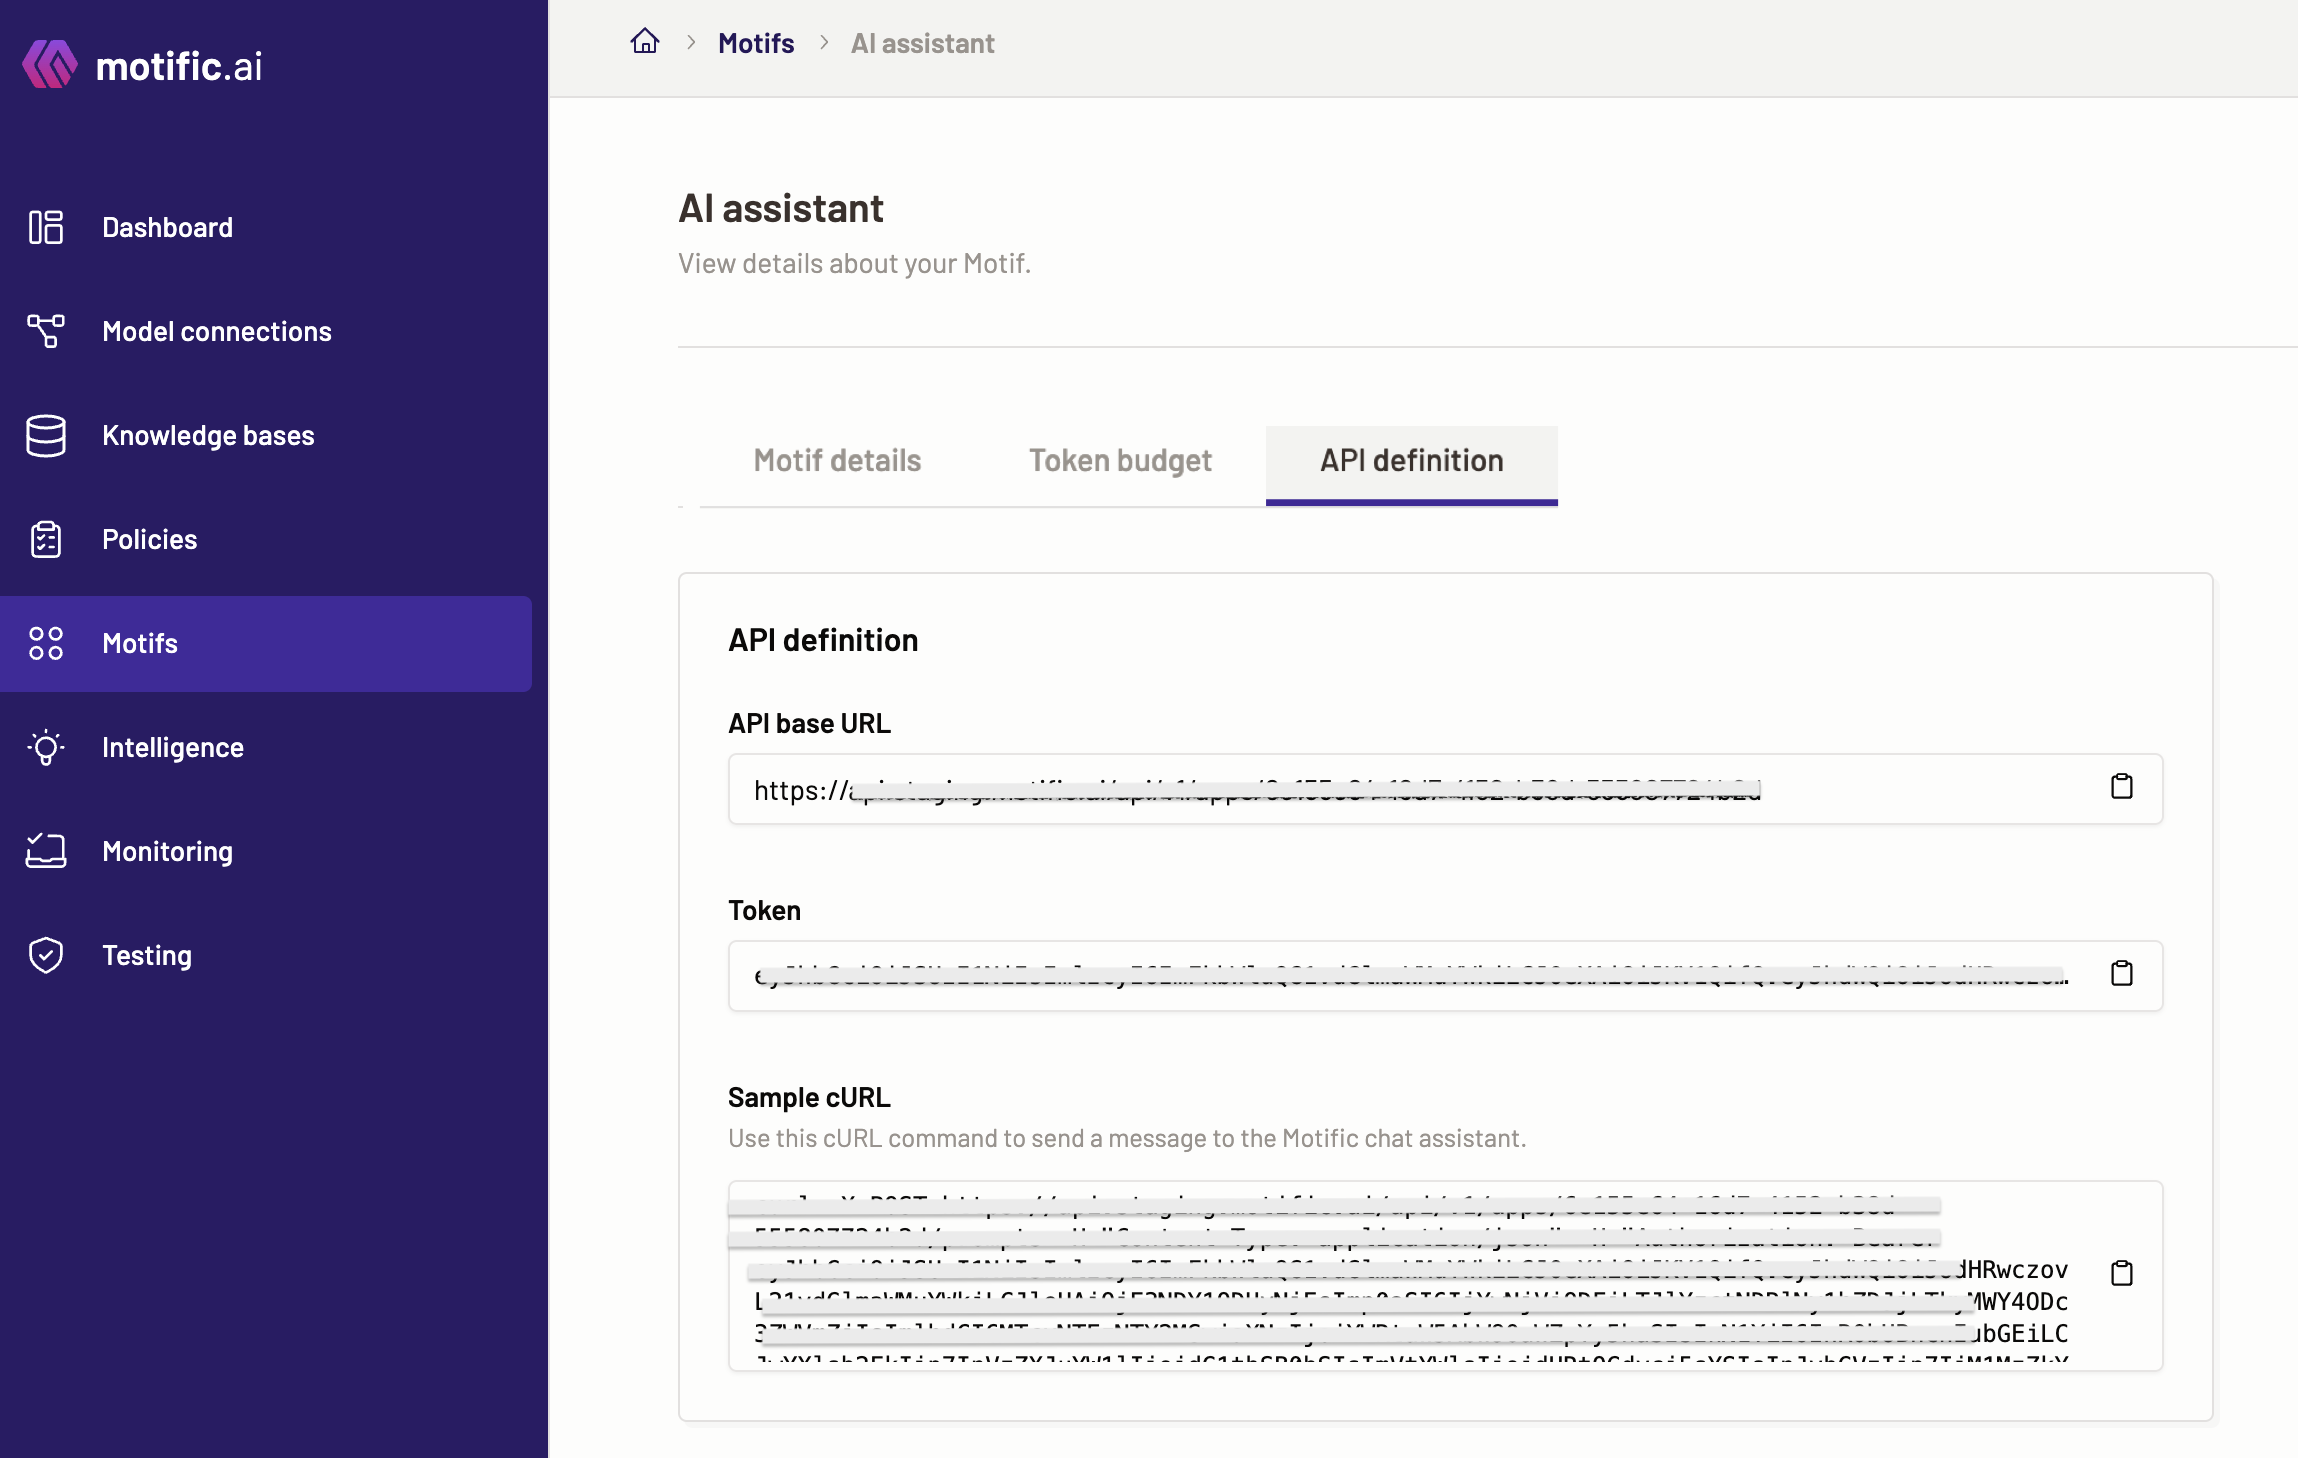
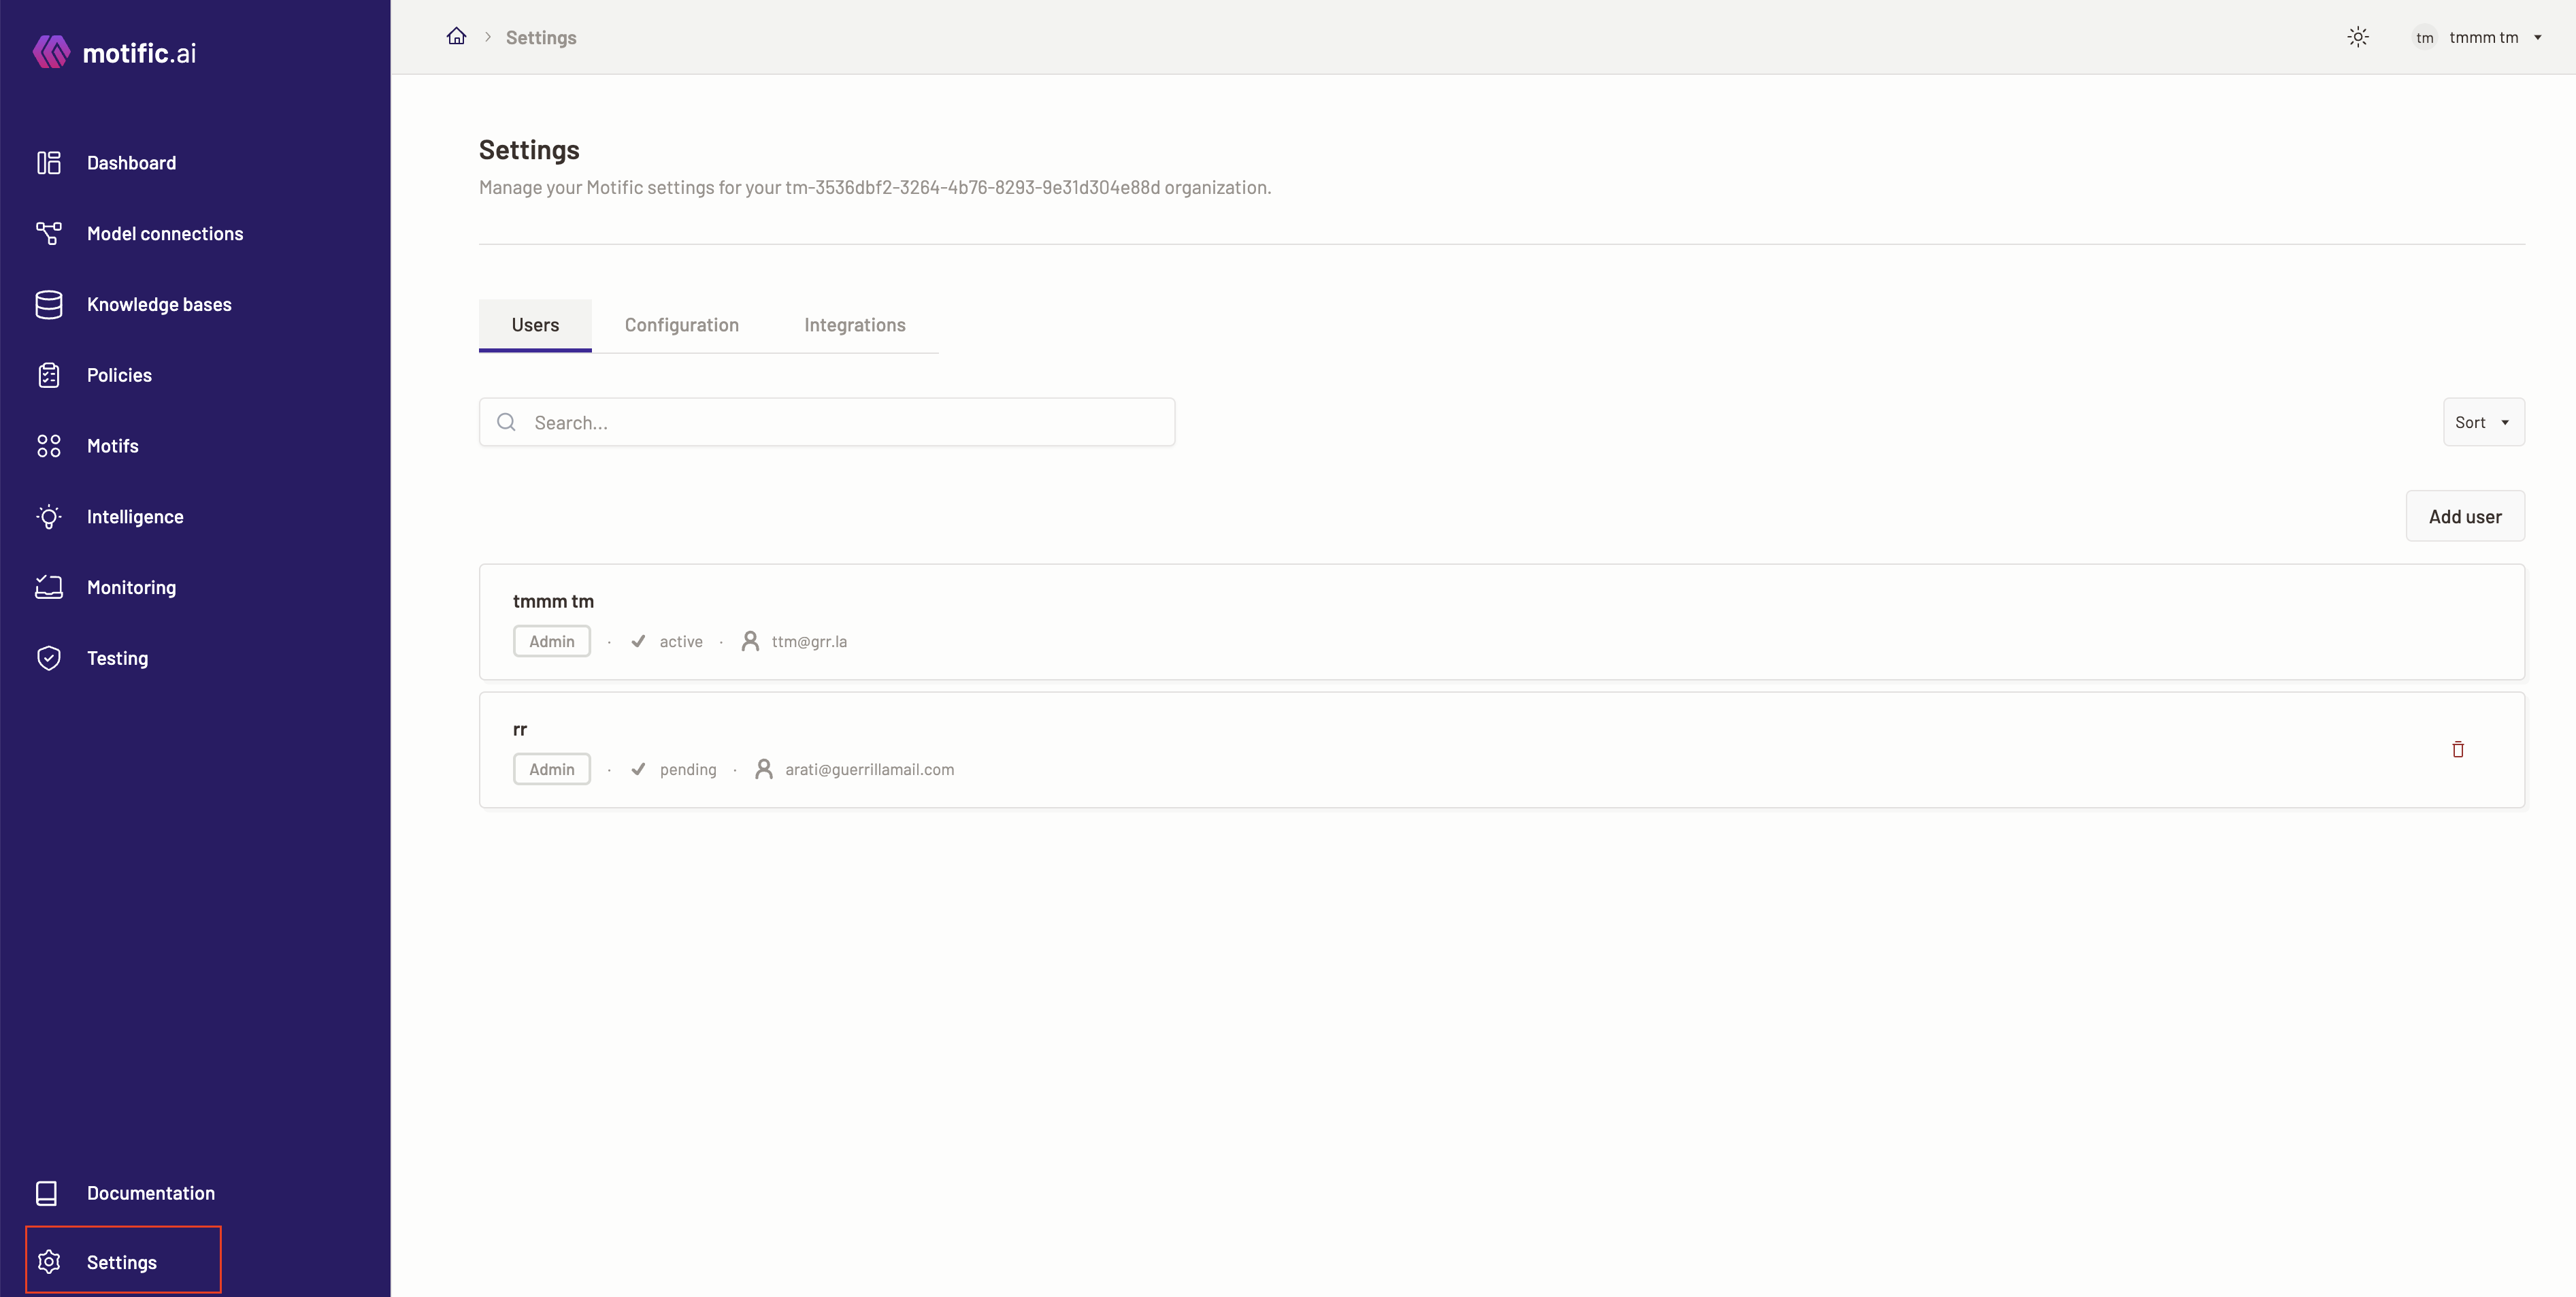
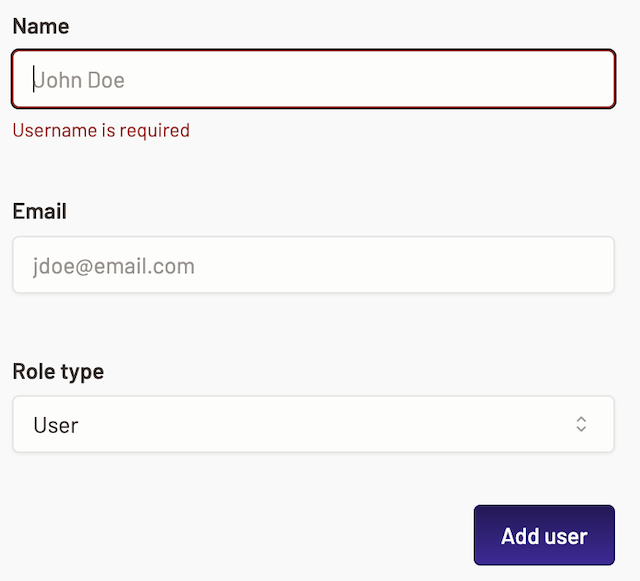
 button situated at the end of the user’s name.