Knowledge bases
What is a knowledge base?
A knowledge base is a collection of data sources. Knowledge bases are used to empower your Motifs with contextual knowledge of the data that may not be part of the model’s original training data. Each knowledge base may consist of multiple data sources. Each data source can be configured to synchronize on a set schedule. This ensures that a Motif’s contextual data is kept up to date with the changing data.
Motific.ai enables you to create KB configurations to connect with your data sources so that the model’s response gets relevant contextual information from the data sources.
The knowledge base data sources can be one of the following:
- SharePoint - SharePoint-Online sites where you have different files and folders that can be the data source for the knowledge base.
- Public websites - Public websites are the websites available on the general internet. These websites can be added as data sources to a KB.
On KB page you can:
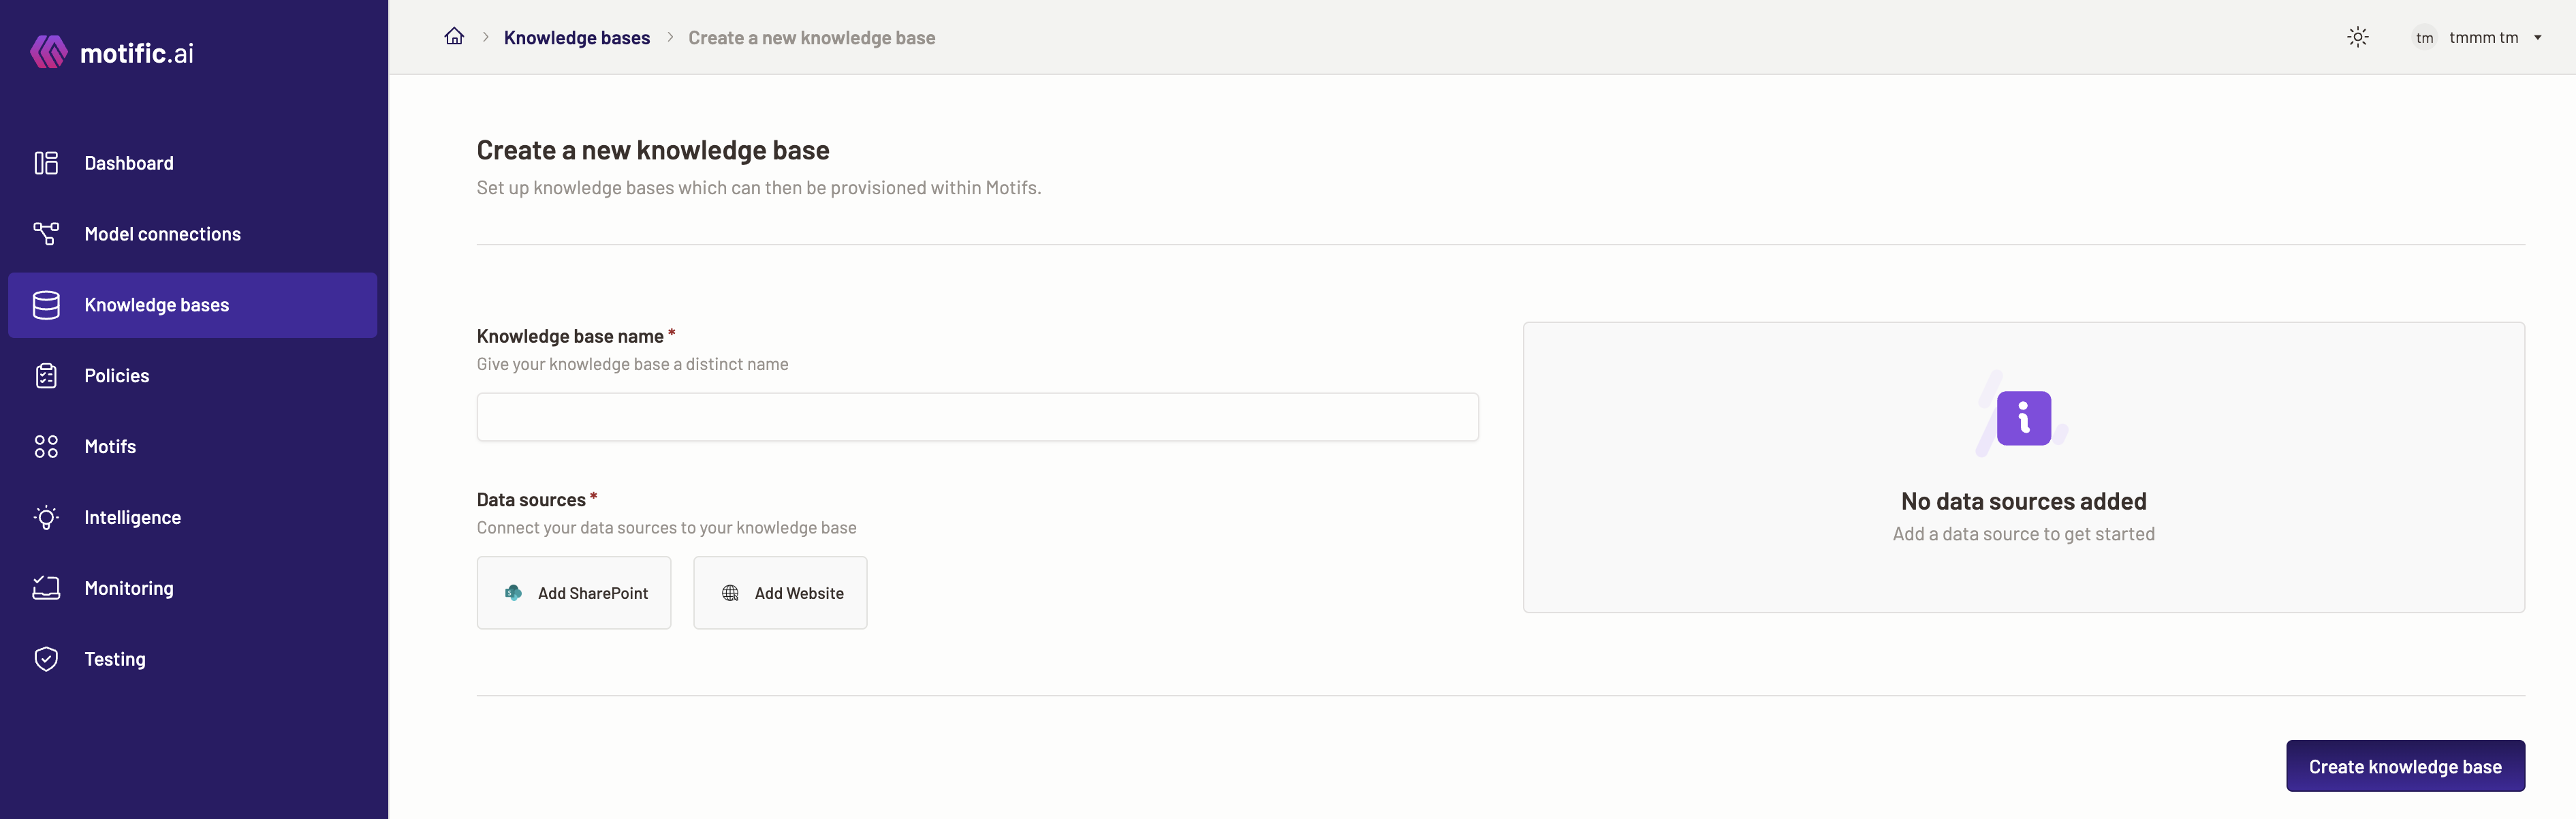
Create a new knowledge base
-
To navigate to the knowledge base connections page, go to the Knowledge base menu.

-
To create a new knowledge base (KB) connection, click on the Create new knowledge base button. A page with fields to create new KB opens.
-
Next, add data sources for your KB. You have the option of adding one or multiple of the following two data source types:
Caveats for knowledge base creation and usage
-
A knowledge base can currently be created using only two types of data sources - SharePoint and public websites. Multiple data sources can be included in a knowledge base.
-
Once a knowledge base is created then it is immutable, i.e., the data sources cannot be edited or added after the creation. The data sources can only be resynced if there is a failure or updated regularly to capture new data added to each data source over time.
-
In Motific.ai while creating a KB with either SharePoint or public website as a data source, following file formats are supported
.html, .json, .csv, .txt, .pdf, .docx, .doc, .pptx, .xlsx. -
Before creating a Motif with a knowledge base and testing it in a chat console, make sure that all the files and data sources of that KB have been completely ingested and there are no failures. The sync status should be
complete. To learn more about viewing the data source sync status, refer to the here. -
If there are failures during the ingestion of data sources, you have the option to resync the data sources. Resyncing the data sources will restart the ingestion process.
-
While creating the knowledge bases you should be aware of the following resource limits:
- The maximum number of knowledge bases that can be created per tenant is ten (10).
- The maximum number of documents per knowledge base that can be added is ten thousand (10000).
- The maximum document size allowed is 50 MB.
1.In Motific.ai, the present hallucination policy is applied only to the queries and responses of Motifs linked to a knowledge base (KB). In essence, hallucination detection is operational for inputs and outputs that involve KB context, while the interactions of Motifs without an associated KB currently lack the capability for detecting hallucinations.
Add SharePoint
Motific.ai supports SharePoint-Online to be added as a data source. Also, Motific.ai Azure AD App-Only authentication. Procedure to grant access via Azure AD App-only is available in the Microsoft documentation
-
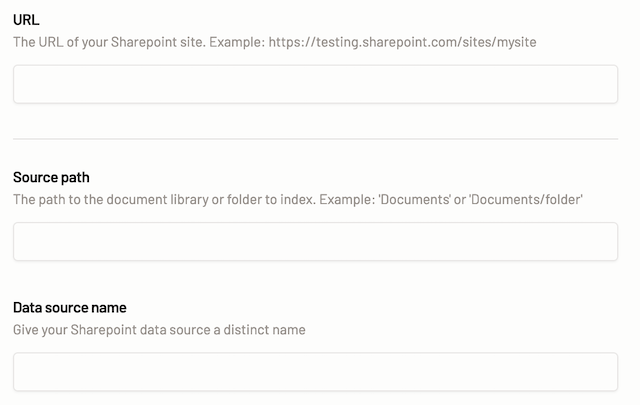
To add a SharePoint as a data source, click Add SharePoint option.
-
Provide the URL for the SharePoint site that you want to add.
-
Enter the source path- the path to the folder or document library you want to index.
-
Provide a Data source name for your SharePoint data source.
-
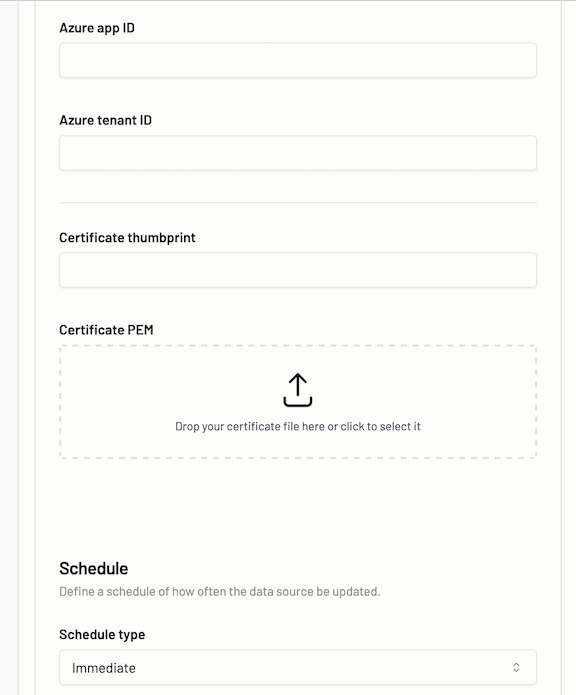
Enter the Azure app ID for the site.
-
Enter the Azure tenant ID for the site.
-
Enter the Certificate thumbprint for the SharePoint site.
-
Provide Certificate PEM (Privacy Enhanced Mail). Drag and drop or click on the drop area to upload the PEM certificate.
Note: Please read our resources section with Sharepoint details page. On this page you can find detailed steps on how to get all of the above information that needs to be input, from your Microsoft Azure account.
You can also check out the Microsoft official page to see how to get all the above details.
-
Define a schedule of how often the data source should be updated by selecting an option from the drop-down. You have the following options:
- One-time - The data source sync begins as soon the KB is created and is a one-time sync.
- Weekly- Specify the day of the week and time of the day when the data source should be updated with any new content.
- Monthly- Specify day of the month and time of the day when the data source should be updated with any new content.
- Daily- Specify the time of the day when the data source should be updated with any new content.
When you add a data source and define a schedule to update that data source while creating a knowledge base the time is always defined in UTC. This is essential information as this defines your data source update schedule and defining the right time is very essential.
-
Verify all the details, then to add the data source, click the Add SharePoint button.
Caveats for adding a SharePoint as a data source
-
For a user to access a SharePoint added to a KB during testing a Motif, the user should have access to the said SharePoint.
-
The email ID of a user authorized to use a Motif should be the same as the email ID that has access to the SharePoint within a KB of the Motif. If the email addresses of a user do not match, then when the user accesses the above-mentioned Motif, they may encounter errors as shown below.

Add public website
Public websites are the websites available on the general Internet. These websites can be added as data sources to a KB.
-
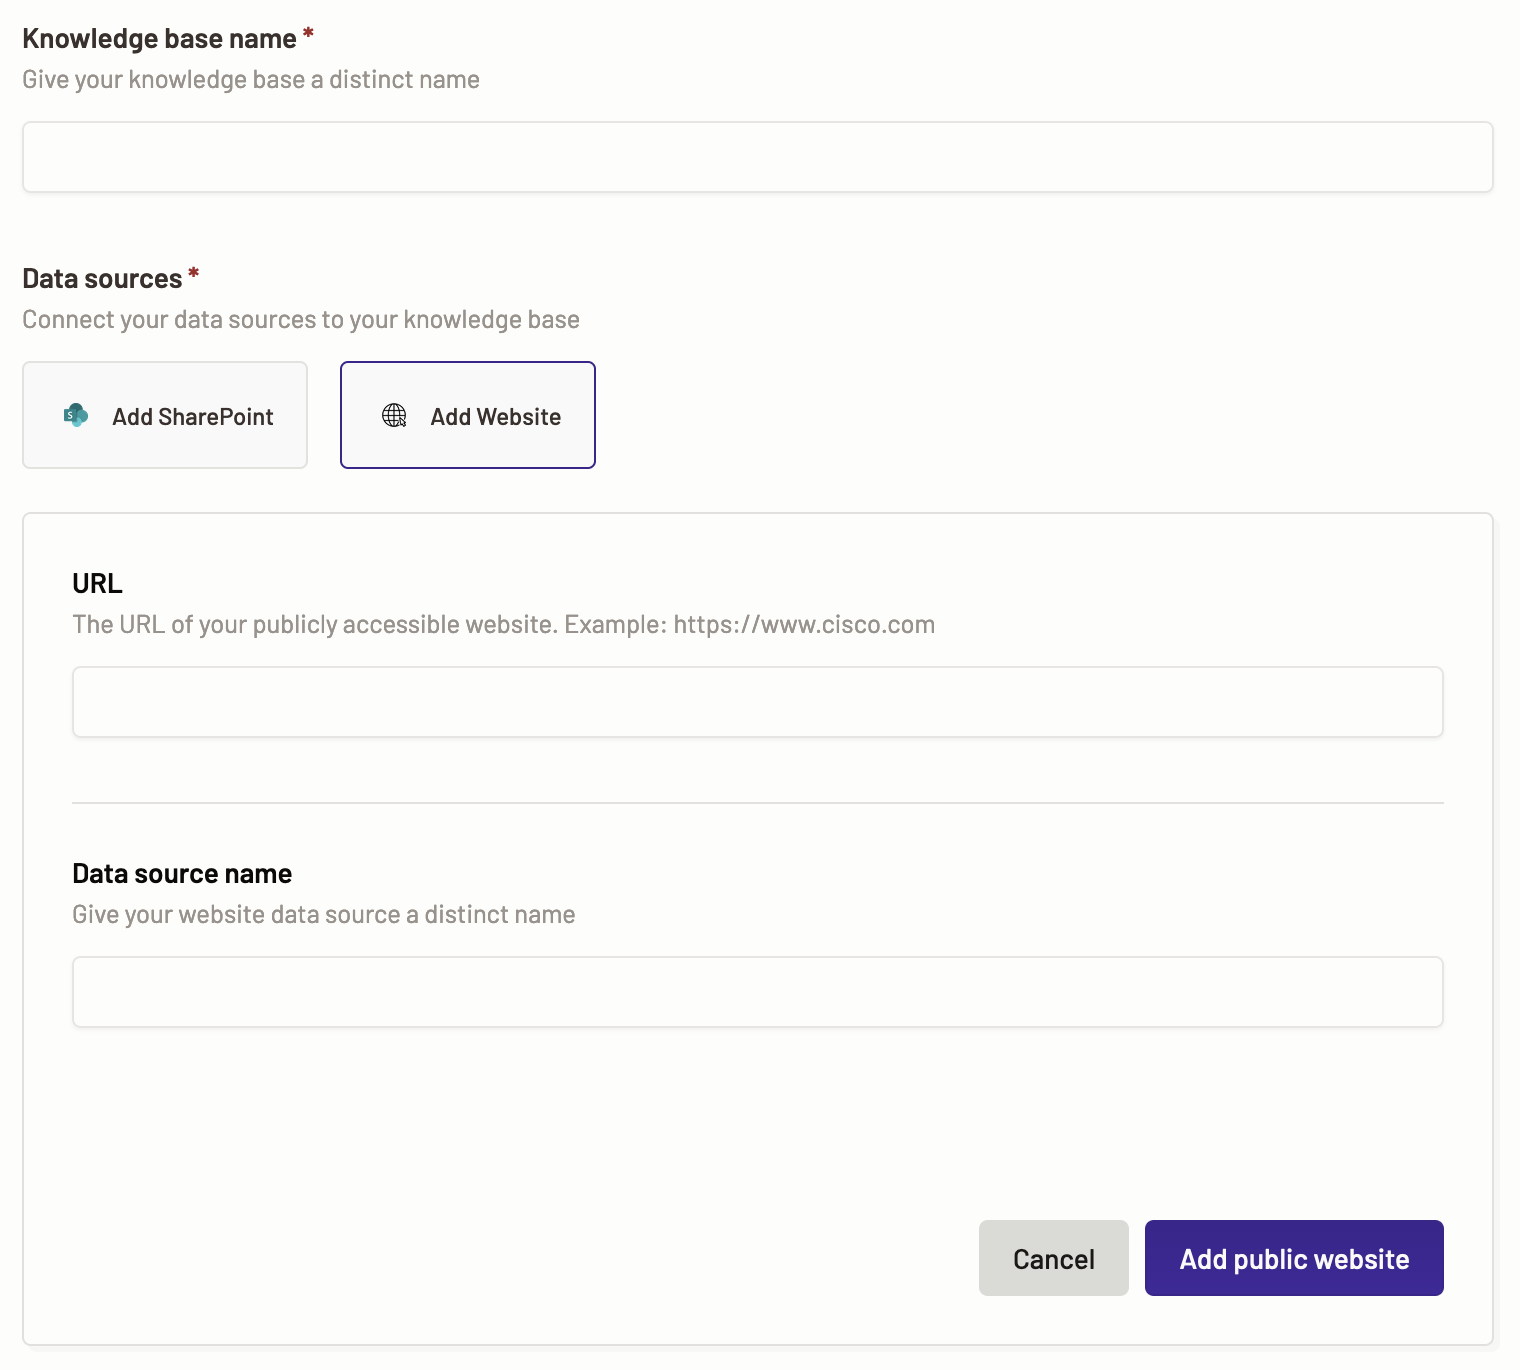
To add a website as a data source, click the Add Website button.
-
Provide the source URL for the website that you want to add.
-
Provide a name and description for your website.
Even though there is no option to define how often the data source should be updated, you have the option to resync the data sources manually whenever there is an update to the website. -
Verify all the details, then to add the data source, click the Add public website source button.
-
When you are done adding the data source(s), you can view the details of the data source added in the knowledge base summary section. You can also delete the data sources in the summary section by clicking the red delete icon.
-
Click the Create Knowledge base button to add the data sources to the knowledge base.
Caveats for adding public website as a data source
-
The source URL added for a public website data source should be in the proper format. For example- if a URL for a website is added www.cisco.com, you may get an error while creating the KB. The right format would be https://www.cisco.com.
-
The ingestion of a large website with many files may take multiple hours. You should check the sync status to view the ingestion progress and be aware of any failures during the website ingestion.
View KB details
When you navigate to the Knowledge base menu the existing KBs are displayed.
You can view the KB name, number of data sources added to the KB when it was created. The data source names can be viewed by hovering over the data sources. Also, created by and the last modified time.

To view each KB detail, follow the steps below:
-
To view KB details, click on the KB name.
-
The page with the KB metrics opens.
-
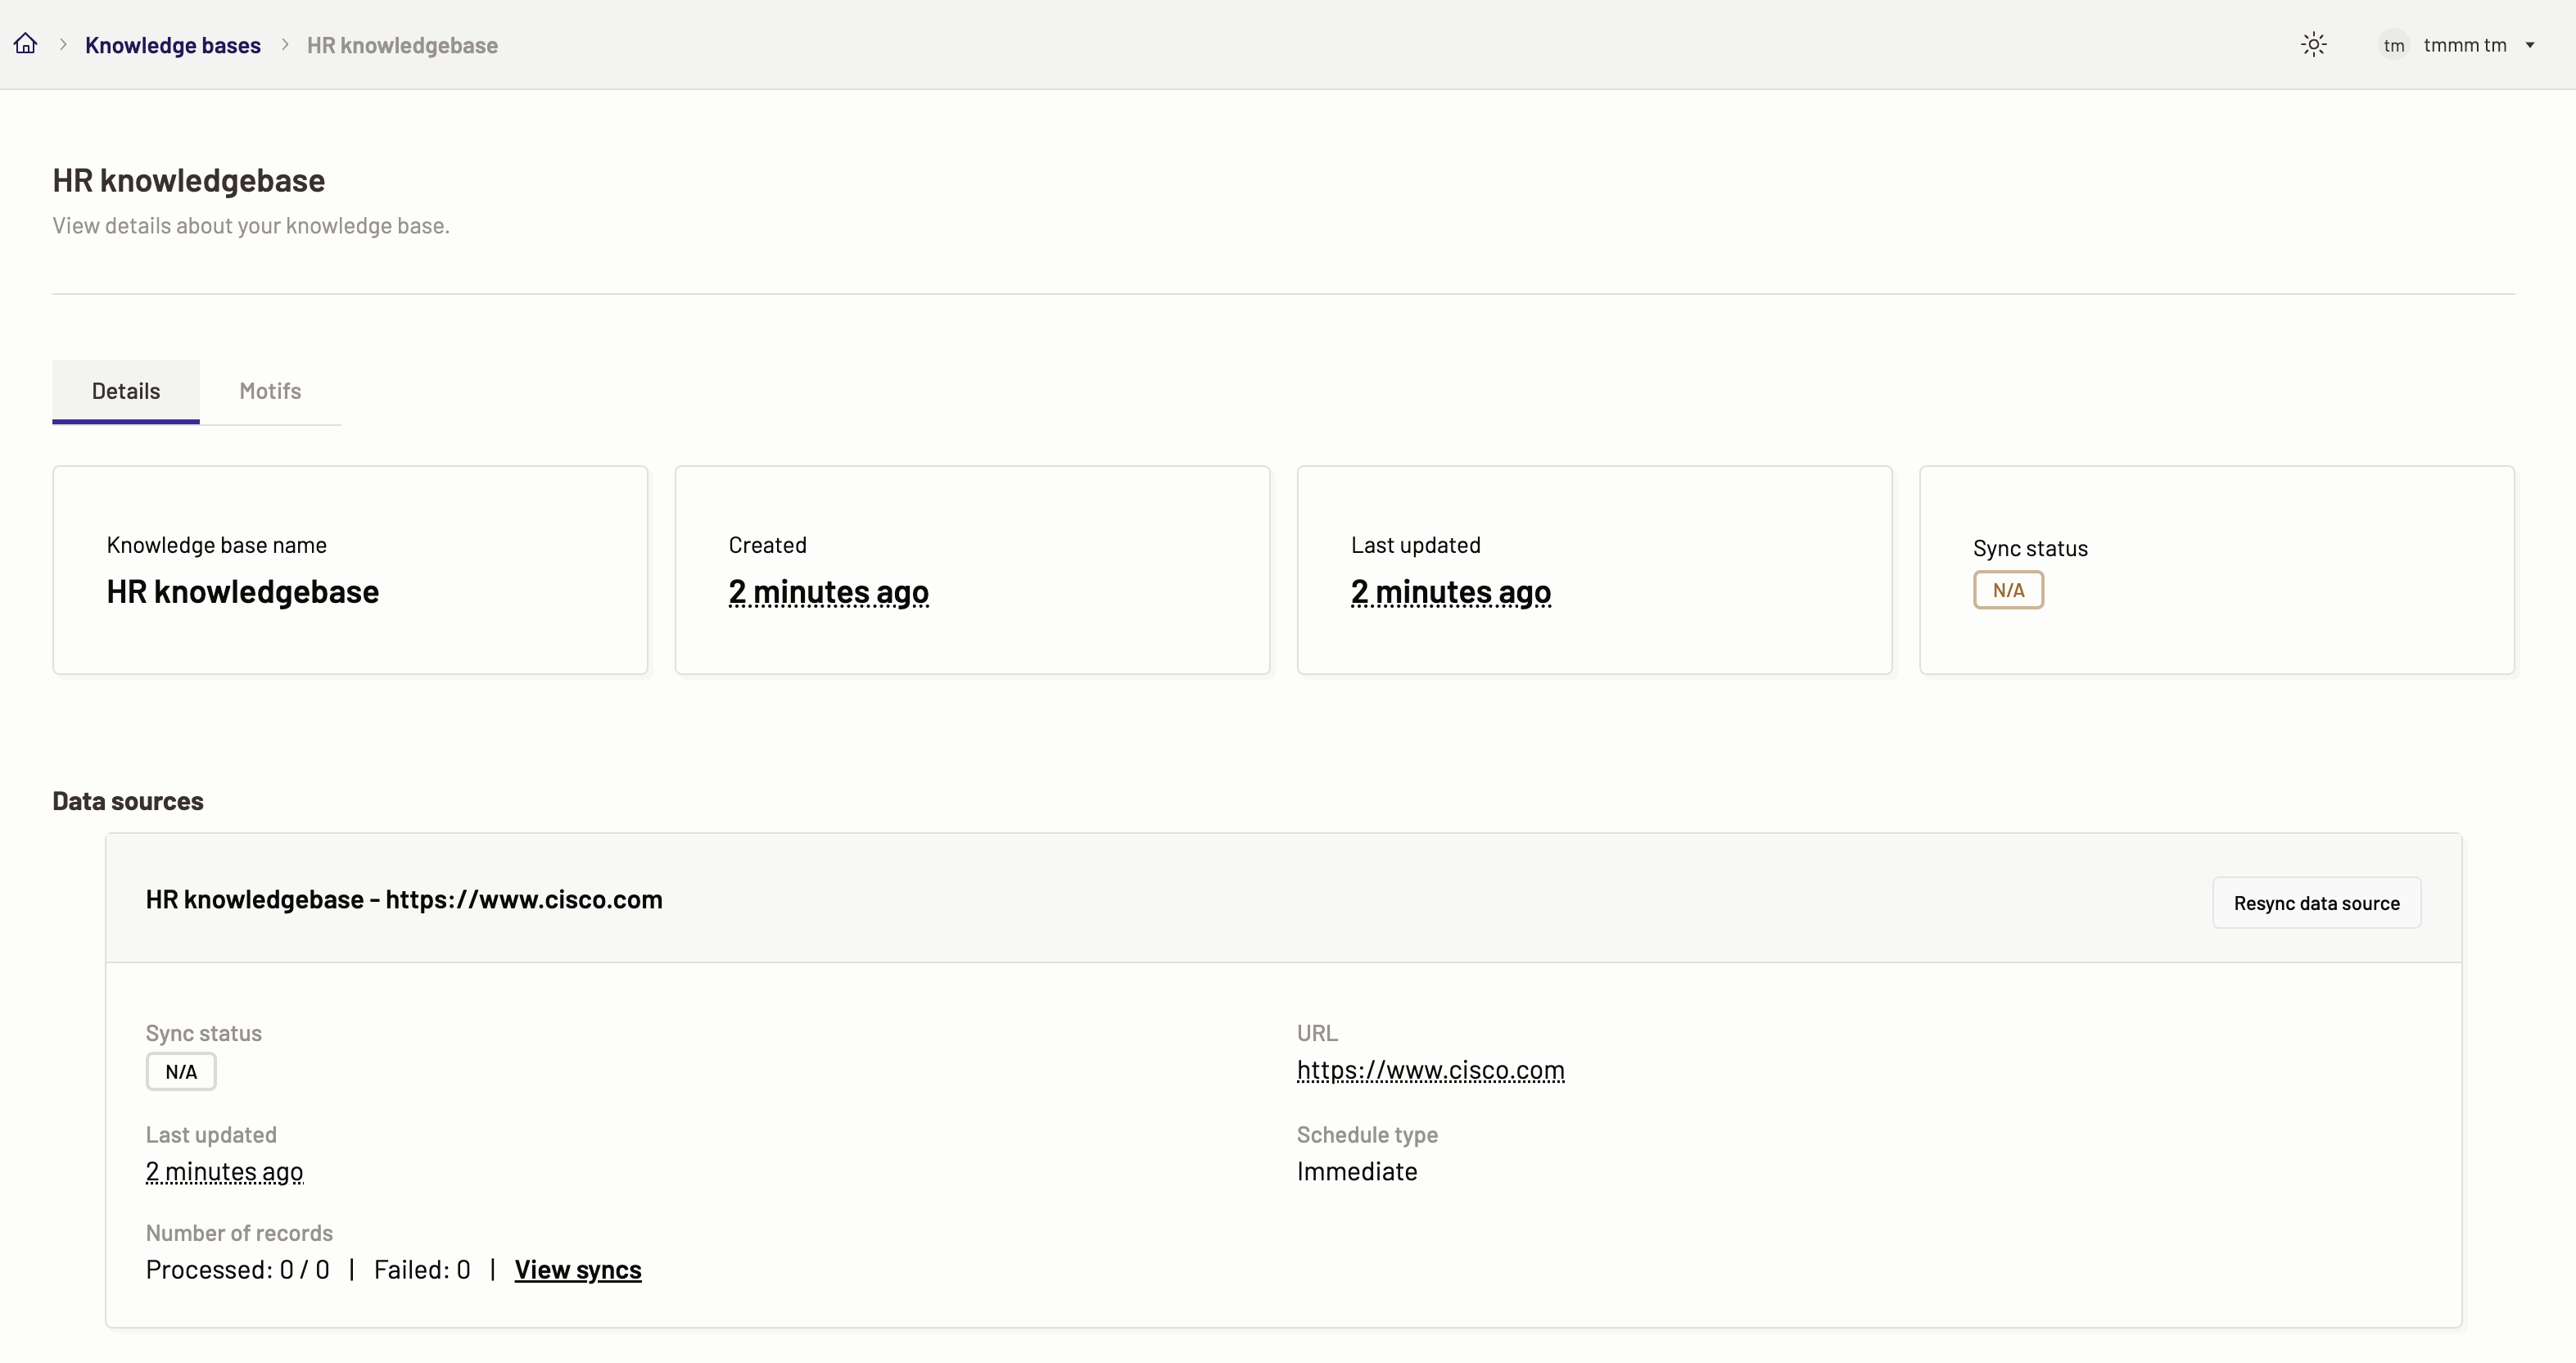
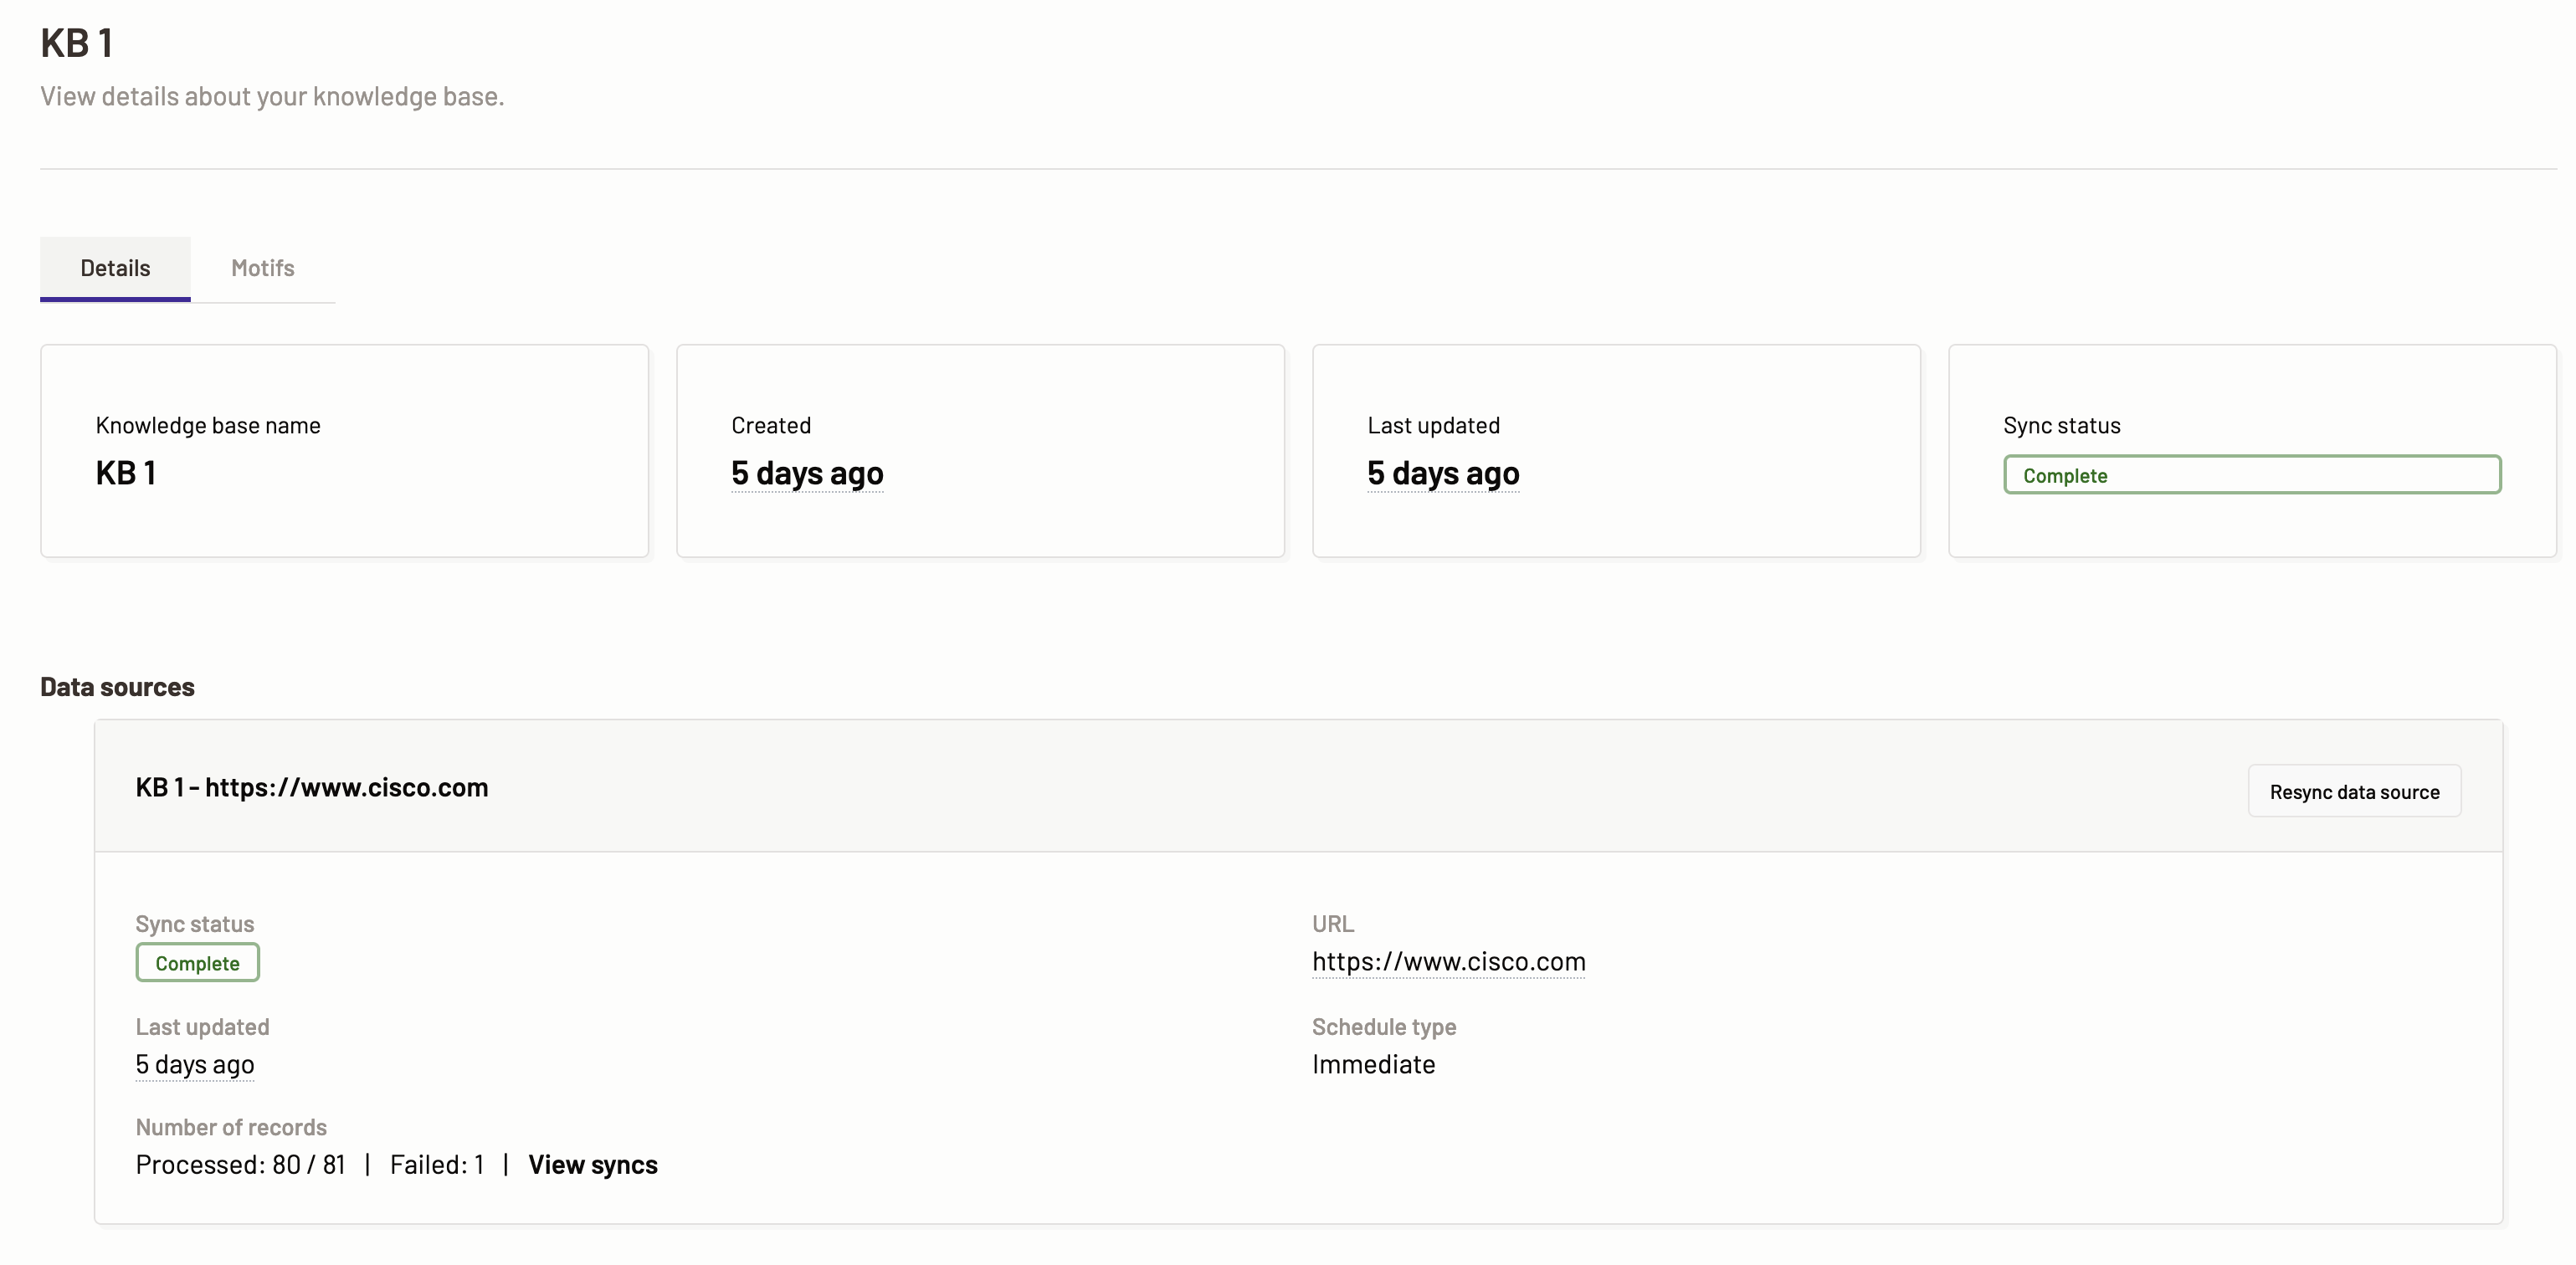
Here, you can view the following:
-
Knowledge base details: The sync status depicts what is the status of the ingestion of the KB. You can also view the KB name, KB creation date, last updated date. The sync status can be in one of the following states- Syncing, Complete, N/A, and None.
-
Data source details: In the data source details following items can be viewed:
- name of the data source and the link to the URL can be viewed.
- the data source’s last updated date
- number of records- shows the number of files processed, passed, or failed during the ingestion of the data source.
If you see any record that has failed ingestion, then you can view the syncs. Click the View syncs button.
-
-
In the data source details if you see any failure of ingestion of a data source, then you can click the Resync data source button to resync the data source.
Resync data sources
The knowledge base that you created can be viewed on the Knowledge base page. The existing KB (if any) are in the list view.
-
To view the sync status of each data source in a KB, click on the KB whose data source sync status you want to check.
-
In the Data source details section, when some of the records have failed ingestion, you can resync the data source.
-
To resync the data sources, click the Resync data source button. The resync starts and the details of the sync can be seen by clicking View syncs.
View syncs
In the data source details section, to see the sync details of a data source, then follow the steps below:
-
To view the sync details of a particular data source, click the respective data source’s View syncs button.
-
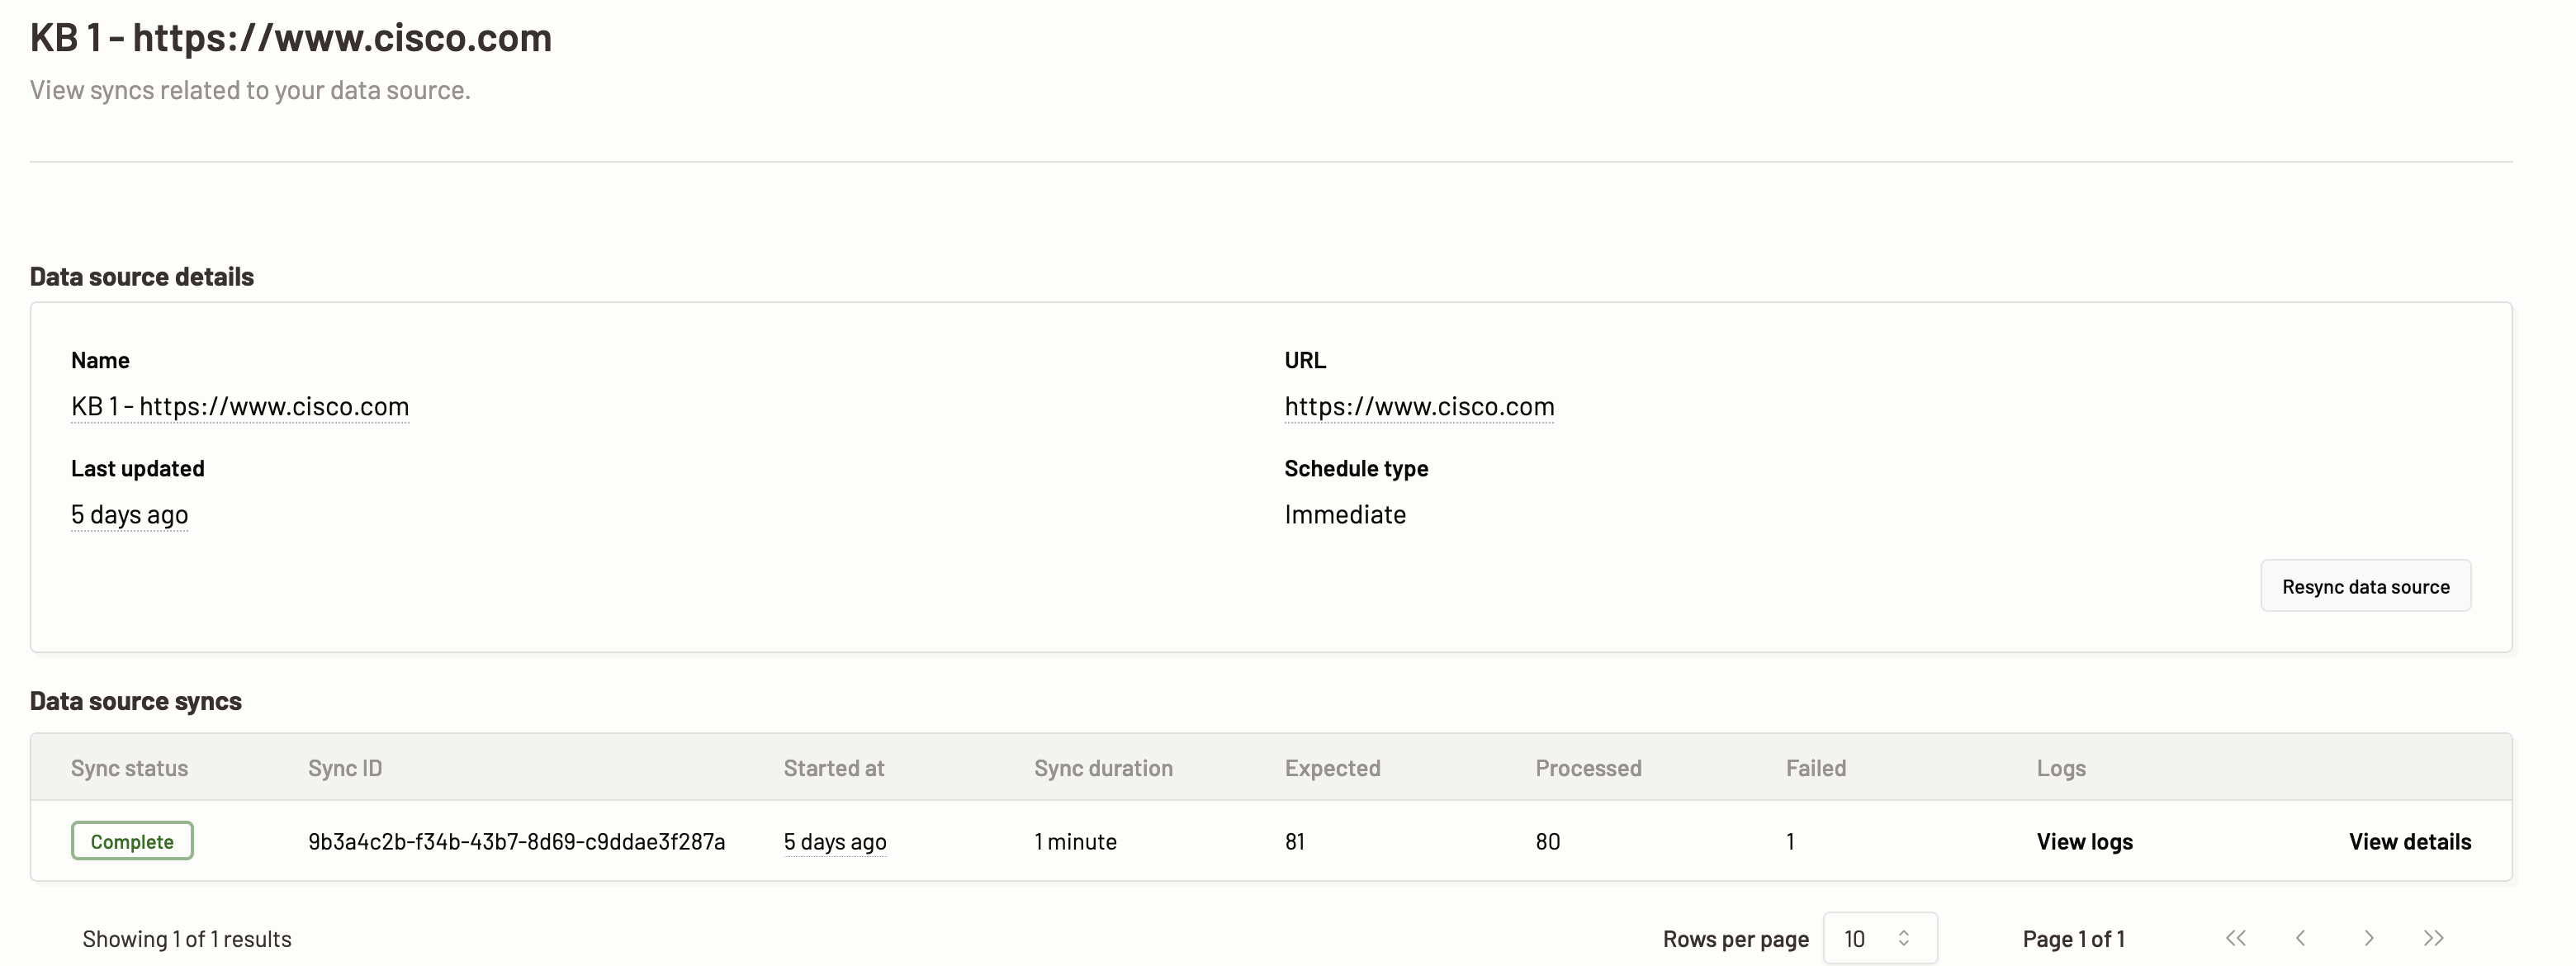
The data source syncs section is displayed. Here, you can see all the resyncs that you have performed.

-
The following data is displayed for each sync:
- Sync status- The status of the sync started.
- Sync ID- Unique ID for each re-sync request
- Started at- The time period when the sync was started
- Sync duration- The duration taken to ingest and sync the data source.
- Expected- The number of expected files that need to be ingested for the data source.
- Processed- The number of files that are already processed and ingested.
- Failed- The number of files that have failed the ingestion process.
- View logs- View the logs for the particular sync run.
- View details- View the details of each and every sync that was started.
View logs
To view the logs of each sync and to find out of what kind or alert level or message is recorded, follow the steps below.
-
Navigate to the knowledge base details of the KB.
-
To view the sync details of a particular data source, click the respective data source’s View syncs button.
-
To view the logs of a data source during a particular sync, click the corresponding sync’s View logs link. A small modal with the log opens.

-
The following details can be viewed in the logs:
- Alert level: Alert level shows the level of the alert in the log details.
- Info: Info alert includes the information about the operations of the data source sync.
- Error: Error alert is assigned to event logs that contain a data source sync error message.
- Message: Here, the message of the log is displayed depending on the alert level.
- Origin: Origin signifies what is the origin of the particular log.
- Step: Step signifies at which step of the sync process the event was logged.
- Reported at: The time when the alert or log was reported.
- Alert level: Alert level shows the level of the alert in the log details.
View sync details
To view the details of each sync and the status of the records/files within the data source, follow the steps below:
-
Navigate to the knowledge base details of the KB.
-
To view the sync details of a particular data source, click the respective data source’s View syncs button.
-
To view the details of each record within the data source during a particular sync, click the corresponding sync’s View details link.
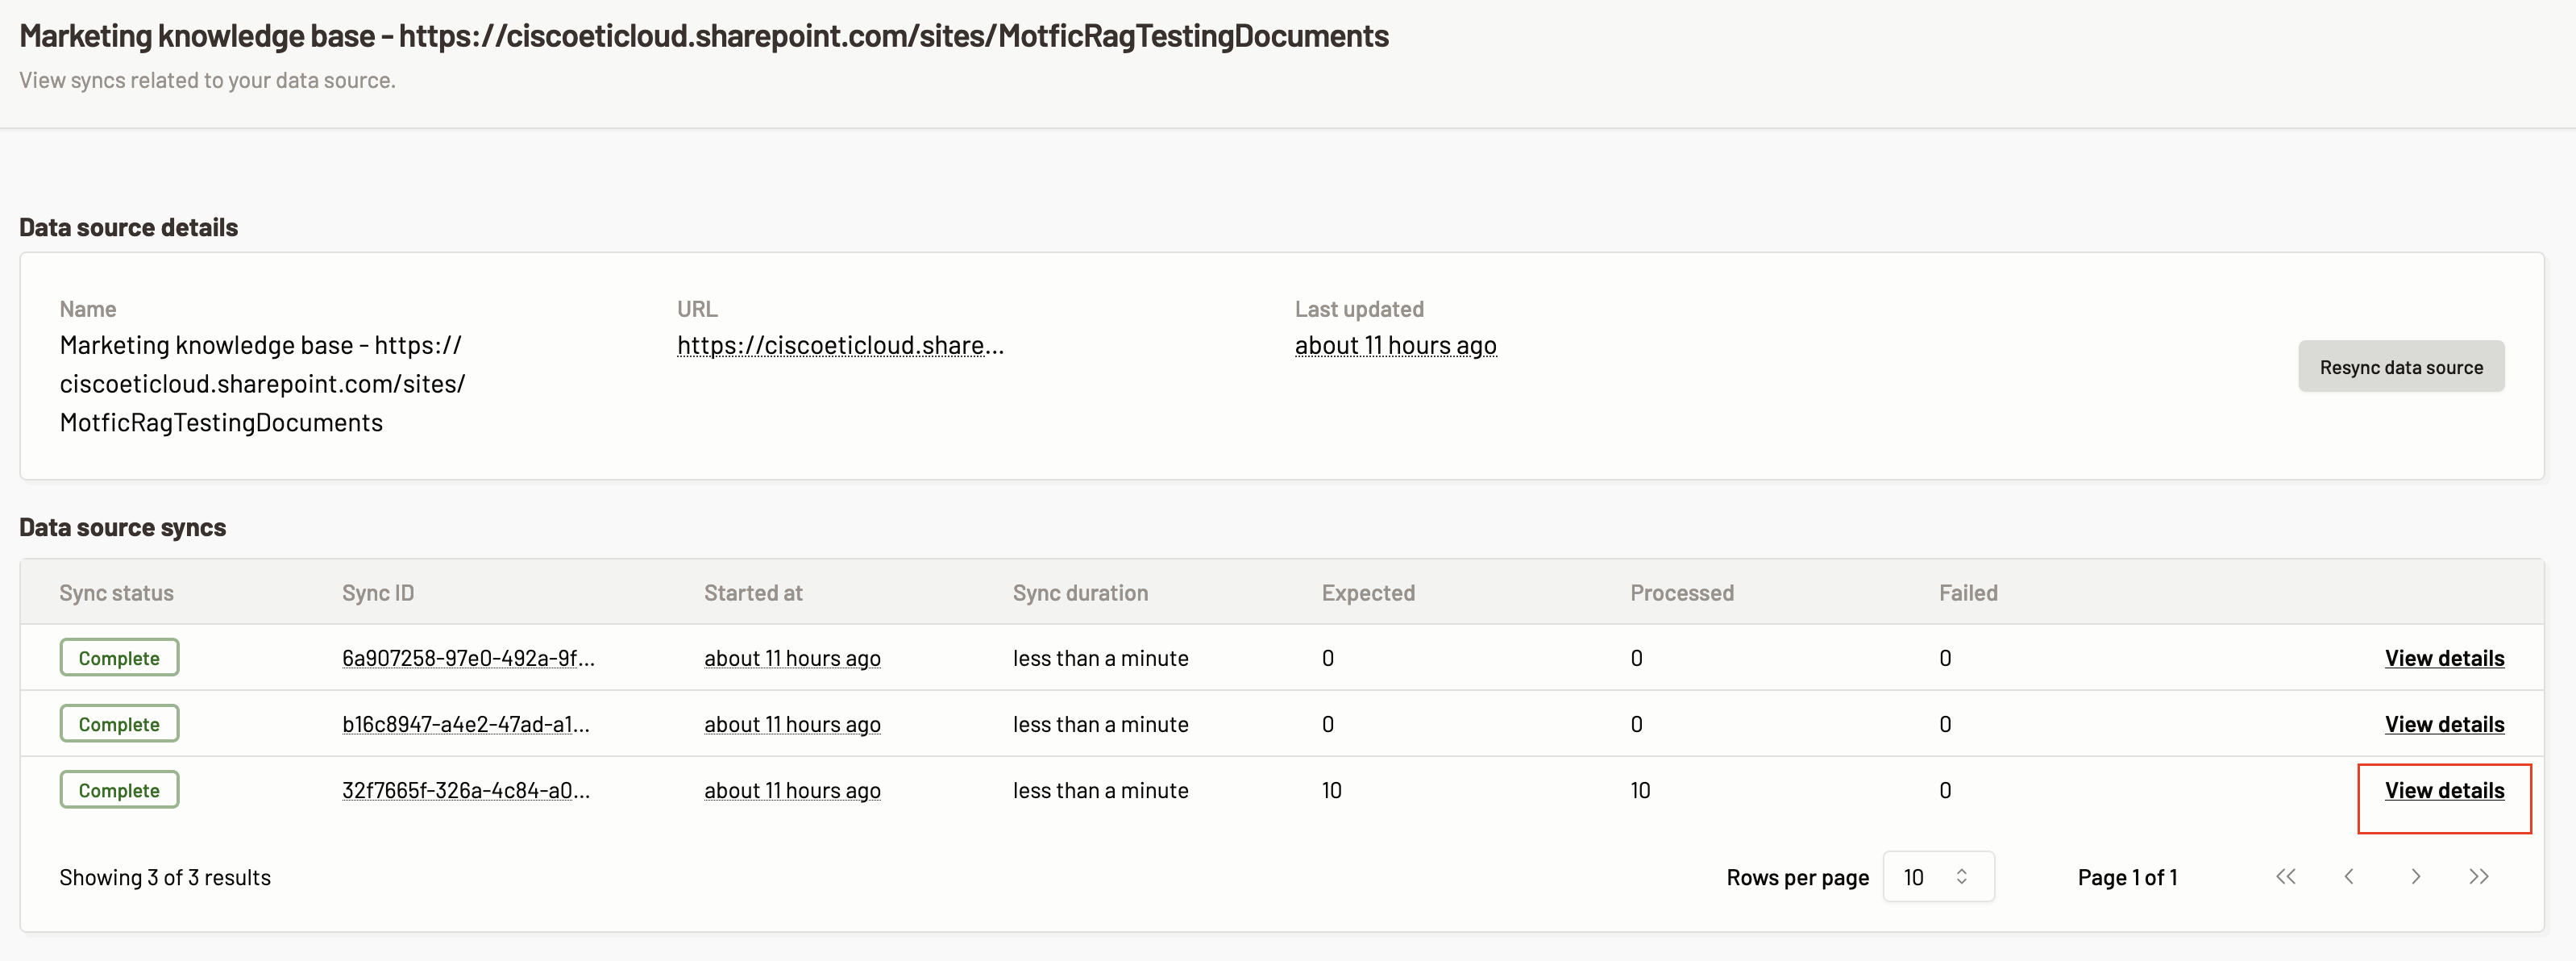
-
The page with the details of each record within the data source for that sync cycle opens.
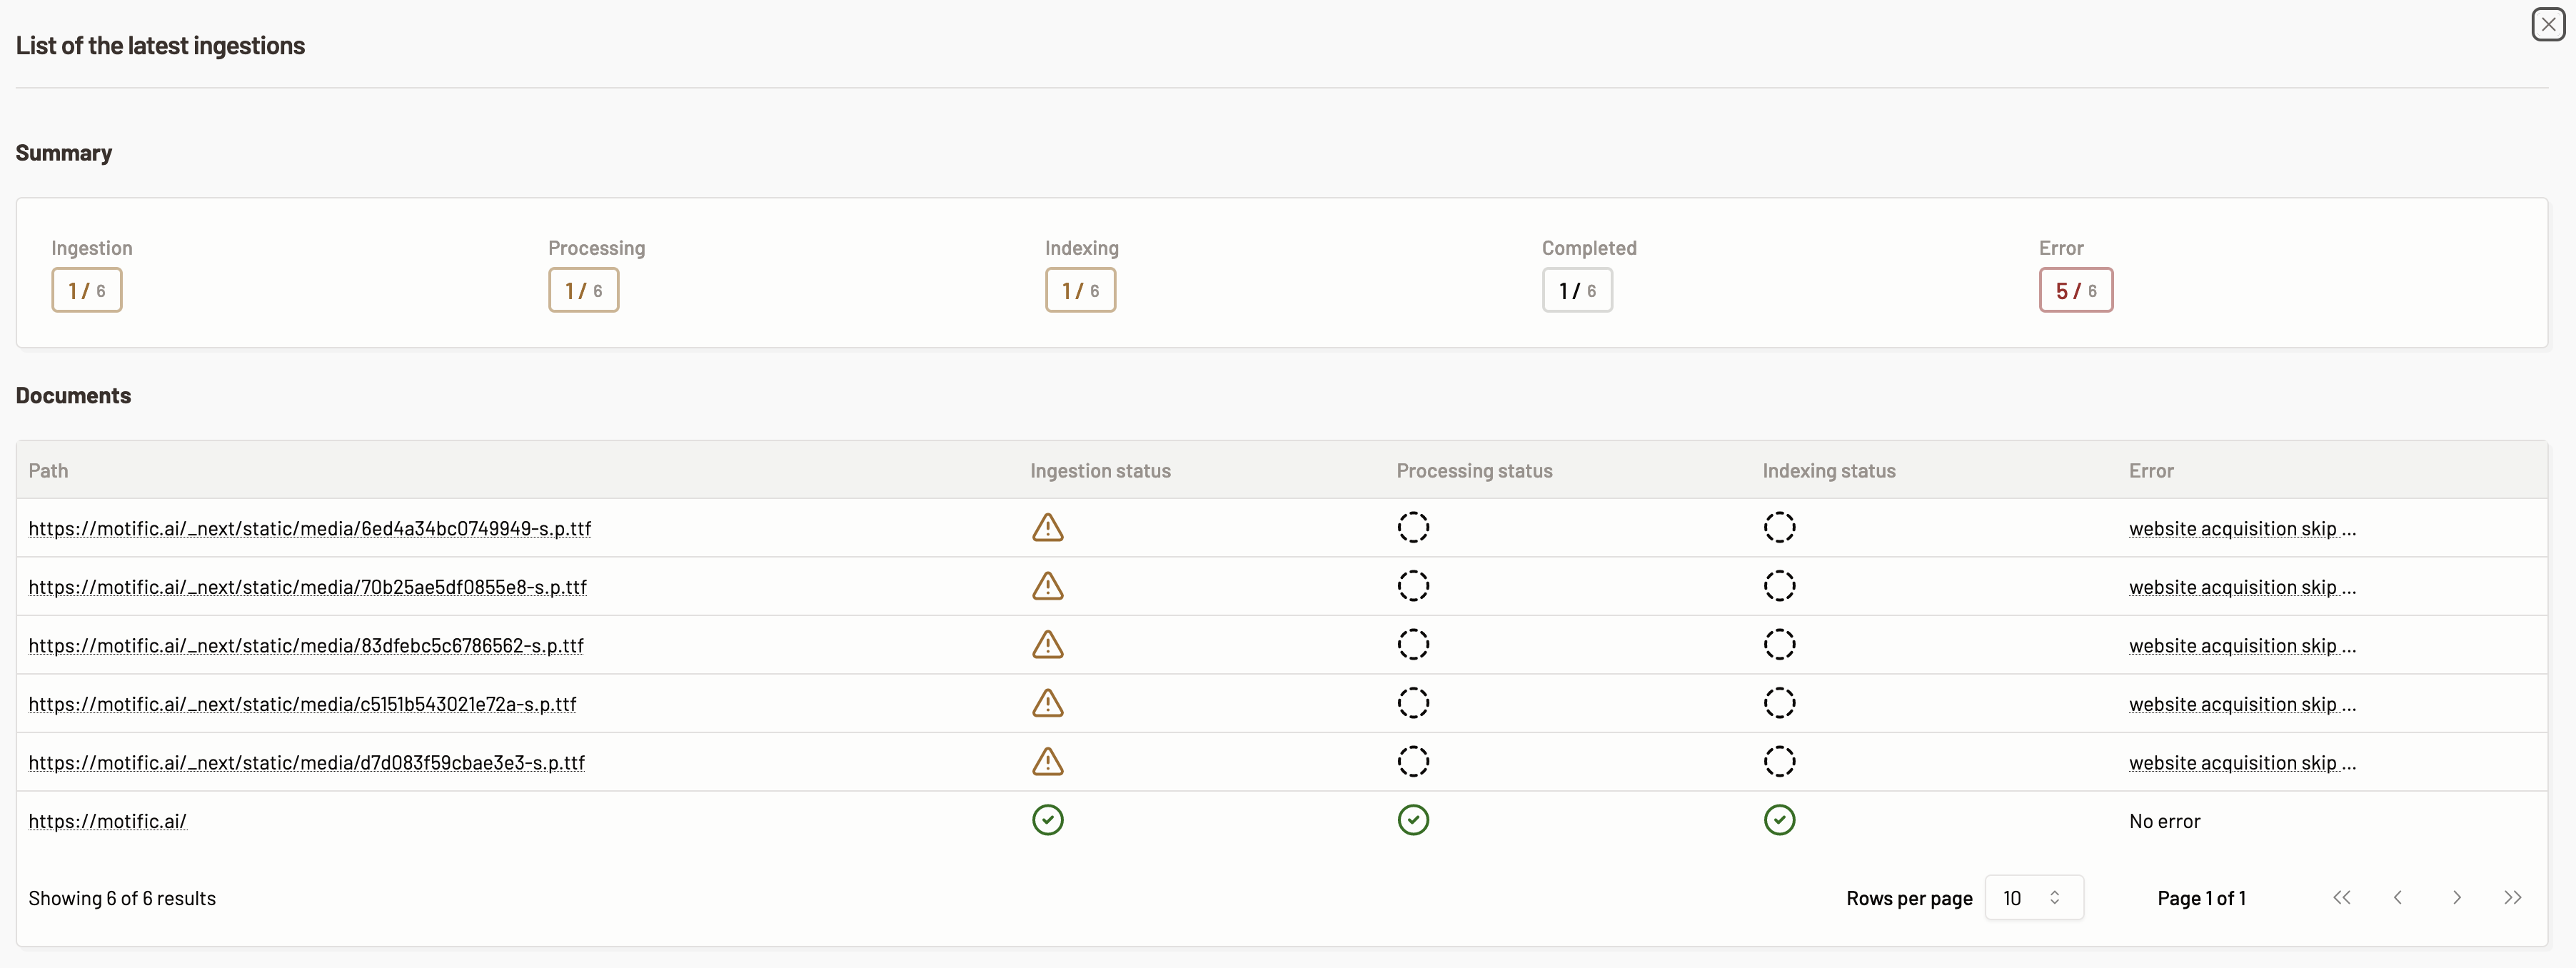
If there are errors while syncing the data source, then the errors would be displayed as shown below:
-
The list of latest ingestion with summary and list of documents opens.
-
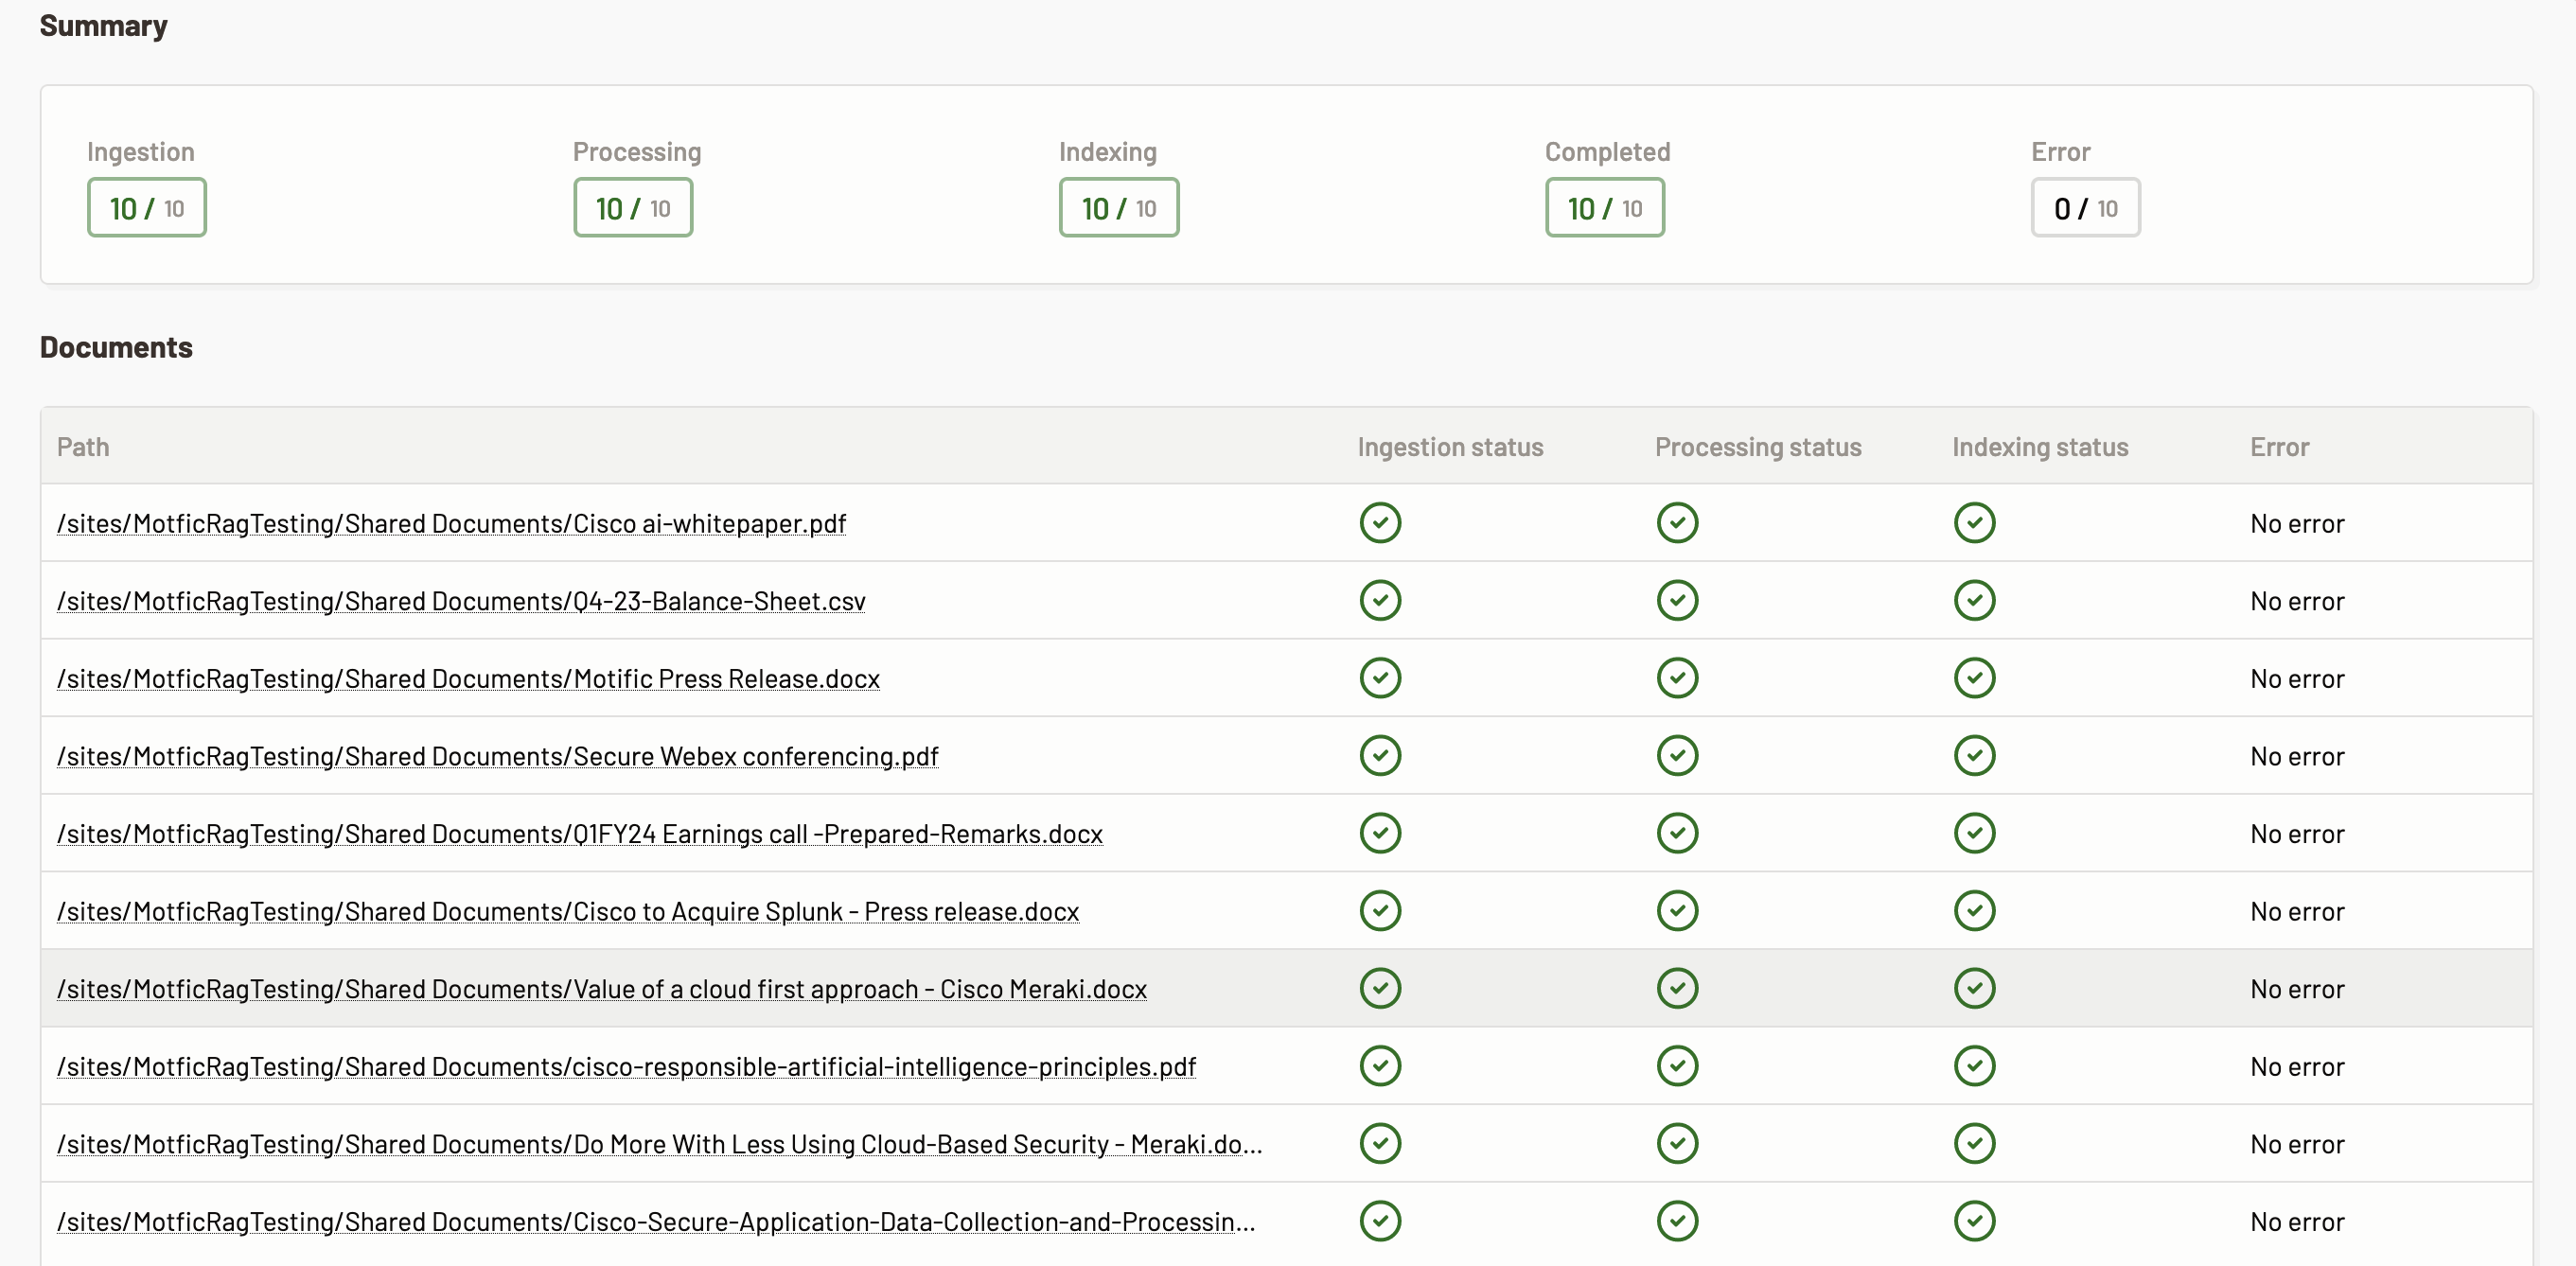
The summary section shows the number of documents that are in the following state:
- Ingestion- The total number of records to be ingested.
- Processing- The total number of records that are being processed.
- Indexing- The total number of records that are being indexed.
- Completed- The total number of records that have completed ingestion and are now in completed state.
- Error- The total number of records that were errored out during ingestion.
-
In the documents section, the following details are indicated about each document/record present in the data source.
- Path- The path of the document.
- Ingestion status- The ingestion status of the file. If there is a green check mark that means the ingestion is completed, otherwise it is still in progress.
- Processing status- The processing status of the file. If there is a green check mark that means the processing is completed, otherwise it is still in progress.
- Indexing status- The indexing status of the file. If there is a green check mark that means the indexing is completed, otherwise it is still in progress.
- Error- This data shows if the document/record failed one of the above steps and was not synced with Motific.ai.